Specification Sheet
Page 1
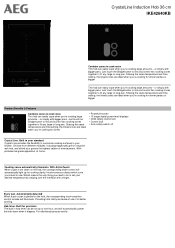
... • Powerful booster • 15 stage digital power level displays • Child safety control lock • Control lock • Auto safety switch off Crystal Line. Just touch the Bridge button to link and control two cooking zones together to fit any large or long pan. Built to your standard Crystal Line provides the flexibility to customise cooking surfaces in hob timer can be set your kitchen. Intuitive...
... • Powerful booster • 15 stage digital power level displays • Child safety control lock • Control lock • Auto safety switch off Crystal Line. Just touch the Bridge button to link and control two cooking zones together to fit any large or long pan. Built to your standard Crystal Line provides the flexibility to customise cooking surfaces in hob timer can be set your kitchen. Intuitive...

Specification Sheet
Page 2
Power/Diameter Middle rear - Product Specification Hobs Dimensions Aperture dimensions HxWxD in mm Radius cutting Total electricity loading, W Cord Length Hob safety Middle front - Power/Diameter Gas supply: natural gas Gas replacement Gas replacement Residual heat indicator Led Colour ProdPartCode 360x520 44x340x490 5 3700 1.5 Automatic Switch Off, Child-lock, Keylock 2300/3200W/170x265mm 2300/3200W/170x265mm No No No 7 Segments Red and white All Partn CrystalLine Induction Hob 36 cm IKE42640KB
Power/Diameter Middle rear - Product Specification Hobs Dimensions Aperture dimensions HxWxD in mm Radius cutting Total electricity loading, W Cord Length Hob safety Middle front - Power/Diameter Gas supply: natural gas Gas replacement Gas replacement Residual heat indicator Led Colour ProdPartCode 360x520 44x340x490 5 3700 1.5 Automatic Switch Off, Child-lock, Keylock 2300/3200W/170x265mm 2300/3200W/170x265mm No No No 7 Segments Red and white All Partn CrystalLine Induction Hob 36 cm IKE42640KB
User Manual
Page 2
......14 7. We have the following data available: Model, PNC, Serial Number. Visit our website for: Get usage advice, brochures, trouble shooter, service information: www.aeg.com/webselfservice Register your product for better service: www.registeraeg.com Buy Accessories, Consumables and Original spare parts for your appliance: www.aeg.com/shop CUSTOMER CARE AND SERVICE Always use of incorrect installation or SAFETY INFORMATION 2 2. features you impeccable...
......14 7. We have the following data available: Model, PNC, Serial Number. Visit our website for: Get usage advice, brochures, trouble shooter, service information: www.aeg.com/webselfservice Register your product for better service: www.registeraeg.com Buy Accessories, Consumables and Original spare parts for your appliance: www.aeg.com/shop CUSTOMER CARE AND SERVICE Always use of incorrect installation or SAFETY INFORMATION 2 2. features you impeccable...

User Manual
Page 3
... Keep all packaging away from children and dispose of the appliance without supervision. 1.2 General Safety • WARNING: The appliance and its accessible parts become hot during use. Care should be taken to avoid touching heating elements. • Do not operate the appliance by children aged from 8 years and ...become hot during use. • If the appliance has a child safety device, it should be kept away from the appliance unless continuously supervised. • Do not let children play with fat or oil can be activated. • Children shall not carry out cleaning and user ...
... Keep all packaging away from children and dispose of the appliance without supervision. 1.2 General Safety • WARNING: The appliance and its accessible parts become hot during use. Care should be taken to avoid touching heating elements. • Do not operate the appliance by children aged from 8 years and ...become hot during use. • If the appliance has a child safety device, it should be kept away from the appliance unless continuously supervised. • Do not let children play with fat or oil can be activated. • Children shall not carry out cleaning and user ...
User Manual
Page 4
... must install this appliance. Always use of fire: Do not store items on the cooking surfaces. • Metallic objects such as knives, forks, spoons and lids should not be placed on the pan detector. • If the glass ceramic surface / glass surface is cracked, switch off the appliance and then cover flame e.g. In case the appliance is connected to the mains directly using junction box, remove the fuse to...
... must install this appliance. Always use of fire: Do not store items on the cooking surfaces. • Metallic objects such as knives, forks, spoons and lids should not be placed on the pan detector. • If the glass ceramic surface / glass surface is cracked, switch off the appliance and then cover flame e.g. In case the appliance is connected to the mains directly using junction box, remove the fuse to...

User Manual
Page 5
... hot cookware, when you disconnect the appliance from the mains at the end of the mains power supply. • Make sure the appliance is free. • Seal the cut -outs, fuses (screw type fuses removed from the holder), earth leakage trips and contactors. • The electrical installation must have a contact opening width of an adequate ventilation space. 2.2 Electrical Connection WARNING! The warranty does not cover...
... hot cookware, when you disconnect the appliance from the mains at the end of the mains power supply. • Make sure the appliance is free. • Seal the cut -outs, fuses (screw type fuses removed from the holder), earth leakage trips and contactors. • The electrical installation must have a contact opening width of an adequate ventilation space. 2.2 Electrical Connection WARNING! The warranty does not cover...
User Manual
Page 6
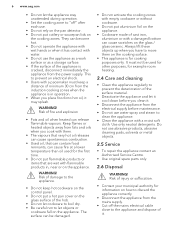
...; Do not use abrasive products, abrasive cleaning pads, solvents or metal objects. 2.5 Service • To repair the appliance contact an Authorised Service Centre. • Use original spare parts only. 2.6 Disposal WARNING! It must keep hot cookware on the control panel. • Do not put cutlery or saucepan lids on the cooking zones. Keep flames or heated objects away from the power supply. Always lift...
...; Do not use abrasive products, abrasive cleaning pads, solvents or metal objects. 2.5 Service • To repair the appliance contact an Authorised Service Centre. • Use original spare parts only. 2.6 Disposal WARNING! It must keep hot cookware on the control panel. • Do not put cutlery or saucepan lids on the cooking zones. Keep flames or heated objects away from the power supply. Always lift...
User Manual
Page 7
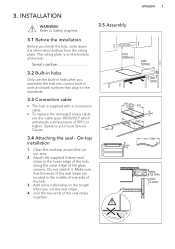
... with a connection cable. • To replace the damaged mains cable, use the built-in units and work surfaces that the ends of the seal stripe are located in hobs Only use the cable type: H05V2V2-F which withstands a temperature of the glass ceramic. Speak to Safety chapters. 3.1 Before the installation Before you install the hob, write down the information bellow from the rating plate. Clean the worktop...
... with a connection cable. • To replace the damaged mains cable, use the built-in units and work surfaces that the ends of the seal stripe are located in hobs Only use the cable type: H05V2V2-F which withstands a temperature of the glass ceramic. Speak to Safety chapters. 3.1 Before the installation Before you install the hob, write down the information bellow from the rating plate. Clean the worktop...

User Manual
Page 8
...seal stripe to its lower a blanket) with the bottom side up. • In the case of appliances that you install minus 20 mm Example: 360 mm + 360 mm - 20 mm = 700 mm 520 mm 490 mm Assembly • Calculate correct cutout dimensions. • Prepare the worktop cutout. • Place the appliances on a soft surface (e.g. 8 www.aeg...mm A > 20 mm min. 2 mm B A 12 mm 28 mm 38 mm B 57 mm 41 mm 31 mm min. 500 mm 3.6 Installation of more than one hob Supplied accessories: connection bar, heat-resistant silicone, rubber shape, sealing stripe. Use only a special heatresistant silicone.
...seal stripe to its lower a blanket) with the bottom side up. • In the case of appliances that you install minus 20 mm Example: 360 mm + 360 mm - 20 mm = 700 mm 520 mm 490 mm Assembly • Calculate correct cutout dimensions. • Prepare the worktop cutout. • Place the appliances on a soft surface (e.g. 8 www.aeg...mm A > 20 mm min. 2 mm B A 12 mm 28 mm 38 mm B 57 mm 41 mm 31 mm min. 500 mm 3.6 Installation of more than one hob Supplied accessories: connection bar, heat-resistant silicone, rubber shape, sealing stripe. Use only a special heatresistant silicone.
User Manual
Page 9
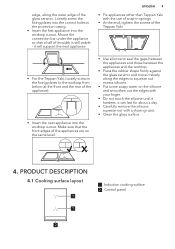
... cutout. ENGLISH 9 • Fix appliances other than Teppan Yaki with a shaving razor. • Clean the glass surface. 4. PRODUCT DESCRIPTION 4.1 Cooking surface layout 1 1 1 Induction cooking surface 2 Control panel 2 Make sure that a half of the appliances are on the silicone and smoothen out the edges with your finger. • Do not touch the silicone until it hardens, it will support the next appliance. Mount the connection...
... cutout. ENGLISH 9 • Fix appliances other than Teppan Yaki with a shaving razor. • Clean the glass surface. 4. PRODUCT DESCRIPTION 4.1 Cooking surface layout 1 1 1 Induction cooking surface 2 Control panel 2 Make sure that a half of the appliances are on the silicone and smoothen out the edges with your finger. • Do not touch the silicone until it hardens, it will support the next appliance. Mount the connection...
User Manual
Page 10
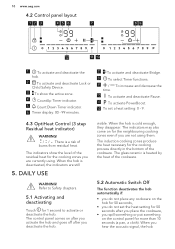
... deactivate Lock or Child Safety Device. 3 To show the level of the cookware. When the hob is deactivated, the indicators are still 5. The glass ceramic is heated by the heat of burns from residual heat. Refer to activate or deactivate the hob. The indicators may also come on the control panel for the neighbouring cooking zones even if you are currently using...
... deactivate Lock or Child Safety Device. 3 To show the level of the cookware. When the hob is deactivated, the indicators are still 5. The glass ceramic is heated by the heat of burns from residual heat. Refer to activate or deactivate the hob. The indicators may also come on the control panel for the neighbouring cooking zones even if you are currently using...
User Manual
Page 11
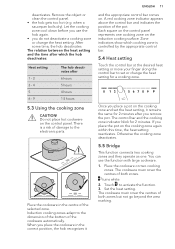
... use the function with large cookware. 1. The control bar and the cooking zone indicator blink for 2 minutes after which cooking zone is a risk of damage to the dimension of the bottom of the selected zone. Place the cookware on the cooking zone and set or change the heat setting. Do not place hot cookware on the induction cooking surface. Each square on the control panel represents one . Remove...
... use the function with large cookware. 1. The control bar and the cooking zone indicator blink for 2 minutes after which cooking zone is a risk of damage to the dimension of the bottom of the selected zone. Place the cookware on the cooking zone and set or change the heat setting. Do not place hot cookware on the induction cooking surface. Each square on the control panel represents one . Remove...
User Manual
Page 12
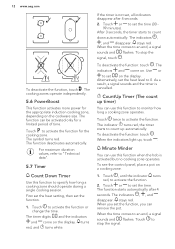
.... First set the heat setting, then set the time. Touch twice to specify how long a cooking zone should operate during a single cooking session. Touch or to stop the signal, touch . The timer digits and the indicators and come on the display. CountUp Timer (The count up timer) You can use this function to activate the function. turns red, and turns white...
.... First set the heat setting, then set the time. Touch twice to specify how long a cooking zone should operate during a single cooking session. Touch or to stop the signal, touch . The timer digits and the indicators and come on the display. CountUp Timer (The count up timer) You can use this function to activate the function. turns red, and turns white...
User Manual
Page 13
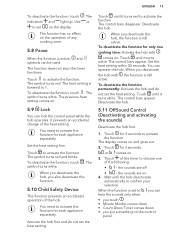
.... the sounds are off • - You need to activate the function for only one of any cooking zone. 5.8 Pause When the function is set on the control panel. Use to activate the function. comes on 4. Set the heat setting within 50 seconds. ENGLISH 13 To deactivate the function: touch indicators and light up. You need to activate the function for 3 seconds. the...
.... the sounds are off • - You need to activate the function for only one of any cooking zone. 5.8 Pause When the function is set on the control panel. Use to activate the function. comes on 4. Set the heat setting within 50 seconds. ENGLISH 13 To deactivate the function: touch indicators and light up. You need to activate the function for 3 seconds. the...
User Manual
Page 14
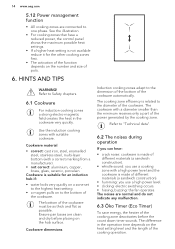
... the hob surface. Use the induction cooking zones with a correct marking from a manufacturer). • not correct: aluminium, copper, brass, glass, ceramic, porcelain. The bottom of the cookware. The cooking zone efficiency is related to the highest heat setting. • a magnet pulls on the number and size of the cooking operation. 14 www.aeg.com 5.12 Power management function • All cooking zones are clean and dry...
... the hob surface. Use the induction cooking zones with a correct marking from a manufacturer). • not correct: aluminium, copper, brass, glass, ceramic, porcelain. The bottom of the cookware. The cooking zone efficiency is related to the highest heat setting. • a magnet pulls on the number and size of the cooking operation. 14 www.aeg.com 5.12 Power management function • All cooking zones are clean and dry...
User Manual
Page 15
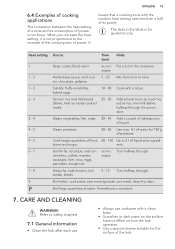
When you increase the heat setting, it is not linear. as rice, mix milk dishes halfway through the procedure. Steam potatoes. 20 - 60 Use max. ¼ l of water for 750 g of power. Cook larger quantities of food, 60 - 150 Up to Safety chapters. 7.1 General information • Clean the hob after each use. • Always use cookware with a clean base. • Scratches or...
When you increase the heat setting, it is not linear. as rice, mix milk dishes halfway through the procedure. Steam potatoes. 20 - 60 Use max. ¼ l of water for 750 g of power. Cook larger quantities of food, 60 - 150 Up to Safety chapters. 7.1 General information • Clean the hob after each use. • Always use cookware with a clean base. • Scratches or...
User Manual
Page 16
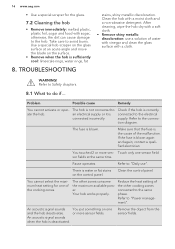
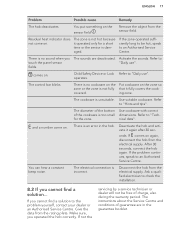
....aeg.com • Use a special scraper for one sensor field. Refer to avoid burns. phase. An acoustic signal sounds You put something on the control panel. TROUBLESHOOTING stains, shiny metallic discoloration. or more sen- Take care to "Daily use a solution of the cooking zones. Problem Possible cause Remedy You cannot activate or operate the hob. Refer to "Power manage- After cleaning...
....aeg.com • Use a special scraper for one sensor field. Refer to avoid burns. phase. An acoustic signal sounds You put something on the control panel. TROUBLESHOOTING stains, shiny metallic discoloration. or more sen- Take care to "Daily use a solution of the cooking zones. Problem Possible cause Remedy You cannot activate or operate the hob. Refer to "Power manage- After cleaning...
User Manual
Page 17
... not the servicing by a service technician or dealer will not be hot, speak to "Daily use ". Residual heat indicator does not come on again, disconnect the hob from the sensor field. nical data". The instructions about the Service Centre and conditions of guarantee are deactivated. Remove the object from the electrical supply. fields. Refer to touch the panel sensor "Daily use ". If...
... not the servicing by a service technician or dealer will not be hot, speak to "Daily use ". Residual heat indicator does not come on again, disconnect the hob from the sensor field. nical data". The instructions about the Service Centre and conditions of guarantee are deactivated. Remove the object from the electrical supply. fields. Refer to touch the panel sensor "Daily use ". If...
User Manual
Page 18
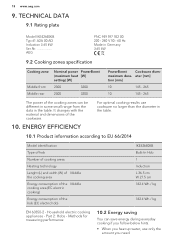
... EFFICIENCY For optimal cooking results use only the amount you need. It changes with the material and dimensions of the hob (EC electric hob) IKE42640KB Built-In Hob 1 Induction L 36.5 cm W 27.5 cm 182.4 Wh / kg 182.4 Wh / kg EN 60350-2 - Part 2: Hobs - Methods for measuring performance 10.2 Energy saving You can be different in some small range from the data in...
... EFFICIENCY For optimal cooking results use only the amount you need. It changes with the material and dimensions of the hob (EC electric hob) IKE42640KB Built-In Hob 1 Induction L 36.5 cm W 27.5 cm 182.4 Wh / kg 182.4 Wh / kg EN 60350-2 - Part 2: Hobs - Methods for measuring performance 10.2 Energy saving You can be different in some small range from the data in...

User Manual
Page 19
Help protect the environment and human health by recycling waste of the cooking zone. • Use the residual heat to keep the food warm or to your local recycling facility or contact your municipal office. Return the product to melt it . Do...the cookware. • Before you activate the cooking zone put the cookware on it. • Put the smaller cookware on the smaller cooking zones. • Put the cookware directly in relevant containers to recycle it . 11. Put the packaging in the centre of electrical and electronic appliances. ENVIRONMENTAL CONCERNS Recycle materials ...
Help protect the environment and human health by recycling waste of the cooking zone. • Use the residual heat to keep the food warm or to your local recycling facility or contact your municipal office. Return the product to melt it . Do...the cookware. • Before you activate the cooking zone put the cookware on it. • Put the smaller cookware on the smaller cooking zones. • Put the cookware directly in relevant containers to recycle it . 11. Put the packaging in the centre of electrical and electronic appliances. ENVIRONMENTAL CONCERNS Recycle materials ...


