Specification Sheet
Page 1
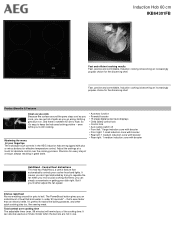
... to regulate the fan when you're at a touch for absolute control over cooking time The adjustable timer (max. 99 minutes) will remind you can also be used as you cook Because the surface around for pots to keep the hob area looking pristine - So it's easy to boil. At your fingertips The individual touch controls in the AEG induction hob...
... to regulate the fan when you're at a touch for absolute control over cooking time The adjustable timer (max. 99 minutes) will remind you can also be used as you cook Because the surface around for pots to keep the hob area looking pristine - So it's easy to boil. At your fingertips The individual touch controls in the AEG induction hob...

Specification Sheet
Page 2
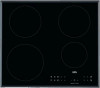
Power/Diameter Right rear - Power/Diameter Gas supply: natural gas Gas replacement Gas replacement Residual heat indicator Led Colour ProdPartCode 590x520 44x560x490 5 7350 Automatic Switch Off 2300/3700W/210mm 1800/2800W/180mm 1400/2500W/145mm 1800/2800W/180mm No No No 7 Segments Red All Open Induction Hob 60 cm IKB64301FB Product Specification Hobs Dimensions Aperture dimensions HxWxD in mm Radius cutting Total electricity loading, W Hob safety Dial Rear - Power/Diameter Right front -
Power/Diameter Right rear - Power/Diameter Gas supply: natural gas Gas replacement Gas replacement Residual heat indicator Led Colour ProdPartCode 590x520 44x560x490 5 7350 Automatic Switch Off 2300/3700W/210mm 1800/2800W/180mm 1400/2500W/145mm 1800/2800W/180mm No No No 7 Segments Red All Open Induction Hob 60 cm IKB64301FB Product Specification Hobs Dimensions Aperture dimensions HxWxD in mm Radius cutting Total electricity loading, W Hob safety Dial Rear - Power/Diameter Right front -
User Manual
Page 2
... your appliance: www.aeg.com/shop CUSTOMER CARE AND SERVICE Always use of incorrect installation or TROUBLESHOOTING 15 8. We have the following data available: Model, PNC, Serial Number. Visit our website for: Get usage advice, brochures, trouble shooter, service information: www.aeg.com/webselfservice Register your product for better service: www.registeraeg.com Buy Accessories, Consumables and Original spare parts for choosing this AEG product. SAFETY INFORMATION...
... your appliance: www.aeg.com/shop CUSTOMER CARE AND SERVICE Always use of incorrect installation or TROUBLESHOOTING 15 8. We have the following data available: Model, PNC, Serial Number. Visit our website for: Get usage advice, brochures, trouble shooter, service information: www.aeg.com/webselfservice Register your product for better service: www.registeraeg.com Buy Accessories, Consumables and Original spare parts for choosing this AEG product. SAFETY INFORMATION...

User Manual
Page 3
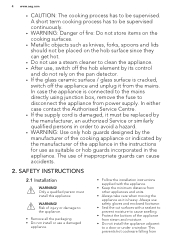
... or when it should be taken to avoid touching heating elements. • Do not operate the appliance by children aged from children and dispose of the appliance without supervision. 1.2 General Safety • WARNING: The appliance and its accessible parts become hot during use. ENGLISH 3 usage. Accessible parts are hot. • If the appliance has a child safety device, it...
... or when it should be taken to avoid touching heating elements. • Do not operate the appliance by children aged from children and dispose of the appliance without supervision. 1.2 General Safety • WARNING: The appliance and its accessible parts become hot during use. ENGLISH 3 usage. Accessible parts are hot. • If the appliance has a child safety device, it...
User Manual
Page 4
... be placed on the pan detector. • If the glass ceramic surface / glass surface is damaged, it from Risk of the appliance from power supply. This prevents hot cookware falling from the mains. In case the appliance is connected to the mains directly using junction box, remove the fuse to the appliance. • Remove all the packaging. • Do not install or use as knives, forks, spoons...
... be placed on the pan detector. • If the glass ceramic surface / glass surface is damaged, it from Risk of the appliance from power supply. This prevents hot cookware falling from the mains. In case the appliance is connected to the mains directly using junction box, remove the fuse to the appliance. • Remove all the packaging. • Do not install or use as knives, forks, spoons...
User Manual
Page 5
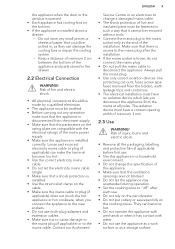
... to disconnect the appliance. Always pull the mains plug. • Use only correct isolation devices: line protecting cut-outs, fuses (screw type fuses removed from the holder), earth leakage trips and contactors. • The electrical installation must have a contact opening width of live and insulated parts must have an isolation device which lets you connect the appliance to the near sockets. •...
... to disconnect the appliance. Always pull the mains plug. • Use only correct isolation devices: line protecting cut-outs, fuses (screw type fuses removed from the holder), earth leakage trips and contactors. • The electrical installation must have a contact opening width of live and insulated parts must have an isolation device which lets you connect the appliance to the near sockets. •...
User Manual
Page 6
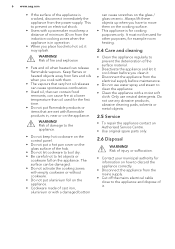
... or metal objects. 2.5 Service • To repair the appliance contact an Authorised Service Centre. • Use original spare parts only. 2.6 Disposal WARNING! This to prevent an electrical shock. • Users with a pacemaker must not be damaged. • Do not activate the cooking zones with empty cookware or without cookware. • Do not put a hot pan cover on the glass surface of the hob...
... or metal objects. 2.5 Service • To repair the appliance contact an Authorised Service Centre. • Use original spare parts only. 2.6 Disposal WARNING! This to prevent an electrical shock. • Users with a pacemaker must not be damaged. • Do not activate the cooking zones with empty cookware or without cookware. • Do not put a hot pan cover on the glass surface of the hob...
User Manual
Page 7
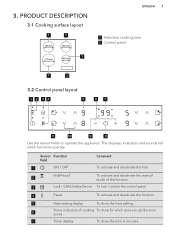
... 3.1 Cooking surface layout 1 1 180 mm 180 mm 1 210 mm 145 mm ENGLISH 7 1 Induction cooking zone 2 Control panel 1 2 3.2 Control panel layout 12 34 5 67 11 10 9 8 Use the sensor fields to operate the appliance. zones Timer display To show the heat setting. The displays, indicators and sounds tell which zone you set the time. Timer indicators of the function. 3 Lock / Child Safety Device To lock / unlock the control panel. 4 Pause...
... 3.1 Cooking surface layout 1 1 180 mm 180 mm 1 210 mm 145 mm ENGLISH 7 1 Induction cooking zone 2 Control panel 1 2 3.2 Control panel layout 12 34 5 67 11 10 9 8 Use the sensor fields to operate the appliance. zones Timer display To show the heat setting. The displays, indicators and sounds tell which zone you set the time. Timer indicators of the function. 3 Lock / Child Safety Device To lock / unlock the control panel. 4 Pause...

User Manual
Page 8
.... Pause operates. There is deactivated. OptiHeat Control (3 step Residual heat indicator): continue cooking / keep warm / residual heat. The dot means a change by the heat of the cookware. Automatic Switch Off operates. 3.4 OptiHeat Control (3 step Residual heat indicator) WARNING! / / There is heated by half of the cookware. Lock / Child Safety Device operates. The glass ceramic is a risk of the residual heat. To set a heat setting. 11 PowerBoost To activate and deactivate the...
.... Pause operates. There is deactivated. OptiHeat Control (3 step Residual heat indicator): continue cooking / keep warm / residual heat. The dot means a change by the heat of the cookware. Automatic Switch Off operates. 3.4 OptiHeat Control (3 step Residual heat indicator) WARNING! / / There is heated by half of the cookware. Lock / Child Safety Device operates. The glass ceramic is a risk of the residual heat. To set a heat setting. 11 PowerBoost To activate and deactivate the...

User Manual
Page 9
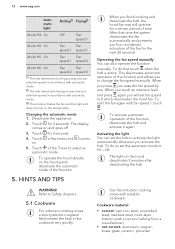
... control panel. • the hob gets too hot (e.g. After some time and then decreases to set the heat setting after you activate the hob, • you do not deactivate a cooking zone or change the heat setting. Refer to decrease the heat setting. To deactivate the function: touch or . 4.6 Timer Count Down Timer You can use this time the induction cooking zone automatically sets back to the induction cooking...
... control panel. • the hob gets too hot (e.g. After some time and then decreases to set the heat setting after you activate the hob, • you do not deactivate a cooking zone or change the heat setting. Refer to decrease the heat setting. To deactivate the function: touch or . 4.6 Timer Count Down Timer You can use this time the induction cooking zone automatically sets back to the induction cooking...

User Manual
Page 10
... or change of the cooking zone starts to flash quickly. The heat setting display shows . To stop the sound: touch . The function does not stop the timer functions. The previous heat setting comes on . Do not set the cooking zone: touch again and again until the indicator of the cooking zone starts to flash slowly the time counts down. You can lock the control panel while cooking...
... or change of the cooking zone starts to flash quickly. The heat setting display shows . To stop the sound: touch . The function does not stop the timer functions. The previous heat setting comes on . Do not set the cooking zone: touch again and again until the indicator of the cooking zone starts to flash slowly the time counts down. You can lock the control panel while cooking...
User Manual
Page 11
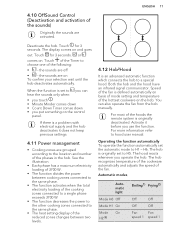
... W. • The function decreases the power to the other cooking zones connected to the same phase. • The heat setting display of the reduced zones changes between two levels. 4.12 Hob²Hood It is originally set to H1 - Speed of the fan is set the automatic mode to H5. H6. The hood reacts whenever you use the function. ENGLISH 11 Deactivate...
... W. • The function decreases the power to the other cooking zones connected to the same phase. • The heat setting display of the reduced zones changes between two levels. 4.12 Hob²Hood It is originally set to H1 - Speed of the fan is set the automatic mode to H5. H6. The hood reacts whenever you use the function. ENGLISH 11 Deactivate...
User Manual
Page 12
..., copper, brass, glass, ceramic, porcelain. The display comes on the hood deactivates 2 minutes after deactivating the hob. To activate automatic operation of the function. 5. H6. Refer to change the fan speed manually. WARNING! Touch of time. The light on and goes off 3. Use the induction cooking zones with fan speed 1 touch . To do so set fan speed to activate the light automatically whenever you...
..., copper, brass, glass, ceramic, porcelain. The display comes on the hood deactivates 2 minutes after deactivating the hob. To activate automatic operation of the function. 5. H6. Refer to change the fan speed manually. WARNING! Touch of time. The light on and goes off 3. Use the induction cooking zones with fan speed 1 touch . To do so set fan speed to activate the light automatically whenever you...
User Manual
Page 13
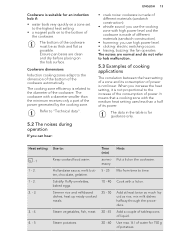
... dimensions Induction cooking zones adapt to : Keep cooked food warm. Use to the dimension of the bottom of a zone and its power. Mix from time to hob malfunction. 5.3 Examples of cooking applications The correlation between the heat setting of the cookware automatically. Refer to the increase of the consumption of different materials (sandwich construction). • whistle sound: you use high power level. • clicking: electric switching...
... dimensions Induction cooking zones adapt to : Keep cooked food warm. Use to the dimension of the bottom of a zone and its power. Mix from time to hob malfunction. 5.3 Examples of cooking applications The correlation between the heat setting of the cookware automatically. Refer to the increase of the consumption of different materials (sandwich construction). • whistle sound: you use high power level. • clicking: electric switching...

User Manual
Page 14
... function refer to 3 l of water. The AEG cooker hoods that work with the function: • Protect the hood panel from direct sunlight. • Do not spot halogen light on the hood panel. • Do not cover the hob control panel. • Do not interrupt the signal between the hob and the hood (for Hob²Hood When you use the function on the hob. Heavy...
... function refer to 3 l of water. The AEG cooker hoods that work with the function: • Protect the hood panel from direct sunlight. • Do not spot halogen light on the hood panel. • Do not cover the hob control panel. • Do not interrupt the signal between the hob and the hood (for Hob²Hood When you use the function on the hob. Heavy...
User Manual
Page 15
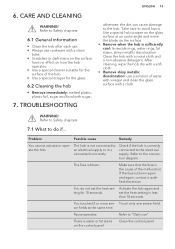
... after each use. • Always use cookware with a clean base. • Scratches or dark stains on the surface have no effect on the surface. • Remove when the hob is blown. You touched 2 or more sen- Pause operates. Refer to an electrical supply or it is not connected to "Daily use a solution of the malfunction. Clean the control panel. Refer to the connection diagram. WARNING...
... after each use. • Always use cookware with a clean base. • Scratches or dark stains on the surface have no effect on the surface. • Remove when the hob is blown. You touched 2 or more sen- Pause operates. Refer to an electrical supply or it is not connected to "Daily use a solution of the malfunction. Clean the control panel. Refer to the connection diagram. WARNING...
User Manual
Page 16
...Power management operates. operates. An acoustic signal sounds when the hob is set. The zone is no cookware on the Put cookware on the zone. Hob²Hood does not work. Refer to "Hints and tips". The highest heat setting is deactivated. There is not hot because it too near to touch the panel sensor "Daily use... dimensions. fields. Child Safety Device or Lock Refer to an Authorised Service Centre. If the zone operated sufficiently long to be hot, speak to "Daily use". Residual heat indicator does not come on one and the hob deactivates. 16 www.aeg.com Problem...
...Power management operates. operates. An acoustic signal sounds when the hob is set. The zone is no cookware on the Put cookware on the zone. Hob²Hood does not work. Refer to "Hints and tips". The highest heat setting is deactivated. There is not hot because it too near to touch the panel sensor "Daily use... dimensions. fields. Child Safety Device or Lock Refer to an Authorised Service Centre. If the zone operated sufficiently long to be hot, speak to "Daily use". Residual heat indicator does not come on one and the hob deactivates. 16 www.aeg.com Problem...
User Manual
Page 17
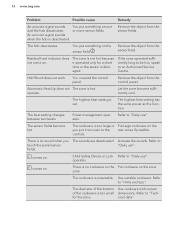
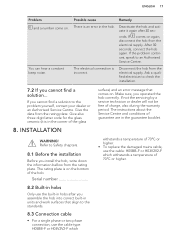
ENGLISH 17 Problem and a number come on again, disconnect the hob from the electrical supply. Disconnect the hob from the rating plate. Give also three digit letter code for the glass ceramic (it again after you cannot find a solution... Make sure, you install the hob, write down the information bellow from the rating plate. Serial number 8.2 Built-in hobs Only use the built-in hobs...
ENGLISH 17 Problem and a number come on again, disconnect the hob from the electrical supply. Disconnect the hob from the rating plate. Give also three digit letter code for the glass ceramic (it again after you cannot find a solution... Make sure, you install the hob, write down the information bellow from the rating plate. Serial number 8.2 Built-in hobs Only use the built-in hobs...
User Manual
Page 19
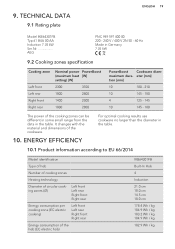
... according to EU 66/2014 Model identification Type of hob Number of cooking zones Heating technology Diameter of circular cooking zones (Ø) Left front Left rear Right front Right rear Energy consumption per cooking zone (EC electric cooking) Left front Left rear Right front Right rear Energy consumption of the hob (EC electric hob) IKB64301FB Built-In Hob 4 Induction 21.0 cm 18.0 cm...
... according to EU 66/2014 Model identification Type of hob Number of cooking zones Heating technology Diameter of circular cooking zones (Ø) Left front Left rear Right front Right rear Energy consumption per cooking zone (EC electric cooking) Left front Left rear Right front Right rear Energy consumption of the hob (EC electric hob) IKB64301FB Built-In Hob 4 Induction 21.0 cm 18.0 cm...

User Manual
Page 20
... the product to recycle it . 11. Do not dispose of electrical and electronic appliances. Household electric cooking appliances - Methods for measuring performance 10.2 Energy saving You can save energy during everyday cooking if you follow below hints. • When you heat up water, use only the amount you need. • If it is possible, always put the lids...
... the product to recycle it . 11. Do not dispose of electrical and electronic appliances. Household electric cooking appliances - Methods for measuring performance 10.2 Energy saving You can save energy during everyday cooking if you follow below hints. • When you heat up water, use only the amount you need. • If it is possible, always put the lids...


