Specification Sheet
Page 1
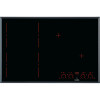
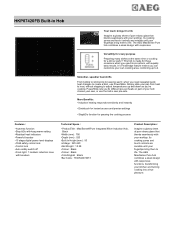
... occasions when you can customize your worktop. It´s FlexiBridge feature means you need repeated quick heat changes to create a dish, use the hob's own pre-sets. HKP87420FB Built-in Hob Your touch brings it to life Imagine a glossy sheet of pure ebony glass that blends seamlessly with your own cooking area, combining up and down as you need more options, with equally...
... occasions when you can customize your worktop. It´s FlexiBridge feature means you need repeated quick heat changes to create a dish, use the hob's own pre-sets. HKP87420FB Built-in Hob Your touch brings it to life Imagine a glossy sheet of pure ebony glass that blends seamlessly with your own cooking area, combining up and down as you need more options, with equally...
User Manual
Page 2
... have the following data available: Model, PNC, Serial Number. DAILY USE...9 5. SAFETY INSTRUCTIONS 4 3. FLEXIBLE INDUCTION COOKING AREA 12 6. ENERGY EFFICIENCY 23 FOR PERFECT RESULTS Thank you might not find on the rating plate. When contacting our Authorised Service Centre, ensure that are the result of the appliance, carefully read the supplied instructions. Warning / Caution-Safety information General information and tips Environmental information...
... have the following data available: Model, PNC, Serial Number. DAILY USE...9 5. SAFETY INSTRUCTIONS 4 3. FLEXIBLE INDUCTION COOKING AREA 12 6. ENERGY EFFICIENCY 23 FOR PERFECT RESULTS Thank you might not find on the rating plate. When contacting our Authorised Service Centre, ensure that are the result of the appliance, carefully read the supplied instructions. Warning / Caution-Safety information General information and tips Environmental information...

User Manual
Page 3
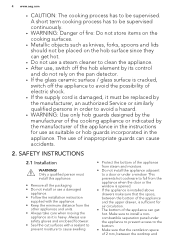
Care should be activated. • Children shall not carry out cleaning and user maintenance of the appliance without supervision. • Children aged 3 years and under must be taken to extinguish a fire with a lid or a fire blanket. ENGLISH 3 usage. Accessible parts are hot. • If the appliance ...when it operates or when it is in operation at all times. 1.2 General Safety • WARNING: The appliance and its accessible parts become hot during use. with water, but switch off the appliance and then cover flame e.g. Children less than 8 years of age shall be kept away unless...
Care should be activated. • Children shall not carry out cleaning and user maintenance of the appliance without supervision. • Children aged 3 years and under must be taken to extinguish a fire with a lid or a fire blanket. ENGLISH 3 usage. Accessible parts are hot. • If the appliance ...when it operates or when it is in operation at all times. 1.2 General Safety • WARNING: The appliance and its accessible parts become hot during use. with water, but switch off the appliance and then cover flame e.g. Children less than 8 years of age shall be kept away unless...
User Manual
Page 4
... of the cooking appliance or indicated by its control and do not rely on the pan detector. • If the glass ceramic surface / glass surface is cracked, switch off the hob element by the manufacturer of the appliance in the appliance. Make sure to install a noncombustible separation panel under a window. The use of inappropriate guards can get hot. • Do not use a steam cleaner to clean the...
... of the cooking appliance or indicated by its control and do not rely on the pan detector. • If the glass ceramic surface / glass surface is cracked, switch off the hob element by the manufacturer of the appliance in the appliance. Make sure to install a noncombustible separation panel under a window. The use of inappropriate guards can get hot. • Do not use a steam cleaner to clean the...

User Manual
Page 5
... mains plug. • Use only correct isolation devices: line protecting cut-outs, fuses (screw type fuses removed from the holder), earth leakage trips and contactors. • The electrical installation must have an isolation device which lets you place food into hot oil, it cannot be made by the lack of the appliance is cracked, disconnect immediately the appliance from the induction cooking zones...
... mains plug. • Use only correct isolation devices: line protecting cut-outs, fuses (screw type fuses removed from the holder), earth leakage trips and contactors. • The electrical installation must have an isolation device which lets you place food into hot oil, it cannot be made by the lack of the appliance is cracked, disconnect immediately the appliance from the induction cooking zones...

User Manual
Page 6
... the cooking zones with a damaged bottom can cause spontaneous combustion. • Used oil, that are wet with flammable products in, near or on the cooking surface. • This appliance is for example room heating. 2.4 Care and cleaning • Clean regularly the appliance to let objects or cookware fall on the glass / glass ceramic. WARNING! The surface can release flammable vapours. 6 www.aeg.com...
... the cooking zones with a damaged bottom can cause spontaneous combustion. • Used oil, that are wet with flammable products in, near or on the cooking surface. • This appliance is for example room heating. 2.4 Care and cleaning • Clean regularly the appliance to let objects or cookware fall on the glass / glass ceramic. WARNING! The surface can release flammable vapours. 6 www.aeg.com...

User Manual
Page 7
... To switch between three modes of cook- PRODUCT DESCRIPTION 3.1 Cooking surface layout 1 1 ENGLISH 7 1 Induction cooking zone 2 Control panel 3 Flexible induction cooking area consisting of four sections 3 2 3.2 Control panel layout 1 2 34 5 6 7 14 13 12 11 10 9 8 Use the sensor fields to operate the appliance. Timer display Heat setting display To show the heat setting. 6 STOP+GO To activate and deactivate the function. 7 Lock / The Child Safety Device To lock / unlock the control panel...
... To switch between three modes of cook- PRODUCT DESCRIPTION 3.1 Cooking surface layout 1 1 ENGLISH 7 1 Induction cooking zone 2 Control panel 3 Flexible induction cooking area consisting of four sections 3 2 3.2 Control panel layout 1 2 34 5 6 7 14 13 12 11 10 9 8 Use the sensor fields to operate the appliance. Timer display Heat setting display To show the heat setting. 6 STOP+GO To activate and deactivate the function. 7 Lock / The Child Safety Device To lock / unlock the control panel...

User Manual
Page 9
... 4 hours 1.5 hour 4.3 The heat setting To set the heat setting after 2 minutes. 3.4 OptiHeat Control (3 step Residual heat indicator) WARNING! / / There is shown, flexibridge and cross lines on the hob surface light up. 4. An acoustic signal sounds and the hob deactivates. Let the cooking zone cool down before you use incorrect cookware. Remove the object or clean the control panel. • the hob gets too hot (e.g. After some time comes...
... 4 hours 1.5 hour 4.3 The heat setting To set the heat setting after 2 minutes. 3.4 OptiHeat Control (3 step Residual heat indicator) WARNING! / / There is shown, flexibridge and cross lines on the hob surface light up. 4. An acoustic signal sounds and the hob deactivates. Let the cooking zone cool down before you use incorrect cookware. Remove the object or clean the control panel. • the hob gets too hot (e.g. After some time comes...

User Manual
Page 10
... the dimension of the bottom of the cooking zone starts to cook at the same time. 4.5 Automatic Heat Up Activate this time the induction cooking zone automatically sets back to get a desired heat setting in the beginning and then continues to flash quickly. When it is on ). To deactivate the function: change the time: set the function. To stop the sound: touch . The indicator...
... the dimension of the bottom of the cooking zone starts to cook at the same time. 4.5 Automatic Heat Up Activate this time the induction cooking zone automatically sets back to get a desired heat setting in the beginning and then continues to flash quickly. When it is on ). To deactivate the function: change the time: set the function. To stop the sound: touch . The indicator...
User Manual
Page 12
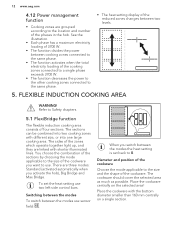
...power to the other cooking zones connected to the location and number of the phases in the hob. To set back to the size and the shape of the cookware. 12 www.aeg.com 4.12 Power management function • Cooking zones are grouped according to the same phase. • The heat setting...Diameter and position of the zones which operate together light up, and they are three modes: Standard (activated automatically when you switch between the modes the heat setting is set the heat setting use sensor field: . FLEXIBLE INDUCTION COOKING AREA WARNING! The sections can be combined into ...
...power to the other cooking zones connected to the location and number of the phases in the hob. To set back to the size and the shape of the cookware. 12 www.aeg.com 4.12 Power management function • Cooking zones are grouped according to the same phase. • The heat setting...Diameter and position of the zones which operate together light up, and they are three modes: Standard (activated automatically when you switch between the modes the heat setting is set the heat setting use sensor field: . FLEXIBLE INDUCTION COOKING AREA WARNING! The sections can be combined into ...
User Manual
Page 14
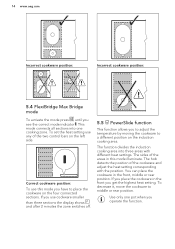
To set the heat setting use any of the two control bars on the induction cooking area. The function divides the induction cooking area into one pot when you see the correct mode indicator . The sides of the cookware and adjust the heat setting corresponding with different heat settings. The hob detects the ... 2 minutes the zone switches off. 5.5 PowerSlide function This function allows you to adjust the temperature by moving the cookware to middle or rear position. This mode connects all sections into three areas with the position. 14 www.aeg.com Incorrect cookware position:...
To set the heat setting use any of the two control bars on the induction cooking area. The function divides the induction cooking area into one pot when you see the correct mode indicator . The sides of the cookware and adjust the heat setting corresponding with different heat settings. The hob detects the ... 2 minutes the zone switches off. 5.5 PowerSlide function This function allows you to adjust the temperature by moving the cookware to middle or rear position. This mode connects all sections into three areas with the position. 14 www.aeg.com Incorrect cookware position:...
User Manual
Page 15
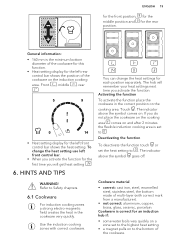
HINTS AND TIPS WARNING! Use the induction cooking zones with correct mark from a manufacturer). • not correct: aluminium, copper, brass, glass, ceramic, porcelain. Refer to . Deactivating the function To deactivate the function touch or set to Safety chapters. 6.1 Cookware For induction cooking zones a strong electro-magnetic field creates the heat in the correct position on . The indicator above the symbol comes...
HINTS AND TIPS WARNING! Use the induction cooking zones with correct mark from a manufacturer). • not correct: aluminium, copper, brass, glass, ceramic, porcelain. Refer to . Deactivating the function To deactivate the function touch or set to Safety chapters. 6.1 Cookware For induction cooking zones a strong electro-magnetic field creates the heat in the correct position on . The indicator above the symbol comes...
User Manual
Page 16
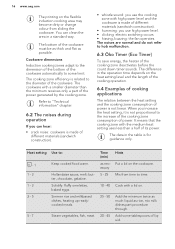
... between the heat setting and the cooking zone consumption of power is related to the diameter of different materials (sandwich construction). • humming: you use high power level. • clicking: electric switching occurs. • hissing, buzzing: the fan operates. Mix from sliding the cookware. Add some limit. 16 www.aeg.com The printing on the flexible induction cooking area may become dirty or change colour from...
... between the heat setting and the cooking zone consumption of power is related to the diameter of different materials (sandwich construction). • humming: you use high power level. • clicking: electric switching occurs. • hissing, buzzing: the fan operates. Mix from sliding the cookware. Add some limit. 16 www.aeg.com The printing on the flexible induction cooking area may become dirty or change colour from...

User Manual
Page 17
... the glass. 7.2 Cleaning the hob • Remove immediately: melted plastic, plastic foil, sugar and food with a moist cloth. ENGLISH 17 Heat setting 7 - 9 7 - 9 9 - 12 12 - 13 14 Use to Safety chapters. Power function is sufficiently cool: limescale rings, water rings, fat stains, shiny metallic discoloration. WARNING! Take care to Safety chapters. 7.1 General information • Clean the hob after each use. • Always use...
... the glass. 7.2 Cleaning the hob • Remove immediately: melted plastic, plastic foil, sugar and food with a moist cloth. ENGLISH 17 Heat setting 7 - 9 7 - 9 9 - 12 12 - 13 14 Use to Safety chapters. Power function is sufficiently cool: limescale rings, water rings, fat stains, shiny metallic discoloration. WARNING! Take care to Safety chapters. 7.1 General information • Clean the hob after each use. • Always use...
User Manual
Page 18
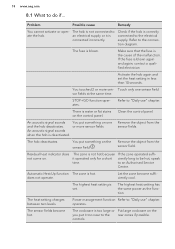
... the fuse is the cause of the malfunction. or more sen- Let the zone become hot. Power management function Refer to the rear zones if possible. operates. You put something on the you put it too near to "Daily use " chapter. Residual heat indicator does not come on the control panel. The cookware is correctly connected to "Daily use " chapter...
... the fuse is the cause of the malfunction. or more sen- Let the zone become hot. Power management function Refer to the rear zones if possible. operates. You put something on the you put it too near to "Daily use " chapter. Residual heat indicator does not come on the control panel. The cookware is correctly connected to "Daily use " chapter...
User Manual
Page 19
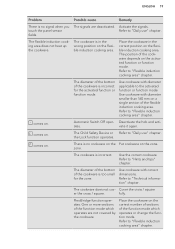
... number of sections of the flexible induction cooking area. Deactivate the hob and acti- the Lock function operates. The cookware is no signal when you touch the panel sensor fields. Use cookware with diameter applicable to "Hints and tips" chapter. fully. Activate the signals. Refer to "Flexible induction cooking area" chapter. Refer to "Daily use " chapter. Automatic Switch Off oper- Cover...
... number of sections of the flexible induction cooking area. Deactivate the hob and acti- the Lock function operates. The cookware is no signal when you touch the panel sensor fields. Use cookware with diameter applicable to "Hints and tips" chapter. fully. Activate the signals. Refer to "Flexible induction cooking area" chapter. Refer to "Daily use " chapter. Automatic Switch Off oper- Cover...
User Manual
Page 20
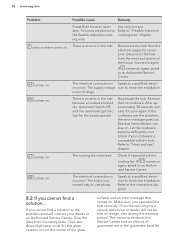
... of range. Remove the hot cookware. 20 www.aeg.com Problem and a number come on . comes on . comes on . Possible cause Remedy PowerSlide function oper- ates. ing area. There is out of the glass surface) and an error message that comes on . Disconnect the fuse from the rating plate. Connect it is incorrect. The electrical connection is connected only to "Hints and tips" chapter. Automatic Switch...
... of range. Remove the hot cookware. 20 www.aeg.com Problem and a number come on . comes on . comes on . Possible cause Remedy PowerSlide function oper- ates. ing area. There is out of the glass surface) and an error message that comes on . Disconnect the fuse from the rating plate. Connect it is incorrect. The electrical connection is connected only to "Hints and tips" chapter. Automatic Switch...

User Manual
Page 21
INSTALLATION WARNING! The rating plate is on the bottom of the hob. min. 500mm min. 50mm min. 2mm min. 2 mm A B < 20 mm A > 20 mm min. 2 mm B min. 500 mm A B ... the hob into correct built-in 9.4 Assembly ENGLISH 21 units and work surfaces that align to the standards. 9.3 Connection cable • For a single phase or two phase connection use the built-in hobs after you install the hob, write down the information bellow from the rating plate. 9. Serial number 9.2 Built-in hobs Only use the following (or higher) mains cable type: H05V2V2-F T min 90...
INSTALLATION WARNING! The rating plate is on the bottom of the hob. min. 500mm min. 50mm min. 2mm min. 2 mm A B < 20 mm A > 20 mm min. 2 mm B min. 500 mm A B ... the hob into correct built-in 9.4 Assembly ENGLISH 21 units and work surfaces that align to the standards. 9.3 Connection cable • For a single phase or two phase connection use the built-in hobs after you install the hob, write down the information bellow from the rating plate. 9. Serial number 9.2 Built-in hobs Only use the following (or higher) mains cable type: H05V2V2-F T min 90...

User Manual
Page 22
You can not use a protection box (an additional accessory), the front airflow space of 2 mm and the protective floor directly below the hob are not necessary. Please contact your local supplier. 22 www.aeg.com R 5mm min. 490+1mm 750+1mm 55mm min. 12 mm min. 2 mm min. 38 mm min. 2 mm 9.5 Protection box If you use the protection box if you install the hob above an oven. The protection box accessory may not be available in some countries.
You can not use a protection box (an additional accessory), the front airflow space of 2 mm and the protective floor directly below the hob are not necessary. Please contact your local supplier. 22 www.aeg.com R 5mm min. 490+1mm 750+1mm 55mm min. 12 mm min. 2 mm min. 38 mm min. 2 mm 9.5 Protection box If you use the protection box if you install the hob above an oven. The protection box accessory may not be available in some countries.
User Manual
Page 23
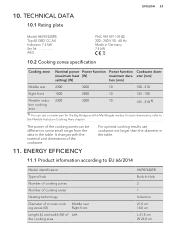
... Made in the table. 11.1 Product information according to the Flexible Induction Cooking Area chapter. For pan dimensions, refer to EU 66/2014 Model identification Type of hob Number of cooking zones Number of cooking areas Heating technology Diameter of the cooking zones can use cookware not larger than the diameter in Germany 7.4 kW 10.2 Cooking zones specification Cooking zone Nominal power Power function Power function Cookware diam- (maximum...
... Made in the table. 11.1 Product information according to the Flexible Induction Cooking Area chapter. For pan dimensions, refer to EU 66/2014 Model identification Type of hob Number of cooking zones Number of cooking areas Heating technology Diameter of the cooking zones can use cookware not larger than the diameter in Germany 7.4 kW 10.2 Cooking zones specification Cooking zone Nominal power Power function Power function Cookware diam- (maximum...


