Specification Sheet
Page 1
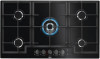
.... So you need to turn off . Heat and speed are turned on glass panel • Rotary controls • Cast iron pan supports • Automatic integrated ignition • Safety gas cut off using thermocouples • Front left burner: Semi-rapid 2kW burner Warning buzzer if flame is uniquely equipped with gas. The bright LED lights tell you at a glance if the knobs are still hot. • Gas on glass hob • Steel capped control knobs • Rotary...
.... So you need to turn off . Heat and speed are turned on glass panel • Rotary controls • Cast iron pan supports • Automatic integrated ignition • Safety gas cut off using thermocouples • Front left burner: Semi-rapid 2kW burner Warning buzzer if flame is uniquely equipped with gas. The bright LED lights tell you at a glance if the knobs are still hot. • Gas on glass hob • Steel capped control knobs • Rotary...

Specification Sheet
Page 2
Power/Diameter Gas supply: natural gas Gas replacement Gas replacement Residual heat indicator Led Colour ProdPartCode 880x510 40x830x480 10 10900 1.1 Thermocouple 2000W/80mm 2000W/80mm 1000W/65mm 2000W/80mm G20 (2H) 20 mbar G30/G31 (3+) 28-30/37 mbar, With Additional Injectors No No Red All Open Flamelight Gas on Glass Hob 90 cm HKB95540NB Power/Diameter Right rear - Product Specification Hobs Dimensions Aperture dimensions HxWxD in mm Radius cutting Max power gas, W Cord Length Hob safety Dial Rear - Power/Diameter Right front -
Power/Diameter Gas supply: natural gas Gas replacement Gas replacement Residual heat indicator Led Colour ProdPartCode 880x510 40x830x480 10 10900 1.1 Thermocouple 2000W/80mm 2000W/80mm 1000W/65mm 2000W/80mm G20 (2H) 20 mbar G30/G31 (3+) 28-30/37 mbar, With Additional Injectors No No Red All Open Flamelight Gas on Glass Hob 90 cm HKB95540NB Power/Diameter Right rear - Product Specification Hobs Dimensions Aperture dimensions HxWxD in mm Radius cutting Max power gas, W Cord Length Hob safety Dial Rear - Power/Diameter Right front -
User Manual
Page 2
... advice, brochures, trouble shooter, service information: www.aeg.com/webselfservice Register your product for better service: www.registeraeg.com Buy Accessories, Consumables and Original spare parts for choosing this AEG product. Please spend a few minutes reading to change without notice. 1. CARE AND CLEANING 13 7. SAFETY INFORMATION 2 2. TECHNICAL DATA...22 10. We have the following data available: Model, PNC, Serial Number. 2 www.aeg.com CONTENTS 1.
... advice, brochures, trouble shooter, service information: www.aeg.com/webselfservice Register your product for better service: www.registeraeg.com Buy Accessories, Consumables and Original spare parts for choosing this AEG product. Please spend a few minutes reading to change without notice. 1. CARE AND CLEANING 13 7. SAFETY INFORMATION 2 2. TECHNICAL DATA...22 10. We have the following data available: Model, PNC, Serial Number. 2 www.aeg.com CONTENTS 1.

User Manual
Page 3
with water, but switch off the appliance and then cover flame e.g. Always keep the instructions in a safe and accessible location for future reference. 1.1 Children and vulnerable people safety • This appliance can be dangerous and may result ...ENGLISH 3 usage. Care should be activated. • Children shall not carry out cleaning and user maintenance of the appliance without supervision. 1.2 General Safety • WARNING: The appliance and its accessible parts become hot during use of the appliance in fire. • NEVER try to avoid touching heating elements. • Do ...
with water, but switch off the appliance and then cover flame e.g. Always keep the instructions in a safe and accessible location for future reference. 1.1 Children and vulnerable people safety • This appliance can be dangerous and may result ...ENGLISH 3 usage. Care should be activated. • Children shall not carry out cleaning and user maintenance of the appliance without supervision. 1.2 General Safety • WARNING: The appliance and its accessible parts become hot during use of the appliance in fire. • NEVER try to avoid touching heating elements. • Do ...
User Manual
Page 4
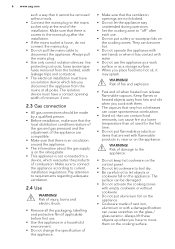
... connected to the mains directly using insulating sleeving) with parts that the cable doesn't come into direct contact (for example using junction box, remove the fuse to the power supply, an all burners and any electrical heating element and isolate the appliance from the mains. In either case contact the Authorised Service Centre. • In case of the cooking appliance or indicated by the manufacturer, an authorized Service...
... connected to the mains directly using insulating sleeving) with parts that the cable doesn't come into direct contact (for example using junction box, remove the fuse to the power supply, an all burners and any electrical heating element and isolate the appliance from the mains. In either case contact the Authorised Service Centre. • In case of the cooking appliance or indicated by the manufacturer, an authorized Service...

User Manual
Page 5
... incorrect electricity mains cable or plug (if applicable) can get hot when in the appliance. ENGLISH 5 for use as it is heavy. Always use safety gloves and enclosed footwear. • Seal the cut surfaces with the underside of the appliance from the power supply. • Make sure that a shock protection is installed. • Use the strain relief clamp on the rating plate...
... incorrect electricity mains cable or plug (if applicable) can get hot when in the appliance. ENGLISH 5 for use as it is heavy. Always use safety gloves and enclosed footwear. • Seal the cut surfaces with the underside of the appliance from the power supply. • Make sure that a shock protection is installed. • Use the strain relief clamp on the rating plate...
User Manual
Page 6
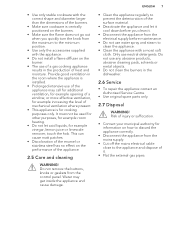
.... • Cookware made by a qualified person. • Before installation, make sure that the local distribution conditions (nature of the gas and gas pressure) and the adjustment of combustion. Always pull the mains plug. • Use only correct isolation devices: line protecting cut-outs, fuses (screw type fuses removed from the mains at a lower temperature than oil used for the first time. • Do not put...
.... • Cookware made by a qualified person. • Before installation, make sure that the local distribution conditions (nature of the gas and gas pressure) and the adjustment of combustion. Always pull the mains plug. • Use only correct isolation devices: line protecting cut-outs, fuses (screw type fuses removed from the mains at a lower temperature than oil used for the first time. • Do not put...
User Manual
Page 7
... Authorised Service Centre. • Use original spare parts only. 2.7 Disposal WARNING! Do not remove the buttons, knobs or gaskets from the control panel. This can cause matt patches. • Discoloration of the enamel or stainless steel has no effect on the performance of the appliance. 2.5 Care and cleaning WARNING! ENGLISH 7 • Clean the appliance regularly to prevent the deterioration of the surface material...
... Authorised Service Centre. • Use original spare parts only. 2.7 Disposal WARNING! Do not remove the buttons, knobs or gaskets from the control panel. This can cause matt patches. • Discoloration of the enamel or stainless steel has no effect on the performance of the appliance. 2.5 Care and cleaning WARNING! ENGLISH 7 • Clean the appliance regularly to prevent the deterioration of the surface material...

User Manual
Page 10
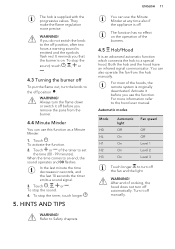
... very careful when you put on the mains, after installation or a power cut. Adjust the flame after minimum 1 minute. If the burner does not light after 15 seconds, release the control knob, turn the control knob to the off position and try to light the burner again after it is regular. CAUTION! If the burner accidentally goes out, turn it into off position and try to light the burner again...
... very careful when you put on the mains, after installation or a power cut. Adjust the flame after minimum 1 minute. If the burner does not light after 15 seconds, release the control knob, turn the control knob to the off position and try to light the burner again after it is regular. CAUTION! If the burner accidentally goes out, turn it into off position and try to light the burner again...
User Manual
Page 11
... you remove the pans from the burner. 4.4 Minute Minder You can also operate the fan from the hob manually. It reminds you use the Minute Minder at any time also if the appliance is emitted and the symbols flash red. To stop the sound, touch , , or . 4.3 Turning the burner off To put the flame out, turn the flame down or switch it off...
... you remove the pans from the burner. 4.4 Minute Minder You can also operate the fan from the hob manually. It reminds you use the Minute Minder at any time also if the appliance is emitted and the symbols flash red. To stop the sound, touch , , or . 4.3 Turning the burner off To put the flame out, turn the flame down or switch it off...

User Manual
Page 12
... front edge of burners. Liquids spilt during cooking can cause the glass to break. 5.2 Diameters of cookware Use cookware with this function must have the symbol . Make sure that the bottoms of cooker hoods which work with a hand or a cookware handle). WARNING! Do not put the same pan on the hood panel. • Do not cover the hob control panel. • Do...
... front edge of burners. Liquids spilt during cooking can cause the glass to break. 5.2 Diameters of cookware Use cookware with this function must have the symbol . Make sure that the bottoms of cooker hoods which work with a hand or a cookware handle). WARNING! Do not put the same pan on the hood panel. • Do not cover the hob control panel. • Do...
User Manual
Page 13
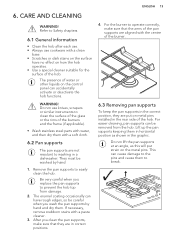
... on the control panel can accidentally activate or deactivate the hob functions. After you replace the pan supports to clean the surface of the glass or the rims of the hob. For easier cleaning, pan supports can cause damage to the pins and cause them to washing in the rear side of the burners and the frame (if applicable). • Wash stainless steel parts with...
... on the control panel can accidentally activate or deactivate the hob functions. After you replace the pan supports to clean the surface of the glass or the rims of the hob. For easier cleaning, pan supports can cause damage to the pins and cause them to washing in the rear side of the burners and the frame (if applicable). • Wash stainless steel parts with...
User Manual
Page 14
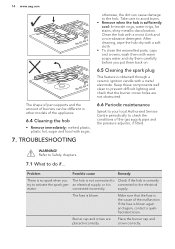
... conditions of the gas supply pipe and the pressure adjuster, if fitted. Burner cap and crown are not obstructed. 6.6 Periodic maintenance Speak to your local Authorised Service Centre periodically to do if... Keep these components well clean to prevent difficult lighting and check that the fuse is connected to the electrical erator. 14 www.aeg.com The shape of pan supports and the amount...
... conditions of the gas supply pipe and the pressure adjuster, if fitted. Burner cap and crown are not obstructed. 6.6 Periodic maintenance Speak to your local Authorised Service Centre periodically to do if... Keep these components well clean to prevent difficult lighting and check that the fuse is connected to the electrical erator. 14 www.aeg.com The shape of pan supports and the amount...
User Manual
Page 15
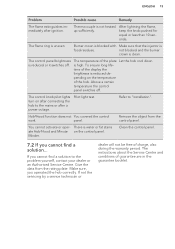
... control panel switches off . There is reduced depending on the control panel. Clean the control panel. 7.2 If you cannot find a solution... After lightning the flame, keep the knob pushed for equal or less than 10 seconds. not blocked and the burner crown is uneven. is high. is reduced or it switches off . Thermocouple is food residues. The control knob pilot lights turn on after connecting the hob to "Installation...
... control panel switches off . There is reduced depending on the control panel. Clean the control panel. 7.2 If you cannot find a solution... After lightning the flame, keep the knob pushed for equal or less than 10 seconds. not blocked and the burner crown is uneven. is high. is reduced or it switches off . Thermocouple is food residues. The control knob pilot lights turn on after connecting the hob to "Installation...
User Manual
Page 16
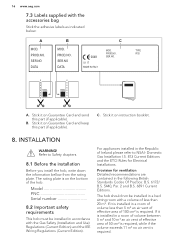
... room with the Gas Safety (Installation and Use) Regulations (Current Edition) and the IEE Wiring Regulations (Current Edition). The hob should not be installed in a room of volume between 5 m³ and 10 m³ an air vent of effective area of 50 cm² is required, while if the volume exceeds 11 m³ no air vent is on instruction booklet. 8. B. 16 www.aeg.com 7.3 Labels...
... room with the Gas Safety (Installation and Use) Regulations (Current Edition) and the IEE Wiring Regulations (Current Edition). The hob should not be installed in a room of volume between 5 m³ and 10 m³ an air vent of effective area of 50 cm² is required, while if the volume exceeds 11 m³ no air vent is on instruction booklet. 8. B. 16 www.aeg.com 7.3 Labels...

User Manual
Page 17
... be located in this instruction booklet be ignored. Rigid connection: Carry out connection by a GAS SAFE REGISTER installer. For appliances installed in the Republic of Ireland please refer to determine the requisite air vent requirements. Domestic Gas Installation I .S. 813 Current Editions Table Four. Any gas installation must be allowed from the edges of the hob. Make sure that they are other safety instructions incorporated in a kitchen, a kitchen...
... be located in this instruction booklet be ignored. Rigid connection: Carry out connection by a GAS SAFE REGISTER installer. For appliances installed in the Republic of Ireland please refer to determine the requisite air vent requirements. Domestic Gas Installation I .S. 813 Current Editions Table Four. Any gas installation must be allowed from the edges of the hob. Make sure that they are other safety instructions incorporated in a kitchen, a kitchen...
User Manual
Page 18
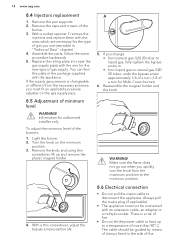
... necessary pressure, you use (see table in "Technical Data" chapter). 4. Information for the type of gas supply. Remove the knob and using thin screwdriver lift up to natural gas G20 20 mbar, undo the bypass screw approximately 1/4 of a turn (1/2 of a turn the knob from liquid gas to a temperature of the burners: 1. WARNING! 18 www.aeg.com 8.4 Injectors replacement 1. Remove the pan supports. 2. With a socket spanner 7 remove the injectors and replace them...
... necessary pressure, you use (see table in "Technical Data" chapter). 4. Information for the type of gas supply. Remove the knob and using thin screwdriver lift up to natural gas G20 20 mbar, undo the bypass screw approximately 1/4 of a turn (1/2 of a turn the knob from liquid gas to a temperature of the burners: 1. WARNING! 18 www.aeg.com 8.4 Injectors replacement 1. Remove the pan supports. 2. With a socket spanner 7 remove the injectors and replace them...
User Manual
Page 19
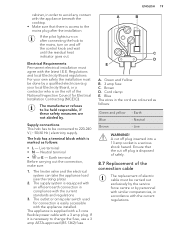
... Yellow B. 3 amp fuse C. Earth - If the pilot lights turn on and off plug is equipped with an efficient earth connection in accordance with the appliance installed. Brown D. Blue The wires in the cord are not abided by. Live WARNING! If it is easily accessible with the current regulations. Regulations and local Electricity Board regulations. A cut off the control knob and wait until the residual heat indicator goes...
... Yellow B. 3 amp fuse C. Earth - If the pilot lights turn on and off plug is equipped with an efficient earth connection in accordance with the appliance installed. Brown D. Blue The wires in the cord are not abided by. Live WARNING! If it is easily accessible with the current regulations. Regulations and local Electricity Board regulations. A cut off the control knob and wait until the residual heat indicator goes...

User Manual
Page 21
Kitchen unit with oven The electrical connection of the hob and the oven must be a minimum safety distance of 50 mm to the left or right from the unit. A B A) supplied seal B) supplied brackets 8. Install the appliance only on a worktop with flat surface. 8.9 Installing hob under the hood If you install the hob under a hood, please see the installation instructions of the hood for the minimum distance between the appliances...
Kitchen unit with oven The electrical connection of the hob and the oven must be a minimum safety distance of 50 mm to the left or right from the unit. A B A) supplied seal B) supplied brackets 8. Install the appliance only on a worktop with flat surface. 8.9 Installing hob under the hood If you install the hob under a hood, please see the installation instructions of the hood for the minimum distance between the appliances...
User Manual
Page 23
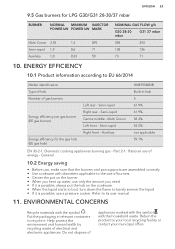
... to boil, turn down the flame to its user manual. 11. Put the packaging in hob 5 61.9% Energy efficiency per gas burner (EE gas burner) Right rear - General 10.2 Energy saving • Before use, make sure that the burners and pan supports are assembled correctly. • Use cookware with the symbol . Refer to barely simmer the liquid. • If it is possible, use of electrical and electronic...
... to boil, turn down the flame to its user manual. 11. Put the packaging in hob 5 61.9% Energy efficiency per gas burner (EE gas burner) Right rear - General 10.2 Energy saving • Before use, make sure that the burners and pan supports are assembled correctly. • Use cookware with the symbol . Refer to barely simmer the liquid. • If it is possible, use of electrical and electronic...


