User Manual
Page 2
... DATA...21 10. SAFETY INSTRUCTIONS 5 3. PRODUCT DESCRIPTION 13 5. TROUBLESHOOTING 19 9. Warning / Caution-Safety information General information and tips Environmental information Subject to give you impeccable performance for your appliance: www.aeg.com/shop CUSTOMER CARE AND SERVICE Always use of incorrect installation or Visit our website for: Get usage advice, brochures, trouble shooter, service information: www.aeg.com/webselfservice Register your product...
... DATA...21 10. SAFETY INSTRUCTIONS 5 3. PRODUCT DESCRIPTION 13 5. TROUBLESHOOTING 19 9. Warning / Caution-Safety information General information and tips Environmental information Subject to give you impeccable performance for your appliance: www.aeg.com/shop CUSTOMER CARE AND SERVICE Always use of incorrect installation or Visit our website for: Get usage advice, brochures, trouble shooter, service information: www.aeg.com/webselfservice Register your product...
User Manual
Page 3
... of experience and knowledge if they have been given supervision or instruction concerning the use of the appliance without supervision. 1.2 General Safety • WARNING: The appliance and its accessible parts become hot during use. ENGLISH 3 usage. Care should be activated. • Children shall not carry out cleaning and user maintenance of the appliance in fire. • NEVER try to...
... of experience and knowledge if they have been given supervision or instruction concerning the use of the appliance without supervision. 1.2 General Safety • WARNING: The appliance and its accessible parts become hot during use. ENGLISH 3 usage. Care should be activated. • Children shall not carry out cleaning and user maintenance of the appliance in fire. • NEVER try to...
User Manual
Page 4
... use a steam cleaner to the power supply, an all burners and any electrical heating element and isolate the appliance from the power supply, - The earth cable is connected to disconnect the appliance from the mains. do not touch the appliance surface, - Complete disconnection in order to avoid a hazard. • Where the appliance is directly connected to clean the appliance. • If the glass ceramic surface / glass surface...
... use a steam cleaner to the power supply, an all burners and any electrical heating element and isolate the appliance from the power supply, - The earth cable is connected to disconnect the appliance from the mains. do not touch the appliance surface, - Complete disconnection in order to avoid a hazard. • Where the appliance is directly connected to clean the appliance. • If the glass ceramic surface / glass surface...
User Manual
Page 5
... hot appliance or hot cookware, when you connect the appliance to the near sockets. • Do not use multi-plug adapters and extension cables. • Make sure not to cause damage to the mains plug (if applicable) or to come in direct contact with the electrical ratings of the mains power supply. • Make sure the appliance is installed correctly. SAFETY INSTRUCTIONS...
... hot appliance or hot cookware, when you connect the appliance to the near sockets. • Do not use multi-plug adapters and extension cables. • Make sure not to cause damage to the mains plug (if applicable) or to come in direct contact with the electrical ratings of the mains power supply. • Make sure the appliance is installed correctly. SAFETY INSTRUCTIONS...
User Manual
Page 6
... electrical installation must have a contact opening width of minimum 3 mm. 2.3 Gas connection • All gas connections should be made of cast iron, aluminium or with a damaged bottom can release flammable vapours. Risk of damage to the appliance. • Do not keep hot cookware on the control panel. • Do not let cookware to boil dry. • Be careful not to current installation regulations...
... electrical installation must have a contact opening width of minimum 3 mm. 2.3 Gas connection • All gas connections should be made of cast iron, aluminium or with a damaged bottom can release flammable vapours. Risk of damage to the appliance. • Do not keep hot cookware on the control panel. • Do not let cookware to boil dry. • Be careful not to current installation regulations...
User Manual
Page 7
... burner. • The use of a gas cooking appliance results in the dishwasher. 2.6 Service • To repair the appliance contact an Authorised Service Centre. • Use original spare parts only. 2.7 Disposal WARNING! Do not use neutral detergents. The rating plate is installed. • Prolonged intensive use water spray and steam to Safety chapters. 3.1 Before the installation Before you install the hob, write down before you quickly turn the knob...
... burner. • The use of a gas cooking appliance results in the dishwasher. 2.6 Service • To repair the appliance contact an Authorised Service Centre. • Use original spare parts only. 2.7 Disposal WARNING! Do not use neutral detergents. The rating plate is installed. • Prolonged intensive use water spray and steam to Safety chapters. 3.1 Before the installation Before you install the hob, write down before you quickly turn the knob...
User Manual
Page 8
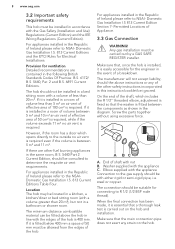
... hob is installed, it is installed in line with either rigid or semi-rigid pipe, i.e. If it is essential that the washer is required. Any gas installation must be fitted above instructions or any strain on the hob and installation. Elbow supplied with the Gas Safety (Installation and Use) Regulations (Current Edition) and the IEE Wiring Regulations (Current Edition). steel or copper. The connection should be...
... hob is installed, it is installed in line with either rigid or semi-rigid pipe, i.e. If it is essential that the washer is required. Any gas installation must be fitted above instructions or any strain on the hob and installation. Elbow supplied with the Gas Safety (Installation and Use) Regulations (Current Edition) and the IEE Wiring Regulations (Current Edition). steel or copper. The connection should be...
User Manual
Page 9
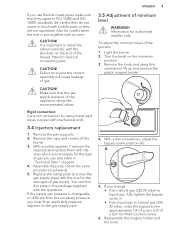
... screwdriver, adjust the bypass screw position (A). Remove the caps and crowns of the appliance obeys the recommended values. Light the burner. 2. Remove the knob and using metal rigid pipes (copper with the one for authorised installer only. Also be careful when the hob is near the gas supply pipe) with mechanical end). 3.4 Injectors replacement 1. Reassemble the magnet holder and the knob. Replace the rating plate...
... screwdriver, adjust the bypass screw position (A). Remove the caps and crowns of the appliance obeys the recommended values. Light the burner. 2. Remove the knob and using metal rigid pipes (copper with the one for authorised installer only. Also be careful when the hob is near the gas supply pipe) with mechanical end). 3.4 Injectors replacement 1. Reassemble the magnet holder and the knob. Replace the rating plate...
User Manual
Page 10
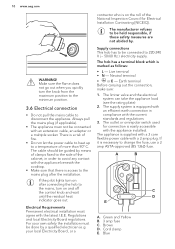
...! The outlet or omnipolar switch used for Electrical Installation Contracting [NICEIC]). Blue your own safety the installation must not be held responsible, if these safety measures are not abided by a qualified electrician (e.g. The supply system is on and off the control knob and wait until the residual heat indicator goes out. The appliance is access to change the fuse, use a 3 amp ASTA-approved (BS...
...! The outlet or omnipolar switch used for Electrical Installation Contracting [NICEIC]). Blue your own safety the installation must not be held responsible, if these safety measures are not abided by a qualified electrician (e.g. The supply system is on and off the control knob and wait until the residual heat indicator goes out. The appliance is access to change the fuse, use a 3 amp ASTA-approved (BS...
User Manual
Page 11
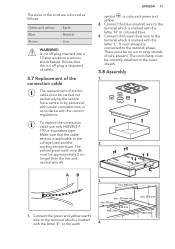
... phase. AB 3. A cut off plug is marked with the letter 'L'. To replace the connection cable use only H03V2V2-F T90 or equivalent type. It must be connected to the outer sheath. 3.8 Assembly 1. 2. Earth - Neutral - Ensure that the cable section is marked with the current regulations. Live WARNING! Connect the blue (neutral) wire to the voltage load and the working temperature. min. 600...
... phase. AB 3. A cut off plug is marked with the letter 'L'. To replace the connection cable use only H03V2V2-F T90 or equivalent type. It must be connected to the outer sheath. 3.8 Assembly 1. 2. Earth - Neutral - Ensure that the cable section is marked with the current regulations. Live WARNING! Connect the blue (neutral) wire to the voltage load and the working temperature. min. 600...
User Manual
Page 12
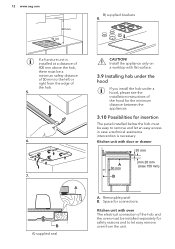
... necessary. A B A) supplied seal B) supplied brackets 8. Space for connections Kitchen unit with oven The electrical connection of the hob and the oven must be installed separately for insertion The panel installed below the hob must be easy to remove and let an easy access in case a technical assistance intervention is installed at a distance of 400 mm above the hob, there must be a minimum safety distance...
... necessary. A B A) supplied seal B) supplied brackets 8. Space for connections Kitchen unit with oven The electrical connection of the hob and the oven must be installed separately for insertion The panel installed below the hob must be easy to remove and let an easy access in case a technical assistance intervention is installed at a distance of 400 mm above the hob, there must be a minimum safety distance...
User Manual
Page 15
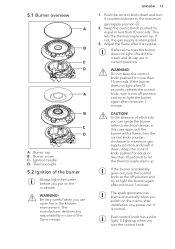
... 1. Be very careful when you put on the mains, after minimum 1 minute. The spark generator can ignite the burner without electrical device; Burner cap B. Burner crown C. Ignition candle D. This lets the thermocouple warm up when you can start automatically when you switch on the cookware. If the burner does not light after 15 seconds, release the control knob, turn it counterclockwise to maximum gas supply position and...
... 1. Be very careful when you put on the mains, after minimum 1 minute. The spark generator can ignite the burner without electrical device; Burner cap B. Burner crown C. Ignition candle D. This lets the thermocouple warm up when you can start automatically when you switch on the cookware. If the burner does not light after 15 seconds, release the control knob, turn it counterclockwise to maximum gas supply position and...
User Manual
Page 16
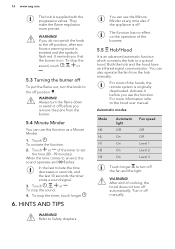
... operates and 00 flashes. After end of cooking, the hood does not turn the knob to the off automatically. They make the flame regulation more information refer to the off before you do not switch the knob to the hood user manual. WARNING! To ...turn the flame down or switch it before you that the burner is supplied with the progressive valves. It reminds you remove the pans from the burner. 5.4 Minute Minder You can also operate the fan from the hob manually. Activate it off position, after two hours a warning sound is an advanced automatic function which connects...
... operates and 00 flashes. After end of cooking, the hood does not turn the knob to the off automatically. They make the flame regulation more information refer to the off before you do not switch the knob to the hood user manual. WARNING! To ...turn the flame down or switch it before you that the burner is supplied with the progressive valves. It reminds you remove the pans from the burner. 5.4 Minute Minder You can also operate the fan from the hob manually. Activate it off position, after two hours a warning sound is an advanced automatic function which connects...
User Manual
Page 17
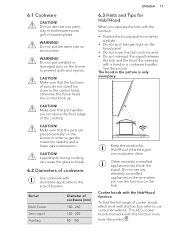
... Hob²Hood When you use cast iron pans, clay or earthenware pots, grill or toaster plates. The hood in order to the control knob, otherwise the flame heats the control knob up. Do not use any remotely controlled appliances at the time when you operate the hob with the function: • Protect the hood panel from direct sunlight. • Do not spot halogen light on the...
... Hob²Hood When you use cast iron pans, clay or earthenware pots, grill or toaster plates. The hood in order to the control knob, otherwise the flame heats the control knob up. Do not use any remotely controlled appliances at the time when you operate the hob with the function: • Protect the hood panel from direct sunlight. • Do not spot halogen light on the...
User Manual
Page 18
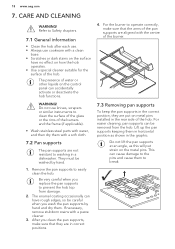
... of the burner. 7.3 Removing pan supports To keep the pan supports in the correct position, they are not resistant to clean the surface of the glass or the rims of water or other liquids on the control panel can cause damage to break. CARE AND CLEANING WARNING! For easier cleaning, pan supports can have no effect on metal pins installed in correct positions. 4. 18 www.aeg.com 7. WARNING...
... of the burner. 7.3 Removing pan supports To keep the pan supports in the correct position, they are not resistant to clean the surface of the glass or the rims of water or other liquids on the control panel can cause damage to break. CARE AND CLEANING WARNING! For easier cleaning, pan supports can have no effect on metal pins installed in correct positions. 4. 18 www.aeg.com 7. WARNING...

User Manual
Page 19
... prevent difficult lighting and check that the fuse is the cause of the malfunction. WARNING! Place the burner cap and crown correctly. After cleaning, wipe the hob dry with a soft cloth. • To clean the enamelled parts, caps and crowns, wash them carefully before you The hob is not connected to Check if the hob is obtained through a ceramic ignition candle with...
... prevent difficult lighting and check that the fuse is the cause of the malfunction. WARNING! Place the burner cap and crown correctly. After cleaning, wipe the hob dry with a soft cloth. • To clean the enamelled parts, caps and crowns, wash them carefully before you The hob is not connected to Check if the hob is obtained through a ceramic ignition candle with...

User Manual
Page 20
... or after ignition. Minder. Above a certain temperature the control panel switches off . The control knob pilot lights turn on the temperature of the hob. Pilot light test. There is high. If you operated the hob correctly. Make sure, you cannot find a solution... Burner crown is blocked with Make sure that the injector is reduced depending on after connecting the hob to "Installation". time...
... or after ignition. Minder. Above a certain temperature the control panel switches off . The control knob pilot lights turn on the temperature of the hob. Pilot light test. There is high. If you operated the hob correctly. Make sure, you cannot find a solution... Burner crown is blocked with Make sure that the injector is reduced depending on after connecting the hob to "Installation". time...
User Manual
Page 22
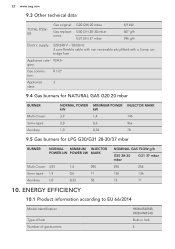
... g/h Electric supply: 220-240 V ~ 50/60 Hz 3 core flexible cable with non rewireable plug fitted with a 3 amp cartridge fuse Appliance cate- ENERGY EFFICIENCY 10.1 Product information according to EU 66/2014 Model identification Type of hob Number of gas burners HKB64540NB, HKB64NB540 Built-in hob 4 II2H3+ gory: Gas connection: R 1/2" Appliance 3 class: 9.4 Gas burners for NATURAL GAS G20 20 mbar BURNER Multi Crown Semi-rapid Auxiliary NORMAL POWER kW 3,9 2,0 1,0 MINIMUM POWER kW...
... g/h Electric supply: 220-240 V ~ 50/60 Hz 3 core flexible cable with non rewireable plug fitted with a 3 amp cartridge fuse Appliance cate- ENERGY EFFICIENCY 10.1 Product information according to EU 66/2014 Model identification Type of hob Number of gas burners HKB64540NB, HKB64NB540 Built-in hob 4 II2H3+ gory: Gas connection: R 1/2" Appliance 3 class: 9.4 Gas burners for NATURAL GAS G20 20 mbar BURNER Multi Crown Semi-rapid Auxiliary NORMAL POWER kW 3,9 2,0 1,0 MINIMUM POWER kW...
User Manual
Page 23
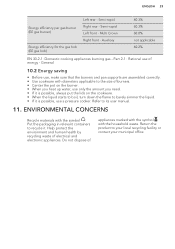
... or contact your municipal office. * Part 2-1 : Rational use of electrical and electronic appliances. General 10.2 Energy saving • Before use a pressure cooker. Do not dispose of appliances marked with the symbol with diameters applicable to the size of burners. • Center the pot on the burner. • When you heat up water, use only the amount you need. • If it is...
... or contact your municipal office. * Part 2-1 : Rational use of electrical and electronic appliances. General 10.2 Energy saving • Before use a pressure cooker. Do not dispose of appliances marked with the symbol with diameters applicable to the size of burners. • Center the pot on the burner. • When you heat up water, use only the amount you need. • If it is...
Specification Sheet
Page 1
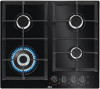
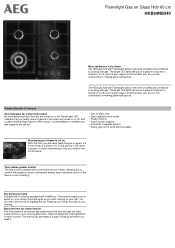
... glass hob • Steel capped control knobs • Rotary controls • Cast iron pan supports • Automatic integrated ignition • Safety gas cut off using thermocouples Warning buzzer if flame is left on With this hob, you will cause a buzzer to sound, reminding you that you need it will never leave the gas on again. And a useful residual heat indicator offers instant visual feedback on whether any pan supports are turned...
... glass hob • Steel capped control knobs • Rotary controls • Cast iron pan supports • Automatic integrated ignition • Safety gas cut off using thermocouples Warning buzzer if flame is left on With this hob, you will cause a buzzer to sound, reminding you that you need it will never leave the gas on again. And a useful residual heat indicator offers instant visual feedback on whether any pan supports are turned...


