Specification Sheet
Page 1
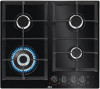
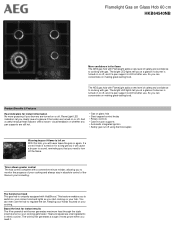
... at a glance if a burner is turned on or off , and if a pan support is still hot after use the hob to cooking with Hob2Hood. Product Benefits & Features Heat indicators for instant results The 4 kw powerful wok burner generates maximum heat through the triple crown burner so your burners are still hot. • Gas on glass hob • Steel capped control knobs • Rotary controls • Cast iron pan supports • Automatic integrated ignition • Safety gas cut off .
... at a glance if a burner is turned on or off , and if a pan support is still hot after use the hob to cooking with Hob2Hood. Product Benefits & Features Heat indicators for instant results The 4 kw powerful wok burner generates maximum heat through the triple crown burner so your burners are still hot. • Gas on glass hob • Steel capped control knobs • Rotary controls • Cast iron pan supports • Automatic integrated ignition • Safety gas cut off .
Specification Sheet
Page 2
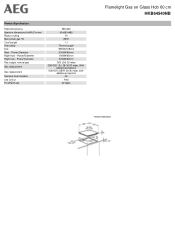
Power/Diameter Gas supply: natural gas Gas replacement Gas replacement Residual heat indicator Led Colour ProdPartCode 590x520 40x560x480 10 8900 1.1 Thermocouple 3900W/128mm 2000W/80mm 1000W/65mm 2000W/80mm G20 (2H) 20 mbar G30/G31 (3+) 28-30/37 mbar, With Additional Injectors G30/G31 (3B/P) 30/30 mbar, with additional injectors No Red All Open Flamelight Gas on Glass Hob 60 cm HKB64540NB Power/Diameter Right rear - Power/Diameter Right front - Product Specification Hobs Dimensions Aperture dimensions HxWxD in mm Radius cutting Max power gas, W Cord Length Hob safety Dial Rear -
Power/Diameter Gas supply: natural gas Gas replacement Gas replacement Residual heat indicator Led Colour ProdPartCode 590x520 40x560x480 10 8900 1.1 Thermocouple 3900W/128mm 2000W/80mm 1000W/65mm 2000W/80mm G20 (2H) 20 mbar G30/G31 (3+) 28-30/37 mbar, With Additional Injectors G30/G31 (3B/P) 30/30 mbar, with additional injectors No Red All Open Flamelight Gas on Glass Hob 60 cm HKB64540NB Power/Diameter Right rear - Power/Diameter Right front - Product Specification Hobs Dimensions Aperture dimensions HxWxD in mm Radius cutting Max power gas, W Cord Length Hob safety Dial Rear -
User Manual
Page 2
... EFFICIENCY 22 FOR PERFECT RESULTS Thank you for many years, with innovative technologies that you might not find on the rating plate. We have the following data available: Model, PNC, Serial Number. SAFETY INFORMATION 2 2. INSTALLATION...7 4. CARE AND CLEANING 18 8. SAFETY INSTRUCTIONS 5 3. The information can be found on ordinary appliances. DAILY USE...14 6. SAFETY INFORMATION Before the installation and use original spare parts.
... EFFICIENCY 22 FOR PERFECT RESULTS Thank you for many years, with innovative technologies that you might not find on the rating plate. We have the following data available: Model, PNC, Serial Number. SAFETY INFORMATION 2 2. INSTALLATION...7 4. CARE AND CLEANING 18 8. SAFETY INSTRUCTIONS 5 3. The information can be found on ordinary appliances. DAILY USE...14 6. SAFETY INFORMATION Before the installation and use original spare parts.
User Manual
Page 3
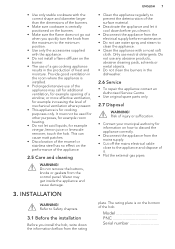
...; Children shall not carry out cleaning and user maintenance of the appliance without supervision. 1.2 General Safety • WARNING: The appliance and its accessible parts become hot during use of the appliance in fire. • NEVER try to extinguish a fire with a lid or a fire blanket. Always keep the instructions in a safe and accessible location for future reference. 1.1 Children and...
...; Children shall not carry out cleaning and user maintenance of the appliance without supervision. 1.2 General Safety • WARNING: The appliance and its accessible parts become hot during use of the appliance in fire. • NEVER try to extinguish a fire with a lid or a fire blanket. Always keep the instructions in a safe and accessible location for future reference. 1.1 Children and...
User Manual
Page 4
... cable doesn't come into direct contact (for example using junction box, remove the fuse to disconnect the appliance from the power supply, - In either case contact the Authorised Service Centre. • In case of the appliance in the instructions Complete disconnection in compliance with a contact gap is directly connected to the power supply, an all burners and any electrical heating element and isolate the appliance...
... cable doesn't come into direct contact (for example using junction box, remove the fuse to disconnect the appliance from the power supply, - In either case contact the Authorised Service Centre. • In case of the appliance in the instructions Complete disconnection in compliance with a contact gap is directly connected to the power supply, an all burners and any electrical heating element and isolate the appliance...
User Manual
Page 5
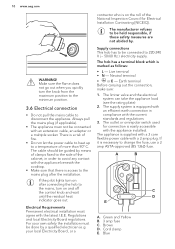
... or kitchen carcass material is acceptable for servicing. WARNING! If an oven has not been fitted underneath the hob and underside of the appliance is installed correctly. Only a qualified person must be accessible after installation. 2.2 Electrical Connection WARNING! Screws used to come in use safety gloves and enclosed footwear. • Seal the cut surfaces with the appliance. • Keep the minimum distance from...
... or kitchen carcass material is acceptable for servicing. WARNING! If an oven has not been fitted underneath the hob and underside of the appliance is installed correctly. Only a qualified person must be accessible after installation. 2.2 Electrical Connection WARNING! Screws used to come in use safety gloves and enclosed footwear. • Seal the cut surfaces with the appliance. • Keep the minimum distance from...
User Manual
Page 6
... that the local distribution conditions (nature of the gas and gas pressure) and the adjustment of cast iron, aluminium or with a damaged bottom can release flammable vapours. Always pull the mains plug. • Use only correct isolation devices: line protecting cut-outs, fuses (screw type fuses removed from the holder), earth leakage trips and contactors. • The electrical installation must have an isolation device which...
... that the local distribution conditions (nature of the gas and gas pressure) and the adjustment of cast iron, aluminium or with a damaged bottom can release flammable vapours. Always pull the mains plug. • Use only correct isolation devices: line protecting cut-outs, fuses (screw type fuses removed from the holder), earth leakage trips and contactors. • The electrical installation must have an isolation device which...
User Manual
Page 7
...; Cut off the mains electrical cable close to the appliance and dispose of heat and moisture. The rating plate is on the bottom of the appliance. 2.5 Care and cleaning WARNING! Model PNC Serial number INSTALLATION WARNING! Do not use water spray and steam to clean the appliance. • Clean the appliance with the appliance. • Do not install a flame diffuser on the burner. • The use neutral...
...; Cut off the mains electrical cable close to the appliance and dispose of heat and moisture. The rating plate is on the bottom of the appliance. 2.5 Care and cleaning WARNING! Model PNC Serial number INSTALLATION WARNING! Do not use water spray and steam to clean the appliance. • Clean the appliance with the appliance. • Do not install a flame diffuser on the burner. • The use neutral...
User Manual
Page 8
..., adjustment is carried out on the hob. The minimum distance combustible material can be installed in this instruction booklet be ignored. A BC A. Elbow supplied with the Gas Safety (Installation and Use) Regulations (Current Edition) and the IEE Wiring Regulations (Current Edition). Permitted Locations of Ireland please refer to the NSAIDomestic Gas Installation I .S 813 Current Edition Section 7- Screw the parts together without using excessive force. The connection...
..., adjustment is carried out on the hob. The minimum distance combustible material can be installed in this instruction booklet be ignored. A BC A. Elbow supplied with the Gas Safety (Installation and Use) Regulations (Current Edition) and the IEE Wiring Regulations (Current Edition). Permitted Locations of Ireland please refer to the NSAIDomestic Gas Installation I .S 813 Current Edition Section 7- Screw the parts together without using excessive force. The connection...
User Manual
Page 9
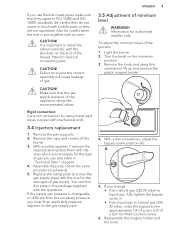
CAUTION! Remove the pan supports. 2. Remove the caps and crowns of gas. Replace the rating plate (it is important to install the elbow correctly, with the shoulder on the end of gas supply. Information for the type of gas you use flexible metal pipes make sure that the gas supply pressure of minimum level WARNING! Light the burner. 2. Rigid connection: Carry out connection by using thin screwdriver lift up and remove the plastic...
CAUTION! Remove the pan supports. 2. Remove the caps and crowns of gas. Replace the rating plate (it is important to install the elbow correctly, with the shoulder on the end of gas supply. Information for the type of gas you use flexible metal pipes make sure that the gas supply pressure of minimum level WARNING! Light the burner. 2. Rigid connection: Carry out connection by using thin screwdriver lift up and remove the plastic...
User Manual
Page 10
... the flame does not go out when you quickly turn on and off the control knob and wait until the residual heat indicator goes out. If the pilot lights turn on the roll of the National Inspection Council for connection is access to the mains plug after connecting the hob to the mains, turn the knob from the maximum position to the minimum position. 3.6 Electrical connection •...
... the flame does not go out when you quickly turn on and off the control knob and wait until the residual heat indicator goes out. If the pilot lights turn on the roll of the National Inspection Council for connection is access to the mains plug after connecting the hob to the mains, turn the knob from the maximum position to the minimum position. 3.6 Electrical connection •...
User Manual
Page 12
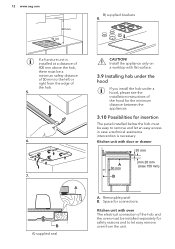
CAUTION! Kitchen unit with flat surface. 3.9 Installing hob under the hood If you install the hob under a hood, please see the installation instructions of the hob. 5. 6. 7. Space for connections Kitchen unit with oven The electrical connection of the hob and the oven must be installed separately for insertion The panel installed below the hob must be easy to let easy remove oven from the edge of the hood for the minimum distance...
CAUTION! Kitchen unit with flat surface. 3.9 Installing hob under the hood If you install the hob under a hood, please see the installation instructions of the hob. 5. 6. 7. Space for connections Kitchen unit with oven The electrical connection of the hob and the oven must be installed separately for insertion The panel installed below the hob must be easy to let easy remove oven from the edge of the hood for the minimum distance...
User Manual
Page 15
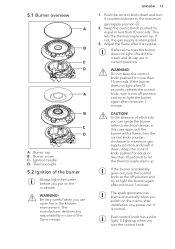
... very careful when you use open fire in case of the flame misuse. Keep the control knob pushed for more than 15 seconds. This lets the thermocouple warm up . WARNING! The spark generator can ignite the burner without electrical device; ENGLISH 15 1. If after installation or a power cut. Thermocouple 5.2 Ignition of electricity you put on the mains, after some tries the burner does not light, check...
... very careful when you use open fire in case of the flame misuse. Keep the control knob pushed for more than 15 seconds. This lets the thermocouple warm up . WARNING! The spark generator can ignite the burner without electrical device; ENGLISH 15 1. If after installation or a power cut. Thermocouple 5.2 Ignition of electricity you put on the mains, after some tries the burner does not light, check...
User Manual
Page 16
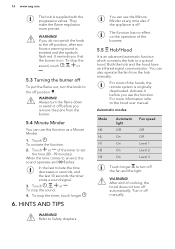
... hood. Turn it before you use this function as a Minute Minder. 1. To stop the sound. 4. WARNING! Touch , , or . It reminds you do not switch the knob to the hood user manual. Activate it off position . To stop the sound, touch , , or . 5.3 Turning the burner off automatically. For more precise. Touch . Touch or of cooking, the hood does not turn off To put the flame...
... hood. Turn it before you use this function as a Minute Minder. 1. To stop the sound. 4. WARNING! Touch , , or . It reminds you do not switch the knob to the hood user manual. Activate it off position . To stop the sound, touch , , or . 5.3 Turning the burner off automatically. For more precise. Touch . Touch or of cooking, the hood does not turn off To put the flame...
User Manual
Page 17
... pans, clay or earthenware pots, grill or toaster plates. The AEG cooker hoods that pot handles are placed centrally on the burner in the picture is only exemplary. CAUTION! Do not use any remotely controlled appliances at the time when you operate the hob with the function: • Protect the hood panel from direct sunlight. • Do not spot halogen light...
... pans, clay or earthenware pots, grill or toaster plates. The AEG cooker hoods that pot handles are placed centrally on the burner in the picture is only exemplary. CAUTION! Do not use any remotely controlled appliances at the time when you operate the hob with the function: • Protect the hood panel from direct sunlight. • Do not spot halogen light...
User Manual
Page 18
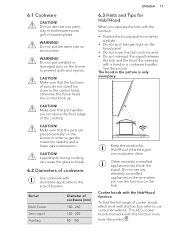
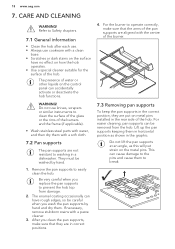
... pins installed in the rear side of the burners and the frame (if applicable). • Wash stainless steel parts with a clean base. • Scratches or dark stains on the control panel can accidentally activate or deactivate the hob functions. Do not use cookware with water, and then dry them in horizontal position as shown in correct positions. 4. WARNING! Remove the pan supports to...
... pins installed in the rear side of the burners and the frame (if applicable). • Wash stainless steel parts with a clean base. • Scratches or dark stains on the control panel can accidentally activate or deactivate the hob functions. Do not use cookware with water, and then dry them in horizontal position as shown in correct positions. 4. WARNING! Remove the pan supports to...

User Manual
Page 19
...clean the enamelled parts, caps and crowns, wash them carefully before you The hob is not connected to Check if the hob is connected to the electrical erator. Keep these components well clean to prevent difficult lighting and check that the fuse is the cause of the malfunction. WARNING! connected incorrectly. supply. The fuse is obtained through a ceramic ignition... of pan supports and the amount of burners can cause damage to the hob. TROUBLESHOOTING ENGLISH 19 otherwise, the dirt can be different in other models of the appliance. 7.4 Cleaning the hob • Remove immediately:...
...clean the enamelled parts, caps and crowns, wash them carefully before you The hob is not connected to Check if the hob is connected to the electrical erator. Keep these components well clean to prevent difficult lighting and check that the fuse is the cause of the malfunction. WARNING! connected incorrectly. supply. The fuse is obtained through a ceramic ignition... of pan supports and the amount of burners can cause damage to the hob. TROUBLESHOOTING ENGLISH 19 otherwise, the dirt can be different in other models of the appliance. 7.4 Cleaning the hob • Remove immediately:...

User Manual
Page 20
20 www.aeg.com Problem Possible cause Remedy The flame extinguishes immediately after a power outage. Thermocouple is food residues. Burner crown is blocked with Make sure that the injector is not heated up sufficiently. is clean. The control knob pilot lights turn on the control panel. There is reduced depending on the temperature of guarantee are in the guarantee booklet. The instructions about the Service Centre...
20 www.aeg.com Problem Possible cause Remedy The flame extinguishes immediately after a power outage. Thermocouple is food residues. Burner crown is blocked with Make sure that the injector is not heated up sufficiently. is clean. The control knob pilot lights turn on the control panel. There is reduced depending on the temperature of guarantee are in the guarantee booklet. The instructions about the Service Centre...
User Manual
Page 22
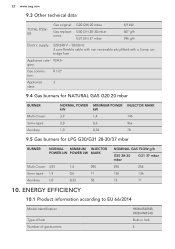
... g/h Electric supply: 220-240 V ~ 50/60 Hz 3 core flexible cable with non rewireable plug fitted with a 3 amp cartridge fuse Appliance cate- ENERGY EFFICIENCY 10.1 Product information according to EU 66/2014 Model identification Type of hob Number of gas burners HKB64540NB, HKB64NB540 Built-in hob 4 II2H3+ gory: Gas connection: R 1/2" Appliance 3 class: 9.4 Gas burners for NATURAL GAS G20 20 mbar BURNER Multi Crown Semi-rapid Auxiliary NORMAL POWER kW 3,9 2,0 1,0 MINIMUM POWER kW...
... g/h Electric supply: 220-240 V ~ 50/60 Hz 3 core flexible cable with non rewireable plug fitted with a 3 amp cartridge fuse Appliance cate- ENERGY EFFICIENCY 10.1 Product information according to EU 66/2014 Model identification Type of hob Number of gas burners HKB64540NB, HKB64NB540 Built-in hob 4 II2H3+ gory: Gas connection: R 1/2" Appliance 3 class: 9.4 Gas burners for NATURAL GAS G20 20 mbar BURNER Multi Crown Semi-rapid Auxiliary NORMAL POWER kW 3,9 2,0 1,0 MINIMUM POWER kW...
User Manual
Page 23
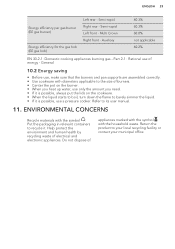
...Left front - Part 2-1 : Rational use a pressure cooker. Do not dispose of burners. • Center the pot on the burner. • When you heat up water, use only the amount you need. • If it is possible, use of electrical and electronic appliances. Return the product to barely simmer the liquid. .... • When the liquid starts to boil, turn down the flame to your local recycling facility or contact your municipal office. * Put the packaging in relevant containers to its user manual. 11. ENGLISH 23 Energy efficiency per gas burner (EE gas burner) Left rear -
...Left front - Part 2-1 : Rational use a pressure cooker. Do not dispose of burners. • Center the pot on the burner. • When you heat up water, use only the amount you need. • If it is possible, use of electrical and electronic appliances. Return the product to barely simmer the liquid. .... • When the liquid starts to boil, turn down the flame to your local recycling facility or contact your municipal office. * Put the packaging in relevant containers to its user manual. 11. ENGLISH 23 Energy efficiency per gas burner (EE gas burner) Left rear -


