
Specification Sheet
Page 1
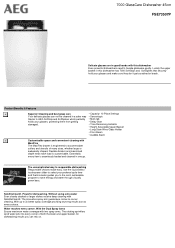
7000 GlassCare Dishwasher 45cm FSE73507P Delicate glasses are in this dishwasher Even powerful dishwashers need to handle glassware gently. Luckily the upper basket in good hands with two spray arms. The rotating sprinklers send water jets into every corner of many sizes, whether large or awkwardly shaped. Water reaches every corner. Powerful dishwashing. With up to -corner cleaning. With the Dual Spray Arms Ensure maximum water coverage with this dishwasher has 7000...
7000 GlassCare Dishwasher 45cm FSE73507P Delicate glasses are in this dishwasher Even powerful dishwashers need to handle glassware gently. Luckily the upper basket in good hands with two spray arms. The rotating sprinklers send water jets into every corner of many sizes, whether large or awkwardly shaped. Water reaches every corner. Powerful dishwashing. With up to -corner cleaning. With the Dual Spray Arms Ensure maximum water coverage with this dishwasher has 7000...
Specification Sheet
Page 2
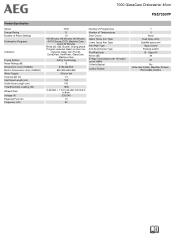
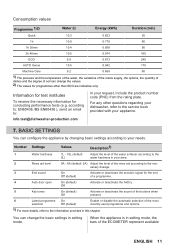
7000 GlassCare Dishwasher 45cm FSE73507P Product Specification Series Energy Rating Number of Place Settings Dishwasher Programs Indicators Drying System Noise Rating (dB) Dimensions (mm) (HxWxD) Built-in Dimensions (mm) (HxWxD) Water Supply Cord Length (m) Inlet Hose Length (cm) Outlet Hose Length (cm) Total Electricity Loading (W) Wheels/Feet Voltage (V) Required Fuse (A) Frequency (Hz) 7000 D 10 160 Minutes, 60 Minutes, 90 Minutes, AUTO Sense, ECO, Machine Care, Quick 30 Minutes Rinse aid, Salt, Buzzer, Drying phase, Program selected, Beam on floor two coloured, Delay start 1h-24h...
7000 GlassCare Dishwasher 45cm FSE73507P Product Specification Series Energy Rating Number of Place Settings Dishwasher Programs Indicators Drying System Noise Rating (dB) Dimensions (mm) (HxWxD) Built-in Dimensions (mm) (HxWxD) Water Supply Cord Length (m) Inlet Hose Length (cm) Outlet Hose Length (cm) Total Electricity Loading (W) Wheels/Feet Voltage (V) Required Fuse (A) Frequency (Hz) 7000 D 10 160 Minutes, 60 Minutes, 90 Minutes, AUTO Sense, ECO, Machine Care, Quick 30 Minutes Rinse aid, Salt, Buzzer, Drying phase, Program selected, Beam on floor two coloured, Delay start 1h-24h...
User Manual
Page 2
... make life simpler - CONTROL PANEL 8 6. features you might not find on the rating plate. CONTENTS 1. Warning / Caution-Safety information General information and tips Environmental information Subject to : Get usage advice, brochures, trouble shooter, service and repair information: www.aeg.com/support Register your appliance: www.aeg.com/shop CUSTOMER CARE AND SERVICE Always use of the appliance, carefully read the supplied instructions. SAFETY INSTRUCTIONS 4 3. BASIC SETTINGS 11 8. FOR PERFECT...
... make life simpler - CONTROL PANEL 8 6. features you might not find on the rating plate. CONTENTS 1. Warning / Caution-Safety information General information and tips Environmental information Subject to : Get usage advice, brochures, trouble shooter, service and repair information: www.aeg.com/support Register your appliance: www.aeg.com/shop CUSTOMER CARE AND SERVICE Always use of the appliance, carefully read the supplied instructions. SAFETY INSTRUCTIONS 4 3. BASIC SETTINGS 11 8. FOR PERFECT...
User Manual
Page 3
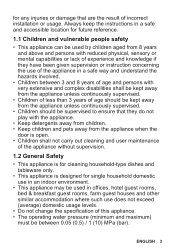
... where such use does not exceed (average) domestic usage levels. • Do not change the specification of incorrect installation or usage. Always keep the instructions in a safe and accessible location for future reference. 1.1 Children and vulnerable people safety • This appliance can be used by children ...be kept away from the appliance when the door is open. • Children shall not carry out cleaning and user maintenance of the appliance without supervision. 1.2 General Safety • This appliance is for cleaning household-type dishes and tableware only. • This appliance ...
... where such use does not exceed (average) domestic usage levels. • Do not change the specification of incorrect installation or usage. Always keep the instructions in a safe and accessible location for future reference. 1.1 Children and vulnerable people safety • This appliance can be used by children ...be kept away from the appliance when the door is open. • Children shall not carry out cleaning and user maintenance of the appliance without supervision. 1.2 General Safety • This appliance is for cleaning household-type dishes and tableware only. • This appliance ...
User Manual
Page 4
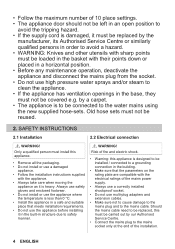
.... SAFETY INSTRUCTIONS 2.1 Installation 2.2 Electrical connection WARNING! • Follow the maximum number of 10 place settings. • The appliance door should not be left in an open position to avoid the tripping hazard. • If the supply cord is damaged, it in the built-in structure due to safety manner. WARNING! Should the mains cable need to be replaced, this appliance. • Remove all the...
.... SAFETY INSTRUCTIONS 2.1 Installation 2.2 Electrical connection WARNING! • Follow the maximum number of 10 place settings. • The appliance door should not be left in an open position to avoid the tripping hazard. • If the supply cord is damaged, it in the built-in structure due to safety manner. WARNING! Should the mains cable need to be replaced, this appliance. • Remove all the...
User Manual
Page 5
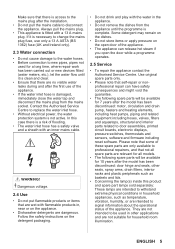
... appliance is a risk of flooding. • The water inlet hose has a safety valve and a sheath with a 13 A mains plug. Some detergent may remain on the dishes. • Do not store items or apply pressure on the open the door while a programme operates. 2.5 Service • To repair the appliance contact the Authorised Service Centre. Use original spare parts only. • Please note that there is not...
... appliance is a risk of flooding. • The water inlet hose has a safety valve and a sheath with a 13 A mains plug. Some detergent may remain on the dishes. • Do not store items or apply pressure on the open the door while a programme operates. 2.5 Service • To repair the appliance contact the Authorised Service Centre. Use original spare parts only. • Please note that there is not...
User Manual
Page 8
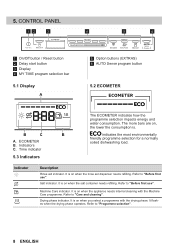
... Refer to "Care and cleaning". Machine Care indicator. Refer to "Before first use ". Indicator Description Rinse aid indicator. It is on , the lower the consumption is on when the appliance needs internal cleaning with the drying phase. CONTROL PANEL 12 3 4 5 6 1 On/Off button / Reset button 2 Delay start button 3 Display 4 MY TIME program selection bar 5.1 Display A 5 Option buttons (EXTRAS) 6 AUTO Sense program button 5.2 ECOMETER B C B A. Time indicator 5.3 Indicators The ECOMETER indicates how the programme selection impacts energy and water consumption. The...
... Refer to "Care and cleaning". Machine Care indicator. Refer to "Before first use ". Indicator Description Rinse aid indicator. It is on , the lower the consumption is on when the appliance needs internal cleaning with the drying phase. CONTROL PANEL 12 3 4 5 6 1 On/Off button / Reset button 2 Delay start button 3 Display 4 MY TIME program selection bar 5.1 Display A 5 Option buttons (EXTRAS) 6 AUTO Sense program button 5.2 ECOMETER B C B A. Time indicator 5.3 Indicators The ECOMETER indicates how the programme selection impacts energy and water consumption. The...
User Manual
Page 9
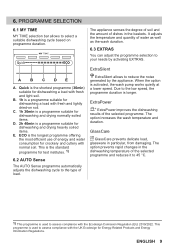
... suitable for dishwashing and drying normally soiled items. D. 2h 40min is used to the low speed, the programme duration is a programme suitable for dishwashing a load with fresh and lightly dried-on programme duration. The option prevents rapid changes in the dishwashing temperature of energy and water consumption for dishwashing and drying heavily soiled items. E. The option increases the wash temperature and duration. It adjusts the temperature...
... suitable for dishwashing and drying normally soiled items. D. 2h 40min is used to the low speed, the programme duration is a programme suitable for dishwashing a load with fresh and lightly dried-on programme duration. The option prevents rapid changes in the dishwashing temperature of energy and water consumption for dishwashing and drying heavily soiled items. E. The option increases the wash temperature and duration. It adjusts the temperature...
User Manual
Page 11
... dishwasher, refer to the service book provided with your request, include the product number code (PNC) from the rating plate. BASIC SETTINGS You can change the basic settings in your area. 2 Rinse aid level 0A - 8A (default: 5A) Adjust the level of the rinse aid according to the nec‐ essary dosage. 3 End sound On Activate or deactivate the acoustic signal for the end Off (default) of a programme. 4 Auto door open...
... dishwasher, refer to the service book provided with your request, include the product number code (PNC) from the rating plate. BASIC SETTINGS You can change the basic settings in your area. 2 Rinse aid level 0A - 8A (default: 5A) Adjust the level of the rinse aid according to the nec‐ essary dosage. 3 End sound On Activate or deactivate the acoustic signal for the end Off (default) of a programme. 4 Auto door open...
User Manual
Page 15
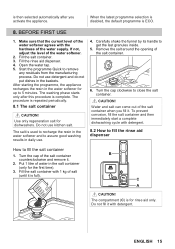
... the rinse aid dispenser. 4. After starting the programme, the appliance recharges the resin in the baskets. The compartment (C) is for dishwashers. Do not use detergent and do not put dishes in the water softener for the first time). 3. CAUTION! Remove the salt around the opening of the water softener. 2. ENGLISH 15 Fill the salt container. 3. Open the water tap. 5. Water and salt can come out of the water supply...
... the rinse aid dispenser. 4. After starting the programme, the appliance recharges the resin in the baskets. The compartment (C) is for dishwashers. Do not use detergent and do not put dishes in the water softener for the first time). 3. CAUTION! Remove the salt around the opening of the water softener. 2. ENGLISH 15 Fill the salt container. 3. Open the water tap. 5. Water and salt can come out of the water supply...
User Manual
Page 16
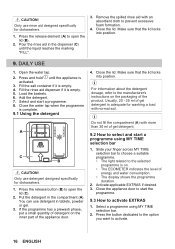
... baskets. 6. Make sure that the lid locks into position. Put the detergent in the dispenser (C) until the appliance is empty. 4. Press the release element (A) to the selected programme is adequate for washing a load with normal soil. Close the lid. Open the water tap. 2. If the programme has a prewash phase, put a small quantity of detergent on the packaging of the appliance door. Remove the spilled rinse aid...
... baskets. 6. Make sure that the lid locks into position. Put the detergent in the dispenser (C) until the appliance is empty. 4. Press the release element (A) to the selected programme is adequate for washing a load with normal soil. Close the lid. Open the water tap. 2. If the programme has a prewash phase, put a small quantity of detergent on the packaging of the appliance door. Remove the spilled rinse aid...
User Manual
Page 17
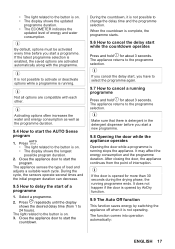
.... 2. After closing the door, the appliance continues from 1 to start while the countdown operates Press and hold for about 3 seconds. The appliance returns to the button is on . • The display shows the updated programme duration. • The ECOMETER indicates the updated level of load and adjusts a suitable wash cycle. • The light related to the programme selection. During the cycle, the sensors operate several times and the...
.... 2. After closing the door, the appliance continues from 1 to start while the countdown operates Press and hold for about 3 seconds. The appliance returns to the button is on . • The display shows the updated programme duration. • The ECOMETER indicates the updated level of load and adjusts a suitable wash cycle. • The light related to the programme selection. During the cycle, the sensors operate several times and the...
User Manual
Page 18
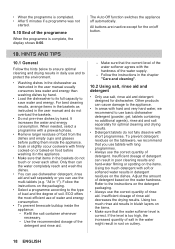
... off button. 10. HINTS AND TIPS 10.1 General Follow the hints below to ensure optimal cleaning and drying results in the user manual usually consumes less water and energy than washing dishes by hand. For best cleaning results, arrange items in the baskets as instructed in daily use the multi-tablets (e.g. ''All in 1''). Make sure that the water softener level is correct. Adjust the amount of detergent...
... off button. 10. HINTS AND TIPS 10.1 General Follow the hints below to ensure optimal cleaning and drying results in the user manual usually consumes less water and energy than washing dishes by hand. For best cleaning results, arrange items in the baskets as instructed in daily use the multi-tablets (e.g. ''All in 1''). Make sure that the water softener level is correct. Adjust the amount of detergent...
User Manual
Page 19
... disconnect the mains plug from the upper basket. Adjust the released quantity of rinse aid. 10.4 Before starting a programme Before you start the selected programme, make sure that: • The filters are clean and correctly installed. • The cap of the salt container is tight. • The spray arms are full. 3. Hot items can still remain on the inside surfaces of detergent is completed, water can be easily...
... disconnect the mains plug from the upper basket. Adjust the released quantity of rinse aid. 10.4 Before starting a programme Before you start the selected programme, make sure that: • The filters are clean and correctly installed. • The cap of the salt container is tight. • The spray arms are full. 3. Hot items can still remain on the inside surfaces of detergent is completed, water can be easily...
User Manual
Page 20
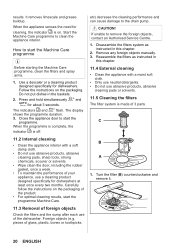
... indicator is made of 3 parts. C B A 1. Turn the filter (B) counterclockwise and remove it. 20 ENGLISH Use a descaler or a cleaning product designed specifically for about 3 seconds. The indicators and flash. Foreign objects (e.g. Remove any foreign objects manually. 3. results. When the appliance senses the need for dishwashers at least once every two months. Start the Machine Care programme to start the Machine Care programme Before starting the Machine Care programme, clean the filters and spray arms. 1. Carefully follow the instructions...
... indicator is made of 3 parts. C B A 1. Turn the filter (B) counterclockwise and remove it. 20 ENGLISH Use a descaler or a cleaning product designed specifically for about 3 seconds. The indicators and flash. Foreign objects (e.g. Remove any foreign objects manually. 3. results. When the appliance senses the need for dishwashers at least once every two months. Start the Machine Care programme to start the Machine Care programme Before starting the Machine Care programme, clean the filters and spray arms. 1. Carefully follow the instructions...
User Manual
Page 23
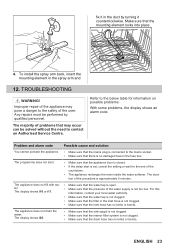
... spray arm back, insert the mounting element in the inlet hose is not clogged. • Make sure that the inlet hose has no kinks or bends. Refer to the mains socket. • Make sure that the drain hose has no damaged fuse in the fuse box. Make sure that the water tap is set, cancel the setting or wait for information on possible problems. With some problems, the display...
... spray arm back, insert the mounting element in the inlet hose is not clogged. • Make sure that the inlet hose has no kinks or bends. Refer to the mains socket. • Make sure that the drain hose has no damaged fuse in the fuse box. Make sure that the water tap is set, cancel the setting or wait for information on possible problems. With some problems, the display...
User Manual
Page 24
...; tion of the wash pump or the • drain pump. The remaining time in the display in the lection". Small leak from the baskets. You can deactivate the function. Refer to the installation instructions. tion sensor. • Switch the appliance off and on . The display shows i41 - i59 or i5A - The programme lasts too long. • If the delay start option is normal. consumption values...
...; tion of the wash pump or the • drain pump. The remaining time in the display in the lection". Small leak from the baskets. You can deactivate the function. Refer to the installation instructions. tion sensor. • Switch the appliance off and on . The display shows i41 - i59 or i5A - The programme lasts too long. • If the delay start option is normal. consumption values...
User Manual
Page 25
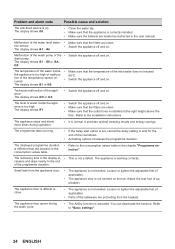
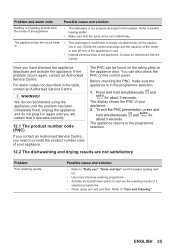
... the control panel. The appliance trips the circuit-beak‐ • The amperage is insufficient to improve the washing results of a selected programme. • Clean spray arm jets and filter. ces in the table, contact an Authorised Service Centre. The appliance returns to provide the product number code of your appliance. 2. Once you need to the programme selection. 12.2 The dishwashing and drying results...
... the control panel. The appliance trips the circuit-beak‐ • The amperage is insufficient to improve the washing results of a selected programme. • Clean spray arm jets and filter. ces in the table, contact an Authorised Service Centre. The appliance returns to provide the product number code of your appliance. 2. Once you need to the programme selection. 12.2 The dishwashing and drying results...
User Manual
Page 26
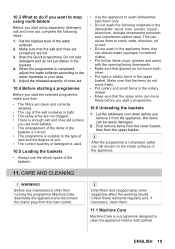
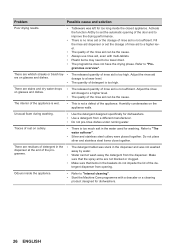
.... Adjust the rinse aid dosage to a higher level. • The quality of the rinse aid can be the cause. • Always use rinse aid, even with a descaler or a cleaning product designed for dishwashers. • Use a detergent from a different manufacturer. • Do not pre-rinse dishes under running water. Unusual foam during washing. • Use the detergent designed specifically for dishwashers. 26 ENGLISH gramme. • Water cannot wash away the detergent from opening of the rinse aid can be towel dried...
.... Adjust the rinse aid dosage to a higher level. • The quality of the rinse aid can be the cause. • Always use rinse aid, even with a descaler or a cleaning product designed for dishwashers. • Use a detergent from a different manufacturer. • Do not pre-rinse dishes under running water. Unusual foam during washing. • Use the detergent designed specifically for dishwashers. 26 ENGLISH gramme. • Water cannot wash away the detergent from opening of the rinse aid can be towel dried...

User Manual
Page 27
... functional tablets are washed in the upper basket. • Activate the GlassCare option to ensure special care for glassware and delicate items. Refer to "Before first use", "Daily use the hot water supply to de‐ crease energy consumption. 13.1 Link to "The water softener". • Use salt and set regeneration of energy (e.g. Keep the energy label for dishwashers. • If limescale deposits persist, clean the appliance...
... functional tablets are washed in the upper basket. • Activate the GlassCare option to ensure special care for glassware and delicate items. Refer to "Before first use", "Daily use the hot water supply to de‐ crease energy consumption. 13.1 Link to "The water softener". • Use salt and set regeneration of energy (e.g. Keep the energy label for dishwashers. • If limescale deposits persist, clean the appliance...


