Installation Guide
Page 3
... Tools and equipment required 30 Installation Overview 30 Installation Instructions 32 Replacing the Battery 37 Appendix: Technical Support 40 Sales and ordering information 40 Feedback on this Package 1 System Requirements 2 9650SE RAID Controller Card Models 4 Cables 7 Safety Information 10 Chapter 2. Connect ... Controller Installation 28 Step 6. Install the Controller in the Computer 18 Step 3. Installing Your 3ware RAID Controller 15 Tools You Need 15 Before You Start 15 Step 1 (9650SE-2LP). Configure Your RAID Arrays 28 Chapter 3. Table of this manual 40 www...
... Tools and equipment required 30 Installation Overview 30 Installation Instructions 32 Replacing the Battery 37 Appendix: Technical Support 40 Sales and ordering information 40 Feedback on this Package 1 System Requirements 2 9650SE RAID Controller Card Models 4 Cables 7 Safety Information 10 Chapter 2. Connect ... Controller Installation 28 Step 6. Install the Controller in the Computer 18 Step 3. Installing Your 3ware RAID Controller 15 Tools You Need 15 Before You Start 15 Step 1 (9650SE-2LP). Configure Your RAID Arrays 28 Chapter 3. Table of this manual 40 www...
Installation Guide
Page 4
... Manager). Chapter Description 1 Getting Started Overview of the 3ware RAID controller and important safety factors to keep in mind during installation 2 Installing Your 3ware How to install your 3ware RAID controller RAID Controller 3 Installing the Battery How to install it. About this website: http://www.3ware.com/KB iv 3ware 9650SE Serial ATA RAID Controller Installation Guide
... Manager). Chapter Description 1 Getting Started Overview of the 3ware RAID controller and important safety factors to keep in mind during installation 2 Installing Your 3ware How to install your 3ware RAID controller RAID Controller 3 Installing the Battery How to install it. About this website: http://www.3ware.com/KB iv 3ware 9650SE Serial ATA RAID Controller Installation Guide
Installation Guide
Page 5
... and RAID 6 disk accesses to maximize application performance under heavy loads „ StorSave Battery Backup Unit (BBU) with write journaling to optimize data protection and performance (BBU must be purchased separately, and is not supported on 9650SE-2LP.) „ RAID levels 0, 1, 5, 6, 10, 50, Single Disk,...8 or more ports) „ PCI Express® x1, x4, or x8 connectivity Contents of this Package If you purchased a full retail kit, the following items are included: „ This document, 3ware 9650SE Serial ATA RAID Controller Installation Guide „ 3ware CD-ROM with driver, software, ...
... and RAID 6 disk accesses to maximize application performance under heavy loads „ StorSave Battery Backup Unit (BBU) with write journaling to optimize data protection and performance (BBU must be purchased separately, and is not supported on 9650SE-2LP.) „ RAID levels 0, 1, 5, 6, 10, 50, Single Disk,...8 or more ports) „ PCI Express® x1, x4, or x8 connectivity Contents of this Package If you purchased a full retail kit, the following items are included: „ This document, 3ware 9650SE Serial ATA RAID Controller Installation Guide „ 3ware CD-ROM with driver, software, ...
Installation Guide
Page 9
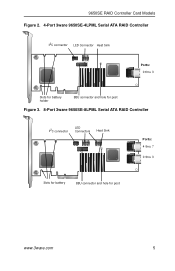
9650SE RAID Controller Card Models Figure 2. 4-Port 3ware 9650SE-4LPML Serial ATA RAID Controller I2C connector LED Connector Heat Sink Ports: 0 thru 3 Slots for battery holder BBU connector and hole for post Figure 3. 8-Port 3ware 9650SE-8LPML Serial ATA RAID Controller I2C connector LED Connectors Heat Sink Ports: 4 thru 7 0 thru 3 Slots for battery BBU connector and hole for post www.3ware.com 5
9650SE RAID Controller Card Models Figure 2. 4-Port 3ware 9650SE-4LPML Serial ATA RAID Controller I2C connector LED Connector Heat Sink Ports: 0 thru 3 Slots for battery holder BBU connector and hole for post Figure 3. 8-Port 3ware 9650SE-8LPML Serial ATA RAID Controller I2C connector LED Connectors Heat Sink Ports: 4 thru 7 0 thru 3 Slots for battery BBU connector and hole for post www.3ware.com 5
Installation Guide
Page 10
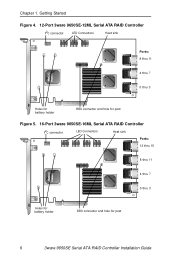
Chapter 1. Getting Started Figure 4. 12-Port 3ware 9650SE-12ML Serial ATA RAID Controller I2C connector LED Connectors Heat sink Ports: 8 thru 11 4 thru 7 0 thru 3 Holes for battery holder BBU connector and hole for post Figure 5. 16-Port 3ware 9650SE-16ML Serial ATA RAID Controller I2C connector LED Connectors Heat sink Ports: 12 thru 15 8 thru 11 4 thru 7 0 thru 3 Holes for battery holder BBU connector and hole for post 6 3ware 9650SE Serial ATA RAID Controller Installation Guide
Chapter 1. Getting Started Figure 4. 12-Port 3ware 9650SE-12ML Serial ATA RAID Controller I2C connector LED Connectors Heat sink Ports: 8 thru 11 4 thru 7 0 thru 3 Holes for battery holder BBU connector and hole for post Figure 5. 16-Port 3ware 9650SE-16ML Serial ATA RAID Controller I2C connector LED Connectors Heat sink Ports: 12 thru 15 8 thru 11 4 thru 7 0 thru 3 Holes for battery holder BBU connector and hole for post 6 3ware 9650SE Serial ATA RAID Controller Installation Guide
Installation Guide
Page 11
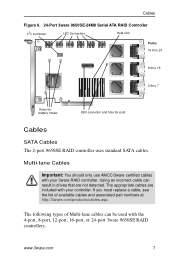
... an incorrect cable can be used with your 3ware RAID controller. Cables Figure 6. 24-Port 3ware 9650SE-24M8 Serial ATA RAID Controller I2C connector LED Connectors Heat sink Ports: 16 thru 23 8 thru 15 0 thru 7 Holes for battery holder BBU connector and hole for post Cables ...SATA Cables The 2-port 9650SE RAID controller uses standard SATA cables...
... an incorrect cable can be used with your 3ware RAID controller. Cables Figure 6. 24-Port 3ware 9650SE-24M8 Serial ATA RAID Controller I2C connector LED Connectors Heat sink Ports: 16 thru 23 8 thru 15 0 thru 7 Holes for battery holder BBU connector and hole for post Cables ...SATA Cables The 2-port 9650SE RAID controller uses standard SATA cables...
Installation Guide
Page 19
...: „ An ESD grounding strap or mat „ A Phillips screwdriver Before You Start 3ware 9650SE RAID controllers can be installed in a standard enclosure or in an enclosure with your drives, you have a Battery Backup Unit (BBU), install it on page 10 in Chapter 1. 2 If you may need... to remove a jumper or run a software utility to change the transfer rate to 1.5Gbps. Installing the Battery Backup Unit". 3 If appropriate, set to 3.0Gbps,. Please check with a backplane. 1 Be sure to see "Chapter 3. For details, see whether this ...
...: „ An ESD grounding strap or mat „ A Phillips screwdriver Before You Start 3ware 9650SE RAID controllers can be installed in a standard enclosure or in an enclosure with your drives, you have a Battery Backup Unit (BBU), install it on page 10 in Chapter 1. 2 If you may need... to remove a jumper or run a software utility to change the transfer rate to 1.5Gbps. Installing the Battery Backup Unit". 3 If appropriate, set to 3.0Gbps,. Please check with a backplane. 1 Be sure to see "Chapter 3. For details, see whether this ...
Installation Guide
Page 33
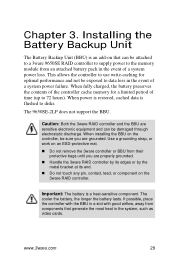
...system, such as video cards. When fully charged, the battery preserves the contents of the controller cache memory for optimal performance and not be attached to a 3ware 9650SE RAID controller to supply power to the memory module from an attached battery pack in the event of a system power loss. ...Installing the Battery Backup Unit The Battery Backup Unit (BBU) is an add-on that generate the ...
...system, such as video cards. When fully charged, the battery preserves the contents of the controller cache memory for optimal performance and not be attached to a 3ware 9650SE RAID controller to supply power to the memory module from an attached battery pack in the event of a system power loss. ...Installing the Battery Backup Unit The Battery Backup Unit (BBU) is an add-on that generate the ...
Installation Guide
Page 34
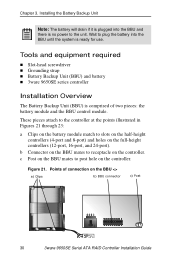
.... Chapter 3. Tools and equipment required „ Slot-head screwdriver „ Grounding strap „ Battery Backup Unit (BBU) and battery „ 3ware 9650SE series controller Installation Overview The Battery Backup Unit (BBU) is comprised of connection on the controller. Wait to plug the battery into the BBU and there is ready for use. c Post on the BBU...
.... Chapter 3. Tools and equipment required „ Slot-head screwdriver „ Grounding strap „ Battery Backup Unit (BBU) and battery „ 3ware 9650SE series controller Installation Overview The Battery Backup Unit (BBU) is comprised of connection on the controller. Wait to plug the battery into the BBU and there is ready for use. c Post on the BBU...
Installation Guide
Page 36
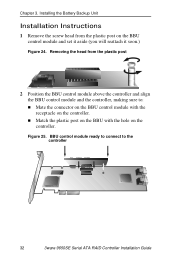
Installing the Battery Backup Unit Installation Instructions 1 Remove the screw head from the plastic post 2 Position the BBU control module above the controller and align the BBU control module and the controller, making sure to the controller 32 3ware 9650SE Serial ATA RAID Controller Installation Guide Figure 25. BBU control module ready to connect...
Installing the Battery Backup Unit Installation Instructions 1 Remove the screw head from the plastic post 2 Position the BBU control module above the controller and align the BBU control module and the controller, making sure to the controller 32 3ware 9650SE Serial ATA RAID Controller Installation Guide Figure 25. BBU control module ready to connect...
Installation Guide
Page 38
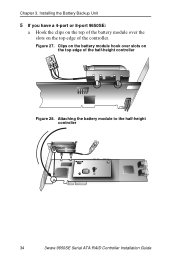
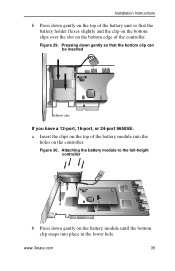
Clips on the battery module hook over the slots on the top edge of the controller. Attaching the battery module to the half-height controller 34 3ware 9650SE Serial ATA RAID Controller Installation Guide Chapter 3. Figure 27. Installing the Battery Backup Unit 5 If you have a 4-port or 8-port 9650SE: a Hook the clips on the top of the battery module over slots on the top edge of the half-height controller Figure 28.
Clips on the battery module hook over the slots on the top edge of the controller. Attaching the battery module to the half-height controller 34 3ware 9650SE Serial ATA RAID Controller Installation Guide Chapter 3. Figure 27. Installing the Battery Backup Unit 5 If you have a 4-port or 8-port 9650SE: a Hook the clips on the top of the battery module over slots on the top edge of the half-height controller Figure 28.
Installation Guide
Page 39
www.3ware.com 35 Installation Instructions b Press down gently on the top of the battery unit so that the bottom clip can be inserted Bottom clip If you have a 12-port, 16-port, or 24-port 9650SE: a Insert the clips on the top of the controller. Attaching the battery module to the full-height ...controller b Press down gently so that the battery holder flexes slightly and the clip on the bottom slips over the slot on...
www.3ware.com 35 Installation Instructions b Press down gently on the top of the battery unit so that the bottom clip can be inserted Bottom clip If you have a 12-port, 16-port, or 24-port 9650SE: a Insert the clips on the top of the controller. Attaching the battery module to the full-height ...controller b Press down gently so that the battery holder flexes slightly and the clip on the bottom slips over the slot on...

Installation Guide
Page 40
Installing the Battery Backup Unit 3 Insert the battery power connector into the power receptacle on the BBU. If the system will drain if it is plugged in your system. 36 3ware 9650SE Serial ATA RAID Controller Installation Guide Battery power connector inserted in power receptacle The controller is now ready to the unit. Chapter 3. Note: The battery will not be used right away, wait to do this step until the system is no power to install in and there is ready for use. Figure 31.
Installing the Battery Backup Unit 3 Insert the battery power connector into the power receptacle on the BBU. If the system will drain if it is plugged in your system. 36 3ware 9650SE Serial ATA RAID Controller Installation Guide Battery power connector inserted in power receptacle The controller is now ready to the unit. Chapter 3. Note: The battery will not be used right away, wait to do this step until the system is no power to install in and there is ready for use. Figure 31.
Installation Guide
Page 41
...current status of explosion if the battery is replaced by an incorrect type. For proper battery disposal resources, contact RBRC, the Rechargeable Battery Recycling Corporation (www.rbrc.com). Pour obtenir un module de batterie de rechange, entrez en contact avec AMCC. www.3ware.com 37 For details, see instructions... one to two years depending on the bottom of the battery module to free the clip on usage. Caution: There is powered down, that you are grounded, and follow all appropriate safety procedures. 2 Remove the 3ware RAID controller from your system. 3 Press down on the...
...current status of explosion if the battery is replaced by an incorrect type. For proper battery disposal resources, contact RBRC, the Rechargeable Battery Recycling Corporation (www.rbrc.com). Pour obtenir un module de batterie de rechange, entrez en contact avec AMCC. www.3ware.com 37 For details, see instructions... one to two years depending on the bottom of the battery module to free the clip on usage. Caution: There is powered down, that you are grounded, and follow all appropriate safety procedures. 2 Remove the 3ware RAID controller from your system. 3 Press down on the...
Installation Guide
Page 42
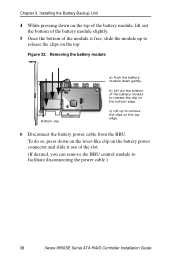
... free, slide the module up to facilitate disconnecting the power cable.) 38 3ware 9650SE Serial ATA RAID Controller Installation Guide Removing the battery module Bottom clip a) Push the battery module down on the top of the battery module, lift out the bottom of the battery module slightly. 5 Once the bottom of the slot. (If desired, you...
... free, slide the module up to facilitate disconnecting the power cable.) 38 3ware 9650SE Serial ATA RAID Controller Installation Guide Removing the battery module Bottom clip a) Push the battery module down on the top of the battery module, lift out the bottom of the battery module slightly. 5 Once the bottom of the slot. (If desired, you...
Installation Guide
Page 43
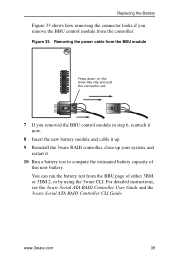
..., and restart it. 10 Run a battery test to compute the estimated battery capacity of either 3BM or 3DM 2, or by using the 3ware CLI. www.3ware.com 39 You can run the battery test from the controller. Figure 33. For detailed instructions, see the 3ware Serial ATA RAID Controller User Guide and... the 3ware Serial ATA RAID Controller CLI Guide. Removing the power cable...
..., and restart it. 10 Run a battery test to compute the estimated battery capacity of either 3BM or 3DM 2, or by using the 3ware CLI. www.3ware.com 39 You can run the battery test from the controller. Figure 33. For detailed instructions, see the 3ware Serial ATA RAID Controller User Guide and... the 3ware Serial ATA RAID Controller CLI Guide. Removing the power cable...
