Installation Guide
Page 4
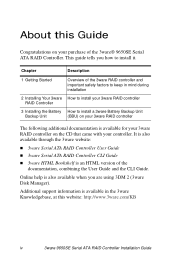
... Backup Unit (BBU) on your 3ware RAID controller The following additional documentation is available in the 3ware Knowledgebase, at this Guide Congratulations on the CD that came with your purchase of the documentation, combining the User Guide and the CLI Guide. Online help is an HTML version of the 3ware® 9650SE Serial ATA RAID...
... Backup Unit (BBU) on your 3ware RAID controller The following additional documentation is available in the 3ware Knowledgebase, at this Guide Congratulations on the CD that came with your purchase of the documentation, combining the User Guide and the CLI Guide. Online help is an HTML version of the 3ware® 9650SE Serial ATA RAID...
Installation Guide
Page 5
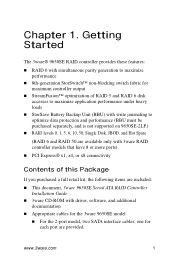
...protection and performance (BBU must be purchased separately, and is not supported on 9650SE-2LP.) „ RAID levels 0, 1, 5, 6, 10, 50, Single Disk, JBOD, and Hot Spare (RAID 6 and RAID 50 are available only with 3ware RAID controller models that have 8 or more ports) „ PCI Express® x1..., x4, or x8 connectivity Contents of this Package If you purchased a full retail kit, the following items are included: „ This document, 3ware 9650SE Serial ATA RAID Controller Installation Guide „ 3ware CD-ROM with driver, software, and ...
...protection and performance (BBU must be purchased separately, and is not supported on 9650SE-2LP.) „ RAID levels 0, 1, 5, 6, 10, 50, Single Disk, JBOD, and Hot Spare (RAID 6 and RAID 50 are available only with 3ware RAID controller models that have 8 or more ports) „ PCI Express® x1..., x4, or x8 connectivity Contents of this Package If you purchased a full retail kit, the following items are included: „ This document, 3ware 9650SE Serial ATA RAID Controller Installation Guide „ 3ware CD-ROM with driver, software, and ...
Installation Guide
Page 9
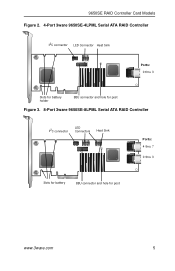
9650SE RAID Controller Card Models Figure 2. 4-Port 3ware 9650SE-4LPML Serial ATA RAID Controller I2C connector LED Connector Heat Sink Ports: 0 thru 3 Slots for battery holder BBU connector and hole for post Figure 3. 8-Port 3ware 9650SE-8LPML Serial ATA RAID Controller I2C connector LED Connectors Heat Sink Ports: 4 thru 7 0 thru 3 Slots for battery BBU connector and hole for post www.3ware.com 5
9650SE RAID Controller Card Models Figure 2. 4-Port 3ware 9650SE-4LPML Serial ATA RAID Controller I2C connector LED Connector Heat Sink Ports: 0 thru 3 Slots for battery holder BBU connector and hole for post Figure 3. 8-Port 3ware 9650SE-8LPML Serial ATA RAID Controller I2C connector LED Connectors Heat Sink Ports: 4 thru 7 0 thru 3 Slots for battery BBU connector and hole for post www.3ware.com 5
Installation Guide
Page 10
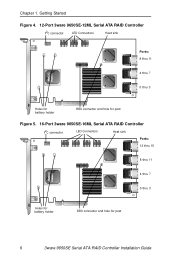
Getting Started Figure 4. 12-Port 3ware 9650SE-12ML Serial ATA RAID Controller I2C connector LED Connectors Heat sink Ports: 8 thru 11 4 thru 7 0 thru 3 Holes for battery holder BBU connector and hole for post Figure 5. 16-Port 3ware 9650SE-16ML Serial ATA RAID Controller I2C connector LED Connectors Heat sink Ports: 12 thru 15 8 thru 11 4 thru 7 0 thru 3 Holes for battery holder BBU connector and hole for post 6 3ware 9650SE Serial ATA RAID Controller Installation Guide Chapter 1.
Getting Started Figure 4. 12-Port 3ware 9650SE-12ML Serial ATA RAID Controller I2C connector LED Connectors Heat sink Ports: 8 thru 11 4 thru 7 0 thru 3 Holes for battery holder BBU connector and hole for post Figure 5. 16-Port 3ware 9650SE-16ML Serial ATA RAID Controller I2C connector LED Connectors Heat sink Ports: 12 thru 15 8 thru 11 4 thru 7 0 thru 3 Holes for battery holder BBU connector and hole for post 6 3ware 9650SE Serial ATA RAID Controller Installation Guide Chapter 1.
Installation Guide
Page 11
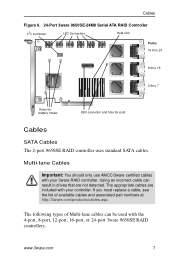
...cables and associated part numbers at http://3ware.com/products/cables.asp. Cables Figure 6. 24-Port 3ware 9650SE-24M8 Serial ATA RAID Controller I2C connector LED Connectors Heat sink Ports: 16 thru 23 8 thru 15 0 thru 7 Holes for battery holder BBU connector and hole for post Cables SATA... Cables The 2-port 9650SE RAID controller uses standard SATA cables. ...
...cables and associated part numbers at http://3ware.com/products/cables.asp. Cables Figure 6. 24-Port 3ware 9650SE-24M8 Serial ATA RAID Controller I2C connector LED Connectors Heat sink Ports: 16 thru 23 8 thru 15 0 thru 7 Holes for battery holder BBU connector and hole for post Cables SATA... Cables The 2-port 9650SE RAID controller uses standard SATA cables. ...
Installation Guide
Page 19
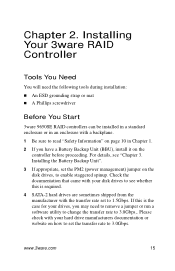
... the documentation that came with your disk drives to see "Chapter 3. Please check with your drives, you have a Battery Backup Unit (BBU), install it on the controller before proceeding. For details, see whether this is required. 4 SATA-2 hard drives are sometimes shipped from the... If you may need the following tools during installation: „ An ESD grounding strap or mat „ A Phillips screwdriver Before You Start 3ware 9650SE RAID controllers can be installed in a standard enclosure or in an enclosure with the transfer rate set the transfer rate to 1.5Gbps. Installing the...
... the documentation that came with your disk drives to see "Chapter 3. Please check with your drives, you have a Battery Backup Unit (BBU), install it on the controller before proceeding. For details, see whether this is required. 4 SATA-2 hard drives are sometimes shipped from the... If you may need the following tools during installation: „ An ESD grounding strap or mat „ A Phillips screwdriver Before You Start 3ware 9650SE RAID controllers can be installed in a standard enclosure or in an enclosure with the transfer rate set the transfer rate to 1.5Gbps. Installing the...
Installation Guide
Page 33
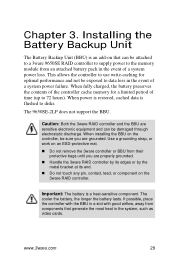
...optimal performance and not be damaged through electrostatic discharge. When installing the BBU on the controller, be attached to a 3ware 9650SE RAID controller to supply power to data loss in the system, such as video cards. www.3ware.com 29 When power is restored, cached data is flushed to 72 ... If possible, place the controller with the BBU in the event of a system power failure. The 9650SE-2LP does not support the BBU. Important: The battery is an add-on an ESD-protective mat. „ Do not remove the 3ware controller or BBU from components that can be sure you are...
...optimal performance and not be damaged through electrostatic discharge. When installing the BBU on the controller, be attached to a 3ware 9650SE RAID controller to supply power to data loss in the system, such as video cards. www.3ware.com 29 When power is restored, cached data is flushed to 72 ... If possible, place the controller with the BBU in the event of a system power failure. The 9650SE-2LP does not support the BBU. Important: The battery is an add-on an ESD-protective mat. „ Do not remove the 3ware controller or BBU from components that can be sure you are...
Installation Guide
Page 34
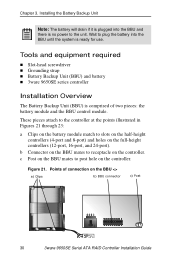
... on the battery module match to slots on the half-height controllers (4-port and 8-port) and holes on the BBU a) Clips b) BBU connector c) Post 30 3ware 9650SE Serial ATA RAID Controller Installation Guide Tools and equipment required „ Slot-head screwdriver „ Grounding strap „... Battery Backup Unit (BBU) and battery „ 3ware 9650SE series controller Installation Overview The Battery Backup Unit (BBU) is ready for use. Figure 21. c Post on the BBU mates to plug the battery into the BBU and there is no power to receptacle on ...
... on the battery module match to slots on the half-height controllers (4-port and 8-port) and holes on the BBU a) Clips b) BBU connector c) Post 30 3ware 9650SE Serial ATA RAID Controller Installation Guide Tools and equipment required „ Slot-head screwdriver „ Grounding strap „... Battery Backup Unit (BBU) and battery „ 3ware 9650SE series controller Installation Overview The Battery Backup Unit (BBU) is ready for use. Figure 21. c Post on the BBU mates to plug the battery into the BBU and there is no power to receptacle on ...
Installation Guide
Page 35
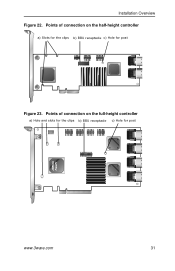
Points of connection on the full-height controller a) Hole and slots for the clips b) BBU receptacle c) Hole for post Figure 23. Installation Overview Figure 22. Points of connection on the half-height controller a) Slots for the clips b) BBU receptacle c) Hole for post www.3ware.com 31
Points of connection on the full-height controller a) Hole and slots for the clips b) BBU receptacle c) Hole for post Figure 23. Installation Overview Figure 22. Points of connection on the half-height controller a) Slots for the clips b) BBU receptacle c) Hole for post www.3ware.com 31
Installation Guide
Page 36
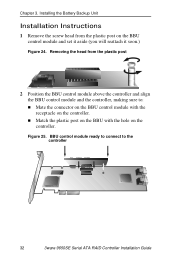
... module ready to connect to : „ Mate the connector on the BBU control module with the receptacle on the controller. „ Match the plastic post on the BBU with the hole on the BBU control module and set it aside (you will reattach it soon.) Figure 24. Installing the...Unit Installation Instructions 1 Remove the screw head from the plastic post 2 Position the BBU control module above the controller and align the BBU control module and the controller, making sure to the controller 32 3ware 9650SE Serial ATA RAID Controller Installation Guide Removing the head from the plastic post on ...
... module ready to connect to : „ Mate the connector on the BBU control module with the receptacle on the controller. „ Match the plastic post on the BBU with the hole on the BBU control module and set it aside (you will reattach it soon.) Figure 24. Installing the...Unit Installation Instructions 1 Remove the screw head from the plastic post 2 Position the BBU control module above the controller and align the BBU control module and the controller, making sure to the controller 32 3ware 9650SE Serial ATA RAID Controller Installation Guide Removing the head from the plastic post on ...
Installation Guide
Page 37
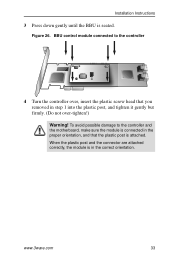
When the plastic post and the connector are attached correctly, the module is seated. www.3ware.com 33 Figure 26. Installation Instructions 3 Press down gently until the BBU is in step 1 into the plastic post, and tighten it gently but firmly. (Do not over , insert the plastic screw head that the plastic post... in the proper orientation, and that you removed in the correct orientation. To avoid possible damage to the controller 4 Turn the controller over -tighten!) Warning! BBU control module connected to the controller and the motherboard, make sure the module is attached.
When the plastic post and the connector are attached correctly, the module is seated. www.3ware.com 33 Figure 26. Installation Instructions 3 Press down gently until the BBU is in step 1 into the plastic post, and tighten it gently but firmly. (Do not over , insert the plastic screw head that the plastic post... in the proper orientation, and that you removed in the correct orientation. To avoid possible damage to the controller 4 Turn the controller over -tighten!) Warning! BBU control module connected to the controller and the motherboard, make sure the module is attached.

Installation Guide
Page 40
Note: The battery will not be used right away, wait to do this step until the system is now ready to the unit. Installing the Battery Backup Unit 3 Insert the battery power connector into the power receptacle on the BBU. Figure 31. Battery power connector inserted in your system. 36 3ware 9650SE Serial ATA RAID Controller Installation Guide Chapter 3. If the system will drain if it is plugged in and there is no power to install in power receptacle The controller is ready for use.
Note: The battery will not be used right away, wait to do this step until the system is now ready to the unit. Installing the Battery Backup Unit 3 Insert the battery power connector into the power receptacle on the BBU. Figure 31. Battery power connector inserted in your system. 36 3ware 9650SE Serial ATA RAID Controller Installation Guide Chapter 3. If the system will drain if it is plugged in and there is no power to install in power receptacle The controller is ready for use.
Installation Guide
Page 41
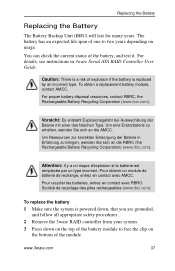
Replacing the Battery Replacing the Battery The Battery Backup Unit (BBU) will last for many years. Um Ressourcen zur korrekten Entsorgung der Baterie in 3ware Serial ATA RAID Controller User Guide. Pour obtenir un module de batterie de rechange, entrez en contact avec AMCC. For details, see ... Es entsteht Explosionsgefahr bei Auswechslung der Baterie mit einer des falschen Typs. Um eine Ersatzbaterie zu erhalten, wenden Sie sich an die AMCC. www.3ware.com 37 To obtain a replacement battery module, contact AMCC. The battery has an expected life span of the module. You can check the ...
Replacing the Battery Replacing the Battery The Battery Backup Unit (BBU) will last for many years. Um Ressourcen zur korrekten Entsorgung der Baterie in 3ware Serial ATA RAID Controller User Guide. Pour obtenir un module de batterie de rechange, entrez en contact avec AMCC. For details, see ... Es entsteht Explosionsgefahr bei Auswechslung der Baterie mit einer des falschen Typs. Um eine Ersatzbaterie zu erhalten, wenden Sie sich an die AMCC. www.3ware.com 37 To obtain a replacement battery module, contact AMCC. The battery has an expected life span of the module. You can check the ...
Installation Guide
Page 42
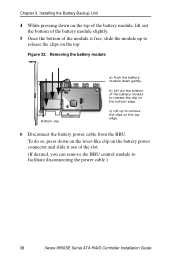
... the clips on the battery power connector and slide it out of the slot. (If desired, you can remove the BBU control module to facilitate disconnecting the power cable.) 38 3ware 9650SE Serial ATA RAID Controller Installation Guide To do so, press down on the top of the battery module, lift out the... bottom of the module is free, slide the module up to release the clip on the top edge. 6 Disconnect the battery power cable from the BBU. Chapter 3.
... the clips on the battery power connector and slide it out of the slot. (If desired, you can remove the BBU control module to facilitate disconnecting the power cable.) 38 3ware 9650SE Serial ATA RAID Controller Installation Guide To do so, press down on the top of the battery module, lift out the... bottom of the module is free, slide the module up to release the clip on the top edge. 6 Disconnect the battery power cable from the BBU. Chapter 3.
Installation Guide
Page 43
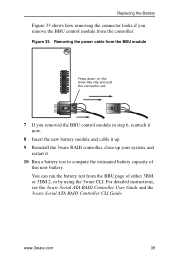
... 33. Replacing the Battery Figure 33 shows how removing the connector looks if you removed the BBU control module in step 6, reattach it now. 8 Insert the new battery module and cable it up. 9 Reinstall the 3ware RAID controller, close up your system, and restart it. 10 Run a battery test to compute the... estimated battery capacity of either 3BM or 3DM 2, or by using the 3ware CLI. Removing the power cable from the BBU module Press down on the lever-like clip and pull the connector out. 7 If you remove the...
... 33. Replacing the Battery Figure 33 shows how removing the connector looks if you removed the BBU control module in step 6, reattach it now. 8 Insert the new battery module and cable it up. 9 Reinstall the 3ware RAID controller, close up your system, and restart it. 10 Run a battery test to compute the... estimated battery capacity of either 3BM or 3DM 2, or by using the 3ware CLI. Removing the power cable from the BBU module Press down on the lever-like clip and pull the connector out. 7 If you remove the...