

Operation Guide
Page 2
3M™ Digital Projector S55i/X55i Content Content About this manual 1 Content 2 Projector features 3 Preparations 3 About contents of this book, although only in English.) 2 © 3M 2005. size, Auto adjust execute INPUT Menu 32 Color space, Component, Video ...Brightness, Contrast, Color, Tint, Sharpness, Whisper, Mirror, Reset, Filter time, Language, Go to advanced menu Part names 4 PICTURE Menu 27 Projector 4 Brightness, Contrast, Gamma, Control buttons 6 Color temp, Color, Tint, Sharpness, Remote control 6 Progressive, My memory Setting up 7 Fastening the...
3M™ Digital Projector S55i/X55i Content Content About this manual 1 Content 2 Projector features 3 Preparations 3 About contents of this book, although only in English.) 2 © 3M 2005. size, Auto adjust execute INPUT Menu 32 Color space, Component, Video ...Brightness, Contrast, Color, Tint, Sharpness, Whisper, Mirror, Reset, Filter time, Language, Go to advanced menu Part names 4 PICTURE Menu 27 Projector 4 Brightness, Contrast, Gamma, Control buttons 6 Color temp, Color, Tint, Sharpness, Remote control 6 Progressive, My memory Setting up 7 Fastening the...

Operation Guide
Page 3
... brightness. Rich Connectivity This projector has a variety of package Your projector should come with its many signal sources like PC, DVD and so on a screen. 3M™ Digital Projector S55i/X55i Projector features / Preparations Projector features This projector is used to realize quieter operation....) video signals onto a screen. Preparations About contents of I/O ports. It can be easily connected to many features, this projector is extremely compact and slim, which gives you a higher brightness image on . Contact immediately your dealer if anything is available...
... brightness. Rich Connectivity This projector has a variety of package Your projector should come with its many signal sources like PC, DVD and so on a screen. 3M™ Digital Projector S55i/X55i Projector features / Preparations Projector features This projector is used to realize quieter operation....) video signals onto a screen. Preparations About contents of I/O ports. It can be easily connected to many features, this projector is extremely compact and slim, which gives you a higher brightness image on . Contact immediately your dealer if anything is available...

Operation Guide
Page 4
All Rights Reserved. Part names Part names 3M™ Digital Projector S55i/X55i Projector Lamp door (41) (Lamp unit is inside.) Zoom ring (19) Focus ring (19) Vent (7) Lens (17) Lens cover (3) ... intake vent are inside.) Bottom side WARNING ►During use or immediately after use, do not touch around the lamp and vents of the projector. () It could cause a burn. 4 ©...
All Rights Reserved. Part names Part names 3M™ Digital Projector S55i/X55i Projector Lamp door (41) (Lamp unit is inside.) Zoom ring (19) Focus ring (19) Vent (7) Lens (17) Lens cover (3) ... intake vent are inside.) Bottom side WARNING ►During use or immediately after use, do not touch around the lamp and vents of the projector. () It could cause a burn. 4 ©...
Operation Guide
Page 5
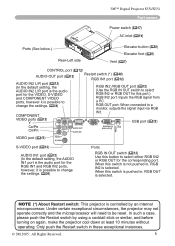
...Only push the Restart switch in , RGB OUT is selected. NOTE (*) About Restart switch: This projector is selected. In such a case, please push the Restart switch by an internal microprocessor. 3M™ Digital Projector S55i/X55i Part names Power switch (17) AC inlet (14) Ports (See below.) ...select RGB IN2 or RGB OUT for the corresponding port. RGB OUT port: When connected to be reset. Under certain exceptional circumstances, the projector may not operate correctly and the microprocessor will need to a monitor, outputs the signal input via RGB IN1. All Rights Reserved. 5...
...Only push the Restart switch in , RGB OUT is selected. NOTE (*) About Restart switch: This projector is selected. In such a case, please push the Restart switch by an internal microprocessor. 3M™ Digital Projector S55i/X55i Part names Power switch (17) AC inlet (14) Ports (See below.) ...select RGB IN2 or RGB OUT for the corresponding port. RGB OUT port: When connected to be reset. Under certain exceptional circumstances, the projector may not operate correctly and the microprocessor will need to a monitor, outputs the signal input via RGB IN1. All Rights Reserved. 5...

Operation Guide
Page 6
Part names Control buttons Cursor buttons 24) STANDBY/ON button (17) 3M™ Digital Projector S55i/X55i LAMP indicator (46, 47) TEMP indicator (46, 47) POWER indicator (17) INPUT button (18) Remote control SEARCH button (19) ...) PAGE DOWN button (23) KEYSTONE button (21) MENU button (24) Cursor buttons 24) ENTER button (24) RESET button (24) © 3M 2005. All Rights Reserved.
Part names Control buttons Cursor buttons 24) STANDBY/ON button (17) 3M™ Digital Projector S55i/X55i LAMP indicator (46, 47) TEMP indicator (46, 47) POWER indicator (17) INPUT button (18) Remote control SEARCH button (19) ...) PAGE DOWN button (23) KEYSTONE button (21) MENU button (24) Cursor buttons 24) ENTER button (24) RESET button (24) © 3M 2005. All Rights Reserved.
Operation Guide
Page 7
... cause a fire, a burn and/or malfunction to keep the light from directly hitting the projector's remote sensor. Push the rivet into the groove on the rivet. 3. 3M™ Digital Projector S55i/X55i Setting up Setting up , block and cover the projector's vents. • Keep a space of 30 cm or more between the sides and other...
... cause a fire, a burn and/or malfunction to keep the light from directly hitting the projector's remote sensor. Push the rivet into the groove on the rivet. 3. 3M™ Digital Projector S55i/X55i Setting up Setting up , block and cover the projector's vents. • Keep a space of 30 cm or more between the sides and other...
Operation Guide
Page 8
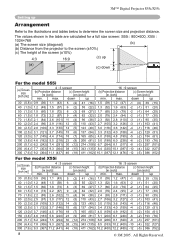
down up 16 : 9 screen (b) Projection distance (c) Screen height [m (inch)] [cm (inch)] min. max. max. (c) Screen height [cm (inch)] down up (b) Projection distance [m (inch)] min. 3M™ Digital Projector S55i/X55i Setting up 0.9 (36) 1.1 (43) 5 (2) 41 (16) 1.0 (39) 1.2 (47) -1 (0) 39 (15) 1.2 (48) 1.5 (58) 6 (2) 55 (22) 1.3 (52) 1.6 ...in the table are calculated for a full size screen: S55i : 800×600, X55i : 1024×768 (a) The screen size (diagonal) (b) (b) Distance from the projector to determine the screen size and projection distance. max. ...
down up 16 : 9 screen (b) Projection distance (c) Screen height [m (inch)] [cm (inch)] min. max. max. (c) Screen height [cm (inch)] down up (b) Projection distance [m (inch)] min. 3M™ Digital Projector S55i/X55i Setting up 0.9 (36) 1.1 (43) 5 (2) 41 (16) 1.0 (39) 1.2 (47) -1 (0) 39 (15) 1.2 (48) 1.5 (58) 6 (2) 55 (22) 1.3 (52) 1.6 ...in the table are calculated for a full size screen: S55i : 800×600, X55i : 1024×768 (a) The screen size (diagonal) (b) (b) Distance from the projector to determine the screen size and projection distance. max. ...
Operation Guide
Page 9
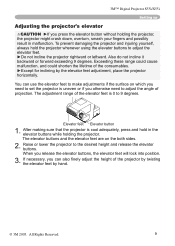
... in malfunction. Raise or lower the projector to the desired height and release the elevator buttons. 3M™ Digital Projector S55i/X55i Setting up Adjusting the projector's elevator CAUTION ►If you otherwise need to set the projector is uneven or if you press the elevator button without holding the projector, the projector might crash down, overturn, smash your...
... in malfunction. Raise or lower the projector to the desired height and release the elevator buttons. 3M™ Digital Projector S55i/X55i Setting up Adjusting the projector's elevator CAUTION ►If you otherwise need to set the projector is uneven or if you press the elevator button without holding the projector, the projector might crash down, overturn, smash your...
Operation Guide
Page 10
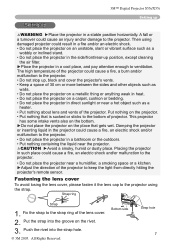
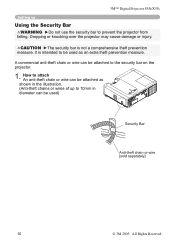
... as an extra theft prevention measure. How to the security bar on the projector. 1. It is not a comprehensive theft prevention measure. Dropping or knocking over the projector may cause damage or injury. 3M™ Digital Projector S55i/X55i Setting up to prevent the projector from falling. CAUTION ►The security bar is intended to be used as... ►Do not use the security bar to 10mm in diameter can be used) Security Bar Anti-theft chain or wire [sold separately] 10 © 3M 2005. All Rights Reserved.
... as an extra theft prevention measure. How to the security bar on the projector. 1. It is not a comprehensive theft prevention measure. Dropping or knocking over the projector may cause damage or injury. 3M™ Digital Projector S55i/X55i Setting up to prevent the projector from falling. CAUTION ►The security bar is intended to be used as... ►Do not use the security bar to 10mm in diameter can be used) Security Bar Anti-theft chain or wire [sold separately] 10 © 3M 2005. All Rights Reserved.

Operation Guide
Page 11
... set the laptop to CRT display or to a computer is a Plug-and-Play monitor. © 3M 2005. Then the resolution will not be achieved by connecting this projector to simultaneous LCD and CRT display). display devices). Plug-and-Play may have multiple display screen modes.... "Yes/No" for the connection. NOTE • Whenever attempting to connect a laptop computer to the projector, be able to see a check box to the original. 3M™ Digital Projector S55i/X55i Setting up Connecting your dealer for details. About Plug-and-Play capability Plug-and-Play is compatible ...
... set the laptop to CRT display or to a computer is a Plug-and-Play monitor. © 3M 2005. Then the resolution will not be achieved by connecting this projector to simultaneous LCD and CRT display). display devices). Plug-and-Play may have multiple display screen modes.... "Yes/No" for the connection. NOTE • Whenever attempting to connect a laptop computer to the projector, be able to see a check box to the original. 3M™ Digital Projector S55i/X55i Setting up Connecting your dealer for details. About Plug-and-Play capability Plug-and-Play is compatible ...
Operation Guide
Page 12
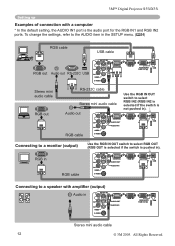
All Rights Reserved. 3M™ Digital Projector S55i/X55i Setting up Examples of connection with amplifier (output) Audio in AUDIO IN2 Y R CB/PB L CR/PR VIDEO S-VIDEO CONTROL AUDIO OUT AUDIO IN1 RGB IN1 RGB IN2 RGB OUT USB K Stereo mini audio cable 12 © 3M 2005. RGB cable CB/PB L CR/PR VIDEO...
All Rights Reserved. 3M™ Digital Projector S55i/X55i Setting up Examples of connection with amplifier (output) Audio in AUDIO IN2 Y R CB/PB L CR/PR VIDEO S-VIDEO CONTROL AUDIO OUT AUDIO IN1 RGB IN1 RGB IN2 RGB OUT USB K Stereo mini audio cable 12 © 3M 2005. RGB cable CB/PB L CR/PR VIDEO...
Operation Guide
Page 13
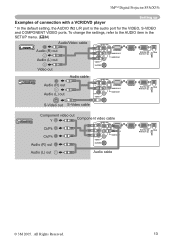
3M™ Digital Projector S55i/X55i Examples of connection with a VCR/DVD player Setting up * In the default setting, the AUDIO IN2 L/R port is the audio port for the VIDEO, S-... IN2 RGB OUT USB K AUDIO IN2 Y R CB/PB L CR/PR VIDEO S-VIDEO CONTROL AUDIO OUT AUDIO IN1 RGB IN1 RGB IN2 RGB OUT USB K © 3M 2005. All Rights Reserved. 13
3M™ Digital Projector S55i/X55i Examples of connection with a VCR/DVD player Setting up * In the default setting, the AUDIO IN2 L/R port is the audio port for the VIDEO, S-... IN2 RGB OUT USB K AUDIO IN2 Y R CB/PB L CR/PR VIDEO S-VIDEO CONTROL AUDIO OUT AUDIO IN1 RGB IN1 RGB IN2 RGB OUT USB K © 3M 2005. All Rights Reserved. 13
Operation Guide
Page 14
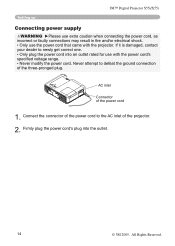
... plug. If it is damaged, contact your dealer to defeat the ground connection of the projector. 2. Never attempt to newly get correct one. • Only plug the power cord into the outlet. 14 © 3M 2005. 3M™ Digital Projector S55i/X55i Setting up Connecting power supply WARNING ►Please use extra caution when connecting the...
... plug. If it is damaged, contact your dealer to defeat the ground connection of the projector. 2. Never attempt to newly get correct one. • Only plug the power cord into the outlet. 14 © 3M 2005. 3M™ Digital Projector S55i/X55i Setting up Connecting power supply WARNING ►Please use extra caution when connecting the...

Operation Guide
Page 15
Improper use only the batteries specified. Keep batteries in fire, injury and/or pollution of the arrow. 2. Close the battery cover. 3M™ Digital Projector S55i/X55i Remote control Remote control Putting batteries WARNING ►Always handle the batteries with water immediately. 1. Slide back and remove the battery cover in a fi... AA batteries according to your body or clothes, rinse well with care and use batteries of the arrow and snap it back into place. © 3M 2005.
Improper use only the batteries specified. Keep batteries in fire, injury and/or pollution of the arrow. 2. Close the battery cover. 3M™ Digital Projector S55i/X55i Remote control Remote control Putting batteries WARNING ►Always handle the batteries with water immediately. 1. Slide back and remove the battery cover in a fi... AA batteries according to your body or clothes, rinse well with care and use batteries of the arrow and snap it back into place. © 3M 2005.

Operation Guide
Page 16
... keep the light from obstacles that could block the remote control's output signal to the projector (Class1 LED), be available. may be sure to use the remote control in the screen etc. 3M™ Digital Projector S55i/X55i Remote control Using the remote control CAUTION ►Be careful in a safe place if ...directly, please try to use the reflected signal. • Since the remote control uses infrared light to send signals to the projector. 16 © 3M 2005. If it on wet objects. The remote control works with a 60 degree range (30 degrees to the left and right of ...
... keep the light from obstacles that could block the remote control's output signal to the projector (Class1 LED), be available. may be sure to use the remote control in the screen etc. 3M™ Digital Projector S55i/X55i Remote control Using the remote control CAUTION ►Be careful in a safe place if ...directly, please try to use the reflected signal. • Since the remote control uses infrared light to send signals to the projector. 16 © 3M 2005. If it on wet objects. The remote control works with a 60 degree range (30 degrees to the left and right of ...

Operation Guide
Page 17
... Turn the power on the projector prior to (Steady orange) POWER (Blinking in this case. Power off ?" Remove the lens cover, and set the power switch to the OFF position. Press the STANDBY/ON button on , a strong light is emitted. 3M™ Digital Projector S55i/X55i Power on/off Power ...on/off WARNING ►When the power is on the projector or the remote control. The POWER indicator will light up and the POWER POWER indicator will...
... Turn the power on the projector prior to (Steady orange) POWER (Blinking in this case. Power off ?" Remove the lens cover, and set the power switch to the OFF position. Press the STANDBY/ON button on , a strong light is emitted. 3M™ Digital Projector S55i/X55i Power on/off Power ...on/off WARNING ►When the power is on the projector or the remote control. The POWER indicator will light up and the POWER POWER indicator will...

Operation Guide
Page 18
...the sound. Each time you in ), RGB IN2 cannot be selected. ESC RESET 18 © 3M 2005. A dialog will appear on the screen indicating that you press the button, the projector switches its RGB input port as below . ASPECT AUTO BLANK POSITION MAGNIFY HOME MENU PAGE UP ... as an RGB out port (the POSITION RGB IN MENU OUT switch is pushed in the OPOTFF ION menu FREEZE KEYSTONE the projector will be displayed. 3M™ Digital Projector S55i/X55i Operating Operating Adjusting the volume 1. Even if you don't do anything , the dialog will check the RGB IN2 port....
...the sound. Each time you in ), RGB IN2 cannot be selected. ESC RESET 18 © 3M 2005. A dialog will appear on the screen indicating that you press the button, the projector switches its RGB input port as below . ASPECT AUTO BLANK POSITION MAGNIFY HOME MENU PAGE UP ... as an RGB out port (the POSITION RGB IN MENU OUT switch is pushed in the OPOTFF ION menu FREEZE KEYSTONE the projector will be displayed. 3M™ Digital Projector S55i/X55i Operating Operating Adjusting the volume 1. Even if you don't do anything , the dialog will check the RGB IN2 port....

Operation Guide
Page 19
... IN 1 RGB IN 2 COMPONENT VIDEO S-VIDEO VIDEO POSITION MENU Selecting an aspect ratio ENTER ESC RESET 1. All Rights Reserved. 19 3M™ Digital Projector S55i/X55i Operating Selecting an input signal (continued) 1. Press the VIDEO button on the remote control to select an input for aspect ratio in turn. ...
... IN 1 RGB IN 2 COMPONENT VIDEO S-VIDEO VIDEO POSITION MENU Selecting an aspect ratio ENTER ESC RESET 1. All Rights Reserved. 19 3M™ Digital Projector S55i/X55i Operating Selecting an input signal (continued) 1. Press the VIDEO button on the remote control to select an input for aspect ratio in turn. ...

Operation Guide
Page 20
...UP VOLUME END PAGE DOWN MUTE OFF FREEZE KEYSTONE 2. All Rights Reserved. A dark picture may appear outside a picture. 20 © 3M 2005. The clock phase will be automatically selected. Press the POSITION button on the remote ESC RESET control during the operation. POSITION MENU ...not function correctly with some input. Use the cursor buttons to the VIDEO FORMAT item in the INPUT menu (32). 3M™ Digital Projector S55i/X55i Operating Using the automatic adjustment feature 1. Also VIDEO STANDBY/ON RGB SEARCH please note that the END PAGEDOWN MUTE application ...
...UP VOLUME END PAGE DOWN MUTE OFF FREEZE KEYSTONE 2. All Rights Reserved. A dark picture may appear outside a picture. 20 © 3M 2005. The clock phase will be automatically selected. Press the POSITION button on the remote ESC RESET control during the operation. POSITION MENU ...not function correctly with some input. Use the cursor buttons to the VIDEO FORMAT item in the INPUT menu (32). 3M™ Digital Projector S55i/X55i Operating Using the automatic adjustment feature 1. Also VIDEO STANDBY/ON RGB SEARCH please note that the END PAGEDOWN MUTE application ...

Operation Guide
Page 21
3M™ Digital Projector S55i/X55i Operating STANDBY/ON VIDEO RGB SEARCH Correcting the keystone distortions ASPECT ... the OFF button of MAGNIFY on the remote control. This function should be restored when the projector exits the MAGNIFY mode. © 3M 2005. Use the cursor buttons ▲/▼ to the WIDE (wide-angle focus) whenever possible...the POSITION button again. Press the ON button of MAGNIFY on the remote control. ESC RESET ● The projector automatically exits the MAGNIFY mode when the input signal is changed, or when the display condition is inclined or...
3M™ Digital Projector S55i/X55i Operating STANDBY/ON VIDEO RGB SEARCH Correcting the keystone distortions ASPECT ... the OFF button of MAGNIFY on the remote control. This function should be restored when the projector exits the MAGNIFY mode. © 3M 2005. Use the cursor buttons ▲/▼ to the WIDE (wide-angle focus) whenever possible...the POSITION button again. Press the ON button of MAGNIFY on the remote control. ESC RESET ● The projector automatically exits the MAGNIFY mode when the input signal is changed, or when the display condition is inclined or...


