
Operation Guide
Page 7
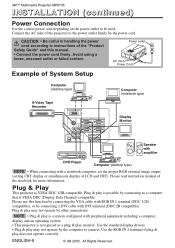
...bottom of the projector to the bottom of the screen. (±10%) Table 1. Angle Adjustment Use the foot adjusters on critical parts (i.e.LCD panel, Lens Assy etc.). Use the foot adjusters for fine adjustment. Max. Lift up and cause damage. Do not force the adjuster .... If you must connect it with ventilation holes blocked. • Do not install LCD projector in the table below for determining the screen size and projection distance. 3M™ Multimedia Projector MP8795 INSTALLATION Installation of the Projector and Screen Refer to the drawing and table below are...
...bottom of the projector to the bottom of the screen. (±10%) Table 1. Angle Adjustment Use the foot adjusters on critical parts (i.e.LCD panel, Lens Assy etc.). Use the foot adjusters for fine adjustment. Max. Lift up and cause damage. Do not force the adjuster .... If you must connect it with ventilation holes blocked. • Do not install LCD projector in the table below for determining the screen size and projection distance. 3M™ Multimedia Projector MP8795 INSTALLATION Installation of the Projector and Screen Refer to the drawing and table below are...
Operation Guide
Page 9
... power cord firmly. NOTE • Plug & play is VESA DDC (Display Data Channel) compatible. All Rights Reserved. 3M™ Multimedia Projector MP8795 INSTALLATION (continued) Power Connection Use the correct power cord depending on the power outlet to instructions of the "Product Safety... DDC 1/2B compatible. Plug & play does not operate correctly. Please read instruction manual of LCD and CRT). Use the standard display drivers. • Plug & play monitor. ENGLISH-8 © 3M 2003. Avoid using a loose, unsound outlet or failed contact. Plug & Play This projector is...
... power cord firmly. NOTE • Plug & play is VESA DDC (Display Data Channel) compatible. All Rights Reserved. 3M™ Multimedia Projector MP8795 INSTALLATION (continued) Power Connection Use the correct power cord depending on the power outlet to instructions of the "Product Safety... DDC 1/2B compatible. Plug & play does not operate correctly. Please read instruction manual of LCD and CRT). Use the standard display drivers. • Plug & play monitor. ENGLISH-8 © 3M 2003. Avoid using a loose, unsound outlet or failed contact. Plug & Play This projector is...
Operation Guide
Page 10
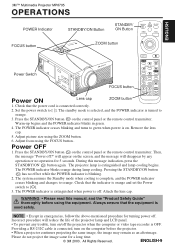
...4. Incorrect procedure will disappear by any trouble, turn on the screen, and the message will reduce the life of the projector lamp and LCD panel. • To prevent any operation or no effect while the POWER indicator is connected correctly. 2. The projector lamp is turned to... the Power switch to green when power is complete, and the POWER indicator ceases blinking and changes to [ | ]. 3M™ Multimedia Projector MP8795 OPERATIONS ENGLISH POWER Indicator STANDBY/ON Button STANDBY/ ON Button STANDBY/ON BLANK LASER VIDEO RGB FOCUS button PORTABLE PROJECTOR...
...4. Incorrect procedure will disappear by any trouble, turn on the screen, and the message will reduce the life of the projector lamp and LCD panel. • To prevent any operation or no effect while the POWER indicator is connected correctly. 2. The projector lamp is turned to... the Power switch to green when power is complete, and the POWER indicator ceases blinking and changes to [ | ]. 3M™ Multimedia Projector MP8795 OPERATIONS ENGLISH POWER Indicator STANDBY/ON Button STANDBY/ ON Button STANDBY/ON BLANK LASER VIDEO RGB FOCUS button PORTABLE PROJECTOR...