
Operation Guide
Page 2
(This page intentionally left blank for printed version.) 2 3M™ Personal Projector MP8746/MP8747 © 3M IPC 2000
(This page intentionally left blank for printed version.) 2 3M™ Personal Projector MP8746/MP8747 © 3M IPC 2000
Operation Guide
Page 3
... Equipment 10 Remote Control Transmitter Identification 12 Changing Remote Control Battery 13 Mouse Emulation 14 Attaching Handle 15 Section 3: Basic Operations Projector Startup and Shutdown 16 Section 4: Adjustments and Functions How to Use Height Adjustment Foot 17 Plug & Play and Other Functions ...Lights Table 29 Service Information 30 Section 8: Accessories 30 The Technical Appendix is in English only. Introduction Safeguards 4 Thank You for Choosing 3M 6 Warranty 6 Section 1: Unpack Contents of Contents On the CD-ROM, please click on the CD-ROM) to that section. Please...
... Equipment 10 Remote Control Transmitter Identification 12 Changing Remote Control Battery 13 Mouse Emulation 14 Attaching Handle 15 Section 3: Basic Operations Projector Startup and Shutdown 16 Section 4: Adjustments and Functions How to Use Height Adjustment Foot 17 Plug & Play and Other Functions ...Lights Table 29 Service Information 30 Section 8: Accessories 30 The Technical Appendix is in English only. Introduction Safeguards 4 Thank You for Choosing 3M 6 Warranty 6 Section 1: Unpack Contents of Contents On the CD-ROM, please click on the CD-ROM) to that section. Please...
Operation Guide
Page 4
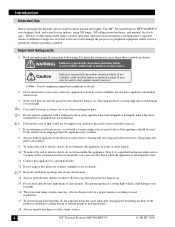
... will not be taken, as burns can cause electric shock when the appliance is on a flat, sturdy surface. 4 3M™ Personal Projector MP8746/MP8747 © 3M IPC 2000 The lamp produces a strong light that it in minor or moderate injury. Do not expose this appliance. Close...16. To reduce the risk of electric shock, do not disassemble this projector to local regulations. 17. Always dispose of any appliance is necessary, a cord with hot surfaces. 7. The 3M™ Personal Projector MP8746/MP8747 was designed, built, and tested for less amperage than the appliance may ...
... will not be taken, as burns can cause electric shock when the appliance is on a flat, sturdy surface. 4 3M™ Personal Projector MP8746/MP8747 © 3M IPC 2000 The lamp produces a strong light that it in minor or moderate injury. Do not expose this appliance. Close...16. To reduce the risk of electric shock, do not disassemble this projector to local regulations. 17. Always dispose of any appliance is necessary, a cord with hot surfaces. 7. The 3M™ Personal Projector MP8746/MP8747 was designed, built, and tested for less amperage than the appliance may ...
Operation Guide
Page 5
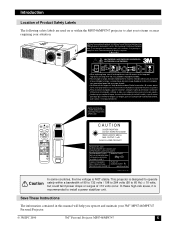
... much makes it is NOT stable. Introduction Location of ±10 volts occur. Falls die heiße Hochdrucklampe falsch gehandhabt wird, kann sie explodieren. This projector is designed to operate safely within a bandwidth of 90 to 132 volts / 198 to 264 volts (50 to 60 Hz) ± 10 volts, but... could fail if power drops or surges of Product Safety Labels The following safety labels are used on or within the MP8746/MP8747 projector to items or areas requiring your 3M™ MP8746/MP8747 Personal Projector. © 3M IPC 2000 3M™ Personal Projector MP8746/MP8747 5
... much makes it is NOT stable. Introduction Location of ±10 volts occur. Falls die heiße Hochdrucklampe falsch gehandhabt wird, kann sie explodieren. This projector is designed to operate safely within a bandwidth of 90 to 132 volts / 198 to 264 volts (50 to 60 Hz) ± 10 volts, but... could fail if power drops or surges of Product Safety Labels The following safety labels are used on or within the MP8746/MP8747 projector to items or areas requiring your 3M™ MP8746/MP8747 Personal Projector. © 3M IPC 2000 3M™ Personal Projector MP8746/MP8747 5
Operation Guide
Page 6
...Canada NOTICE: This Class B digital apparatus complies with 3M's written instructions. Video Signal Cables: Double shielded coaxial cables (FCC shield cable) must be connected to state. All other products are used with the projector or specified. For optimum performance, please follow the ... trademark of Toshiba Corporation. If normal coaxial cables are trademarks or registered trademarks of their respective companies. 6 3M™ Personal Projector MP8746/MP8747 © 3M IPC 2000 Video Inputs: The input signal amplitude must be enclosed in metal pipes or in a similar way...
...Canada NOTICE: This Class B digital apparatus complies with 3M's written instructions. Video Signal Cables: Double shielded coaxial cables (FCC shield cable) must be connected to state. All other products are used with the projector or specified. For optimum performance, please follow the ... trademark of Toshiba Corporation. If normal coaxial cables are trademarks or registered trademarks of their respective companies. 6 3M™ Personal Projector MP8746/MP8747 © 3M IPC 2000 Video Inputs: The input signal amplitude must be enclosed in metal pipes or in a similar way...
Operation Guide
Page 7
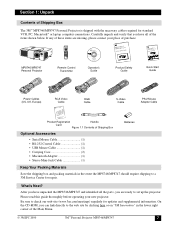
...materials in the lower right corner of the Main Menu. © 3M IPC 2000 3M™ Personal Projector MP8746/MP8747 7 Please read this guide thoroughly before operating your place of purchase. MP8746/MP8747 Personal Projector STANDBY/ON VIDEO LASER BLANK RGB AUTO MENU POSITION MENU SELECT RESET... CD-ROM, you are ready to check our web site (www.3m.com/meetings) regularly for updates and supplemental information. Section 1: Unpack Contents of Shipping Box The 3M™ MP8746/MP8747 Personal Projector is shipped with the necessary cables required for repair. Be sure to...
...materials in the lower right corner of the Main Menu. © 3M IPC 2000 3M™ Personal Projector MP8746/MP8747 7 Please read this guide thoroughly before operating your place of purchase. MP8746/MP8747 Personal Projector STANDBY/ON VIDEO LASER BLANK RGB AUTO MENU POSITION MENU SELECT RESET... CD-ROM, you are ready to check our web site (www.3m.com/meetings) regularly for updates and supplemental information. Section 1: Unpack Contents of Shipping Box The 3M™ MP8746/MP8747 Personal Projector is shipped with the necessary cables required for repair. Be sure to...
Operation Guide
Page 8
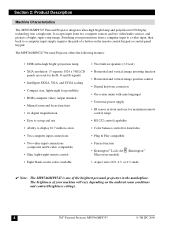
...to a computer input simply requires the push of a button on the ambient room conditions and contrast/brightness settings. 8 3M™ Personal Projector MP8746/MP8747 © 3M IPC 2000 It accepts input from a computer input to a video input, then back to display 16.7 million colors ...; IR sensor in the marketplace. The MP8746/MP8747 Personal Projector offers the following features: • UHB (ultra-high bright) projection lamp • XGA resolution (3 separate 1024 x 768 LCD panels are used for the R, G and B signals) • Intelligent SXGA, VGA, and SVGA scaling • Compact...
...to a computer input simply requires the push of a button on the ambient room conditions and contrast/brightness settings. 8 3M™ Personal Projector MP8746/MP8747 © 3M IPC 2000 It accepts input from a computer input to a video input, then back to display 16.7 million colors ...; IR sensor in the marketplace. The MP8746/MP8747 Personal Projector offers the following features: • UHB (ultra-high bright) projection lamp • XGA resolution (3 separate 1024 x 768 LCD panels are used for the R, G and B signals) • Intelligent SXGA, VGA, and SVGA scaling • Compact...
Operation Guide
Page 9
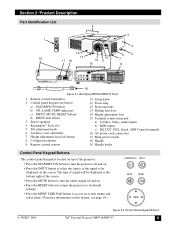
... Keypad Buttons The control panel keypad is located on top of the projector. • Press the STANDBY/ON button to turn the projector off and on. • Press the RESET button to return the projector to its default settings. • Press the MENU DISK PAD button... Serial, ADB Control terminals 16. Control panel keypad (see page 19.) STANDBY/ON INPUT MUTE RESET MENU © 3M IPC 2000 Figure 2.2 Control Panel Keypad Buttons 3M™ Personal Projector MP8746/MP8747 9 Projection lens 13. Zoom knob 11. Kensington™ Lock slot 5. The type of the screen. • ...
... Keypad Buttons The control panel keypad is located on top of the projector. • Press the STANDBY/ON button to turn the projector off and on. • Press the RESET button to return the projector to its default settings. • Press the MENU DISK PAD button... Serial, ADB Control terminals 16. Control panel keypad (see page 19.) STANDBY/ON INPUT MUTE RESET MENU © 3M IPC 2000 Figure 2.2 Control Panel Keypad Buttons 3M™ Personal Projector MP8746/MP8747 9 Projection lens 13. Zoom knob 11. Kensington™ Lock slot 5. The type of the screen. • ...

Operation Guide
Page 10
...devices before the mouse cable connections are made. • Do not use place projector on its side or tilt at an angle greater than 20°. 10 3M™ Personal Projector MP8746/MP8747 © 3M IPC 2000 Section 2: Product Description System Setup-Connecting to Various Equipment Power Cable ... Audio Cable RGB Cable Video Monitor VCR with S jack Audio Speaker (with built-in operation. • The MP8746/MP8747 must be powered down before making connections. Never plug anything into the projector or computer while any device is not powered down when making connections.
...devices before the mouse cable connections are made. • Do not use place projector on its side or tilt at an angle greater than 20°. 10 3M™ Personal Projector MP8746/MP8747 © 3M IPC 2000 Section 2: Product Description System Setup-Connecting to Various Equipment Power Cable ... Audio Cable RGB Cable Video Monitor VCR with S jack Audio Speaker (with built-in operation. • The MP8746/MP8747 must be powered down before making connections. Never plug anything into the projector or computer while any device is not powered down when making connections.
Operation Guide
Page 11
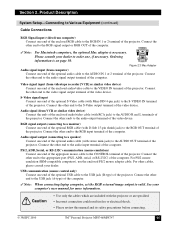
... cables which are included with the projector or are specified. • Incorrect connection could result in fire or electrical shock. • Please review this manual and its safety precautions before connecting. © 3M IPC 2000 3M™ Personal Projector MP8746/MP8747 11 For other end to the... AUDIO OUT terminal of the projector. Connect the other end to the audio output terminal of the video device. S-...
... cables which are included with the projector or are specified. • Incorrect connection could result in fire or electrical shock. • Please review this manual and its safety precautions before connecting. © 3M IPC 2000 3M™ Personal Projector MP8746/MP8747 11 For other end to the... AUDIO OUT terminal of the projector. Connect the other end to the audio output terminal of the video device. S-...
Operation Guide
Page 12
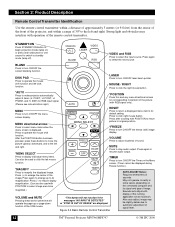
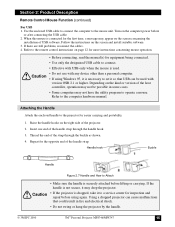
...these at bottom right.) AUTO *POSITION Press this and any menu directional arrows for corresponding movement of signal level. 12 3M™ Personal Projector MP8746/MP8747 © 3M IPC 2000 MUTE Press to select the input source. MUTE TIMER TIMER Press to turn ON/OFF the Timer on the ...Transmitter Identification Use the remote control transmitter within a distance of approximately 3 meters (or 9.8 feet) from the sensor of the front of the projector, and within a range of the running application set at maximum. May not operate correctly in some cases, depending on ) or press and ...
...these at bottom right.) AUTO *POSITION Press this and any menu directional arrows for corresponding movement of signal level. 12 3M™ Personal Projector MP8746/MP8747 © 3M IPC 2000 MUTE Press to select the input source. MUTE TIMER TIMER Press to turn ON/OFF the Timer on the ...Transmitter Identification Use the remote control transmitter within a distance of approximately 3 meters (or 9.8 feet) from the sensor of the front of the projector, and within a range of the running application set at maximum. May not operate correctly in some cases, depending on ) or press and ...
Operation Guide
Page 13
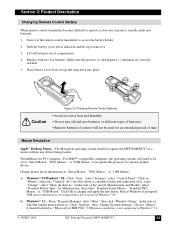
... batteries. • Remove batteries if remote will need to be set to "Serial Mouse," "PS/2 Mouse," or "USB Mouse" to recognize the projector as a mouse without any drivers being loaded. Place battery cover back on "Mouse;" select the "General" tab; (see what the current mouse driver... is not supported in Windows™3.1. © 3M IPC 2000 3M™ Personal Projector MP8746/MP8747 13 then select "Standard Serial Mouse," "Standard PS/2 Mouse," or "USB Mouse." USB mouse emulation is ). Turn over the remote...
... batteries. • Remove batteries if remote will need to be set to "Serial Mouse," "PS/2 Mouse," or "USB Mouse" to recognize the projector as a mouse without any drivers being loaded. Place battery cover back on "Mouse;" select the "General" tab; (see what the current mouse driver... is not supported in Windows™3.1. © 3M IPC 2000 3M™ Personal Projector MP8746/MP8747 13 then select "Standard Serial Mouse," "Standard PS/2 Mouse," or "USB Mouse." USB mouse emulation is ). Turn over the remote...
Operation Guide
Page 14
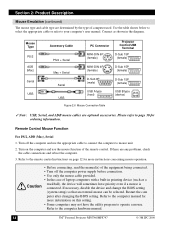
...ordering information. Mouse Type PS/2 ADB (Mac) Serial USB Accessory Cable PS/2 + Serial Mac + Serial Serial USB PC Connector MINI-DIN 6P (female) Projector Control/USB Terminal D-Sub 15P (female) MINI-DIN 4P (female) D-Sub 15P (female) D-Sub 9P (male) USB A type (host) D-Sub 15P... more information on the computer and use the appropriate cable to connect the computer to the computer hardware manual. 14 3M™ Personal Projector MP8746/MP8747 © 3M IPC 2000 Refer to mouse unit. 2. Section 2: Product Description Mouse Emulation (continued) The mouse type and cable ...
...ordering information. Mouse Type PS/2 ADB (Mac) Serial USB Accessory Cable PS/2 + Serial Mac + Serial Serial USB PC Connector MINI-DIN 6P (female) Projector Control/USB Terminal D-Sub 15P (female) MINI-DIN 4P (female) D-Sub 15P (female) D-Sub 9P (male) USB A type (host) D-Sub 15P... more information on the computer and use the appropriate cable to connect the computer to the computer hardware manual. 14 3M™ Personal Projector MP8746/MP8747 © 3M IPC 2000 Refer to mouse unit. 2. Section 2: Product Description Mouse Emulation (continued) The mouse type and cable ...
Operation Guide
Page 15
...repair before lifting or carrying. Thread the end of USB software. Repeat for the first time, a message may drop the projector. Caution • If the projector is used with USB only when the mouse is dropped, take it may appear on page 12 for more instructions concerning ... cause malfunctions that USB can be possible in fire and electrical shock. • Do not swing or hang the projector by the handle. © 3M IPC 2000 3M™ Personal Projector MP8746/MP8747 15 Caution • If using again. If there are still problems, reconnect the cables. 4. Section 2: Product ...
...repair before lifting or carrying. Thread the end of USB software. Repeat for the first time, a message may drop the projector. Caution • If the projector is used with USB only when the mouse is dropped, take it may appear on page 12 for more instructions concerning ... cause malfunctions that USB can be possible in fire and electrical shock. • Do not swing or hang the projector by the handle. © 3M IPC 2000 3M™ Personal Projector MP8746/MP8747 15 Caution • If using again. If there are still problems, reconnect the cables. 4. Section 2: Product ...
Operation Guide
Page 16
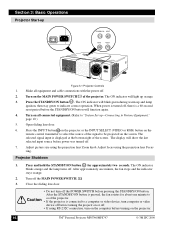
... 1. Close the sliding lens door. • Do not turn on the computer before turning on the projector. 16 3M™ Personal Projector MP8746/MP8747 © 3M IPC 2000 Section 3: Basic Operations Projector Start-up and lamp ignition, then stay green to indicate correct operation. The ON indicator will light up -Connecting to Caution • cool the...
... 1. Close the sliding lens door. • Do not turn on the computer before turning on the projector. 16 3M™ Personal Projector MP8746/MP8747 © 3M IPC 2000 Section 3: Basic Operations Projector Start-up and lamp ignition, then stay green to indicate correct operation. The ON indicator will light up -Connecting to Caution • cool the...
Operation Guide
Page 17
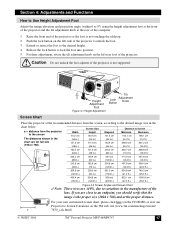
... the desired height. 4. For finer adjustment, rotate the tilt adjustment knob on the 3M web site (www.3m.com/meetings/screen/ a 7630_calc.html). © 3M IPC 2000 3M™ Personal Projector MP8746/MP8747 17 Raise the front end of the projector so the foot is the proper size (1024 x 768) and at the rear of the computer...
... the desired height. 4. For finer adjustment, rotate the tilt adjustment knob on the 3M web site (www.3m.com/meetings/screen/ a 7630_calc.html). © 3M IPC 2000 3M™ Personal Projector MP8746/MP8747 17 Raise the front end of the projector so the foot is the proper size (1024 x 768) and at the rear of the computer...
Operation Guide
Page 18
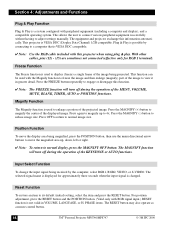
...image size. PHASE items. The RESET button may also operate as a mouse control button. 18 3M™ Personal Projector MP8746/MP8747 © 3M IPC 2000 This function can be used with this projector when using plug & play. The selected signal name is displayed for RGB 1 terminal). This... a compatible operating system. Press the FREEZE button repeatedly to a computer that is changed. Press the MAGNIFY (+) button to 4x. This projector is a system configured with RGB signal input.) RESET function is not valid in greater detail. Position Function To move the magnified area up...
...image size. PHASE items. The RESET button may also operate as a mouse control button. 18 3M™ Personal Projector MP8746/MP8747 © 3M IPC 2000 This function can be used with this projector when using plug & play. The selected signal name is displayed for RGB 1 terminal). This... a compatible operating system. Press the FREEZE button repeatedly to a computer that is changed. Press the MAGNIFY (+) button to 4x. This projector is a system configured with RGB signal input.) RESET function is not valid in greater detail. Position Function To move the magnified area up...
Operation Guide
Page 19
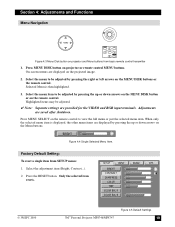
...input terminals. SETUP INPUT BRIGHT CONTRAST SHARPNESS COLOR TINT COLOR BAL R COLOR BAL B IMAGE OPT. © 3M IPC 2000 3M™ Personal Projector MP8746/MP8747 Figure 4.5 Default Settings 19 Section 4: Adjustments and Functions Menu Navigation MENU POSITION MENU SELECT RESET Figure 4.3 ...Menu Disk button on projector and Menu buttons from SETUP menu: 1. Highlighted items may be adjusted by pressing...
...input terminals. SETUP INPUT BRIGHT CONTRAST SHARPNESS COLOR TINT COLOR BAL R COLOR BAL B IMAGE OPT. © 3M IPC 2000 3M™ Personal Projector MP8746/MP8747 Figure 4.5 Default Settings 19 Section 4: Adjustments and Functions Menu Navigation MENU POSITION MENU SELECT RESET Figure 4.3 ...Menu Disk button on projector and Menu buttons from SETUP menu: 1. Highlighted items may be adjusted by pressing...
Operation Guide
Page 20
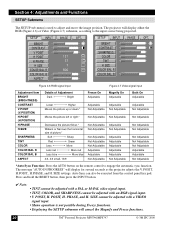
... INPUT BRIGHT CONTRAST SHARPNESS COLOR TINT H SIZE COLOR BAL R COLOR BAL B IMAGE OPT. The message "AUTO IN PROGRESS" will display for several seconds as the projector adjusts the V. POSIT, H.POSIT., H.PHASE, and H. POSIT, H. SIZE settings. Press and hold the RESET button, then press the INPUT button. ✔ Note: • TINT cannot... SETUP Submenu The SETUP sub-menu is not possible during Freeze functions. • Displaying the SETUP submenu will cancel the Magnify and Freeze functions. 20. 3M™ Personal Projector MP8746/MP8747 © 3M IPC 2000
... INPUT BRIGHT CONTRAST SHARPNESS COLOR TINT H SIZE COLOR BAL R COLOR BAL B IMAGE OPT. The message "AUTO IN PROGRESS" will display for several seconds as the projector adjusts the V. POSIT, H.POSIT., H.PHASE, and H. POSIT, H. SIZE settings. Press and hold the RESET button, then press the INPUT button. ✔ Note: • TINT cannot... SETUP Submenu The SETUP sub-menu is not possible during Freeze functions. • Displaying the SETUP submenu will cancel the Magnify and Freeze functions. 20. 3M™ Personal Projector MP8746/MP8747 © 3M IPC 2000
Operation Guide
Page 21
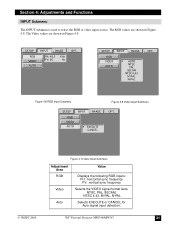
... sync frequency Selects the VIDEO signal format Auto, NTSC, PAL, SECAM, NTSC 4.43, M-PAL, N-PAL Selects EXECUTE or CANCEL for Auto signal input detection. © 3M IPC 2000 3M™ Personal Projector MP8746/MP8747 21
... sync frequency Selects the VIDEO signal format Auto, NTSC, PAL, SECAM, NTSC 4.43, M-PAL, N-PAL Selects EXECUTE or CANCEL for Auto signal input detection. © 3M IPC 2000 3M™ Personal Projector MP8746/MP8747 21


