
User Manual
Page 2
...of Apple Computer, Inc. • VESA and SVGA are trademarks of their respective owners. NOTE • The information in this projector. After reading, store this instruction manual in this manual • The reproduction, transmission or use of this document or contents is a registered trademark of Microsoft Corporation. • All other trademarks... LAMP 29 THE AIR FILTER 31 OTHER CARE 33 WHAT TO DO WHEN YOU THINK A MACHINE DEFECT HAS OCCURRED ......... 34 SPECIFICATIONS 37 ACCESSORIES 38 1 MP7640i/MP7740i Multimedia Projector Operator's Guide Thank you for future reference.
...of Apple Computer, Inc. • VESA and SVGA are trademarks of their respective owners. NOTE • The information in this projector. After reading, store this instruction manual in this manual • The reproduction, transmission or use of this document or contents is a registered trademark of Microsoft Corporation. • All other trademarks... LAMP 29 THE AIR FILTER 31 OTHER CARE 33 WHAT TO DO WHEN YOU THINK A MACHINE DEFECT HAS OCCURRED ......... 34 SPECIFICATIONS 37 ACCESSORIES 38 1 MP7640i/MP7740i Multimedia Projector Operator's Guide Thank you for future reference.
User Manual
Page 7
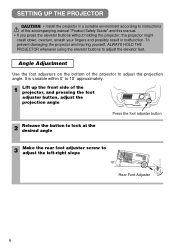
To prevent damaging the projector and injuring yourself, ALWAYS HOLD THE PROJECTOR whenever using the elevator buttons to instructions of the accompanying manual "Product Safety Guide" and this manual. • If you press the elevator buttons without holding the projector, the projector might crash ...
To prevent damaging the projector and injuring yourself, ALWAYS HOLD THE PROJECTOR whenever using the elevator buttons to instructions of the accompanying manual "Product Safety Guide" and this manual. • If you press the elevator buttons without holding the projector, the projector might crash ...
User Manual
Page 11
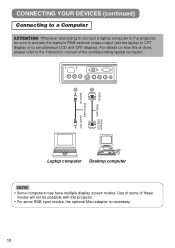
... • Some computers may have multiple display screen modes. Use of some RGB input modes, the optional Mac adapter is done, please refer to the instruction manual of these modes will not be sure to activate the laptop's RGB external image output (set the laptop to CRT display or to the...
... • Some computers may have multiple display screen modes. Use of some RGB input modes, the optional Mac adapter is done, please refer to the instruction manual of these modes will not be sure to activate the laptop's RGB external image output (set the laptop to CRT display or to the...
User Manual
Page 25
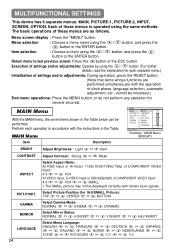
... picture may not be performed. MAIN Menu With the MAIN menu, the seven items shown in the Table below can be displayed correctly with the instructions in accordance with certain input signals. POSIT. MAIN Menu Item Description MENU MAIN BRIGHT PICTURE-1 CONTRAST PICTURE-2 ASPECT INPUT PICT. Menu selection : Choose a menu name...
... picture may not be performed. MAIN Menu With the MAIN menu, the seven items shown in the Table below can be displayed correctly with the instructions in accordance with certain input signals. POSIT. MAIN Menu Item Description MENU MAIN BRIGHT PICTURE-1 CONTRAST PICTURE-2 ASPECT INPUT PICT. Menu selection : Choose a menu name...
User Manual
Page 26
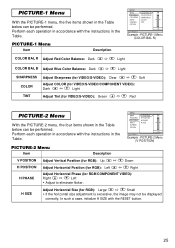
...-1 menu, the five items shown in the Table below can be displayed correctly. Perform each operation in accordance with the instructions in the Table. In such a case, initialize H SIZE with the instructions in the Table below can be performed. MENU MAIN PICTURE-1 PICTURE-2 INPUT SCREEN OPTION V POSITION H POSITION H PHASE H SIZE 12 : SELECT...
...-1 menu, the five items shown in the Table below can be displayed correctly. Perform each operation in accordance with the instructions in the Table. In such a case, initialize H SIZE with the instructions in the Table below can be performed. MENU MAIN PICTURE-1 PICTURE-2 INPUT SCREEN OPTION V POSITION H POSITION H PHASE H SIZE 12 : SELECT...

User Manual
Page 27
... connector so that no signal is inactive. Refer to the description for the item VIDEO below. • This function may not function correctly with the instructions in the Table below . It automatically selects the proper mode from among those above. The SYNC ON G mode allows reception of SYNC on the initial...
... connector so that no signal is inactive. Refer to the description for the item VIDEO below. • This function may not function correctly with the instructions in the Table below . It automatically selects the proper mode from among those above. The SYNC ON G mode allows reception of SYNC on the initial...
User Manual
Page 28
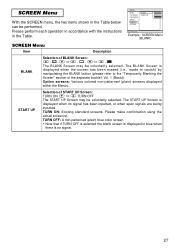
.... The START UP Screen is no signal has been inputted, or when spec signals are being inputted. Please perform each operation in accordance with the instructions in blue when there is displayed when no signal. 27 Option screens: Various colored non-patterned (plain) screens displayed within the Menus. TURN ON: Existing...
.... The START UP Screen is no signal has been inputted, or when spec signals are being inputted. Please perform each operation in accordance with the instructions in blue when there is displayed when no signal. 27 Option screens: Various colored non-patterned (plain) screens displayed within the Menus. TURN ON: Existing...
User Manual
Page 29
... on the menu with the button. • Do not reset the lamp time unless you replace the filter, select RESET on the menu with the instructions in the Table. The reset menu will then appear. After you have cleaned or replaced the filter. Please perform each operation in the Table below...
... on the menu with the button. • Do not reset the lamp time unless you replace the filter, select RESET on the menu with the instructions in the Table. The reset menu will then appear. After you have cleaned or replaced the filter. Please perform each operation in the Table below...
User Manual
Page 33
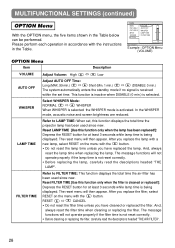
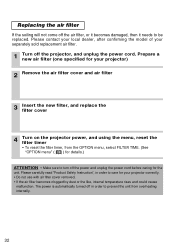
... replacement air filter. 1 Turn off the air filter, or it becomes damaged, then it needs to care for the unit. Please carefully read "Product Safety Instruction", in order to prevent the unit from the OPTION menu, select FILTER TIME. (See "OPTION menu" ( 28 ) for details.) ATTENTION • Make sure to turn...
... replacement air filter. 1 Turn off the air filter, or it becomes damaged, then it needs to care for the unit. Please carefully read "Product Safety Instruction", in order to prevent the unit from the OPTION menu, select FILTER TIME. (See "OPTION menu" ( 28 ) for details.) ATTENTION • Make sure to turn...
User Manual
Page 35
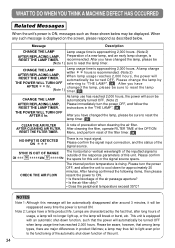
... to reset the lamp (Note 1) timer. 28 CHANGE THE LAMP AFTER REPLACING LAMP, RESET THE LAMP TIMER. Please turn the power OFF, and follow the instructions in product lifetimes; Lamps are major differences in the "THE LAMP", 29 THE POWER WILL TURN OFF AFTER 0 hr. As lamp use has reached 2,000...
... to reset the lamp (Note 1) timer. 28 CHANGE THE LAMP AFTER REPLACING LAMP, RESET THE LAMP TIMER. Please turn the power OFF, and follow the instructions in product lifetimes; Lamps are major differences in the "THE LAMP", 29 THE POWER WILL TURN OFF AFTER 0 hr. As lamp use has reached 2,000...
User Manual
Page 36
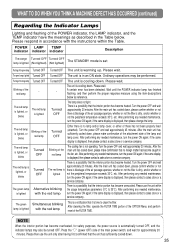
... minutes. Turned OFF There is displayed, then please change the lamp. After performing any needed maintenance, turn the power ON again; Alternative blinking with the instructions within the usage temperature parameters (0°C to clean the filter. Please use the unit only after having first confirmed that it is automatically turned OFF...
... minutes. Turned OFF There is displayed, then please change the lamp. After performing any needed maintenance, turn the power ON again; Alternative blinking with the instructions within the usage temperature parameters (0°C to clean the filter. Please use the unit only after having first confirmed that it is automatically turned OFF...