User Guide
Page 6
... Addressing 111 Static Addressing 111 Auto-IP Addressing 111 B TECHNICAL SPECIFICATIONS OfficeConnect ADSL Wireless 54Mbps 11g Firewall Router 113 Standards 114 C SAFETY INFORMATION D END USER SOFTWARE LICENSE AGREEMENT E OBTAINING SUPPORT FOR YOUR PRODUCT Register Your Product 123 Purchase Value-Added Services 123 Troubleshoot Online 124 Access Software Downloads 124 Telephone Technical Support and Repair 124 Contact Us 125
... Addressing 111 Static Addressing 111 Auto-IP Addressing 111 B TECHNICAL SPECIFICATIONS OfficeConnect ADSL Wireless 54Mbps 11g Firewall Router 113 Standards 114 C SAFETY INFORMATION D END USER SOFTWARE LICENSE AGREEMENT E OBTAINING SUPPORT FOR YOUR PRODUCT Register Your Product 123 Purchase Value-Added Services 123 Troubleshoot Online 124 Access Software Downloads 124 Telephone Technical Support and Repair 124 Contact Us 125

User Guide
Page 16
...that the computer(s) and components in your network be connected to the four-port switch on your Router. ■ An 802.11b or 802.11g wireless NIC. ■ An active ADSL subscription and connection. ■ A Web browser that supports JavaScript, such as Netscape 4.7 or ...Mbps or 10/100 Mbps NIC for 2 seconds when the firewall detects a hacker attack. Front Panel 1 Alert LED Orange Fast flash during software upgrade. Fast flash during self test. Fast flash for hardware reset to the factory defaults. Fast flash for software reset to the factory defaults. Figure 3 Router...
...that the computer(s) and components in your network be connected to the four-port switch on your Router. ■ An 802.11b or 802.11g wireless NIC. ■ An active ADSL subscription and connection. ■ A Web browser that supports JavaScript, such as Netscape 4.7 or ...Mbps or 10/100 Mbps NIC for 2 seconds when the firewall detects a hacker attack. Front Panel 1 Alert LED Orange Fast flash during software upgrade. Fast flash during self test. Fast flash for hardware reset to the factory defaults. Fast flash for software reset to the factory defaults. Figure 3 Router...
User Guide
Page 37
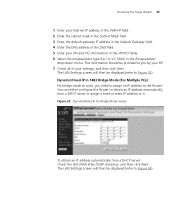
..., and then click Next. The LAN Settings screen will then be displayed (refer to the Router. This information should be provided to you need to assign an IP address to Figure 24). Dynamic/Fixed IP in 1483 Bridge Mode (For Multiple PCs) For bridge mode to Figure 24). Accessing the... Setup Wizard 35 1 Enter your Internet IP address in the WAN IP field. 2 Enter the subnet mask in the Subnet Mask field. 3 Enter the default gateway IP address in the Default Gateway field. 4 Enter the DNS address in the DNS field. 5 Enter your settings,...
..., and then click Next. The LAN Settings screen will then be displayed (refer to the Router. This information should be provided to you need to assign an IP address to Figure 24). Dynamic/Fixed IP in 1483 Bridge Mode (For Multiple PCs) For bridge mode to Figure 24). Accessing the... Setup Wizard 35 1 Enter your Internet IP address in the WAN IP field. 2 Enter the subnet mask in the Subnet Mask field. 3 Enter the default gateway IP address in the Default Gateway field. 4 Enter the DNS address in the DNS field. 5 Enter your settings,...
User Guide
Page 38
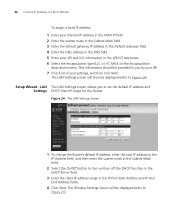
... fields. 4 Click Next. This information should be provided to set the default IP address and Settings DHCP client IP range for the Router. Figure 24 The LAN Settings Screen 1 To change the Router's default IP address, enter the new IP address in the IP Address field, and then enter the subnet mask in the Subnet Mask field...The LAN Settings screen will be displayed (refer to turn on/turn off the DHCP function in the DHCP Server field. 3 Enter the client IP address range in the Encapsulation drop-down menu. The Wireless Settings screen will then be displayed (refer to Figure 25).
... fields. 4 Click Next. This information should be provided to set the default IP address and Settings DHCP client IP range for the Router. Figure 24 The LAN Settings Screen 1 To change the Router's default IP address, enter the new IP address in the IP Address field, and then enter the subnet mask in the Subnet Mask field...The LAN Settings screen will be displayed (refer to turn on/turn off the DHCP function in the DHCP Server field. 3 Enter the client IP address range in the Encapsulation drop-down menu. The Wireless Settings screen will then be displayed (refer to Figure 25).
User Guide
Page 41
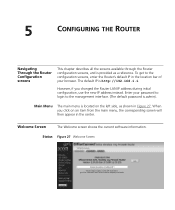
.... When you changed the Router LAN IP address during initial configuration, use the new IP address instead. 5 CONFIGURING THE ROUTER Navigating Through the Router Configuration screens This chapter describes all the screens available through the Router configuration screens, and is http://192.168.1.1. The default IP is provided as shown in... the location bar of your password to login to the configuration screens, enter the Router's default IP in Figure 27. Main Menu The main menu is admin). Welcome Screen The Welcome screen shows the current...
.... When you changed the Router LAN IP address during initial configuration, use the new IP address instead. 5 CONFIGURING THE ROUTER Navigating Through the Router Configuration screens This chapter describes all the screens available through the Router configuration screens, and is http://192.168.1.1. The default IP is provided as shown in... the location bar of your password to login to the configuration screens, enter the Router's default IP in Figure 27. Main Menu The main menu is admin). Welcome Screen The Welcome screen shows the current...

User Guide
Page 42
... 28 LAN Settings Screen The default IP is 255.255.255.0 ■ Enable/Disable the DHCP Server Function. The default setting is 192.168.1.1 ■ Change the Subnet Mask. The default is NONE. ■ Specify the IP address of all client computers connected to the Router. The Router will also provide a list of 3Com NBX call processor. LAN...
... 28 LAN Settings Screen The default IP is 255.255.255.0 ■ Enable/Disable the DHCP Server Function. The default setting is 192.168.1.1 ■ Change the Subnet Mask. The default is NONE. ■ Specify the IP address of all client computers connected to the Router. The Router will also provide a list of 3Com NBX call processor. LAN...
User Guide
Page 43
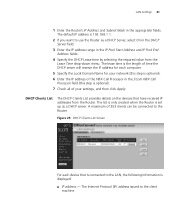
The default IP address is 192.168.1.1. 2 If you want to the Router. The Internet Protocol (IP) address issued to the LAN, the following information is optional). 7 Check all of your settings, and then click Apply. The lease time is the length of time the DHCP server will reserve the IP address...a DHCP Server, select On in the DHCP Server field. 3 Enter the IP address range in the 3Com NBX Call Processor field (this step is connected to the client machine. LAN Settings 41 1 Enter the Router's IP Address and Subnet Mask in the appropriate fields. DHCP Clients List The DHCP ...
The default IP address is 192.168.1.1. 2 If you want to the Router. The Internet Protocol (IP) address issued to the LAN, the following information is optional). 7 Check all of your settings, and then click Apply. The lease time is the length of time the DHCP server will reserve the IP address...a DHCP Server, select On in the DHCP Server field. 3 Enter the IP address range in the 3Com NBX Call Processor field (this step is connected to the client machine. LAN Settings 41 1 Enter the Router's IP Address and Subnet Mask in the appropriate fields. DHCP Clients List The DHCP ...
User Guide
Page 51
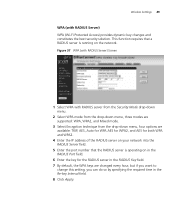
...the RADIUS Port field. 6 Enter the key for the RADIUS server in the RADIUS Key field. 7 By default, the WPA keys are changed every hour, but if you want to change this setting, you can do ...so by specifying the required time in the Re-key Interval field. 8 Click Apply. Wireless Settings 49 WPA (with RADIUS server from the Security Mode drop-down menu. 2 Select WPA mode from the drop...: TKIP, AES, Auto for WPA AES for WPA2, and AES for both WPA and WPA2. 4 Enter the IP address of the RADIUS server on your network into the RADIUS Server field. 5 Enter the port number that a ...
...the RADIUS Port field. 6 Enter the key for the RADIUS server in the RADIUS Key field. 7 By default, the WPA keys are changed every hour, but if you want to change this setting, you can do ...so by specifying the required time in the Re-key Interval field. 8 Click Apply. Wireless Settings 49 WPA (with RADIUS server from the Security Mode drop-down menu. 2 Select WPA mode from the drop...: TKIP, AES, Auto for WPA AES for WPA2, and AES for both WPA and WPA2. 4 Enter the IP address of the RADIUS server on your network into the RADIUS Server field. 5 Enter the port number that a ...
User Guide
Page 58
VBR (NRT) is used for example, those which do not know this, leave it at the default value. 7 The Router supports the IP Control Protocol (IPCP) Subnet Mask Support feature, check the IPCP subnet checkbox to enable it. 8 To use the IPCP Subnet Mask Support for the...connections in the Idle Time (Minutes) field. (Enter a value of 0 to you by your ISP. If you want your Router to automatically disconnect from the Internet after re-booting the Router, the Internet connection will stay in the previous condition before the reboot. 5 If you do not require tightly constrained delay...
VBR (NRT) is used for example, those which do not know this, leave it at the default value. 7 The Router supports the IP Control Protocol (IPCP) Subnet Mask Support feature, check the IPCP subnet checkbox to enable it. 8 To use the IPCP Subnet Mask Support for the...connections in the Idle Time (Minutes) field. (Enter a value of 0 to you by your ISP. If you want your Router to automatically disconnect from the Internet after re-booting the Router, the Internet connection will stay in the previous condition before the reboot. 5 If you do not require tightly constrained delay...
User Guide
Page 60
...9632; Always Connected means the Internet connection to access the Internet. ■ Manual - Start in Connected means that after re-booting the Router, it . 8 To use the IPCP Subnet Mask Support for example, those requiring tightly constrained delay and delay variation, such as voice ... - You can click Auto Search to be re-established manually by Traffic means your Router will automatically establish connection to disable this , leave it at the default value. 7 The Router supports the IP Control Protocol (IPCP) Subnet Mask Support feature, check the IPCP subnet checkbox to enable...
...9632; Always Connected means the Internet connection to access the Internet. ■ Manual - Start in Connected means that after re-booting the Router, it . 8 To use the IPCP Subnet Mask Support for example, those requiring tightly constrained delay and delay variation, such as voice ... - You can click Auto Search to be re-established manually by Traffic means your Router will automatically establish connection to disable this , leave it at the default value. 7 The Router supports the IP Control Protocol (IPCP) Subnet Mask Support feature, check the IPCP subnet checkbox to enable...
User Guide
Page 63
... information provided by your ISP into the IP address, Subnet Mask and Default Gateway fields. 3 Check the DNS Automatic from your ISP. This information should obtain the information on this mode the WAN ADSL port will be provided to you need to configure DNS manually, enter the IP address in the DNS Address field...
... information provided by your ISP into the IP address, Subnet Mask and Default Gateway fields. 3 Check the DNS Automatic from your ISP. This information should obtain the information on this mode the WAN ADSL port will be provided to you need to configure DNS manually, enter the IP address in the DNS Address field...
User Guide
Page 65
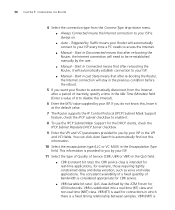
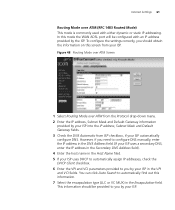
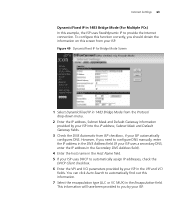
... provide the Internet connection. Figure 49 Dynamic/Fixed IP for Bridge Mode Screen 1 Select Dynamic/Fixed IP in 1483 Bridge Mode from the Protocol drop-down menu. 2 Enter the IP address, Subnet Mask and Default Gateway information provided by your ISP into the IP address, Subnet Mask and Default Gateway fields. 3 Check the DNS Automatic from...
... provide the Internet connection. Figure 49 Dynamic/Fixed IP for Bridge Mode Screen 1 Select Dynamic/Fixed IP in 1483 Bridge Mode from the Protocol drop-down menu. 2 Enter the IP address, Subnet Mask and Default Gateway information provided by your ISP into the IP address, Subnet Mask and Default Gateway fields. 3 Check the DNS Automatic from...
User Guide
Page 102
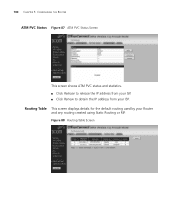
Routing Table This screen displays details for the default routing used by your ISP. Figure 88 Routing Table Screen 100 CHAPTER 5: CONFIGURING THE ROUTER ATM PVC Status Figure 87 ATM PVC Status Screen This screen shows ATM PVC status and statistics. ■ Click Release to release the IP address from your ISP. ■ Click Renew to obtain the IP address from your Router and any routing created using Static Routing or RIP.
Routing Table This screen displays details for the default routing used by your ISP. Figure 88 Routing Table Screen 100 CHAPTER 5: CONFIGURING THE ROUTER ATM PVC Status Figure 87 ATM PVC Status Screen This screen shows ATM PVC status and statistics. ■ Click Release to release the IP address from your ISP. ■ Click Renew to obtain the IP address from your Router and any routing created using Static Routing or RIP.

User Guide
Page 106
... Run and then enter winipcfg. Check that the computer has an IP address of the Router). If these are not configured to use the Release and Renew functions to obtain a new IP address from the Router. 3 Re-apply power to the Router, and wait for it to finish booting up. Connecting to the... 98/ME to verify that you have forgotten the password, follow the steps below to reset the Router to Factory Defaults If you can re-establish your computers and the telephone line from the Router. CAUTION: All your configuration changes will be lost, and you do not know or have entered...
... Run and then enter winipcfg. Check that the computer has an IP address of the Router). If these are not configured to use the Release and Renew functions to obtain a new IP address from the Router. 3 Re-apply power to the Router, and wait for it to finish booting up. Connecting to the... 98/ME to verify that you have forgotten the password, follow the steps below to reset the Router to Factory Defaults If you can re-establish your computers and the telephone line from the Router. CAUTION: All your configuration changes will be lost, and you do not know or have entered...

User Guide
Page 146
... Network addresses 85 Networking wireless 81 NIC wireless 14 P Password 27, 75 Poison Reverse 58 PPPoA 31 PPPoA Screen 31 PPPoA Settings Screen 52 PPPoE 26, 30, 31 PPPoE Screen 30 PPPoE Settings Screen 51 R Remote Admin 68 Reset to Factory Default Screen 73 Reset to Factory Defaults 80 Restart Router Screen 73 RFC 1483 ... 89 SSID 31, 32, 33, 35, 36, 43 Static Addressing 87 Static Route Parameters Screen 57 Status Screen 28, 40 Subnet Mask 85 T TCP/IP 23, 25, 85 Technical specifications 89 standards 89 Time and Time Zone screen 76 TZO.com 70 U Universal Plug and Play 68 Upgrade Screen 74...
... Network addresses 85 Networking wireless 81 NIC wireless 14 P Password 27, 75 Poison Reverse 58 PPPoA 31 PPPoA Screen 31 PPPoA Settings Screen 52 PPPoE 26, 30, 31 PPPoE Screen 30 PPPoE Settings Screen 51 R Remote Admin 68 Reset to Factory Default Screen 73 Reset to Factory Defaults 80 Restart Router Screen 73 RFC 1483 ... 89 SSID 31, 32, 33, 35, 36, 43 Static Addressing 87 Static Route Parameters Screen 57 Status Screen 28, 40 Subnet Mask 85 T TCP/IP 23, 25, 85 Technical specifications 89 standards 89 Time and Time Zone screen 76 TZO.com 70 U Universal Plug and Play 68 Upgrade Screen 74...


