User Guide
Page 3
...User Guide 8 Related Documentation 9 1 INTRODUCING THE ROUTER OfficeConnect Cable/DSL Router 11 Router Advantages 13 Package Contents 13 Minimum System and Component Requirements 14 Front Panel 14 Rear Panel 16 2 HARDWARE INSTALLATION Introduction 17 Safety Information 17 Positioning the Router 17 Using the Rubber Feet 18 Wall Mounting ...18 Connecting the Router 18 3 SETTING UP YOUR COMPUTERS Obtaining an IP Address Automatically 21 Windows 2000 21...
...User Guide 8 Related Documentation 9 1 INTRODUCING THE ROUTER OfficeConnect Cable/DSL Router 11 Router Advantages 13 Package Contents 13 Minimum System and Component Requirements 14 Front Panel 14 Rear Panel 16 2 HARDWARE INSTALLATION Introduction 17 Safety Information 17 Positioning the Router 17 Using the Rubber Feet 18 Wall Mounting ...18 Connecting the Router 18 3 SETTING UP YOUR COMPUTERS Obtaining an IP Address Automatically 21 Windows 2000 21...
User Guide
Page 4
... Wizard 25 Password 27 Time Zone 28 Connection Type 29 DNS 35 Hostname and MAC Address 36 LAN Settings 37 Configuration Summary 38 5 ROUTER CONFIGURATION Navigating Through the Router Configuration Pages 39 Main Menu 39 LAN Settings 40 Internet Settings 42 Connection to ISP 43 DNS 49 Hostname & MAC 50 Firewall 50... 63 VPN 64 Adding an IPSec Connection 67 Adding an L2TP over IPSec Connection 68 Adding a PPTP Connection 70 SNMP 71 System Tools 72 Restart Router 73 Reset to Factory Defaults 73 Backup/Restore Settings 74 Upgrade 75
... Wizard 25 Password 27 Time Zone 28 Connection Type 29 DNS 35 Hostname and MAC Address 36 LAN Settings 37 Configuration Summary 38 5 ROUTER CONFIGURATION Navigating Through the Router Configuration Pages 39 Main Menu 39 LAN Settings 40 Internet Settings 42 Connection to ISP 43 DNS 49 Hostname & MAC 50 Firewall 50... 63 VPN 64 Adding an IPSec Connection 67 Adding an L2TP over IPSec Connection 68 Adding a PPTP Connection 70 SNMP 71 System Tools 72 Restart Router 73 Reset to Factory Defaults 73 Backup/Restore Settings 74 Upgrade 75

User Guide
Page 5
... Status and Logs 87 Status 87 Traffic Metering 88 Logs 88 Support/Feedback 89 Support 89 Feedback 90 6 TROUBLESHOOTING Basic Connection Checks 91 Browsing to the Router Configuration Screens 91 Connecting to the Internet 92 Forgotten Password and Reset to Factory Defaults 93 Alert LED 93 Power LED or Power Adapter OK LED...
... Status and Logs 87 Status 87 Traffic Metering 88 Logs 88 Support/Feedback 89 Support 89 Feedback 90 6 TROUBLESHOOTING Basic Connection Checks 91 Browsing to the Router Configuration Screens 91 Connecting to the Internet 92 Forgotten Password and Reset to Factory Defaults 93 Alert LED 93 Power LED or Power Adapter OK LED...

User Guide
Page 6
B ISP INFORMATION C TECHNICAL SPECIFICATIONS OfficeConnect Cable/DSL Router 105 Standards 105 D SAFETY INFORMATION E OBTAINING SUPPORT FOR YOUR PRODUCT Register Your Product to Gain Service Benefits 111 Purchase Value-Added Services 111 Troubleshoot Online 111 Access Software Downloads 112 Contact Us 112 Telephone Technical Support and Repair 112 F END USER SOFTWARE LICENSE AGREEMENT GLOSSARY REGULATORY NOTICES INDEX
B ISP INFORMATION C TECHNICAL SPECIFICATIONS OfficeConnect Cable/DSL Router 105 Standards 105 D SAFETY INFORMATION E OBTAINING SUPPORT FOR YOUR PRODUCT Register Your Product to Gain Service Benefits 111 Purchase Value-Added Services 111 Troubleshoot Online 111 Access Software Downloads 112 Contact Us 112 Telephone Technical Support and Repair 112 F END USER SOFTWARE LICENSE AGREEMENT GLOSSARY REGULATORY NOTICES INDEX
User Guide
Page 7
... Web site: http://www.3com.com Naming Convention Throughout this guide. Most user guides and release notes are referred to install and configure the OfficeConnect Cable/DSL Router (3CR858-91). Category 3 and Category 5 Twisted Pair Cables are available in the release note. This guide is referred to as Twisted Pair Cables throughout this guide, the OfficeConnect Cable/DSL Router is intended for use...
... Web site: http://www.3com.com Naming Convention Throughout this guide. Most user guides and release notes are referred to install and configure the OfficeConnect Cable/DSL Router (3CR858-91). Category 3 and Category 5 Twisted Pair Cables are available in the release note. This guide is referred to as Twisted Pair Cables throughout this guide, the OfficeConnect Cable/DSL Router is intended for use...
User Guide
Page 9
Related In addition to this e-mail address for your Router. This guide contains the instructions you need to Appendix E "Obtaining Support for technical support questions. For information about contacting Technical Support, please refer to install and configure your Product". Conventions 9 Example: ■ OfficeConnect Cable/DSL Router User Guide ■ Part Number DUA8589-1AAA01 ■ Page 24 Do not use this guide, each Router document set includes one Documentation Installation Guide.
Related In addition to this e-mail address for your Router. This guide contains the instructions you need to Appendix E "Obtaining Support for technical support questions. For information about contacting Technical Support, please refer to install and configure your Product". Conventions 9 Example: ■ OfficeConnect Cable/DSL Router User Guide ■ Part Number DUA8589-1AAA01 ■ Page 24 Do not use this guide, each Router document set includes one Documentation Installation Guide.
User Guide
Page 11
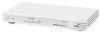
... on for the other private networks. OfficeConnect Cable/DSL Router The OfficeConnect Cable/DSL Router is crucial. The Router also includes an electronic "firewall" that protects your computers. This completely equipped, Cable/DSL Router also features Virtual Private Network (VPN) initiation and termination, allowing encrypted links to the world of networking with 3Com®. 1 INTRODUCING THE ROUTER Welcome to other computers on the network...
... on for the other private networks. OfficeConnect Cable/DSL Router The OfficeConnect Cable/DSL Router is crucial. The Router also includes an electronic "firewall" that protects your computers. This completely equipped, Cable/DSL Router also features Virtual Private Network (VPN) initiation and termination, allowing encrypted links to the world of networking with 3Com®. 1 INTRODUCING THE ROUTER Welcome to other computers on the network...
User Guide
Page 12
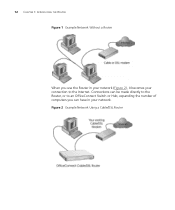
Figure 2 Example Network Using a Cable/DSL Router Connections can be made directly to the Router, or to an OfficeConnect Switch or Hub, expanding the number of computers you use the Router in your connection to the Internet. 12 CHAPTER 1: INTRODUCING THE ROUTER Figure 1 Example Network Without a Router When you can have in your network (Figure 2), it becomes your network.
Figure 2 Example Network Using a Cable/DSL Router Connections can be made directly to the Router, or to an OfficeConnect Switch or Hub, expanding the number of computers you use the Router in your connection to the Internet. 12 CHAPTER 1: INTRODUCING THE ROUTER Figure 1 Example Network Without a Router When you can have in your network (Figure 2), it becomes your network.

User Guide
Page 13
...connection for use , Web-based setup and configuration ■ Provides centralization of these items are missing or damaged, please contact your retailer. The Cable/DSL Router also provides shared internet connection ■ No need for a dedicated, "always on" computer serving as your Internet connection ■ Cross-platform...address settings (DHCP) ■ Acts as a Virtual server to enable remote access to protect network traffic Package Contents The Router kit includes the following items: ■ One OfficeConnect Cable/DSL Router ■ One power adapter for wired computers.
...connection for use , Web-based setup and configuration ■ Provides centralization of these items are missing or damaged, please contact your retailer. The Cable/DSL Router also provides shared internet connection ■ No need for a dedicated, "always on" computer serving as your Internet connection ■ Cross-platform...address settings (DHCP) ■ Acts as a Virtual server to enable remote access to protect network traffic Package Contents The Router kit includes the following items: ■ One OfficeConnect Cable/DSL Router ■ One power adapter for wired computers.
User Guide
Page 14
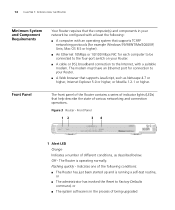
... higher). ■ An Ethernet 10Mbps or 10/100 Mbps NIC for connection to your Router. ■ A cable or DSL broadband connection to the four-port switch on your Router. ■ A Web browser that supports JavaScript, such as described below. Figure 3 Router - The Router is in your network be connected to the Internet, with a suitable modem. The...
... higher). ■ An Ethernet 10Mbps or 10/100 Mbps NIC for connection to your Router. ■ A cable or DSL broadband connection to the four-port switch on your Router. ■ A Web browser that supports JavaScript, such as described below. Figure 3 Router - The Router is in your network be connected to the Internet, with a suitable modem. The...
User Guide
Page 15
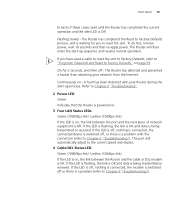
...OK and data is OK. To do this, remove power, wait 10 seconds and then re-apply power. Refer to Chapter 6 "Troubleshooting"). The Router has completed the Reset to Factory Defaults process, and is a problem (refer to Chapter 6 "Troubleshooting". 2 Power LED Green Indicates that the... Defaults, refer to "Forgotten Password and Reset to the correct speed and duplex. 4 Cable/DSL Status LED Green (100Mbps link) / yellow (10Mbps link) If the LED is on , the link between the Router and the cable or DSL modem is a problem with your network from the Internet. The port will then enter ...
...OK and data is OK. To do this, remove power, wait 10 seconds and then re-apply power. Refer to Chapter 6 "Troubleshooting"). The Router has completed the Reset to Factory Defaults process, and is a problem (refer to Chapter 6 "Troubleshooting". 2 Power LED Green Indicates that the... Defaults, refer to "Forgotten Password and Reset to the correct speed and duplex. 4 Cable/DSL Status LED Green (100Mbps link) / yellow (10Mbps link) If the LED is on , the link between the Router and the cable or DSL modem is a problem with your network from the Internet. The port will then enter ...

User Guide
Page 16
... 5 Power Adapter Socket Only use any other adapter. 6 Ethernet Cable/DSL port Use the supplied patch cable to connect the Router to the Router. The LAN ports are configured as MDIX, for connection to a computer with a straight through RJ-45 cable. 8 Power Adapter OK LED Green Indicates that has an Ethernet ...automatically adjust to the correct speed and duplex. 7 Four 10/100 LAN ports Using suitable RJ-45 cable, you can connect your cable or DSL modem. 16 CHAPTER 1: INTRODUCING THE ROUTER Rear Panel The rear panel (Figure 4) of equipment that the power adapter is off, there may ...
... 5 Power Adapter Socket Only use any other adapter. 6 Ethernet Cable/DSL port Use the supplied patch cable to connect the Router to the Router. The LAN ports are configured as MDIX, for connection to a computer with a straight through RJ-45 cable. 8 Power Adapter OK LED Green Indicates that has an Ethernet ...automatically adjust to the correct speed and duplex. 7 Four 10/100 LAN ports Using suitable RJ-45 cable, you can connect your cable or DSL modem. 16 CHAPTER 1: INTRODUCING THE ROUTER Rear Panel The rear panel (Figure 4) of equipment that the power adapter is off, there may ...
User Guide
Page 17
... Appendix D before you through a basic installation of the Router, including: ■ "Positioning the Router". ■ "Connecting the Router". When positioning your Router, ensure: ■ It is out of direct sunlight and away from power lines, fluorescent lighting fixtures, and sources of heat. ■ Cabling is conveniently located for connection to the telephone socket. ■ allows...
... Appendix D before you through a basic installation of the Router, including: ■ "Positioning the Router". ■ "Connecting the Router". When positioning your Router, ensure: ■ It is out of direct sunlight and away from power lines, fluorescent lighting fixtures, and sources of heat. ■ Cabling is conveniently located for connection to the telephone socket. ■ allows...

User Guide
Page 18
...a standard electrical wall socket. When in the side of the case is not restricted. 3Com recommends you use is within reach of the Router. 2 Plug the power adapter into the power adapter socket located on to the wall... and move it over the screw heads. Connecting the Router To power up and off the wall. To do not wall mount stacked units. Using ...the Rubber Feet Use the four self-adhesive rubber feet to prevent your Router from moving around the unit and through the vents in line, gently push the unit on the ...
...a standard electrical wall socket. When in the side of the case is not restricted. 3Com recommends you use is within reach of the Router. 2 Plug the power adapter into the power adapter socket located on to the wall... and move it over the screw heads. Connecting the Router To power up and off the wall. To do not wall mount stacked units. Using ...the Rubber Feet Use the four self-adhesive rubber feet to prevent your Router from moving around the unit and through the vents in line, gently push the unit on the ...

User Guide
Page 19
Figure 5 Connecting the Router Your existing Cable/DSL Modem Internet LAN Status Cable/DSL 3C857 OfficeConnect Cable/DSL Gateway Alert OfficeConnect Cable/DSL Router OfficeConnect Switch Connecting the Router 19 3 Ensure that your computer to the modem. Check that the LAN Status LED for an example configuration. Check that the Cable/DSL Status LED lights. 5 Connect your modem and computer are both switched on. 4 Use the supplied cable to connect the Router's Ethernet Cable/DSL port to one of the 10/100 LAN ports on the Router. See Figure 5 for the port lights green.
Figure 5 Connecting the Router Your existing Cable/DSL Modem Internet LAN Status Cable/DSL 3C857 OfficeConnect Cable/DSL Gateway Alert OfficeConnect Cable/DSL Router OfficeConnect Switch Connecting the Router 19 3 Ensure that your computer to the modem. Check that the LAN Status LED for an example configuration. Check that the Cable/DSL Status LED lights. 5 Connect your modem and computer are both switched on. 4 Use the supplied cable to connect the Router's Ethernet Cable/DSL port to one of the 10/100 LAN ports on the Router. See Figure 5 for the port lights green.
User Guide
Page 21
... similar to Figure 6 should be configured correctly for your particular operating system to ensure that your computers are using DHCP. 3 SETTING UP YOUR COMPUTERS The Router has the ability to dynamically allocate network addresses to the computers on your network, using a Windows 2000-based computer, use the following procedure to change...
... similar to Figure 6 should be configured correctly for your particular operating system to ensure that your computers are using DHCP. 3 SETTING UP YOUR COMPUTERS The Router has the ability to dynamically allocate network addresses to the computers on your network, using a Windows 2000-based computer, use the following procedure to change...

User Guide
Page 24
... PPPoE client software from your computer to free resources, as it . Ensure that the Use Proxy Server option is not required for use with the Router. To do not have PPPoE client software installed on your computer, you have a web proxy enabled on Internet Options. 3 Select the Connections Tab. 24 CHAPTER...
... PPPoE client software from your computer to free resources, as it . Ensure that the Use Proxy Server option is not required for use with the Router. To do not have PPPoE client software installed on your computer, you have a web proxy enabled on Internet Options. 3 Select the Connections Tab. 24 CHAPTER...

User Guide
Page 25
To use the Setup Wizard: 1 Ensure that it is Web-based, which means that you have at least one computer connected to do this. 2 Launch your Web browser on how to the Router. Refer to Chapter 2 for details on the computer. 3 Enter the following URL in Figure 9). 4 RUNNING THE SETUP WIZARD Accessing the Wizard The Router setup program is accessed through your browser: http://192.168.1.1 (as shown in the location or address field of your Web browser (Netscape Navigator or Internet Explorer). Figure 9 Web Browser Location Field (Factory Default)
To use the Setup Wizard: 1 Ensure that it is Web-based, which means that you have at least one computer connected to do this. 2 Launch your Web browser on how to the Router. Refer to Chapter 2 for details on the computer. 3 Enter the following URL in Figure 9). 4 RUNNING THE SETUP WIZARD Accessing the Wizard The Router setup program is accessed through your browser: http://192.168.1.1 (as shown in the location or address field of your Web browser (Netscape Navigator or Internet Explorer). Figure 9 Web Browser Location Field (Factory Default)
User Guide
Page 26
... any time, click Next to move to the next screen, click Back to return to the previous screen, or click Cancel to change the Router settings. Figure 10 Router Login Screen 4 Log in by step through a basic setup procedure, described in . Be sure to bookmark this screen for easy reference if you...
... any time, click Next to move to the next screen, click Back to return to the previous screen, or click Cancel to change the Router settings. Figure 10 Router Login Screen 4 Log in by step through a basic setup procedure, described in . Be sure to bookmark this screen for easy reference if you...
User Guide
Page 27
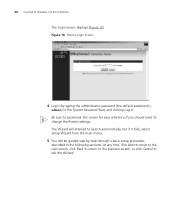
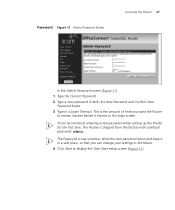
This is the amount of time you want the Router to remain inactive before it in a safe place, so that you can change your settings in a Login Timeout. The Password is shipped from the factory ... password in both the New Password and Confirm New Password boxes. 3 Type in the future. 4 Click Next to the login screen. 3Com recommends entering a new password when setting up the Router for the first time. Write the new password down and keep it returns to display the Time Zone setup screen (Figure...
This is the amount of time you want the Router to remain inactive before it in a safe place, so that you can change your settings in a Login Timeout. The Password is shipped from the factory ... password in both the New Password and Confirm New Password boxes. 3 Type in the future. 4 Click Next to the login screen. 3Com recommends entering a new password when setting up the Router for the first time. Write the new password down and keep it returns to display the Time Zone setup screen (Figure...

