User Guide
Page 4
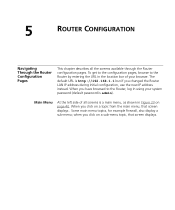
Disabling Web Proxy 24 4 RUNNING THE SETUP WIZARD Accessing the Wizard 25 Password 27 Time Zone 28 Connection Type 29 DNS 35 Hostname and MAC Address 36 LAN Settings 37 Configuration Summary 38 5 ROUTER CONFIGURATION Navigating Through the Router Configuration Pages 39 Main Menu 39 LAN Settings 40 Internet Settings 42 Connection to ISP... 63 VPN 64 Adding an IPSec Connection 67 Adding an L2TP over IPSec Connection 68 Adding a PPTP Connection 70 SNMP 71 System Tools 72 Restart Router 73 Reset to Factory Defaults 73 Backup/Restore Settings 74 Upgrade 75
Disabling Web Proxy 24 4 RUNNING THE SETUP WIZARD Accessing the Wizard 25 Password 27 Time Zone 28 Connection Type 29 DNS 35 Hostname and MAC Address 36 LAN Settings 37 Configuration Summary 38 5 ROUTER CONFIGURATION Navigating Through the Router Configuration Pages 39 Main Menu 39 LAN Settings 40 Internet Settings 42 Connection to ISP... 63 VPN 64 Adding an IPSec Connection 67 Adding an L2TP over IPSec Connection 68 Adding a PPTP Connection 70 SNMP 71 System Tools 72 Restart Router 73 Reset to Factory Defaults 73 Backup/Restore Settings 74 Upgrade 75

User Guide
Page 5
... 87 Traffic Metering 88 Logs 88 Support/Feedback 89 Support 89 Feedback 90 6 TROUBLESHOOTING Basic Connection Checks 91 Browsing to the Router Configuration Screens 91 Connecting to the Internet 92 Forgotten Password and Reset to Factory Defaults 93 Alert LED 93 Power LED or Power Adapter OK LED Not Lit 94 Replacement Power Adapters 94...
... 87 Traffic Metering 88 Logs 88 Support/Feedback 89 Support 89 Feedback 90 6 TROUBLESHOOTING Basic Connection Checks 91 Browsing to the Router Configuration Screens 91 Connecting to the Internet 92 Forgotten Password and Reset to Factory Defaults 93 Alert LED 93 Power LED or Power Adapter OK LED Not Lit 94 Replacement Power Adapters 94...
User Guide
Page 15
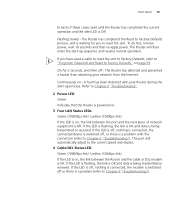
... speed and duplex. 4 Cable/DSL Status LED Green (100Mbps link) / yellow (10Mbps link) If the LED is on , the link between the Router and the cable or DSL modem is a problem with your network from attacking your Router during the start -up process. The Router has detected and prevented a...OK and data is being transmitted or received. On for you have used a cable to reset the unit to Factory Defaults, refer to "Forgotten Password and Reset to Chapter 6 "Troubleshooting". 2 Power LED Green Indicates that the Router is powered on. 3 Four LAN Status LEDs Green (100Mbps link) / yellow...
... speed and duplex. 4 Cable/DSL Status LED Green (100Mbps link) / yellow (10Mbps link) If the LED is on , the link between the Router and the cable or DSL modem is a problem with your network from attacking your Router during the start -up process. The Router has detected and prevented a...OK and data is being transmitted or received. On for you have used a cable to reset the unit to Factory Defaults, refer to "Forgotten Password and Reset to Chapter 6 "Troubleshooting". 2 Power LED Green Indicates that the Router is powered on. 3 Four LAN Status LEDs Green (100Mbps link) / yellow...
User Guide
Page 26
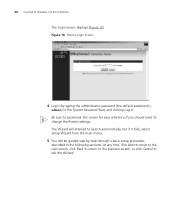
... . At any time, click Next to move to the next screen, click Back to return to the previous screen, or click Cancel to change the Router settings. 26 CHAPTER 4: RUNNING THE SETUP WIZARD The Login screen displays (Figure 10). Be sure to bookmark this screen for easy reference if you should... will attempt to launch automatically, but if it fails, select Setup Wizard from the main menu. 5 You will be guided step by typing the administrator password (the default password is admin) in the System Password field, and clicking Log in the following sections.
... . At any time, click Next to move to the next screen, click Back to return to the previous screen, or click Cancel to change the Router settings. 26 CHAPTER 4: RUNNING THE SETUP WIZARD The Login screen displays (Figure 10). Be sure to bookmark this screen for easy reference if you should... will attempt to launch automatically, but if it fails, select Setup Wizard from the main menu. 5 You will be guided step by typing the administrator password (the default password is admin) in the System Password field, and clicking Log in the following sections.
User Guide
Page 27
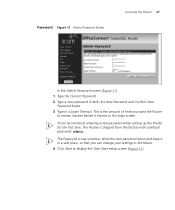
... factory with a default password, admin. Password Figure 11 Admin Password Screen Accessing the Wizard 27 In the Admin Password screen (Figure 11) 1 Type the Current Password. 2 Type a new password in both the New Password and Confirm New Password boxes. 3 Type in the future. 4 Click Next to the login screen. 3Com recommends entering a new password when setting up the Router for the first...
... factory with a default password, admin. Password Figure 11 Admin Password Screen Accessing the Wizard 27 In the Admin Password screen (Figure 11) 1 Type the Current Password. 2 Type a new password in both the New Password and Confirm New Password boxes. 3 Type in the future. 4 Click Next to the login screen. 3Com recommends entering a new password when setting up the Router for the first...
User Guide
Page 31
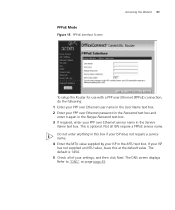
...supplied by your ISP in the Service Name text box. Do not enter anything in this at the default value. The DNS screen displays Refer to "DNS" on page page 35. PPPoE Mode Figure 15... PPPoE Interface Screen Accessing the Wizard 31 To setup the Router for use with a PPP over Ethernet (PPPoE) connection, do the following: 1 Enter your PPP over ...name in the User Name text box. 2 Enter your PPP over Ethernet password in the Password text box and enter it again in the Retype Password text box. 3 If required, enter your PPP over Ethernet service name in...
...supplied by your ISP in the Service Name text box. Do not enter anything in this at the default value. The DNS screen displays Refer to "DNS" on page page 35. PPPoE Mode Figure 15... PPPoE Interface Screen Accessing the Wizard 31 To setup the Router for use with a PPP over Ethernet (PPPoE) connection, do the following: 1 Enter your PPP over ...name in the User Name text box. 2 Enter your PPP over Ethernet password in the Password text box and enter it again in the Retype Password text box. 3 If required, enter your PPP over Ethernet service name in...
User Guide
Page 32
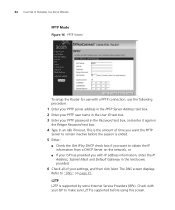
... provided you with a PPTP connection, use with IP address information, enter the IP Address, Subnet Mask and Default Gateway in an Idle Timeout. This is ended. 5 Either: ■ Check the Get IP by some ...(ISPs). 32 CHAPTER 4: RUNNING THE SETUP WIZARD PPTP Mode Figure 16 PPTP Screen To setup the Router for use the following procedure: 1 Enter your PPTP server address in the PPTP Server Address text ...user name in the User ID text box. 3 Enter your PPTP password in the Password text box, and enter it again in the Retype Password text box. 4 Type in the text boxes provided. 6 Check all...
... provided you with a PPTP connection, use with IP address information, enter the IP Address, Subnet Mask and Default Gateway in an Idle Timeout. This is ended. 5 Either: ■ Check the Get IP by some ...(ISPs). 32 CHAPTER 4: RUNNING THE SETUP WIZARD PPTP Mode Figure 16 PPTP Screen To setup the Router for use the following procedure: 1 Enter your PPTP server address in the PPTP Server Address text ...user name in the User ID text box. 3 Enter your PPTP password in the Password text box, and enter it again in the Retype Password text box. 4 Type in the text boxes provided. 6 Check all...
User Guide
Page 33
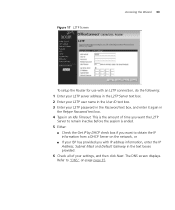
... Screen Accessing the Wizard 33 To setup the Router for use with IP address information, enter the IP Address, Subnet Mask and Default Gateway in the text boxes provided. 6 Check all of your L2TP password in the Password text box, and enter it again in the Retype Password text box. 4 Type in the User ID...
... Screen Accessing the Wizard 33 To setup the Router for use with IP address information, enter the IP Address, Subnet Mask and Default Gateway in the text boxes provided. 6 Check all of your L2TP password in the Password text box, and enter it again in the Retype Password text box. 4 Type in the User ID...
User Guide
Page 39
... screen displays . Some main menu topics, for example Firewall, also display a sub-menu; The default URL is admin). Main Menu At the left side of your system password (default password is http://192.168.1.1 but if you changed the Router LAN IP address during initial configuration, use the new IP address instead. To get to...
... screen displays . Some main menu topics, for example Firewall, also display a sub-menu; The default URL is admin). Main Menu At the left side of your system password (default password is http://192.168.1.1 but if you changed the Router LAN IP address during initial configuration, use the new IP address instead. To get to...
User Guide
Page 45
... box and enter it again in the Retype Password text box. 4 If required, enter your PPP over Ethernet service name in the MTU text box. Do not enter anything in this at the default value. This is ended. 7 If you want to automatically reconnect to remain inactive before the session is optional.... This is the amount of your ISP in the Service Name text box. If your Router: 1 Select PPPoE and then click Next. Not all...
... box and enter it again in the Retype Password text box. 4 If required, enter your PPP over Ethernet service name in the MTU text box. Do not enter anything in this at the default value. This is ended. 7 If you want to automatically reconnect to remain inactive before the session is optional.... This is the amount of your ISP in the Service Name text box. If your Router: 1 Select PPPoE and then click Next. Not all...
User Guide
Page 46
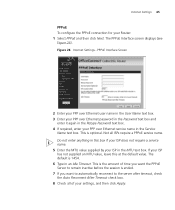
Or: ■ If your PPTP password in the Password text box, and enter it again in the Retype Password text box. 5 Type in the text boxes provided, or 7 Check all of time you with IP address information, enter the IP Address, Subnet Mask and Default Gateway in an Idle Timeout. PPTP Screen... Server to remain inactive before the session is the amount of your Router: 1 Select PPTP and then click Next. The PPTP screen displays (see Figure 27). 46 CHAPTER 5: ROUTER CONFIGURATION PPTP To configure the PPTP connection for the Router, or click Renew to renew the current WAN IP Address, using...
Or: ■ If your PPTP password in the Password text box, and enter it again in the Retype Password text box. 5 Type in the text boxes provided, or 7 Check all of time you with IP address information, enter the IP Address, Subnet Mask and Default Gateway in an Idle Timeout. PPTP Screen... Server to remain inactive before the session is the amount of your Router: 1 Select PPTP and then click Next. The PPTP screen displays (see Figure 27). 46 CHAPTER 5: ROUTER CONFIGURATION PPTP To configure the PPTP connection for the Router, or click Renew to renew the current WAN IP Address, using...

User Guide
Page 47
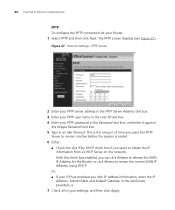
... click Apply. With this check box enabled, you with your L2TP password in the Password text box, and enter it again in the Retype Password text box. 5 Type in an Idle Timeout. Figure 28 Internet ... Internet Settings 47 L2TP Check with IP address information, enter the IP Address, Subnet Mask and Default Gateway in the text boxes provided. 7 Check all of time you want the L2TP Server to ...remain inactive before the session is the amount of your Router: 1 Select L2TP and then click Next. To configure the L2TP connection for the Router, or click Renew to obtain the IP information from...
... click Apply. With this check box enabled, you with your L2TP password in the Password text box, and enter it again in the Retype Password text box. 5 Type in an Idle Timeout. Figure 28 Internet ... Internet Settings 47 L2TP Check with IP address information, enter the IP Address, Subnet Mask and Default Gateway in the text boxes provided. 7 Check all of time you want the L2TP Server to ...remain inactive before the session is the amount of your Router: 1 Select L2TP and then click Next. To configure the L2TP connection for the Router, or click Renew to obtain the IP information from...

User Guide
Page 53
...FIN wait text box, enter the length of a hacker attack. 6 Enter your SMTP Server Address. 7 Enter your SMTP Server User Name. 8 Enter your SMTP Server Password. For example, if you check only the FTP Service check box, all incoming traffic is blocked except for a TCP session to be sent in the... event of time, in seconds, that you want alerts to synchronize before the Router drops it drops the session. The default is no activity. The default is 180 seconds. Alert by E-mail 5 In the Your E-mail Address text box, enter the e-mail address you want ...
...FIN wait text box, enter the length of a hacker attack. 6 Enter your SMTP Server Address. 7 Enter your SMTP Server User Name. 8 Enter your SMTP Server Password. For example, if you check only the FTP Service check box, all incoming traffic is blocked except for a TCP session to be sent in the... event of time, in seconds, that you want alerts to synchronize before the Router drops it drops the session. The default is no activity. The default is 180 seconds. Alert by E-mail 5 In the Your E-mail Address text box, enter the e-mail address you want ...
User Guide
Page 68
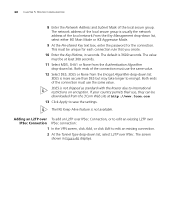
...settings. Both ends of the local secure group. The screen shown in seconds. The default is not available. 68 CHAPTER 5: ROUTER CONFIGURATION 8 Enter the Network Address and Subnet Mask of the connection must use the ... IPSec Connection, or to edit an existing L2TP over IPSec. This must be downloaded from the 3Com Web site at least 300 seconds. 11 Select MD5, SHA1 or None from the Encrypt Algorithm ...IKE Main Mode or IKE Aggressive Mode. 9 At the Pre-shared Key text box, enter the password for each connection rule that you create. 10 Enter the Key lifetime, in Figure 46 displays. ...
...settings. Both ends of the local secure group. The screen shown in seconds. The default is not available. 68 CHAPTER 5: ROUTER CONFIGURATION 8 Enter the Network Address and Subnet Mask of the connection must use the ... IPSec Connection, or to edit an existing L2TP over IPSec. This must be downloaded from the 3Com Web site at least 300 seconds. 11 Select MD5, SHA1 or None from the Encrypt Algorithm ...IKE Main Mode or IKE Aggressive Mode. 9 At the Pre-shared Key text box, enter the password for each connection rule that you create. 10 Enter the Key lifetime, in Figure 46 displays. ...
User Guide
Page 72
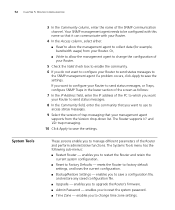
... enables you to Factory Defaults - enables you to collect data (for example, bandwidth usage) from the Version drop-down list. enables you to restart the Router and retain the current system configuration. ■ Reset to upgrade the Router's firmware. ■ Admin Password - Your SNMP management ...channel. The Systems Tools menu has the following sub-menus: ■ Restart Router - These screens enable you to save the settings. Or, ■ Write to allow the management agent to reset the system password. ■ Time Zone - enables you to save a configuration file, ...
... enables you to Factory Defaults - enables you to collect data (for example, bandwidth usage) from the Version drop-down list. enables you to restart the Router and retain the current system configuration. ■ Reset to upgrade the Router's firmware. ■ Admin Password - Your SNMP management ...channel. The Systems Tools menu has the following sub-menus: ■ Restart Router - These screens enable you to save the settings. Or, ■ Write to allow the management agent to reset the system password. ■ Time Zone - enables you to save a configuration file, ...

User Guide
Page 76
... Tools from the main menu, then select Upgrade from your PC to your Router. The file you change the password for added security. The Upgrade screen displays (Figure 52). Admin Password The Router ships with a default password of admin. 3Com recommends that you set a password if you plan to use the Remote management feature of currently saved firmware...
... Tools from the main menu, then select Upgrade from your PC to your Router. The file you change the password for added security. The Upgrade screen displays (Figure 52). Admin Password The Router ships with a default password of admin. 3Com recommends that you set a password if you plan to use the Remote management feature of currently saved firmware...

User Guide
Page 77
Figure 53 Admin Password Screen 2 Enter the current password into the Current password text box. 3 Enter the new password into the New Password and Confirm New Password fields. 4 Type in the Router is used to record the security log and control client filtering. This allows the Router to synchronize the system ... want the Router to the login screen. System Tools 77 To change the password: 1 Select System Tools from the main menu, then select Admin Password from the sub-menu. The Admin Password screen displays (Figure 53). This is 10 minutes. 5 Click Apply. The default is the...
Figure 53 Admin Password Screen 2 Enter the current password into the Current password text box. 3 Enter the new password into the New Password and Confirm New Password fields. 4 Type in the Router is used to record the security log and control client filtering. This allows the Router to synchronize the system ... want the Router to the login screen. System Tools 77 To change the password: 1 Select System Tools from the main menu, then select Admin Password from the sub-menu. The Admin Password screen displays (Figure 53). This is 10 minutes. 5 Click Apply. The default is the...
User Guide
Page 86
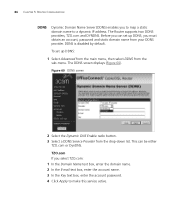
...DDNS from the drop-down list. DDNS is disabled by default. Figure 60 DDNS screen 2 Select the Dynamic DNS Enable radio button. 3 Select a DDNS Service Provider from the sub-menu. The DDNS screen displays (Figure 60). 86 CHAPTER 5: ROUTER CONFIGURATION DDNS Dynamic Domain Name Server (DDNS) enables you... to map a static domain name to make this service active. Before you can be either TZO.com or DynDNS. TZO.com If you must obtain an account, password and static domain name from ...
...DDNS from the drop-down list. DDNS is disabled by default. Figure 60 DDNS screen 2 Select the Dynamic DNS Enable radio button. 3 Select a DDNS Service Provider from the sub-menu. The DDNS screen displays (Figure 60). 86 CHAPTER 5: ROUTER CONFIGURATION DDNS Dynamic Domain Name Server (DDNS) enables you... to map a static domain name to make this service active. Before you can be either TZO.com or DynDNS. TZO.com If you must obtain an account, password and static domain name from ...
User Guide
Page 92
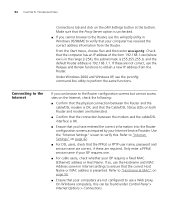
...if your ISP requires one. ■ For cable users, check whether your Internet Service Provider. If so, use the Release and Renew functions to "Hostname & MAC" on page 42. ■ For DSL users, check that the PPPoE or PPTP user name, password and service name are correct, if these ... connection between the Router and the cable/DSL modem is OK, and that the Cable/DSL Status LEDs on the LAN Settings button at the bottom. Under Windows 2000 and Windows XP, use the winipcfg utility in the range 2-254), the subnet mask is 255.255.255.0, and the default Router address is unchecked....
...if your ISP requires one. ■ For cable users, check whether your Internet Service Provider. If so, use the Release and Renew functions to "Hostname & MAC" on page 42. ■ For DSL users, check that the PPPoE or PPTP user name, password and service name are correct, if these ... connection between the Router and the cable/DSL modem is OK, and that the Cable/DSL Status LEDs on the LAN Settings button at the bottom. Under Windows 2000 and Windows XP, use the winipcfg utility in the range 2-254), the subnet mask is 255.255.255.0, and the default Router address is unchecked....
User Guide
Page 93
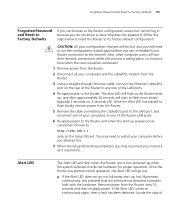
...does not go out following start up, but cannot log in because you do not know or have forgotten the password, follow the steps below to reset the Router to it was before you attempt this indicates that the software has detected a possible fault with the hardware. You... while the system software checks the hardware for proper operation. The Alert LED will flash as it 's factory default configuration. Remove power from the Router. 5 Remove the cable connecting the Cable/DSL port to the LAN port, and reconnect one of your computers to one of CAUTION: All your configuration changes...
...does not go out following start up, but cannot log in because you do not know or have forgotten the password, follow the steps below to reset the Router to it was before you attempt this indicates that the software has detected a possible fault with the hardware. You... while the system software checks the hardware for proper operation. The Alert LED will flash as it 's factory default configuration. Remove power from the Router. 5 Remove the cable connecting the Cable/DSL port to the LAN port, and reconnect one of your computers to one of CAUTION: All your configuration changes...