Getting Started Guide
Page 4
... 34 Removing an SFP Transceiver 35 3 SETTING UP FOR MANAGEMENT Setting Up Overview 38 IP Configuration 39 Preparing for Management 40 Manually Configuring IP Information 41 Connecting to a Front Panel Port 41 Connecting to the Console Port 44 Viewing Automatically Configured IP Information 47 Using 3Com Network Supervisor 47 Connecting to the Console Port 48 Methods of Managing a Switch 50 Command Line Interface Management 50 Web Interface Management 51 SNMP Management 51 Setting Up Command Line Interface Management 52 CLI Management via the Console Port 52 CLI Management over the Network 52...
... 34 Removing an SFP Transceiver 35 3 SETTING UP FOR MANAGEMENT Setting Up Overview 38 IP Configuration 39 Preparing for Management 40 Manually Configuring IP Information 41 Connecting to a Front Panel Port 41 Connecting to the Console Port 44 Viewing Automatically Configured IP Information 47 Using 3Com Network Supervisor 47 Connecting to the Console Port 48 Methods of Managing a Switch 50 Command Line Interface Management 50 Web Interface Management 51 SNMP Management 51 Setting Up Command Line Interface Management 52 CLI Management via the Console Port 52 CLI Management over the Network 52...
Getting Started Guide
Page 5
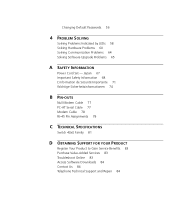
...-AT Serial Cable 77 Modem Cable 78 RJ-45 Pin Assignments 78 C TECHNICAL SPECIFICATIONS Switch 40x0 Family 81 D OBTAINING SUPPORT FOR YOUR PRODUCT Register Your Product to Gain Service Benefits 83 Purchase Value-Added Services 83 Troubleshoot Online 83 Access Software Downloads 84 Contact Us 84 Telephone Technical Support and Repair 84 Changing Default Passwords 56 4 PROBLEM SOLVING Solving Problems Indicated by LEDs 58 Solving Hardware Problems 60 Solving Communication Problems 64 Solving Software Upgrade Problems 65...
...-AT Serial Cable 77 Modem Cable 78 RJ-45 Pin Assignments 78 C TECHNICAL SPECIFICATIONS Switch 40x0 Family 81 D OBTAINING SUPPORT FOR YOUR PRODUCT Register Your Product to Gain Service Benefits 83 Purchase Value-Added Services 83 Troubleshoot Online 83 Access Software Downloads 84 Contact Us 84 Telephone Technical Support and Repair 84 Changing Default Passwords 56 4 PROBLEM SOLVING Solving Problems Indicated by LEDs 58 Solving Hardware Problems 60 Solving Communication Problems 64 Solving Software Upgrade Problems 65...

Getting Started Guide
Page 13
... Addresses Up to 12,000 supported Up to create a Distributed Fabric. Allows interconnection of Table 3 summarizes the hardware features that are fitted XRN Support eXpandable Resilient Networking (XRN) support. Traffic Prioritization Supported (IEEE Std 802.1D, 1998 Edition) Four traffic queues per port Fast Ethernet and Auto-negotiating 10BASE-T/100BASE-TX/1000BASE-T, Gigabit Ethernet Ports 1000BASE-SX, GBIC and SFP ports Mounting 19-inch rack or stand-alone mounting Layer 3 Switching Support for wire-speed IP routing Replaceable PSUs Replaceable...
... Addresses Up to 12,000 supported Up to create a Distributed Fabric. Allows interconnection of Table 3 summarizes the hardware features that are fitted XRN Support eXpandable Resilient Networking (XRN) support. Traffic Prioritization Supported (IEEE Std 802.1D, 1998 Edition) Four traffic queues per port Fast Ethernet and Auto-negotiating 10BASE-T/100BASE-TX/1000BASE-T, Gigabit Ethernet Ports 1000BASE-SX, GBIC and SFP ports Mounting 19-inch rack or stand-alone mounting Layer 3 Switching Support for wire-speed IP routing Replaceable PSUs Replaceable...

Getting Started Guide
Page 15
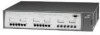
...link partner. Alternatively, auto-negotiation can be disabled and the flow control setting can be manually configured. front view Unit Status LED Module and Layer 3 LED Status LEDs Fan LEDs Temperature PSU LEDs Unit LEDs LED Unit Status Layer 3 1 PSU Status 2 F R Fan Fault 12 3 4 Unit P Module S Temperature S1 P S 13 P S2 P S 14 P S3 P S 15 P S4 P S 16 P S5 P S 17 P P = Packet S = Status On = enabled, link OK Flashing = disabled S6 P S 18 P S7 P S 19 P S8 P S 20 P 1 2 3 4 5 6 7 8 13 14 15 16 17 18 19 20 SFP Ports Console Port S9 P S 21 P 3Com Switch...
...link partner. Alternatively, auto-negotiation can be disabled and the flow control setting can be manually configured. front view Unit Status LED Module and Layer 3 LED Status LEDs Fan LEDs Temperature PSU LEDs Unit LEDs LED Unit Status Layer 3 1 PSU Status 2 F R Fan Fault 12 3 4 Unit P Module S Temperature S1 P S 13 P S2 P S 14 P S3 P S 15 P S4 P S 16 P S5 P S 17 P P = Packet S = Status On = enabled, link OK Flashing = disabled S6 P S 18 P S7 P S 19 P S8 P S 20 P 1 2 3 4 5 6 7 8 13 14 15 16 17 18 19 20 SFP Ports Console Port S9 P S 21 P 3Com Switch...

Getting Started Guide
Page 21
... Switches on the network have this and configures itself with an IP address in use then the Switch detects this IP address. If this default IP address is returned to the untagged Default VLAN (VLAN 1) IGMP filtering enabled Enabled Disabled per second - Default Settings 21 Default Settings Table 5 shows the default settings for the Switch 40x0. Notify and unfilter All ports belong to these defaults. Table 5 Default Settings Feature Port Status Port Speed Duplex Mode Flow Control Broadcast Storm Control Virtual LANs (VLANs) Multicast Filtering Rapid Spanning Tree Protocol Link...
... Switches on the network have this and configures itself with an IP address in use then the Switch detects this IP address. If this default IP address is returned to the untagged Default VLAN (VLAN 1) IGMP filtering enabled Enabled Disabled per second - Default Settings 21 Default Settings Table 5 shows the default settings for the Switch 40x0. Notify and unfilter All ports belong to these defaults. Table 5 Default Settings Feature Port Status Port Speed Duplex Mode Flow Control Broadcast Storm Control Virtual LANs (VLANs) Multicast Filtering Rapid Spanning Tree Protocol Link...

Getting Started Guide
Page 37
... work straight away (plug-and-play). This chapter explains the initial set up of the Switch and the different methods of Managing a Switch ■ Setting Up Command Line Interface Management ■ Setting Up Web Interface Management ■ Setting Up SNMP Management ■ Default Users and Passwords Managing the Switch can help you have to manage a Switch. It covers the following topics: ■ Setting Up Overview ■ Manually Configuring IP Information ■ Viewing Automatically Configured IP Information ■ Methods of accessing...
... work straight away (plug-and-play). This chapter explains the initial set up of the Switch and the different methods of Managing a Switch ■ Setting Up Command Line Interface Management ■ Setting Up Web Interface Management ■ Setting Up SNMP Management ■ Default Users and Passwords Managing the Switch can help you have to manage a Switch. It covers the following topics: ■ Setting Up Overview ■ Manually Configuring IP Information ■ Viewing Automatically Configured IP Information ■ Methods of accessing...

Getting Started Guide
Page 38
... Connect via Telnet. See page 52 Web Interface Connect over the network via the console port. See page 39 Do you want to get your Switch set up and ready for management when it is automatically configured. See page 41 Use 3Com Network Supervisor (3NS). See page 47 Connect to the console port and use the Command Line Interface. See page 54 CAUTION: To protect your Switch from unauthorized access, you must change all three default passwords...
... Connect via Telnet. See page 52 Web Interface Connect over the network via the console port. See page 39 Do you want to get your Switch set up and ready for management when it is automatically configured. See page 41 Use 3Com Network Supervisor (3NS). See page 47 Connect to the console port and use the Command Line Interface. See page 54 CAUTION: To protect your Switch from unauthorized access, you must change all three default passwords...
Getting Started Guide
Page 39
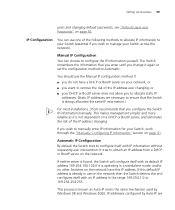
... in the range 169.254.1.0 to manage your network, or ■ you want to ensure that you enter until you do not have a DHCP or BootP server on page 41. Setting Up Overview 39 users and changing default passwords, see "Default Users and Passwords" on the network. If you wish to manually enter IP information for your Switch, work through the "Manually Configuring IP Information" section on your...
... in the range 169.254.1.0 to manage your network, or ■ you want to ensure that you enter until you do not have a DHCP or BootP server on page 41. Setting Up Overview 39 users and changing default passwords, see "Default Users and Passwords" on the network. If you wish to manually enter IP information for your Switch, work through the "Manually Configuring IP Information" section on your...

Getting Started Guide
Page 41
... you connect the Switch to the console port of 169.254.100.100. Connect a workstation using the web interface or the command line interface (CLI). ■ Connecting to a front panel port - You can then manually enter IP information using a console cable to a network. Pre-requisites ■ A workstation running Windows 95/98/2000 or Windows NT. ■ A Network Interface Card (NIC). ■ A Category 5 twisted pair Ethernet cable with IP information: ■ IP address ■ subnet mask ■ default gateway refer...
... you connect the Switch to the console port of 169.254.100.100. Connect a workstation using the web interface or the command line interface (CLI). ■ Connecting to a front panel port - You can then manually enter IP information using a console cable to a network. Pre-requisites ■ A workstation running Windows 95/98/2000 or Windows NT. ■ A Network Interface Card (NIC). ■ A Category 5 twisted pair Ethernet cable with IP information: ■ IP address ■ subnet mask ■ default gateway refer...

Getting Started Guide
Page 42
.... Using the Web Interface 1 Power-up the Switch with IP Information You need to change the IP address and subnet mask of the cable to one minute. 2 Open a suitable Web browser and enter 169.254.100.100 in Figure 10. 42 CHAPTER 3: SETTING UP FOR MANAGEMENT Connecting the Workstation to the Switch 1 Connect the workstation to a front panel port using the Web interface or the command line interface (CLI) via a front panel port...
.... Using the Web Interface 1 Power-up the Switch with IP Information You need to change the IP address and subnet mask of the cable to one minute. 2 Open a suitable Web browser and enter 169.254.100.100 in Figure 10. 42 CHAPTER 3: SETTING UP FOR MANAGEMENT Connecting the Workstation to the Switch 1 Connect the workstation to a front panel port using the Web interface or the command line interface (CLI) via a front panel port...

Getting Started Guide
Page 43
... you to set up your chosen management method. Using Command Line Interface via Telnet 1 To start a Telnet session to open a login prompt. If you to enter basic setup information for the Switch. b In the dialogue box that appears type the default IP address of the command line interface is displayed as shown in the example in Microsoft Windows 95/98/2000/NT. The initial set up of your Switch is now...
... you to set up your chosen management method. Using Command Line Interface via Telnet 1 To start a Telnet session to open a login prompt. If you to enter basic setup information for the Switch. b In the dialogue box that appears type the default IP address of the command line interface is displayed as shown in the example in Microsoft Windows 95/98/2000/NT. The initial set up of your Switch is now...

Getting Started Guide
Page 45
... Switch. Figure 12 Connecting a workstation to the Switch via the console port To connect the cable: a Attach the female connector on the cable to the console port, or ■ A standard modem cable - Manually Configuring IP Information 45 ■ Documentation supplied with IP information: ■ IP address ■ subnet mask ■ default gateway Connecting the Workstation to the Switch 1 Connect the workstation to the console port using a modem. if you can manually set to one of the serial ports...
... Switch. Figure 12 Connecting a workstation to the Switch via the console port To connect the cable: a Attach the female connector on the cable to the console port, or ■ A standard modem cable - Manually Configuring IP Information 45 ■ Documentation supplied with IP information: ■ IP address ■ subnet mask ■ default gateway Connecting the Workstation to the Switch 1 Connect the workstation to the console port using a modem. if you can manually set to one of the serial ports...

Getting Started Guide
Page 48
... a DHCP or BootP server, the workstation running 3Com Network Supervisor must be on page 77. ■ A Category 5 twisted pair Ethernet cable with terminal emulation software installed, such as the Switch, because Auto-IP addresses are non-routable. if you to the console port using a modem. Figure 14 Connecting a workstation to the Switch via the console port directly, or through a connection to the console port. (This example describes a local connection to the console port, rather than a remote one...
... a DHCP or BootP server, the workstation running 3Com Network Supervisor must be on page 77. ■ A Category 5 twisted pair Ethernet cable with terminal emulation software installed, such as the Switch, because Auto-IP addresses are non-routable. if you to the console port using a modem. Figure 14 Connecting a workstation to the Switch via the console port directly, or through a connection to the console port. (This example describes a local connection to the console port, rather than a remote one...

Getting Started Guide
Page 49
... hardware flow control Refer to the documentation that accompanies the terminal emulation software for the Switch, which you have connected the cable. If there is not available, it starts. 3 At the login and password prompts, enter admin as shown in the example in the range 0 to 255). 2 The command line interface login sequence begins as soon as a COM port) on your workstation. 2 Open your Switch to the network using an Ethernet cable. If you have logged...
... hardware flow control Refer to the documentation that accompanies the terminal emulation software for the Switch, which you have connected the cable. If there is not available, it starts. 3 At the login and password prompts, enter admin as shown in the example in the range 0 to 255). 2 The command line interface login sequence begins as soon as a COM port) on your workstation. 2 Open your Switch to the network using an Ethernet cable. If you have logged...

Getting Started Guide
Page 52
... correctly and the Switch is powered up command line interface management using the command line interface via the local the Console Port console port connection: 1 Ensure you get an error message, check that your management workstation. CLI Management over To manage a Switch using the command line interface over a network the Network using Telnet: 1 Ensure you have already set up . If you can browse, the IP protocol is installed. 3 Check you can communicate with IP information as described in "Connecting to the Console Port" on page 55...
... correctly and the Switch is powered up command line interface management using the command line interface via the local the Console Port console port connection: 1 Ensure you get an error message, check that your management workstation. CLI Management over To manage a Switch using the command line interface over a network the Network using Telnet: 1 Ensure you have already set up . If you can browse, the IP protocol is installed. 3 Check you can communicate with IP information as described in "Connecting to the Console Port" on page 55...

Getting Started Guide
Page 53
...; Setting Up Web Interface Management 53 4 To open a Telnet session via third party software you will need to enter the IP address in the format suitable for the Switch you wish to manage is connected to the network using a Category 5 twisted pair Ethernet cable with IP information as your user name and press Return at the password prompt (or the password of your choice if you have logged...
...; Setting Up Web Interface Management 53 4 To open a Telnet session via third party software you will need to enter the IP address in the format suitable for the Switch you wish to manage is connected to the network using a Category 5 twisted pair Ethernet cable with IP information as your user name and press Return at the password prompt (or the password of your choice if you have logged...

Getting Started Guide
Page 55
... command line interface, or to change the default passwords, you must change all ports on the CD-ROM that accompanies your Switch to the command line interface section of access. You can use 3Com Network Supervisor it automatically loads the correct MIBs and necessary files onto your Switch Setting Up SNMP Management 55 Setting Up SNMP Management Any network management application running the Simple Network Management Protocol (SNMP) can manage a Switch if: ■ The correct Management Information Bases (MIBs) are listed in Table 9. By default...
... command line interface, or to change the default passwords, you must change all ports on the CD-ROM that accompanies your Switch to the command line interface section of access. You can use 3Com Network Supervisor it automatically loads the correct MIBs and necessary files onto your Switch Setting Up SNMP Management 55 Setting Up SNMP Management Any network management application running the Simple Network Management Protocol (SNMP) can manage a Switch if: ■ The correct Management Information Bases (MIBs) are listed in Table 9. By default...

Getting Started Guide
Page 56
... "Management Interface Reference Guide" on the web interface. manager manager - Changing Default Passwords You can access and change the default passwords using either: ■ The gettingStarted command on the CLI, or ■ The security device user modify command on the CLI, or ■ The Security > Device > User > Modify operation on the Switch CD-ROM. the user can access and change any manageable parameters. 56 CHAPTER 3: SETTING UP FOR MANAGEMENT Table 9 Default Users User Name monitor manager admin Default Password Access Level monitor monitor - the user can view all...
... "Management Interface Reference Guide" on the web interface. manager manager - Changing Default Passwords You can access and change the default passwords using either: ■ The gettingStarted command on the CLI, or ■ The security device user modify command on the CLI, or ■ The Security > Device > User > Modify operation on the Switch CD-ROM. the user can access and change any manageable parameters. 56 CHAPTER 3: SETTING UP FOR MANAGEMENT Table 9 Default Users User Name monitor manager admin Default Password Access Level monitor monitor - the user can view all...
Getting Started Guide
Page 84
... install, configure and troubleshoot 3Com desktop and server NICs, wireless cards and Bluetooth devices. Contact Us 3Com offers telephone, e-mail and internet access to access these services for your product on the 3Com web site at http://csoweb4.3com.com/contactus/ Telephone Technical Support and Repair To obtain telephone support as part of your warranty and other service benefits, you must first purchase a service contract from the list below. To access these Software Updates...
... install, configure and troubleshoot 3Com desktop and server NICs, wireless cards and Bluetooth devices. Contact Us 3Com offers telephone, e-mail and internet access to access these services for your product on the 3Com web site at http://csoweb4.3com.com/contactus/ Telephone Technical Support and Repair To obtain telephone support as part of your warranty and other service benefits, you must first purchase a service contract from the list below. To access these Software Updates...
Getting Started Guide
Page 87
... A access levels of default users 55 automatic setup 47 3Com Network Supervisor 47 console port 48 C cable 10/100/1000 29 fiber 30 pin-outs 77 CD-ROM 9 command line interface management 50 Console Port 16 conventions notice icons, About This Guide 8 text, About This Guide 8 cross-over configuration 29 D default settings 21 users 55 F factory defaults 21 fan tray 20 G GBIC ports 15 H hardware features 13 I installing the Switch 23 prerequisites 25 interconnect cable 27 IP addressing registered 64 IP configuration...
... A access levels of default users 55 automatic setup 47 3Com Network Supervisor 47 console port 48 C cable 10/100/1000 29 fiber 30 pin-outs 77 CD-ROM 9 command line interface management 50 Console Port 16 conventions notice icons, About This Guide 8 text, About This Guide 8 cross-over configuration 29 D default settings 21 users 55 F factory defaults 21 fan tray 20 G GBIC ports 15 H hardware features 13 I installing the Switch 23 prerequisites 25 interconnect cable 27 IP addressing registered 64 IP configuration...


