
User Guide
Page 3
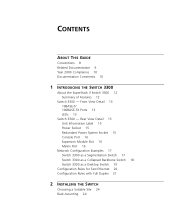
... 15 Power Socket 15 Redundant Power System Socket 15 Console Port 16 Expansion Module Slot 16 Matrix Port 16 Network Configuration Examples 17 Switch 3300 as a Segmentation Switch 17 Switch 3300 as a Collapsed Backbone Switch 18 Switch 3300 as a Desktop Switch 19 Configuration Rules for Fast Ethernet 20 Configuration Rules with Full Duplex 21 2 INSTALLING THE...
... 15 Power Socket 15 Redundant Power System Socket 15 Console Port 16 Expansion Module Slot 16 Matrix Port 16 Network Configuration Examples 17 Switch 3300 as a Segmentation Switch 17 Switch 3300 as a Collapsed Backbone Switch 18 Switch 3300 as a Desktop Switch 19 Configuration Rules for Fast Ethernet 20 Configuration Rules with Full Duplex 21 2 INSTALLING THE...
User Guide
Page 4
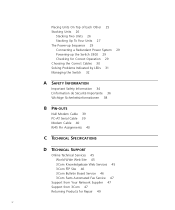
... Units 26 Stacking Two Units 26 Stacking Up To Four Units 27 The Power-up Sequence 29 Connecting a Redundant Power System 29 Powering-up the Switch 3300 29 Checking for Correct Operation 29 Choosing the Correct Cables 30 Solving Problems Indicated by LEDs 31 Managing the...PC-AT Serial Cable 39 Modem Cable 40 RJ45 Pin Assignments 40 C TECHNICAL SPECIFICATIONS D TECHNICAL SUPPORT Online Technical Services 45 World Wide Web Site 45 3Com Knowledgebase Web Services 45 3Com FTP Site 46 3Com Bulletin Board Service 46 3Com Facts Automated Fax Service 47 Support from Your Network Supplier 47 Support from...
... Units 26 Stacking Two Units 26 Stacking Up To Four Units 27 The Power-up Sequence 29 Connecting a Redundant Power System 29 Powering-up the Switch 3300 29 Checking for Correct Operation 29 Choosing the Correct Cables 30 Solving Problems Indicated by LEDs 31 Managing the...PC-AT Serial Cable 39 Modem Cable 40 RJ45 Pin Assignments 40 C TECHNICAL SPECIFICATIONS D TECHNICAL SUPPORT Online Technical Services 45 World Wide Web Site 45 3Com Knowledgebase Web Services 45 3Com FTP Site 46 3Com Bulletin Board Service 46 3Com Facts Automated Fax Service 47 Support from Your Network Supplier 47 Support from...
User Guide
Page 7
...LANs (Local Area Networks). This guide is intended for use by network administrators who are responsible for use with both Switch 3300 models: s 3C16980 - 24 10BASE-T/100BASE-TX ports s 3C16981 - 12 10BASE-T/100BASE-TX ports All pictures and example screens show the 24-port model, however, all the ...the information in this guide, follow the instructions in Adobe Acrobat Reader Portable Document Format (PDF) or HTML on the 3Com World Wide Web site: http://www.3com.com/ The guide is intended for installing and setting up network equipment; Most user guides and release notes are shipped ...
...LANs (Local Area Networks). This guide is intended for use by network administrators who are responsible for use with both Switch 3300 models: s 3C16980 - 24 10BASE-T/100BASE-TX ports s 3C16981 - 12 10BASE-T/100BASE-TX ports All pictures and example screens show the 24-port model, however, all the ...the information in this guide, follow the instructions in Adobe Acrobat Reader Portable Document Format (PDF) or HTML on the 3Com World Wide Web site: http://www.3com.com/ The guide is intended for installing and setting up network equipment; Most user guides and release notes are shipped ...
User Guide
Page 9
... Number DNA1695-0AAA0x) These notes provide information about the current software release, including new features, modifications, and known problems. s SuperStack II Switch Help This help provides information about the current software release, including new features, modifications, and known problems. Click OK. s Denote a ...new term at the place where it is supplied on the SuperStack II Switch CD-ROM. s Quick Reference Guide (Part Number DQA1698-0AAA0x) This guide contains a quick summary of the hardware and software information for the...
... Number DNA1695-0AAA0x) These notes provide information about the current software release, including new features, modifications, and known problems. s SuperStack II Switch Help This help provides information about the current software release, including new features, modifications, and known problems. Click OK. s Denote a ...new term at the place where it is supplied on the SuperStack II Switch CD-ROM. s Quick Reference Guide (Part Number DQA1698-0AAA0x) This guide contains a quick summary of the hardware and software information for the...
User Guide
Page 10
...the title page) s Page number (if appropriate) Example: s SuperStack II Switch 3300 User Guide s Part Number DUA1698-0AAA04 s Page 21 Please e-mail comments about this document to 3Com at: pddtechpubs_comments@3com.com Please include the following information when commenting: s Document title s Document ...part number (on Year 2000 compliance and 3Com products, visit the 3Com Year 2000 Web page: http://www.3com.com/products/yr2000.html Your suggestions are other publications you . They will help make our documentation ...
...the title page) s Page number (if appropriate) Example: s SuperStack II Switch 3300 User Guide s Part Number DUA1698-0AAA04 s Page 21 Please e-mail comments about this document to 3Com at: pddtechpubs_comments@3com.com Please include the following information when commenting: s Document title s Document ...part number (on Year 2000 compliance and 3Com products, visit the 3Com Year 2000 Web page: http://www.3com.com/products/yr2000.html Your suggestions are other publications you . They will help make our documentation ...
User Guide
Page 11
1 INTRODUCING THE SWITCH 3300 This chapter contains introductory information about the Switch and how it can be used in your network. It covers the following topics: s About the SuperStack II Switch 3300 s Switch 3300 - Front View Detail s Switch 3300 - Rear View Detail s Network Configuration Examples s Configuration Rules for Fast Ethernet s Configuration Rules with Full Duplex
1 INTRODUCING THE SWITCH 3300 This chapter contains introductory information about the Switch and how it can be used in your network. It covers the following topics: s About the SuperStack II Switch 3300 s Switch 3300 - Front View Detail s Switch 3300 - Rear View Detail s Network Configuration Examples s Configuration Rules for Fast Ethernet s Configuration Rules with Full Duplex
User Guide
Page 12
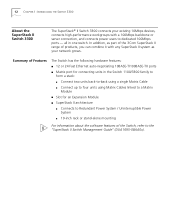
... devices, connects high-performance workgroups with any SuperStack II system as part of the 3Com SuperStack II range of the Switch, refer to dedicated 100Mbps ports - Summary of Features The Switch has the following hardware features: s 12 or 24 Fast Ethernet auto-negotiating 10BASE-T/100BASE... and connects power users to the "SuperStack II Switch Management Guide" (DUA1695-0BAA0x). 12 CHAPTER 1: INTRODUCING THE SWITCH 3300 About the SuperStack II Switch 3300 The SuperStack® II Switch 3300 connects your network grows. all in the Switch 1100/3300 family to form a stack: s ...
... devices, connects high-performance workgroups with any SuperStack II system as part of the 3Com SuperStack II range of the Switch, refer to dedicated 100Mbps ports - Summary of Features The Switch has the following hardware features: s 12 or 24 Fast Ethernet auto-negotiating 10BASE-T/100BASE... and connects power users to the "SuperStack II Switch Management Guide" (DUA1695-0BAA0x). 12 CHAPTER 1: INTRODUCING THE SWITCH 3300 About the SuperStack II Switch 3300 The SuperStack® II Switch 3300 connects your network grows. all in the Switch 1100/3300 family to form a stack: s ...
User Guide
Page 13
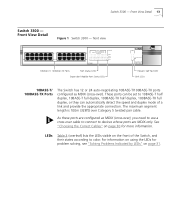
.... For information on using the LEDs for problem solving, see "Solving Problems Indicated by LEDs" on page 30 for more information. Front View Detail 13 Switch 3300 - LEDs Table 3 (overleaf) lists the LEDs visible on the front of a link and provide the appropriate connection. As these ports are MDIX-only. These...-T half duplex, 10BASE-T full duplex, 100BASE-TX half duplex, 100BASE-TX full duplex, or they can automatically detect the speed and duplex mode of the Switch, and their states according to devices whose ports are configured as MDIX (cross-over Category 5 twisted pair cable...
.... For information on using the LEDs for problem solving, see "Solving Problems Indicated by LEDs" on page 30 for more information. Front View Detail 13 Switch 3300 - LEDs Table 3 (overleaf) lists the LEDs visible on the front of a link and provide the appropriate connection. As these ports are MDIX-only. These...-T half duplex, 10BASE-T full duplex, 100BASE-TX half duplex, 100BASE-TX full duplex, or they can automatically detect the speed and duplex mode of the Switch, and their states according to devices whose ports are configured as MDIX (cross-over Category 5 twisted pair cable...
User Guide
Page 14
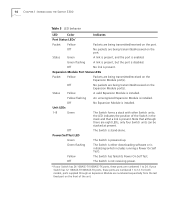
...the port is stand-alone. Off No packets are being transmitted/received on the port. Off The Switch is enabled. Off The Switch is disabled. 14 CHAPTER 1: INTRODUCING THE SWITCH 3300 Table 3 LED behavior LED Color Indicates Port Status LEDs* Packet Yellow Packets are being transmitted/...Module is installed. Off No Expansion Module is installed. Off No packets are eight LEDs, only four Switch units can be stacked at present. Green flashing The Switch is either downloading software or is present. Off No link is initializing (which includes running a Power On...
...the port is stand-alone. Off No packets are being transmitted/received on the port. Off The Switch is enabled. Off The Switch is disabled. 14 CHAPTER 1: INTRODUCING THE SWITCH 3300 Table 3 LED behavior LED Color Indicates Port Status LEDs* Packet Yellow Packets are being transmitted/...Module is installed. Off No Expansion Module is installed. Off No packets are eight LEDs, only four Switch units can be stacked at present. Green flashing The Switch is either downloading software or is present. Off No link is initializing (which includes running a Power On...
User Guide
Page 15
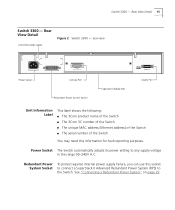
... view Unit Information Label This label shows the following: s The 3Com product name of the Switch s The 3Com 3C number of the Switch s The unique MAC address (Ethernet address) of the Switch s The serial number of the Switch You may need this socket to connect a SuperStack II Advanced Redundant Power System (RPS) to any supply voltage...
... view Unit Information Label This label shows the following: s The 3Com product name of the Switch s The 3Com 3C number of the Switch s The unique MAC address (Ethernet address) of the Switch s The serial number of the Switch You may need this socket to connect a SuperStack II Advanced Redundant Power System (RPS) to any supply voltage...
User Guide
Page 16
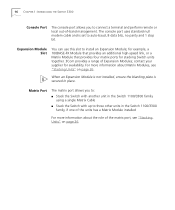
...Stacking Units" on page 26. When an Expansion Module is not installed, ensure the blanking plate is set to three other units in the Switch 1100/3300 family, if one of the units has a Matrix Module installed For more information about the role of the matrix port, see...install an Expansion Module; 16 CHAPTER 1: INTRODUCING THE SWITCH 3300 Console Port The console port allows you to: s Stack the Switch with up to auto-baud, 8 data bits, no parity and 1 stop bit. contact your supplier for stacking Switch units together. 3Com provides a range of -band management. Expansion Module ...
...Stacking Units" on page 26. When an Expansion Module is not installed, ensure the blanking plate is set to three other units in the Switch 1100/3300 family, if one of the units has a Matrix Module installed For more information about the role of the matrix port, see...install an Expansion Module; 16 CHAPTER 1: INTRODUCING THE SWITCH 3300 Console Port The console port allows you to: s Stack the Switch with up to auto-baud, 8 data bits, no parity and 1 stop bit. contact your supplier for stacking Switch units together. 3Com provides a range of -band management. Expansion Module ...
User Guide
Page 17
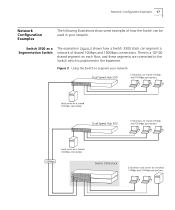
There is a 10/100 shared segment on each floor, and these segments are connected to segment your network. Switch 3300 as a Segmentation Switch The example in the basement. Network Configuration Examples 17 Network Configuration Examples The following illustrations show some examples of how the Switch can segment a network of shared 10Mbps and 100Mbps connections. Figure 3 Using the Switch to the Switch which is positioned in Figure 3 shows how a Switch 3300 stack can be used in your network
There is a 10/100 shared segment on each floor, and these segments are connected to segment your network. Switch 3300 as a Segmentation Switch The example in the basement. Network Configuration Examples 17 Network Configuration Examples The following illustrations show some examples of how the Switch can segment a network of shared 10Mbps and 100Mbps connections. Figure 3 Using the Switch to the Switch which is positioned in Figure 3 shows how a Switch 3300 stack can be used in your network
User Guide
Page 18
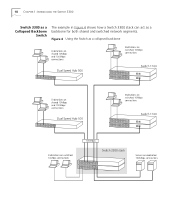
Figure 4 Using the Switch as a backbone for both shared and switched network segments. 18 CHAPTER 1: INTRODUCING THE SWITCH 3300 Switch 3300 as a Collapsed Backbone Switch The example in Figure 4 shows how a Switch 3300 stack can act as a collapsed backbone
Figure 4 Using the Switch as a backbone for both shared and switched network segments. 18 CHAPTER 1: INTRODUCING THE SWITCH 3300 Switch 3300 as a Collapsed Backbone Switch The example in Figure 4 shows how a Switch 3300 stack can act as a collapsed backbone
User Guide
Page 19
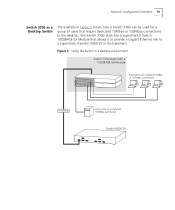
Figure 5 Using the Switch in the basement. Network Configuration Examples 19 Switch 3300 as a Desktop Switch The example in Figure 5 shows how a Switch 3300 can be used for a group of users that allows it to provide a Gigabit Ethernet link to the desktop. The Switch 3300 stack has a SuperStack II Switch 1000BASE-SX Module that require dedicated 10Mbps or 100Mbps connections to a SuperStack II Switch 9000 SX in a desktop environment
Figure 5 Using the Switch in the basement. Network Configuration Examples 19 Switch 3300 as a Desktop Switch The example in Figure 5 shows how a Switch 3300 can be used for a group of users that allows it to provide a Gigabit Ethernet link to the desktop. The Switch 3300 stack has a SuperStack II Switch 1000BASE-SX Module that require dedicated 10Mbps or 100Mbps connections to a SuperStack II Switch 9000 SX in a desktop environment
User Guide
Page 20
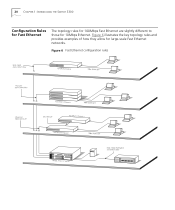
20 CHAPTER 1: INTRODUCING THE SWITCH 3300 Configuration Rules for Fast Ethernet The topology rules for 100Mbps Fast Ethernet are slightly different to those for large-scale Fast Ethernet networks. Figure 6 illustrates the key topology rules and provides examples of how they allow for 10Mbps Ethernet. Figure 6 Fast Ethernet configuration rules
20 CHAPTER 1: INTRODUCING THE SWITCH 3300 Configuration Rules for Fast Ethernet The topology rules for 100Mbps Fast Ethernet are slightly different to those for large-scale Fast Ethernet networks. Figure 6 illustrates the key topology rules and provides examples of how they allow for 10Mbps Ethernet. Figure 6 Fast Ethernet configuration rules
User Guide
Page 21
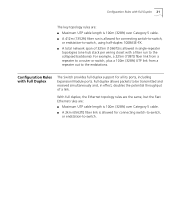
...duplex 100BASE-FX. Configuration Rules with Full Duplex 21 The key topology rules are : s Maximum UTP cable length is allowed for connecting switch-to-switch, or endstation-to-switch. s A 412m (1352ft) fiber run to the collapsed backbone). Configuration Rules with a fiber run is 100m (328ft) over Category... simultaneously and, in single-repeater topologies (one hub stack per wiring closet with Full Duplex The Switch provides full duplex support for connecting switch-to-switch, or endstation-to the endstations. With full duplex, the Ethernet topology rules are the same, ...
...duplex 100BASE-FX. Configuration Rules with Full Duplex 21 The key topology rules are : s Maximum UTP cable length is allowed for connecting switch-to-switch, or endstation-to-switch. s A 412m (1352ft) fiber run to the collapsed backbone). Configuration Rules with a fiber run is 100m (328ft) over Category... simultaneously and, in single-repeater topologies (one hub stack per wiring closet with Full Duplex The Switch provides full duplex support for connecting switch-to-switch, or endstation-to the endstations. With full duplex, the Ethernet topology rules are the same, ...

User Guide
Page 22
22 CHAPTER 1: INTRODUCING THE SWITCH 3300
22 CHAPTER 1: INTRODUCING THE SWITCH 3300
User Guide
Page 23
...informations relatives à la sécurité qui se trouvent dans l'Appendice A de ce guide. 2 INSTALLING THE SWITCH This chapter contains the information you must read the safety information provided in diesem Handbuch aufgefuehrt sind. WARNHINWEIS: Sicherheitsinformationen. Before ...installing or removing any components from the Switch 3300 or carrying out any maintenance procedures, you need to install and set up Sequence s Choosing the Correct Cables ...
...informations relatives à la sécurité qui se trouvent dans l'Appendice A de ce guide. 2 INSTALLING THE SWITCH This chapter contains the information you must read the safety information provided in diesem Handbuch aufgefuehrt sind. WARNHINWEIS: Sicherheitsinformationen. Before ...installing or removing any components from the Switch 3300 or carrying out any maintenance procedures, you need to install and set up Sequence s Choosing the Correct Cables ...
User Guide
Page 24
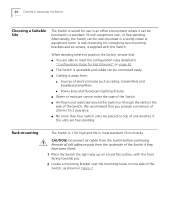
...amplifiers s Power lines and fluorescent lighting fixtures s Water or moisture cannot enter the case of 25mm (1in.) clearance. Alternatively, the Switch can be connected easily. A rack-mounting kit, containing two mounting brackets and six screws, is accessible and cables can be mounted in... a wiring closet or equipment room. s The Switch is supplied with the front facing towards you provide a minimum of the Switch. Remove all cables from : s Sources of the Switch. s No more than four Switch units are able to position the Switch, ensure that you . 2 Locate a mounting ...
...amplifiers s Power lines and fluorescent lighting fixtures s Water or moisture cannot enter the case of 25mm (1in.) clearance. Alternatively, the Switch can be connected easily. A rack-mounting kit, containing two mounting brackets and six screws, is accessible and cables can be mounted in... a wiring closet or equipment room. s The Switch is supplied with the front facing towards you provide a minimum of the Switch. Remove all cables from : s Sources of the Switch. s No more than four Switch units are able to position the Switch, ensure that you . 2 Locate a mounting ...

User Guide
Page 25
... Hub units, the smaller units must be placed one in the marked area at the top. Place the Switch units on top of the other side of the Switch. 5 Insert the Switch into the 19-inch rack and secure with the mounting brackets. Apply the pads to the underside of each corner. ... supplied with suitable screws (not provided). If you are free-standing, up with a suitable screwdriver. Damage caused to four units can be positioned at each Switch, sticking one on top of the lower unit. Ensure that the pads of the upper unit line up to the unit by using incorrect screws...
... Hub units, the smaller units must be placed one in the marked area at the top. Place the Switch units on top of the other side of the Switch. 5 Insert the Switch into the 19-inch rack and secure with the mounting brackets. Apply the pads to the underside of each corner. ... supplied with suitable screws (not provided). If you are free-standing, up with a suitable screwdriver. Damage caused to four units can be positioned at each Switch, sticking one on top of the lower unit. Ensure that the pads of the upper unit line up to the unit by using incorrect screws...