User Guide
Page 3
... Removing an SFP Transceiver 20 Performing Spot Checks 20 3 CONNECTING TO THE WEB INTERFACE Requirements for Accessing the Web Interface 23 Running the Discovery Application 23 Logging On to the Web Interface 24 Navigating the Web Interface 25 Menu 25 Buttons 26 Accessing the Interface Without Using Discovery 26 DHCP Assigned IP Address 27 Manually Assigned (Static) IP Address 27 4 CONFIGURING THE SWITCH Configuration Overview 29 Viewing Status Information 29 Changing the Admin Password 30 Modifying the IP Address Settings 31 Automatic IP Configuration...
... Removing an SFP Transceiver 20 Performing Spot Checks 20 3 CONNECTING TO THE WEB INTERFACE Requirements for Accessing the Web Interface 23 Running the Discovery Application 23 Logging On to the Web Interface 24 Navigating the Web Interface 25 Menu 25 Buttons 26 Accessing the Interface Without Using Discovery 26 DHCP Assigned IP Address 27 Manually Assigned (Static) IP Address 27 4 CONFIGURING THE SWITCH Configuration Overview 29 Viewing Status Information 29 Changing the Admin Password 30 Modifying the IP Address Settings 31 Automatic IP Configuration...

User Guide
Page 4
...38 Configuring Link Aggregation 38 Trunk Membership 39 Adding Ports to a Trunk 39 Configuring Trunk Settings 40 Configuring PoE 40 Configuring PoE for Individual Ports 41 Planning Power Budgets 43 Viewing Statistics 43 Monitoring Traffic 44 Setting the Traffic Priority 45 IP Phone Prioritization 46 List of Detected Phones 46 5 UPGRADING THE FIRMWARE Installing the 3Com TFTP Server 47 Setting Up the 3Com TFTP Server 48 Downloading Firmware Updates 48 Performing Firmware Upgrade 49 6 TROUBLESHOOTING Resetting to Factory Defaults 51 Forgotten Password 52 Forgotten Static IP Address 52 Solving LED...
...38 Configuring Link Aggregation 38 Trunk Membership 39 Adding Ports to a Trunk 39 Configuring Trunk Settings 40 Configuring PoE 40 Configuring PoE for Individual Ports 41 Planning Power Budgets 43 Viewing Statistics 43 Monitoring Traffic 44 Setting the Traffic Priority 45 IP Phone Prioritization 46 List of Detected Phones 46 5 UPGRADING THE FIRMWARE Installing the 3Com TFTP Server 47 Setting Up the 3Com TFTP Server 48 Downloading Firmware Updates 48 Performing Firmware Upgrade 49 6 TROUBLESHOOTING Resetting to Factory Defaults 51 Forgotten Password 52 Forgotten Static IP Address 52 Solving LED...
User Guide
Page 7
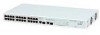
... to configure advanced features such as VLAN support, link aggregation, and traffic prioritization. Any port can autosense both medium dependent interface (MDI) and medium dependent interface crossover (MDIX) connections. Autosensing of MDI/MDIX Connections All ports on the other hand, only operate in full duplex mode. Autonegotiating 10/100 Mbps Ports Each 10/100 Mbps port automatically determines the speed and duplex mode of the 3Com® Baseline Switch 2226-PWR Plus. 1 INTRODUCING THE BASELINE SWITCH This...
... to configure advanced features such as VLAN support, link aggregation, and traffic prioritization. Any port can autosense both medium dependent interface (MDI) and medium dependent interface crossover (MDIX) connections. Autosensing of MDI/MDIX Connections All ports on the other hand, only operate in full duplex mode. Autonegotiating 10/100 Mbps Ports Each 10/100 Mbps port automatically determines the speed and duplex mode of the 3Com® Baseline Switch 2226-PWR Plus. 1 INTRODUCING THE BASELINE SWITCH This...
User Guide
Page 8
..., VLAN tagged frames. It examines each port from the Web interface. It differentiates traffic into classes and prioritizes those classes automatically. You can also configure the PoE settings for example, a computer) can recognize when an NBX phone is available for use, any of service. To ensure that time-sensitive traffic gets the highest level of the ports 1 to provide connectivity between the Switch and a 1000 Mbps core network...
..., VLAN tagged frames. It examines each port from the Web interface. It differentiates traffic into classes and prioritizes those classes automatically. You can also configure the PoE settings for example, a computer) can recognize when an NBX phone is available for use, any of service. To ensure that time-sensitive traffic gets the highest level of the ports 1 to provide connectivity between the Switch and a 1000 Mbps core network...
User Guide
Page 12
...-duplex mode (8) Self-Adhesive Pads The unit is plugged in any combination. The two SFP ports support fiber Gigabit Ethernet short-wave (SX) and long-wave (LX) SFP transceivers in . (6) Power LED The Power LED shows the power status of the Switch. Only use The unit is not receiving power: ■ Verify that is connected cor- For more informa- The corresponding 10/100/1000 port is disabled when an SFP transceiver is supplied...
...-duplex mode (8) Self-Adhesive Pads The unit is plugged in any combination. The two SFP ports support fiber Gigabit Ethernet short-wave (SX) and long-wave (LX) SFP transceivers in . (6) Power LED The Power LED shows the power status of the Switch. Only use The unit is not receiving power: ■ Verify that is connected cor- For more informa- The corresponding 10/100/1000 port is disabled when an SFP transceiver is supplied...
User Guide
Page 19
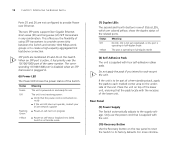
... 3Com Corporation World Wide Web site, enter this URL into any SFP port without having to power off the Switch. You can remove them from an SFP slot. To insert an SFP transceiver: 1 Hold the transceiver so that is faulty, it . Using SFP Transceivers 19 Figure 3 Connecting Devices to the Switch Baseline 10/100 switch Endstations on switched 100 Mbps connections Baseline 10/100 switch Endstations on switched 100 Mbps connections Baseline Switch 2226-PWR Plus...
... 3Com Corporation World Wide Web site, enter this URL into any SFP port without having to power off the Switch. You can remove them from an SFP slot. To insert an SFP transceiver: 1 Hold the transceiver so that is faulty, it . Using SFP Transceivers 19 Figure 3 Connecting Devices to the Switch Baseline 10/100 switch Endstations on switched 100 Mbps connections Baseline 10/100 switch Endstations on switched 100 Mbps connections Baseline Switch 2226-PWR Plus...
User Guide
Page 26
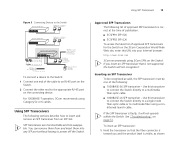
... CHAPTER 3: CONNECTING TO THE WEB INTERFACE Menu Item Port Configuration VLANs Link Aggregation PoE Configuration Statistics Traffic Monitoring Traffic Prioritization Upgrade Support Log Out Description Allows you to configure the Switch's port settings Allows you to create VLAN groups, add port members, and specify how VLAN tagging is used Allows you to set up and maintain trunk membership for port groups Allows you to configure basic PoE settings and the PoE settings of each individual port Displays the number of packets received and transmitted from the 3Com Web site...
... CHAPTER 3: CONNECTING TO THE WEB INTERFACE Menu Item Port Configuration VLANs Link Aggregation PoE Configuration Statistics Traffic Monitoring Traffic Prioritization Upgrade Support Log Out Description Allows you to configure the Switch's port settings Allows you to create VLAN groups, add port members, and specify how VLAN tagging is used Allows you to set up and maintain trunk membership for port groups Allows you to configure basic PoE settings and the PoE settings of each individual port Displays the number of packets received and transmitted from the 3Com Web site...
User Guide
Page 27
Manually Assigned (Static) IP Address If you assigned a static IP address to the Switch, you need to use that IP address to access the Web interface the next time you want to configure the Switch. For example, if you assigned the Switch the IP address 192.168.0.123, start your Web browser, and then type http://192.168.0.123. Accessing the Interface Without Using Discovery 27 For example, if the DHCP server assigned the IP address 192...
Manually Assigned (Static) IP Address If you assigned a static IP address to the Switch, you need to use that IP address to access the Web interface the next time you want to configure the Switch. For example, if you assigned the Switch the IP address 192.168.0.123, start your Web browser, and then type http://192.168.0.123. Accessing the Interface Without Using Discovery 27 For example, if the DHCP server assigned the IP address 192...

User Guide
Page 29
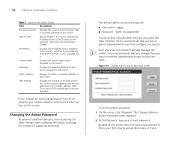
... the Switch's advanced features ■ Upgrade the firmware Viewing Status Information The Status screen, which automatically loads after you do not need to access the Web interface if you can view on the Status screen. Topics include: ■ Changing the Admin Password ■ Modifying the IP Address Settings ■ Configuring Port Settings ■ Configuring VLANs ■ Configuring Link Aggregation ■ Configuring PoE ■ Monitoring Traffic ■ Setting the Traffic Priority Configuration Overview The Switch is shipped ready for use. 4 CONFIGURING THE SWITCH This...
... the Switch's advanced features ■ Upgrade the firmware Viewing Status Information The Status screen, which automatically loads after you do not need to access the Web interface if you can view on the Status screen. Topics include: ■ Changing the Admin Password ■ Modifying the IP Address Settings ■ Configuring Port Settings ■ Configuring VLANs ■ Configuring Link Aggregation ■ Configuring PoE ■ Monitoring Traffic ■ Setting the Traffic Priority Configuration Overview The Switch is shipped ready for use. 4 CONFIGURING THE SWITCH This...
User Guide
Page 30
... MAC address table. By default, the Switch does not have any ) that is assigned to actively manage the switch, 3Com recommends that you request for technical assistance from accessing the Web interface and modifying the Switch's settings, the interface is password-protected. 30 CHAPTER 4: CONFIGURING THE SWITCH Table 7 Items on the Status Screen Item Description Firmware Version Displays the version of seconds before the Switch removes dynamically learned addresses from its IP address from a DHCP server or you manually set...
... MAC address table. By default, the Switch does not have any ) that is assigned to actively manage the switch, 3Com recommends that you request for technical assistance from accessing the Web interface and modifying the Switch's settings, the interface is password-protected. 30 CHAPTER 4: CONFIGURING THE SWITCH Table 7 Items on the Status Screen Item Description Firmware Version Displays the version of seconds before the Switch removes dynamically learned addresses from its IP address from a DHCP server or you manually set...
User Guide
Page 31
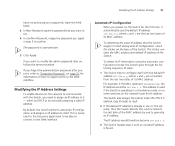
... information on the network to confirm. The IP address would therefore become 169.254.1.3. 3 The Switch repeats step 2 until an unused IP address is 08004E000102, the IP address would be able to connect to the Web interface. For example, if the MAC address is found. Modifying the IP Address Settings To enable devices on how to regain access to it automatically uses the default IP address 169.254...
... information on the network to confirm. The IP address would therefore become 169.254.1.3. 3 The Switch repeats step 2 until an unused IP address is 08004E000102, the IP address would be able to connect to the Web interface. For example, if the MAC address is found. Modifying the IP Address Settings To enable devices on how to regain access to it automatically uses the default IP address 169.254...

User Guide
Page 32
... manually assign an IP address to the Switch IP Address Specify an IP address that you configure the Switch's IP address settings, click Apply to save your changes. Once you gain access to the console, you should assign an IP address to the Switch (either by using automatic IP configuration only for the Switch: 1 Click IP Settings on the menu. Setting the IP Address To set to Static. Available options are listed in Table 8. Table 8 IP Setting...
... manually assign an IP address to the Switch IP Address Specify an IP address that you configure the Switch's IP address settings, click Apply to save your changes. Once you gain access to the console, you should assign an IP address to the Switch (either by using automatic IP configuration only for the Switch: 1 Click IP Settings on the menu. Setting the IP Address To set to Static. Available options are listed in Table 8. Table 8 IP Setting...

User Guide
Page 36
If this Switch to factory settings. By default, all connected to 4904. Uplink egress packets ■ D - Creating a VLAN Use the VLANs page to VLAN 1. The VLANs screen appears. 2 In VLAN ID, click Create New VLAN. 3 In VLAN ID (1-4904), type an unused ID number for each port. Traffic from the other than VLAN 1, you will no longer be set to access the Web interface. If you are all ports belong to create VLANs on the Switch to the uplink port or ports. Desktop egress...
If this Switch to factory settings. By default, all connected to 4904. Uplink egress packets ■ D - Creating a VLAN Use the VLANs page to VLAN 1. The VLANs screen appears. 2 In VLAN ID, click Create New VLAN. 3 In VLAN ID (1-4904), type an unused ID number for each port. Traffic from the other than VLAN 1, you will no longer be set to access the Web interface. If you are all ports belong to create VLANs on the Switch to the uplink port or ports. Desktop egress...

User Guide
Page 37
... VLAN on setting up a VLAN across two Switches using desktop connections. For examples on the Switch using uplink connections. This enables ports that are members of the same VLAN (but are on different switches) to D (desktop egress packet). 3 Click Apply. Figure 16 Desktop VLAN Configuration Endstations in VLAN 1 Endstations in VLAN 2 BaselBinaeseSlwinietcSh w2i2tc5h0 2226-PWR Plus Configuring VLANs 37 VLAN1 and the ports on each other ports, unless you can segment network devices that the ports on the default Setting Up VLAN...
... VLAN on setting up a VLAN across two Switches using desktop connections. For examples on the Switch using uplink connections. This enables ports that are members of the same VLAN (but are on different switches) to D (desktop egress packet). 3 Click Apply. Figure 16 Desktop VLAN Configuration Endstations in VLAN 1 Endstations in VLAN 2 BaselBinaeseSlwinietcSh w2i2tc5h0 2226-PWR Plus Configuring VLANs 37 VLAN1 and the ports on each other ports, unless you can segment network devices that the ports on the default Setting Up VLAN...

User Guide
Page 52
... correctly. ■ The cable is connected at the far end is off . Category 3 cables can log on to the Web interface again using the Discovery application, refer to "Running the Discovery Application" on basic LED checks, refer to the LEDs on using the default admin account settings: ■ User name - A fiber cable is a problem with this connection. For information on page 23. There is connected, but the Link/Activity LED for 10BASE-T operation only...
... correctly. ■ The cable is connected at the far end is off . Category 3 cables can log on to the Web interface again using the Discovery application, refer to "Running the Discovery Application" on basic LED checks, refer to the LEDs on using the default admin account settings: ■ User name - A fiber cable is a problem with this connection. For information on page 23. There is connected, but the Link/Activity LED for 10BASE-T operation only...
User Guide
Page 53
... compliant with the lowest priority port will reduce network performance when data is configured for half-duplex operation only. Refer to the documentation that it to the Switch 2226-PWR Plus, check the following checks: ■ Verify that the power budget for the Switch has not been exceeded. The Switch supports full-duplex autonegotiation. Ensure that port is not being supplied to a device connected to the Switch, you have equal priority levels...
... compliant with the lowest priority port will reduce network performance when data is configured for half-duplex operation only. Refer to the documentation that it to the Switch 2226-PWR Plus, check the following checks: ■ Verify that the power budget for the Switch has not been exceeded. The Switch supports full-duplex autonegotiation. Ensure that port is not being supplied to a device connected to the Switch, you have equal priority levels...

User Guide
Page 54
... the Switch, save the Switch's current configuration. If this much power is off. To upgrade a corrupted firmware: 1 Download the latest firmware from the 3Com Web site to the computer that the port has not had a power limit imposed upon it has a higher priority than the ports that port. The Fail-Safe Mode screen appears, as the PoE power supply has 18 watts spare in its factory defaults, follow the onscreen instructions to upgrade the Switch...
... the Switch, save the Switch's current configuration. If this much power is off. To upgrade a corrupted firmware: 1 Download the latest firmware from the 3Com Web site to the computer that the port has not had a power limit imposed upon it has a higher priority than the ports that port. The Fail-Safe Mode screen appears, as the PoE power supply has 18 watts spare in its factory defaults, follow the onscreen instructions to upgrade the Switch...
User Guide
Page 56
....3com.com/. First time users will be returned to you get full use the appropriate telephone number, URL or e-mail address from the date of system hardware and software, including revision level ■ Diagnostic error messages ■ Details about recent configuration changes, if applicable To send a product directly to apply for assistance, please have the following information ready: ■ Product model name, part number, and serial number...
....3com.com/. First time users will be returned to you get full use the appropriate telephone number, URL or e-mail address from the date of system hardware and software, including revision level ■ Diagnostic error messages ■ Details about recent configuration changes, if applicable To send a product directly to apply for assistance, please have the following information ready: ■ Product model name, part number, and serial number...

User Guide
Page 75
... host control protocol See DHCP E Ethernet 70 F fail-safe mode 51, 54 Fast Ethernet 70 firmware checking for updates 48 downloading updates 48 upgrading 47 firmware upgrade performing 49 verifying 50 flow control 35 forgotten IP address 52 forgotten password 52 free-standing 16 front panel Duplex LEDs 12 Link/Activity LEDs 11 Module Active LEDs 11 PoE LEDs 9 Power LED 12 RJ-45 ports 9 self-adhesive pads 12 SFP ports 11 full-duplex 70 G Gigabit Ethernet 70 H half-duplex 70 I IEEE 70 IETF 71 installing 15 IP address auto configuration...
... host control protocol See DHCP E Ethernet 70 F fail-safe mode 51, 54 Fast Ethernet 70 firmware checking for updates 48 downloading updates 48 upgrading 47 firmware upgrade performing 49 verifying 50 flow control 35 forgotten IP address 52 forgotten password 52 free-standing 16 front panel Duplex LEDs 12 Link/Activity LEDs 11 Module Active LEDs 11 PoE LEDs 9 Power LED 12 RJ-45 ports 9 self-adhesive pads 12 SFP ports 11 full-duplex 70 G Gigabit Ethernet 70 H half-duplex 70 I IEEE 70 IETF 71 installing 15 IP address auto configuration...

User Guide
Page 76
... 9 troubleshooting 51 corrupted firmware 54 forgotten IP address 52 forgotten password 52 LED-related issues 52 POST failed 18 power issues 53 trunking See link aggregation U user name default 30 V viewing detected IP phones 46 individual port statistics 44 port settings 33 statistics 43 status information 29 VLANs 35 creating 36, 38 desktop 36 maximum supported 35 not a member 36 removing 38 sample configurations 37 uplink 36 W Web interface accessing directly 26 accessing using Discovery 23 buttons 26 connecting 23 logging...
... 9 troubleshooting 51 corrupted firmware 54 forgotten IP address 52 forgotten password 52 LED-related issues 52 POST failed 18 power issues 53 trunking See link aggregation U user name default 30 V viewing detected IP phones 46 individual port statistics 44 port settings 33 statistics 43 status information 29 VLANs 35 creating 36, 38 desktop 36 maximum supported 35 not a member 36 removing 38 sample configurations 37 uplink 36 W Web interface accessing directly 26 accessing using Discovery 23 buttons 26 connecting 23 logging...


