
Owners Manual
Page 6
... ...2-1 DESCRIPTION ...3-1 Left view ...3-1 Right view ...3-2 Controls and instruments...3-3 INSTRUMENT AND CONTROL FUNCTIONS ...4-1 Main switch/steering lock ...4-1 Indicator lights and warning light ...4-2 Speedometer unit ...4-3 Self-diagnosis device ...4-3 Handlebar switches ...4-3 Clutch lever ...4-4 Shift pedal ...4-5 Brake lever ...4-5 Brake pedal ...4-5 Fuel tank cap ...4-6 Fuel ...4-6 Catalytic converters ...4-8 Fuel cock ...4-8 Starter (choke) knob ...4-9 Seats ...4-10 Helmet holder ...4-11 Storage compartment ...4-11 Adjusting the shock absorber assembly ...4-12 FOR YOUR SAFETY -
... ...2-1 DESCRIPTION ...3-1 Left view ...3-1 Right view ...3-2 Controls and instruments...3-3 INSTRUMENT AND CONTROL FUNCTIONS ...4-1 Main switch/steering lock ...4-1 Indicator lights and warning light ...4-2 Speedometer unit ...4-3 Self-diagnosis device ...4-3 Handlebar switches ...4-3 Clutch lever ...4-4 Shift pedal ...4-5 Brake lever ...4-5 Brake pedal ...4-5 Fuel tank cap ...4-6 Fuel ...4-6 Catalytic converters ...4-8 Fuel cock ...4-8 Starter (choke) knob ...4-9 Seats ...4-10 Helmet holder ...4-11 Storage compartment ...4-11 Adjusting the shock absorber assembly ...4-12 FOR YOUR SAFETY -
Owners Manual
Page 7
STREET AND ENDURO MOTORCYCLE LIMITED WARRANTY ...10-7 YAMAHA EXTENDED SERVICE (Y.E.S.) ...10-9 TABLE OF CONTENTS Checking the steering ...7-29 Checking the wheel bearings ...7-29 Battery ...7-29 Replacing the fuses ...7-31 Replacing the headlight bulb ...7-32 Replacing a turn signal light bulb or the tail/brake light bulb ...7-33 Supporting the motorcycle ...7-34 Front wheel ...7-34 Rear wheel ...7-36 Troubleshooting ...7-38 Troubleshooting chart ...7-39 MOTORCYCLE CARE AND STORAGE ...8-1 Matte color caution ...8-1 Care ...8-1 Storage ...8-3 SPECIFICATIONS ...9-1 CONSUMER INFORMATION...10-1 ...
STREET AND ENDURO MOTORCYCLE LIMITED WARRANTY ...10-7 YAMAHA EXTENDED SERVICE (Y.E.S.) ...10-9 TABLE OF CONTENTS Checking the steering ...7-29 Checking the wheel bearings ...7-29 Battery ...7-29 Replacing the fuses ...7-31 Replacing the headlight bulb ...7-32 Replacing a turn signal light bulb or the tail/brake light bulb ...7-33 Supporting the motorcycle ...7-34 Front wheel ...7-34 Rear wheel ...7-36 Troubleshooting ...7-38 Troubleshooting chart ...7-39 MOTORCYCLE CARE AND STORAGE ...8-1 Matte color caution ...8-1 Care ...8-1 Storage ...8-3 SPECIFICATIONS ...9-1 CONSUMER INFORMATION...10-1 ...
Owners Manual
Page 12
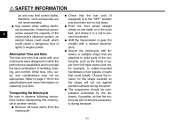
... to your motorcycle. SAFETY INFORMATION Avoid Carbon Monoxide Poisoning All engine exhaust contains carbon monoxide, a deadly gas. Make sure that has added cargo or accessories. If you can create a sudden imbalance. Carbon Monoxide is changed. Breathing carbon monoxide can linger for your load (suspension-adjustable models only), and check the condition and pressure of the operator, passenger, accessories and cargo must not...
... to your motorcycle. SAFETY INFORMATION Avoid Carbon Monoxide Poisoning All engine exhaust contains carbon monoxide, a deadly gas. Make sure that has added cargo or accessories. If you can create a sudden imbalance. Carbon Monoxide is changed. Breathing carbon monoxide can linger for your load (suspension-adjustable models only), and check the condition and pressure of the operator, passenger, accessories and cargo must not...
Owners Manual
Page 13
... modifications performed to your vehicle that change any way reduce ground clearance or cornering clearance, limit suspension travel, steering travel or control operation, or obscure lights or reflectors. • Accessories fitted to lift the motorcycle, or the motorcycle may find aftermarket products similar in design and quality to you or others at greater risk of accessories not sold by Yamaha or modifications not specifically...
... modifications performed to your vehicle that change any way reduce ground clearance or cornering clearance, limit suspension travel, steering travel or control operation, or obscure lights or reflectors. • Accessories fitted to lift the motorcycle, or the motorcycle may find aftermarket products similar in design and quality to you or others at greater risk of accessories not sold by Yamaha or modifications not specifically...
Owners Manual
Page 14
... the front wheel straight ahead on replacing your motorcycle were designed to match the performance capabilities and to provide the best combination of handling, braking, and comfort. If electrical accessories exceed the capacity of the motorcycle's electrical system, an electric failure could result, which could cause a dangerous loss of lights or engine power. ● ● ● 2 ● ● Aftermarket Tires and Rims The tires and rims that could...
... the front wheel straight ahead on replacing your motorcycle were designed to match the performance capabilities and to provide the best combination of handling, braking, and comfort. If electrical accessories exceed the capacity of the motorcycle's electrical system, an electric failure could result, which could cause a dangerous loss of lights or engine power. ● ● ● 2 ● ● Aftermarket Tires and Rims The tires and rims that could...
Owners Manual
Page 19
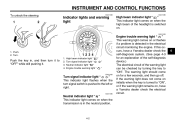
... a problem is switched on. INSTRUMENT AND CONTROL FUNCTIONS To unlock the steering EAU11006 EAU11080 1 2 Indicator lights and warning light High beam indicator light " " This indicator light comes on when the high beam of the warning light can be checked by turning the key to "OFF" while still pushing it to "ON". High beam indicator light " " Turn signal indicator light " Neutral indicator light " " Engine trouble warning light " " " EAU11020 Push the key in, and then turn signal switch...
... a problem is switched on. INSTRUMENT AND CONTROL FUNCTIONS To unlock the steering EAU11006 EAU11080 1 2 Indicator lights and warning light High beam indicator light " " This indicator light comes on when the high beam of the warning light can be checked by turning the key to "OFF" while still pushing it to "ON". High beam indicator light " " Turn signal indicator light " Neutral indicator light " " Engine trouble warning light " " " EAU11020 Push the key in, and then turn signal switch...
Owners Manual
Page 24
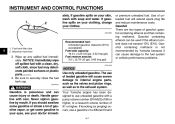
... the fuel tank cap. Handle gasoline with a clean, dry, soft cloth, since fuel may deteriorate painted surfaces or plastic parts. [ECA10071] 4. EAU53060 4 1. EWA15151 Recommended fuel: Unleaded gasoline (Gasohol (E10) acceptable) Fuel tank capacity: 16.0 L (4.23 US gal, 3.52 Imp.gal) Fuel reserve amount: 3.0 L (0.79 US gal, 0.66 Imp.gal) ECA11400 or premium unleaded fuel. Use of leaded gasoline will extend spark plug life and reduce maintenance...
... the fuel tank cap. Handle gasoline with a clean, dry, soft cloth, since fuel may deteriorate painted surfaces or plastic parts. [ECA10071] 4. EAU53060 4 1. EWA15151 Recommended fuel: Unleaded gasoline (Gasohol (E10) acceptable) Fuel tank capacity: 16.0 L (4.23 US gal, 3.52 Imp.gal) Fuel reserve amount: 3.0 L (0.79 US gal, 0.66 Imp.gal) ECA11400 or premium unleaded fuel. Use of leaded gasoline will extend spark plug life and reduce maintenance...
Owners Manual
Page 30
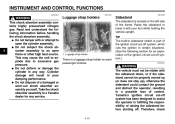
..., check 4-13 This may cause the unit to explode due to an open flame or other high heat source. Take the shock absorber assembly to assist the operator in any service. Luggage strap holder There is part of a damaged or worn-out shock absorber assembly yourself. INSTRUMENT AND CONTROL FUNCTIONS EWA10221 EAU15151 EAU15305 WARNING This shock absorber assembly contains highly pressurized nitrogen gas.
..., check 4-13 This may cause the unit to explode due to an open flame or other high heat source. Take the shock absorber assembly to assist the operator in any service. Luggage strap holder There is part of a damaged or worn-out shock absorber assembly yourself. INSTRUMENT AND CONTROL FUNCTIONS EWA10221 EAU15151 EAU15305 WARNING This shock absorber assembly contains highly pressurized nitrogen gas.
Owners Manual
Page 35
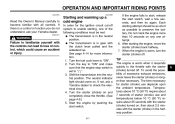
... with all controls. Shift the transmission into the neutral position. Turn the starter (choke) on . Turn the fuel cock lever to check the electrical circuit. 4. If not, ask a Yamaha dealer to "ON". 2. OPERATION AND IMPORTANT RIDING POINTS EAU15951 EAU15999 Read the Owner's Manual carefully to become familiar with the starter (choke) in the halfway position. 6 6-1 TIP The engine is in gear with the controls can...
... with all controls. Shift the transmission into the neutral position. Turn the starter (choke) on . Turn the fuel cock lever to check the electrical circuit. 4. If not, ask a Yamaha dealer to "ON". 2. OPERATION AND IMPORTANT RIDING POINTS EAU15951 EAU15999 Read the Owner's Manual carefully to become familiar with the starter (choke) in the halfway position. 6 6-1 TIP The engine is in gear with the controls can...
Owners Manual
Page 37
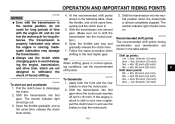
... motorcycle. 6-3 The neutral indicator light should come on. Apply both the front and the rear brakes to disengage the clutch. 2. Always use the clutch while changing gears to avoid damaging the engine, transmission, and drive train, which are shown in normal operating conditions, use the brakes to withstand the shock of time with the transmission in the neutral position, do not tow the motorcycle for long...
... motorcycle. 6-3 The neutral indicator light should come on. Apply both the front and the rear brakes to disengage the clutch. 2. Always use the clutch while changing gears to avoid damaging the engine, transmission, and drive train, which are shown in normal operating conditions, use the brakes to withstand the shock of time with the transmission in the neutral position, do not tow the motorcycle for long...
Owners Manual
Page 39
... of the vehicle owner/operator. To avoid possible burns, let brake components cool before touching them. 7-1 Yamaha dealers are trained and equipped to perform these particular services. 7 WARNING Failure to properly maintain the vehicle or performing maintenance activities incorrectly may increase your vehicle in the periodic maintenance charts should be performed by any repair establishment or individual that can cause shocks or fires. ● Running the engine while servicing can...
... of the vehicle owner/operator. To avoid possible burns, let brake components cool before touching them. 7-1 Yamaha dealers are trained and equipped to perform these particular services. 7 WARNING Failure to properly maintain the vehicle or performing maintenance activities incorrectly may increase your vehicle in the periodic maintenance charts should be performed by any repair establishment or individual that can cause shocks or fires. ● Running the engine while servicing can...
Owners Manual
Page 61
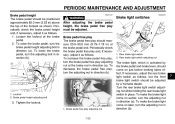
To lower the brake pedal, turn the adjusting nut in direction (a). Brake pedal free play The brake pedal free play adjusting nut at the brake pedal end. Tighten the locknut. 1. Rear brake light switch 2. Brake pedal height adjusting bolt 3. Turn the rear brake light switch adjusting nut while holding the rear brake light switch in direction (a). Periodically check the brake pedal free play adjusting nut The brake light, which is activated by a Yamaha dealer. To increase...
To lower the brake pedal, turn the adjusting nut in direction (a). Brake pedal free play The brake pedal free play adjusting nut at the brake pedal end. Tighten the locknut. 1. Rear brake light switch 2. Brake pedal height adjusting bolt 3. Turn the rear brake light switch adjusting nut while holding the rear brake light switch in direction (a). Periodically check the brake pedal free play adjusting nut The brake light, which is activated by a Yamaha dealer. To increase...
Owners Manual
Page 69
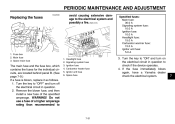
... contains the fuses for the individual circuits, are located behind panel B. (See page 7-9.) If a fuse is blown, replace it as follows. 1. Do not use a fuse of the specified amperage. PERIODIC MAINTENANCE AND ADJUSTMENT EAU23526 Replacing the fuses avoid causing extensive damage to 1. 2. 3. 4. 5. 6. WARNING! Main fuse 3. Headlight fuse Signaling system fuse Ignition fuse Carburetor heater fuse Ignitor unit fuse Spare fuse 3. If the fuse immediately blows again, have a Yamaha dealer check the electrical system...
... contains the fuses for the individual circuits, are located behind panel B. (See page 7-9.) If a fuse is blown, replace it as follows. 1. Do not use a fuse of the specified amperage. PERIODIC MAINTENANCE AND ADJUSTMENT EAU23526 Replacing the fuses avoid causing extensive damage to 1. 2. 3. 4. 5. 6. WARNING! Main fuse 3. Headlight fuse Signaling system fuse Ignition fuse Carburetor heater fuse Ignitor unit fuse Spare fuse 3. If the fuse immediately blows again, have a Yamaha dealer check the electrical system...
Owners Manual
Page 75
... bolts. 3. Install the brake torque rod bolt and nut at the brake shoe plate. 5. Install the rear wheel, wheel axle, final gear case, and drive shaft by pushing the wheel forward and guiding the drive shaft into the middle gear universal joint. 2. Install the panel. 6. Adjust the brake pedal free play. (See page 7-22.) 1. TIP Make sure to the specified torques. 7 7-37 EAU25512 To install the rear wheel 1. PERIODIC MAINTENANCE...
... bolts. 3. Install the brake torque rod bolt and nut at the brake shoe plate. 5. Install the rear wheel, wheel axle, final gear case, and drive shaft by pushing the wheel forward and guiding the drive shaft into the middle gear universal joint. 2. Install the panel. 6. Adjust the brake pedal free play. (See page 7-22.) 1. TIP Make sure to the specified torques. 7 7-37 EAU25512 To install the rear wheel 1. PERIODIC MAINTENANCE...
Owners Manual
Page 81
... the spark plug caps onto the spark plugs, and then place the spark plugs on storing the battery, see page 7-29. For motorcycles equipped with oil.) WARNING! Drain the carburetor float chambers by loosening the drain bolts; this will prevent fuel deposits from deteriorating. 5. Fill up the fuel tank and add fuel stabilizer (if available) to ground the spark plug electrodes while turning the engine over several times with the starter. (This...
... the spark plug caps onto the spark plugs, and then place the spark plugs on storing the battery, see page 7-29. For motorcycles equipped with oil.) WARNING! Drain the carburetor float chambers by loosening the drain bolts; this will prevent fuel deposits from deteriorating. 5. Fill up the fuel tank and add fuel stabilizer (if available) to ground the spark plug electrodes while turning the engine over several times with the starter. (This...
Owners Manual
Page 82
.../model: NGK/DPR7EA-9 Manufacturer/model: DENSO/X22EPR-U9 Spark plug gap: 0.8-0.9 mm (0.031-0.035 in) Weight: Curb weight: XVS65D 233 kg (514 lb) XVS65DC 235 kg (518 lb) Engine: Engine type: Air cooled 4-stroke, SOHC Cylinder arrangement: V-type 2-cylinder Displacement: 649 cm³ Bore × stroke: 81.0 × 63.0 mm (3.19 × 2.48 in) Compression ratio: 9.00 : 1 Starting system: Electric starter Lubrication system: Wet sump Recommended engine oil...
.../model: NGK/DPR7EA-9 Manufacturer/model: DENSO/X22EPR-U9 Spark plug gap: 0.8-0.9 mm (0.031-0.035 in) Weight: Curb weight: XVS65D 233 kg (514 lb) XVS65DC 235 kg (518 lb) Engine: Engine type: Air cooled 4-stroke, SOHC Cylinder arrangement: V-type 2-cylinder Displacement: 649 cm³ Bore × stroke: 81.0 × 63.0 mm (3.19 × 2.48 in) Compression ratio: 9.00 : 1 Starting system: Electric starter Lubrication system: Wet sump Recommended engine oil...

Owners Manual
Page 84
SPECIFICATIONS Voltage, capacity: 12 V, 10.0 Ah Headlight: Bulb type: Halogen bulb Carburetor warmer fuse: 15.0 A Ignitor unit fuse: 5.0 A Bulb voltage, wattage × quantity: Headlight: 12 V, 60.0 W/55.0 W × 1 Tail/brake light: 12 V, 8.0 W/27.0 W × 1 Front turn signal/position light: 12 V, 23 W/8.0 W × 2 Rear turn signal light: 12 V, 21.0 W × 2 Meter lighting: 12 V, 1.7 W × 1 Neutral indicator light: 12 V, 1.7 W × 1 High beam indicator light: 12 V, 1.7 W × 1 Turn signal indicator light: 12 V, 1.7 W × 1 Engine trouble warning light: 12 V, 1.7 W &#...
SPECIFICATIONS Voltage, capacity: 12 V, 10.0 Ah Headlight: Bulb type: Halogen bulb Carburetor warmer fuse: 15.0 A Ignitor unit fuse: 5.0 A Bulb voltage, wattage × quantity: Headlight: 12 V, 60.0 W/55.0 W × 1 Tail/brake light: 12 V, 8.0 W/27.0 W × 1 Front turn signal/position light: 12 V, 23 W/8.0 W × 2 Rear turn signal light: 12 V, 21.0 W × 2 Meter lighting: 12 V, 1.7 W × 1 Neutral indicator light: 12 V, 1.7 W × 1 High beam indicator light: 12 V, 1.7 W × 1 Turn signal indicator light: 12 V, 1.7 W × 1 Engine trouble warning light: 12 V, 1.7 W &#...
Owners Manual
Page 91
... INFORMATION EAU26663 YAMAHA MOTOR CORPORATION, U.S.A. SPECIFIC EXCLUSIONS from this warranty shall include parts replaced due to genuine Yamaha parts. WARRANTY TRANSFER: To transfer the warranty from defects in the appropriate Owner's Manual, and 2. also warrants to the ultimate purchaser and each subsequent purchaser of each Yamaha motorcycle covered by Yamaha due to conform at that new Yamaha motorcycles will , free of proper maintenance. SOME STATES...
... INFORMATION EAU26663 YAMAHA MOTOR CORPORATION, U.S.A. SPECIFIC EXCLUSIONS from this warranty shall include parts replaced due to genuine Yamaha parts. WARRANTY TRANSFER: To transfer the warranty from defects in the appropriate Owner's Manual, and 2. also warrants to the ultimate purchaser and each subsequent purchaser of each Yamaha motorcycle covered by Yamaha due to conform at that new Yamaha motorcycles will , free of proper maintenance. SOME STATES...
Owners Manual
Page 92
... list is expected to help you are handled at the time of normal maintenance services, non-warranty repairs, accident and collision damages, and oil, oil filters, air filters, spark plugs, and brake shoes. Q. What are my responsibility during the warranty period? Specific examples include: Running the machine out of the dealership. If you must take it is in the Owner's Manual, that Yamaha Motor Corporation, U.S.A. Yes, if you . Q. Yes. Be sure...
... list is expected to help you are handled at the time of normal maintenance services, non-warranty repairs, accident and collision damages, and oil, oil filters, air filters, spark plugs, and brake shoes. Q. What are my responsibility during the warranty period? Specific examples include: Running the machine out of the dealership. If you must take it is in the Owner's Manual, that Yamaha Motor Corporation, U.S.A. Yes, if you . Q. Yes. Be sure...
Owners Manual
Page 95
... ...7-3 Maintenance record ...10-5 Matte color, caution...8-1 Model label...10-2 T Throttle grip and cable, checking and lubricating ...7-26 Throttle grip free play, checking...7-17 Tires...7-18 Tool kit ...7-2 Troubleshooting ...7-38 Troubleshooting chart ...7-39 Turn signal indicator light ...4-2 D Dimmer switch ...4-4 E Engine break-in ...6-4 Engine idling speed, checking ...7-17 Engine oil and oil filter element...7-12 Engine, starting a warm...6-2 Engine stop switch...4-4 Engine trouble warning light ...4-2 N Neutral indicator light ...4-2 Noise regulation ...10-4 P Panels, removing...
... ...7-3 Maintenance record ...10-5 Matte color, caution...8-1 Model label...10-2 T Throttle grip and cable, checking and lubricating ...7-26 Throttle grip free play, checking...7-17 Tires...7-18 Tool kit ...7-2 Troubleshooting ...7-38 Troubleshooting chart ...7-39 Turn signal indicator light ...4-2 D Dimmer switch ...4-4 E Engine break-in ...6-4 Engine idling speed, checking ...7-17 Engine oil and oil filter element...7-12 Engine, starting a warm...6-2 Engine stop switch...4-4 Engine trouble warning light ...4-2 N Neutral indicator light ...4-2 Noise regulation ...10-4 P Panels, removing...