
Owners Manual
Page 3
... this manual. It represents the high degree of manufacture. The design and manufacture of this Yamaha motorcycle fully comply with good operating techniques, will give you safely enjoy the capabilities and reliability of the Yamaha Royal Star™ VENTURE®. INTRODUCTION EAU10083 Congratulations on your motorcycle, please consult a Yamaha dealer. This model is any questions concerning the operation or maintenance...
... this manual. It represents the high degree of manufacture. The design and manufacture of this Yamaha motorcycle fully comply with good operating techniques, will give you safely enjoy the capabilities and reliability of the Yamaha Royal Star™ VENTURE®. INTRODUCTION EAU10083 Congratulations on your motorcycle, please consult a Yamaha dealer. This model is any questions concerning the operation or maintenance...
Owners Manual
Page 6
... up a cold engine ...7-1 Starting a warm engine ...7-2 Shifting ...7-2 Engine break-in ...7-4 Parking ...7-4 PERIODIC MAINTENANCE AND ADJUSTMENT...8-1 Owner's tool kit ...8-2 Periodic maintenance chart for the emission control system ...8-3 General maintenance and lubrication chart ...8-5 Removing and installing cowlings and panels ...8-9 Checking the spark plugs ...8-12 Canister (for California only) ...8-13 Engine oil and oil filter cartridge ...8-14 Final gear oil ...8-16 Coolant ...8-18 Cleaning the air filter elements ...8-19 Carburetors ...8-21 Checking the engine idling speed ...8-21...
... up a cold engine ...7-1 Starting a warm engine ...7-2 Shifting ...7-2 Engine break-in ...7-4 Parking ...7-4 PERIODIC MAINTENANCE AND ADJUSTMENT...8-1 Owner's tool kit ...8-2 Periodic maintenance chart for the emission control system ...8-3 General maintenance and lubrication chart ...8-5 Removing and installing cowlings and panels ...8-9 Checking the spark plugs ...8-12 Canister (for California only) ...8-13 Engine oil and oil filter cartridge ...8-14 Final gear oil ...8-16 Coolant ...8-18 Cleaning the air filter elements ...8-19 Carburetors ...8-21 Checking the engine idling speed ...8-21...
Owners Manual
Page 7
...32 Battery ...8-32 Replacing the fuses ...8-33 Replacing the headlight bulb ...8-35 Replacing a turn signal light bulb or the tail/brake light bulb ...8-36 Supporting the motorcycle ...8-36 Troubleshooting ...8-37 Troubleshooting charts ...8-38 MOTORCYCLE CARE AND STORAGE ...9-1 Matte color caution ...9-1 Cleaning ...9-1 Storage ...9-3 SPECIFICATIONS ...10-1 CONSUMER INFORMATION ...11-1 Identification numbers ...11-1 Reporting safety defects ...11-3 Motorcycle noise regulation ...11-4 Maintenance record ...11-5 YAMAHA MOTOR CORPORATION, U.S.A. ROYAL STAR™ VENTURE® LIMITED WARRANTY...
...32 Battery ...8-32 Replacing the fuses ...8-33 Replacing the headlight bulb ...8-35 Replacing a turn signal light bulb or the tail/brake light bulb ...8-36 Supporting the motorcycle ...8-36 Troubleshooting ...8-37 Troubleshooting charts ...8-38 MOTORCYCLE CARE AND STORAGE ...9-1 Matte color caution ...9-1 Cleaning ...9-1 Storage ...9-3 SPECIFICATIONS ...10-1 CONSUMER INFORMATION ...11-1 Identification numbers ...11-1 Reporting safety defects ...11-3 Motorcycle noise regulation ...11-4 Maintenance record ...11-5 YAMAHA MOTOR CORPORATION, U.S.A. ROYAL STAR™ VENTURE® LIMITED WARRANTY...

Owners Manual
Page 12
... motorcycle: The total weight of your vehicle is changed. Make sure that has added cargo or accessories. SAFETY INFORMATION ● ● 2 Do not run engine outdoors where engine exhaust can create unstable handling or a slow steering response. Genuine Yamaha Accessories Choosing accessories for your tires. • Never attach any large or heavy items to Yamaha manufacture parts and accessories or offer other modifications for Yamaha vehicles. Here, along with...
... motorcycle: The total weight of your vehicle is changed. Make sure that has added cargo or accessories. SAFETY INFORMATION ● ● 2 Do not run engine outdoors where engine exhaust can create unstable handling or a slow steering response. Genuine Yamaha Accessories Choosing accessories for your tires. • Never attach any large or heavy items to Yamaha manufacture parts and accessories or offer other modifications for Yamaha vehicles. Here, along with...

Owners Manual
Page 13
... caution when adding electrical accessories. If electrical accessories exceed the capacity of the motorcycle's electrical system, an electric failure could result, which could cause a dangerous loss of lights or engine power. ● 2 Aftermarket Tires and Rims The tires and rims that came with your vehicle that change any way reduce ground clearance or cornering clearance, limit suspension travel, steering travel or control operation, or obscure lights or reflectors. • Accessories fitted to the...
... caution when adding electrical accessories. If electrical accessories exceed the capacity of the motorcycle's electrical system, an electric failure could result, which could cause a dangerous loss of lights or engine power. ● 2 Aftermarket Tires and Rims The tires and rims that came with your vehicle that change any way reduce ground clearance or cornering clearance, limit suspension travel, steering travel or control operation, or obscure lights or reflectors. • Accessories fitted to the...
Owners Manual
Page 18
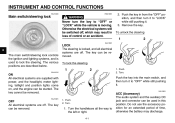
... headlight, meter lighting, taillight and position lights come on, and the engine can be removed. Push the key in loss of time, otherwise the battery may result in from the "OFF" position, and then turn it to "LOCK" while still pushing it . Turn the handlebars all electrical systems are described below. The various positions are off. Turn. 1. To lock the steering 2 4 The main switch/steering lock controls the ignition...
... headlight, meter lighting, taillight and position lights come on, and the engine can be removed. Push the key in loss of time, otherwise the battery may result in from the "OFF" position, and then turn it to "LOCK" while still pushing it . Turn the handlebars all electrical systems are described below. The various positions are off. Turn. 1. To lock the steering 2 4 The main switch/steering lock controls the ignition...

Owners Manual
Page 20
... following procedure. 1. EAU11141 4 Oil level warning light " " This warning light comes on or flashes if a problem is overheating. If this occurs, turn the key to the following procedure. 1. The electrical circuit of these indicator lights. EAU11413 Coolant temperature warning light " " This warning light comes on when the fuel level drops below approximately 3.5 L (0.92 US gal, 0.77 Imp.gal). Fuel level warning light " " This warning light comes on if the engine overheats. Push the start switch.
... following procedure. 1. EAU11141 4 Oil level warning light " " This warning light comes on or flashes if a problem is overheating. If this occurs, turn the key to the following procedure. 1. The electrical circuit of these indicator lights. EAU11413 Coolant temperature warning light " " This warning light comes on when the fuel level drops below approximately 3.5 L (0.92 US gal, 0.77 Imp.gal). Fuel level warning light " " This warning light comes on if the engine overheats. Push the start switch.

Owners Manual
Page 25
... indicate a malfunction. Horn switch " " Press this switch to crank the engine with a self-canceling system, the turn signal lights will self-cancel after it has returned to starting instructions prior to the center position. When released, the switch returns to sound the horn. TIP The self-canceling system only operates when the vehicle is stuck. EAU42390 4 The oil level warning light and coolant temperature warning light will come on...
... indicate a malfunction. Horn switch " " Press this switch to crank the engine with a self-canceling system, the turn signal lights will self-cancel after it has returned to starting instructions prior to the center position. When released, the switch returns to sound the horn. TIP The self-canceling system only operates when the vehicle is stuck. EAU42390 4 The oil level warning light and coolant temperature warning light will come on...
Owners Manual
Page 26
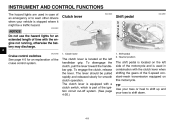
... extended length of time with the engine not running, otherwise the battery may discharge. 4 EAU12780 Cruise control switches See page 4-5 for smooth clutch operation. INSTRUMENT AND CONTROL FUNCTIONS The hazard lights are used in case of the ignition circuit cut-off system. (See page 4-20.) 1. To engage the clutch, release the lever. TIP Use your toes or heel to shift up and your toes to warn other drivers...
... extended length of time with the engine not running, otherwise the battery may discharge. 4 EAU12780 Cruise control switches See page 4-5 for smooth clutch operation. INSTRUMENT AND CONTROL FUNCTIONS The hazard lights are used in case of the ignition circuit cut-off system. (See page 4-20.) 1. To engage the clutch, release the lever. TIP Use your toes or heel to shift up and your toes to warn other drivers...
Owners Manual
Page 36
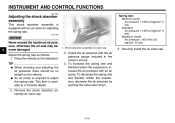
INSTRUMENT AND CONTROL FUNCTIONS EAU14803 Adjusting the shock absorber assembly This shock absorber assembly is equipped with the air pressure gauge included in the owner's tool kit. 4. Place the vehicle on the vehicle. This item is required to adjust the spring rate. Check the air pressure with an air valve for adjusting the spring rate. To increase the spring rate and thereby harden the suspension, increase the air pressure with an air pump. Adjust the spring rate as follows. 1. Shock absorber assembly air valve cap Spring rate: Minimum...
INSTRUMENT AND CONTROL FUNCTIONS EAU14803 Adjusting the shock absorber assembly This shock absorber assembly is equipped with the air pressure gauge included in the owner's tool kit. 4. Place the vehicle on the vehicle. This item is required to adjust the spring rate. Check the air pressure with an air valve for adjusting the spring rate. To increase the spring rate and thereby harden the suspension, increase the air pressure with an air pump. Adjust the spring rate as follows. 1. Shock absorber assembly air valve cap Spring rate: Minimum...
Owners Manual
Page 37
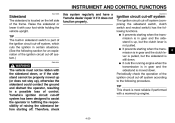
... in fulfilling the responsibility of control. INSTRUMENT AND CONTROL FUNCTIONS EAU15305 Sidestand The sidestand is located on the left side of the ignition circuit cut -off system (comprising the sidestand switch, clutch switch and neutral switch) has the following functions. ● It prevents starting when the transmission is in gear and the sidestand is up engine. 4 WARNING The vehicle must not be properly moved...
... in fulfilling the responsibility of control. INSTRUMENT AND CONTROL FUNCTIONS EAU15305 Sidestand The sidestand is located on the left side of the ignition circuit cut -off system (comprising the sidestand switch, clutch switch and neutral switch) has the following functions. ● It prevents starting when the transmission is in gear and the sidestand is up engine. 4 WARNING The vehicle must not be properly moved...

Owners Manual
Page 66
... coast for long distances. EAU16720 Recommended shift points The recommended shift points during acceleration and deceleration are not designed to withstand the shock of time with the transmission in normal operating conditions, use the clutch while changing gears to slow the motorcycle. 2. Apply both the front and the rear brakes to avoid damaging the engine, transmission, and drive train, which are shown in the...
... coast for long distances. EAU16720 Recommended shift points The recommended shift points during acceleration and deceleration are not designed to withstand the shock of time with the transmission in normal operating conditions, use the clutch while changing gears to slow the motorcycle. 2. Apply both the front and the rear brakes to avoid damaging the engine, transmission, and drive train, which are shown in the...
Owners Manual
Page 75
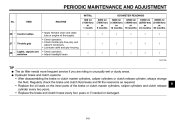
... Yamaha chain and cable lube or engine oil thoroughly. • Check operation. • Check throttle grip free play, and adjust if necessary. • Lubricate cable and grip housing. • Check operation. • Adjust headlight beam. 27 * Throttle grip √ √ √ √ √ 28 * Lights, signals and switches √ √ √ √ √ √ EAU17660 TIP ● ● The air filter needs...
... Yamaha chain and cable lube or engine oil thoroughly. • Check operation. • Check throttle grip free play, and adjust if necessary. • Lubricate cable and grip housing. • Check operation. • Adjust headlight beam. 27 * Throttle grip √ √ √ √ √ 28 * Lights, signals and switches √ √ √ √ √ √ EAU17660 TIP ● ● The air filter needs...
Owners Manual
Page 92
... it as shown. To decrease the brake lever free play, turn the brake lever free play adjusting screw in ) as follows. 1. Air in the hydraulic system will diminish the braking performance, which is activated by a Yamaha dealer, who has the necessary professional knowledge and experience. Tighten the locknut. EWA10630 EAU22282 Brake light switches The brake light, which may result in the hydraulic...
... it as shown. To decrease the brake lever free play, turn the brake lever free play adjusting screw in ) as follows. 1. Air in the hydraulic system will diminish the braking performance, which is activated by a Yamaha dealer, who has the necessary professional knowledge and experience. Tighten the locknut. EWA10630 EAU22282 Brake light switches The brake light, which may result in the hydraulic...
Owners Manual
Page 101
Turn the key to "OFF" and turn on the electrical circuit in question. 2. If the fuse immediately blows again, have a Yamaha dealer check the electrical system. PERIODIC MAINTENANCE AND ADJUSTMENT Fuse box 1 is located behind panel B. (See page 8-9.) Specified fuses: Main fuse: 30.0 A Cruise control fuse: 10.0 A Carburetor heater fuse: 10.0 A Auxiliary DC connector fuse: 5.0 A Auxiliary DC jack fuse: 5.0 A Audio system fuse: 10.0 A Ignition fuse: 10.0 A Signaling system fuse: 15.0 A Headlight fuse: 15.0 A Radiator fan fuse: 10.0 A Backup fuse: 10.0 A 1. 2. 3. 4. 5. 6. Remove the...
Turn the key to "OFF" and turn on the electrical circuit in question. 2. If the fuse immediately blows again, have a Yamaha dealer check the electrical system. PERIODIC MAINTENANCE AND ADJUSTMENT Fuse box 1 is located behind panel B. (See page 8-9.) Specified fuses: Main fuse: 30.0 A Cruise control fuse: 10.0 A Carburetor heater fuse: 10.0 A Auxiliary DC connector fuse: 5.0 A Auxiliary DC jack fuse: 5.0 A Audio system fuse: 10.0 A Ignition fuse: 10.0 A Signaling system fuse: 15.0 A Headlight fuse: 15.0 A Radiator fan fuse: 10.0 A Backup fuse: 10.0 A 1. 2. 3. 4. 5. 6. Remove the...
Owners Manual
Page 111
...) Air filter: Air filter element: Dry element Fuel: Recommended fuel: Unleaded gasoline only Fuel tank capacity: 22.5 L (5.94 US gal, 4.95 Imp.gal) Fuel reserve amount: 3.5 L (0.92 US gal, 0.77 Imp.gal) Carburetor: Type × quantity: BDSR32 x 4 Weight: Curb weight: 394 kg (869 lb) Spark plug(s): Manufacturer/model: NGK/DPR8EA-9 Manufacturer/model: DENSO/X24EPR-U9 Spark plug gap: 0.8-0.9 mm (0.031-0.035 in) Engine: Engine type: Liquid cooled 4-stroke, DOHC Cylinder arrangement: V-type 4-cylinder Displacement...
...) Air filter: Air filter element: Dry element Fuel: Recommended fuel: Unleaded gasoline only Fuel tank capacity: 22.5 L (5.94 US gal, 4.95 Imp.gal) Fuel reserve amount: 3.5 L (0.92 US gal, 0.77 Imp.gal) Carburetor: Type × quantity: BDSR32 x 4 Weight: Curb weight: 394 kg (869 lb) Spark plug(s): Manufacturer/model: NGK/DPR8EA-9 Manufacturer/model: DENSO/X24EPR-U9 Spark plug gap: 0.8-0.9 mm (0.031-0.035 in) Engine: Engine type: Liquid cooled 4-stroke, DOHC Cylinder arrangement: V-type 4-cylinder Displacement...
Owners Manual
Page 112
... Spring/shock absorber type: Coil-air spring/oil damper Wheel travel: 140.0 mm (5.51 in) Front tire: Type: Tubeless Size: 150/80-16M/C 71H Manufacturer/model: DUNLOP/D404F Manufacturer/model: BRIDGESTONE/G705G Rear suspension: Type: Swingarm (link suspension) Spring/shock absorber type: Coil-air spring/oil damper Wheel travel: 105.0 mm (4.13 in) Front wheel: Wheel type: Cast wheel Rim size: 16M/C x MT3.50 10 Rear tire: Type: Tubeless Size: 150/90B15M/C 74H Rear wheel: Wheel type: Cast wheel Rim size: 15M/C x MT4.00 10-2 Electrical...
... Spring/shock absorber type: Coil-air spring/oil damper Wheel travel: 140.0 mm (5.51 in) Front tire: Type: Tubeless Size: 150/80-16M/C 71H Manufacturer/model: DUNLOP/D404F Manufacturer/model: BRIDGESTONE/G705G Rear suspension: Type: Swingarm (link suspension) Spring/shock absorber type: Coil-air spring/oil damper Wheel travel: 105.0 mm (4.13 in) Front wheel: Wheel type: Cast wheel Rim size: 16M/C x MT3.50 10 Rear tire: Type: Tubeless Size: 150/90B15M/C 74H Rear wheel: Wheel type: Cast wheel Rim size: 15M/C x MT4.00 10-2 Electrical...
Owners Manual
Page 113
... Neutral indicator light: 12 V, 1.7 W × 1 High beam indicator light: 12 V, 1.7 W × 1 Oil level warning light: 12 V, 1.7 W × 1 Turn signal indicator light: 12 V, 1.7 W × 2 Fuel level warning light: 14 V, 3.0 W × 1 Coolant temperature warning light: 12 V, 1.7 W × 1 Engine trouble warning light: 12 V, 1.7 W × 1 Overdrive indicator light: 12 V, 1.7 W × 1 Fuses: Main fuse: 30.0 A Headlight fuse: 15.0 A Signaling system fuse: 15.0 A Ignition fuse: 10.0 A Radiator fan fuse: 10.0 A Carburetor heater fuse: 10.0 A Cruise control fuse: 10.0 A Audio system fuse: 10...
... Neutral indicator light: 12 V, 1.7 W × 1 High beam indicator light: 12 V, 1.7 W × 1 Oil level warning light: 12 V, 1.7 W × 1 Turn signal indicator light: 12 V, 1.7 W × 2 Fuel level warning light: 14 V, 3.0 W × 1 Coolant temperature warning light: 12 V, 1.7 W × 1 Engine trouble warning light: 12 V, 1.7 W × 1 Overdrive indicator light: 12 V, 1.7 W × 1 Fuses: Main fuse: 30.0 A Headlight fuse: 15.0 A Signaling system fuse: 15.0 A Ignition fuse: 10.0 A Radiator fan fuse: 10.0 A Carburetor heater fuse: 10.0 A Cruise control fuse: 10.0 A Audio system fuse: 10...
Owners Manual
Page 123
... K Key identification number ...11-1 D Dimmer switch...4-8 L Labels, location...1-1 E Engine break-in ...7-4 Engine idling speed, checking...8-21 Engine oil and oil filter cartridge ...8-14 Engine, starting a warm ...7-2 Engine stop switch ...4-8 Engine trouble warning light ...4-3 M Main switch/steering lock...4-1 Maintenance and lubrication, periodic ...8-5 Maintenance, emission control system ...8-3 Maintenance record ...11-5 Matte color, caution ...9-1 Model label ...11-2 B Battery ...8-32 Brake and clutch fluid levels, checking ...8-26 Brake and clutch fluids, changing...8-28 Brake...
... K Key identification number ...11-1 D Dimmer switch...4-8 L Labels, location...1-1 E Engine break-in ...7-4 Engine idling speed, checking...8-21 Engine oil and oil filter cartridge ...8-14 Engine, starting a warm ...7-2 Engine stop switch ...4-8 Engine trouble warning light ...4-3 M Main switch/steering lock...4-1 Maintenance and lubrication, periodic ...8-5 Maintenance, emission control system ...8-3 Maintenance record ...11-5 Matte color, caution ...9-1 Model label ...11-2 B Battery ...8-32 Brake and clutch fluid levels, checking ...8-26 Brake and clutch fluids, changing...8-28 Brake...
Owners Manual
Page 124
...switch ...4-8 Steering, checking ...8-31 Steering, locking with a padlock...4-14 Storage ...9-3 Supporting the motorcycle ...8-36 Swingarm pivots, lubricating ...8-30 Wheel bearings, checking ...8-32 Wheels...8-24 T TALK switch ...4-8 Throttle grip and cable, checking and lubricating ...8-28 Throttle grip free play, checking...8-21 Tires ...8-22 Tool kit ...8-2 Troubleshooting ...8-37 Troubleshooting charts ...8-38 Turn signal indicator lights ...4-2 Turn signal light bulb or tail/brake light bulb, replacing ...8-36 Turn signal switch ...4-8 V Valve clearance ...8-22 Vehicle Emission Control...
...switch ...4-8 Steering, checking ...8-31 Steering, locking with a padlock...4-14 Storage ...9-3 Supporting the motorcycle ...8-36 Swingarm pivots, lubricating ...8-30 Wheel bearings, checking ...8-32 Wheels...8-24 T TALK switch ...4-8 Throttle grip and cable, checking and lubricating ...8-28 Throttle grip free play, checking...8-21 Tires ...8-22 Tool kit ...8-2 Troubleshooting ...8-37 Troubleshooting charts ...8-38 Turn signal indicator lights ...4-2 Turn signal light bulb or tail/brake light bulb, replacing ...8-36 Turn signal switch ...4-8 V Valve clearance ...8-22 Vehicle Emission Control...