
Owners Manual
Page 3
... performance or economy of operation of the Yamaha Road Star™. The design and manufacture of this Yamaha motorcycle fully comply with good operating techniques, will give you safely enjoy the capabilities and reliability of its controls and operating features. Yamaha has met these fields. Regular inspections and careful maintenance, along with the emissions standards for clean air applicable at the time...
... performance or economy of operation of the Yamaha Road Star™. The design and manufacture of this Yamaha motorcycle fully comply with good operating techniques, will give you safely enjoy the capabilities and reliability of its controls and operating features. Yamaha has met these fields. Regular inspections and careful maintenance, along with the emissions standards for clean air applicable at the time...

Owners Manual
Page 6
... Right view ...3-3 Controls and instruments...3-5 INSTRUMENT AND CONTROL FUNCTIONS ...4-1 Main switch/steering lock ...4-1 Indicator lights and warning lights ...4-2 Multi-function meter unit ...4-3 Handlebar switches ...4-6 Clutch lever ...4-8 Shift pedal ...4-8 Brake lever ...4-8 Brake pedal ...4-9 Fuel tank cap ...4-9 Fuel ...4-10 Fuel tank breather/overflow hose ...4-11 Catalytic converters ...4-11 Locking the steering with a padlock ...4-12 Rider seat ...4-12 Helmet holder ...4-13 Windshield [XV17ATSB(C)]...4-14 Sidecases [XV17ATSB(C)] ...4-15 Adjusting the shock absorber assembly ...4-16...
... Right view ...3-3 Controls and instruments...3-5 INSTRUMENT AND CONTROL FUNCTIONS ...4-1 Main switch/steering lock ...4-1 Indicator lights and warning lights ...4-2 Multi-function meter unit ...4-3 Handlebar switches ...4-6 Clutch lever ...4-8 Shift pedal ...4-8 Brake lever ...4-8 Brake pedal ...4-9 Fuel tank cap ...4-9 Fuel ...4-10 Fuel tank breather/overflow hose ...4-11 Catalytic converters ...4-11 Locking the steering with a padlock ...4-12 Rider seat ...4-12 Helmet holder ...4-13 Windshield [XV17ATSB(C)]...4-14 Sidecases [XV17ATSB(C)] ...4-15 Adjusting the shock absorber assembly ...4-16...
Owners Manual
Page 7
... OF CONTENTS Battery ...7-30 Replacing the fuses ...7-32 Replacing the headlight bulb ...7-33 Tail/brake light ...7-34 Replacing a turn signal light bulb ...7-35 Replacing a license plate light bulb ...7-35 Supporting the motorcycle ...7-36 Troubleshooting ...7-37 Troubleshooting chart ...7-38 MOTORCYCLE CARE AND STORAGE ...8-1 Matte color caution ...8-1 Care ...8-1 Storage ...8-4 SPECIFICATIONS ...9-1 CONSUMER INFORMATION...10-1 Identification numbers ...10-1 Reporting safety defects ...10-3 Motorcycle noise regulation ...10-4 Maintenance record ...10-5 YAMAHA MOTOR CORPORATION, U.S.A.
... OF CONTENTS Battery ...7-30 Replacing the fuses ...7-32 Replacing the headlight bulb ...7-33 Tail/brake light ...7-34 Replacing a turn signal light bulb ...7-35 Replacing a license plate light bulb ...7-35 Supporting the motorcycle ...7-36 Troubleshooting ...7-37 Troubleshooting chart ...7-38 MOTORCYCLE CARE AND STORAGE ...8-1 Matte color caution ...8-1 Care ...8-1 Storage ...8-4 SPECIFICATIONS ...9-1 CONSUMER INFORMATION...10-1 Identification numbers ...10-1 Reporting safety defects ...10-3 Motorcycle noise regulation ...10-4 Maintenance record ...10-5 YAMAHA MOTOR CORPORATION, U.S.A.

Owners Manual
Page 12
... accessories for your load (suspension-adjustable models only), and check the condition and pressure of the motorcycle is not in poorly ventilated or partially enclosed areas such as windows and doors. Many companies with the information about accessories below, are available only from a Yamaha dealer, have been designed, tested, and approved by Yamaha or Operation of accessories not sold by Yamaha for Yamaha vehicles...
... accessories for your load (suspension-adjustable models only), and check the condition and pressure of the motorcycle is not in poorly ventilated or partially enclosed areas such as windows and doors. Many companies with the information about accessories below, are available only from a Yamaha dealer, have been designed, tested, and approved by Yamaha or Operation of accessories not sold by Yamaha for Yamaha vehicles...
Owners Manual
Page 13
... would impair the performance of handling, braking, and comfort. These accessories may find aftermarket products similar in mind, as well as possible and should be appropriate. If electrical accessories exceed the capacity of the motorcycle's electrical system, an electric failure could result, which could cause a dangerous loss of lights or engine power. 2 Aftermarket Tires and Rims The tires and rims that it does not in another vehicle. Transporting the...
... would impair the performance of handling, braking, and comfort. These accessories may find aftermarket products similar in mind, as well as possible and should be appropriate. If electrical accessories exceed the capacity of the motorcycle's electrical system, an electric failure could result, which could cause a dangerous loss of lights or engine power. 2 Aftermarket Tires and Rims The tires and rims that it does not in another vehicle. Transporting the...
Owners Manual
Page 17
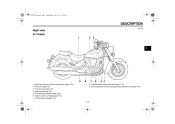
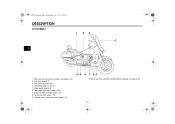
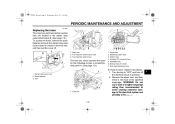
Shock absorber assembly spring preload adjusting nut (page 4-16) 3-3 U1BH12E0.book Page 3 Wednesday, July 6, 2011 4:06 PM DESCRIPTION EAU32230 Right view XV17ASB(C) 1 2 3 3 9 1. 2. 3. 4. 5. 6. 7. Transfer case oil level check bolt (page 7-15) 9. Main fuse and fuel injection system fuse (page 7-32) Fuel tank (page 4-9) Fuel tank cap (page 4-9) Brake pedal (page 4-9) Rear brake light switch (page 7-22) Engine oil filter cartridge (page 7-12) Air filter element (page 7-16) 8 7 6 5 4 8.
Shock absorber assembly spring preload adjusting nut (page 4-16) 3-3 U1BH12E0.book Page 3 Wednesday, July 6, 2011 4:06 PM DESCRIPTION EAU32230 Right view XV17ASB(C) 1 2 3 3 9 1. 2. 3. 4. 5. 6. 7. Transfer case oil level check bolt (page 7-15) 9. Main fuse and fuel injection system fuse (page 7-32) Fuel tank (page 4-9) Fuel tank cap (page 4-9) Brake pedal (page 4-9) Rear brake light switch (page 7-22) Engine oil filter cartridge (page 7-12) Air filter element (page 7-16) 8 7 6 5 4 8.
Owners Manual
Page 18
U1BH12E0.book Page 4 Wednesday, July 6, 2011 4:06 PM DESCRIPTION XV17ATSB(C) 1 2 3 4 3 10 9 1. 2. 3. 4. 5. 6. 7. 8. 9. Main fuse and fuel injection system fuse (page 7-32) Fuel tank (page 4-9) Fuel tank cap (page 4-9) Windshield (page 4-14/4-6) Brake pedal (page 4-9) Rear brake light switch (page 7-22) Engine oil filter cartridge (page 7-12) Air filter element (page 7-16) Transfer case oil level check bolt (page 7-15) 8 7 6 5 10.Shock absorber assembly spring preload adjusting nut (page 4-16) 3-4
U1BH12E0.book Page 4 Wednesday, July 6, 2011 4:06 PM DESCRIPTION XV17ATSB(C) 1 2 3 4 3 10 9 1. 2. 3. 4. 5. 6. 7. 8. 9. Main fuse and fuel injection system fuse (page 7-32) Fuel tank (page 4-9) Fuel tank cap (page 4-9) Windshield (page 4-14/4-6) Brake pedal (page 4-9) Rear brake light switch (page 7-22) Engine oil filter cartridge (page 7-12) Air filter element (page 7-16) Transfer case oil level check bolt (page 7-15) 8 7 6 5 10.Shock absorber assembly spring preload adjusting nut (page 4-16) 3-4
Owners Manual
Page 27
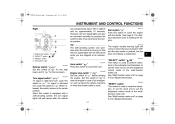
... with the starter. EAU12500 EAU12400 EAU12711 1 2 3 4 1. 2. 3. 4. Engine stop switch " / " Set this switch to " " for the high beam and to " ". EAU42524 4 Dimmer switch " / " Set this switch to the center position. See "Multi-function meter unit" on when the key is turned to "ON" and the start switch is used to perform selections in after the vehicle Engine stop switch " / "SELECT" switch " / "RESET" switch Start switch " " " " Start switch " " Push this switch to the center position.
... with the starter. EAU12500 EAU12400 EAU12711 1 2 3 4 1. 2. 3. 4. Engine stop switch " / " Set this switch to " " for the high beam and to " ". EAU42524 4 Dimmer switch " / " Set this switch to the center position. See "Multi-function meter unit" on when the key is turned to "ON" and the start switch is used to perform selections in after the vehicle Engine stop switch " / "SELECT" switch " / "RESET" switch Start switch " " " " Start switch " " Push this switch to the center position.
Owners Manual
Page 37
... following information before starting off system.) EWA10241 WARNING This shock absorber assembly contains highly pressurized nitrogen gas. NOTICE: Always tighten the locknut against the adjusting nut, and then tighten the locknut to excessive gas pressure. Tighten the locknut to open flame or other high heat source. Cylinder damage will result in any service. 4-17 1. Raise the sidestand or lower it with or...
... following information before starting off system.) EWA10241 WARNING This shock absorber assembly contains highly pressurized nitrogen gas. NOTICE: Always tighten the locknut against the adjusting nut, and then tighten the locknut to excessive gas pressure. Tighten the locknut to open flame or other high heat source. Cylinder damage will result in any service. 4-17 1. Raise the sidestand or lower it with or...
Owners Manual
Page 44
... injury. 6 TIP This model is equipped with all controls. The engine stops automatically if left idling for more information. 1. The following conditions must be met: G The transmission is in gear with the clutch lever pulled and the sidestand up. G Fuel level warning light G Engine trouble warning light ECA15484 NOTICE If a warning light does not come on initially when the key is not a malfunction. G an engine auto-stop system. In this...
... injury. 6 TIP This model is equipped with all controls. The engine stops automatically if left idling for more information. 1. The following conditions must be met: G The transmission is in gear with the clutch lever pulled and the sidestand up. G Fuel level warning light G Engine trouble warning light ECA15484 NOTICE If a warning light does not come on initially when the key is not a malfunction. G an engine auto-stop system. In this...

Owners Manual
Page 45
... disengage the clutch. 2. Pull the clutch lever to start, release the start switch, wait a few seconds, and then try again. The transmission is properly lubricated only when the engine is cold! The neutral indicator light should go out. 3. Shift the transmission into first gear. If not, ask a Yamaha dealer to withstand the shock of engine power available for long distances. Shifting gears lets you control the amount of forced shifting. Inadequate...
... disengage the clutch. 2. Pull the clutch lever to start, release the start switch, wait a few seconds, and then try again. The transmission is properly lubricated only when the engine is cold! The neutral indicator light should go out. 3. Shift the transmission into first gear. If not, ask a Yamaha dealer to withstand the shock of engine power available for long distances. Shifting gears lets you control the amount of forced shifting. Inadequate...
Owners Manual
Page 62
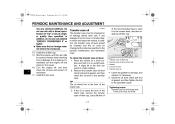
... maintenance and lubrication chart. Turn the engine off and check for oil leakage. Transfer case oil filler cap Transfer case oil level check bolt Gasket Correct oil level Transfer case oil 4. Check the gasket for damage, and replace it for the cause. 16. Install the oil level check bolt and its gasket, and then check the oil level in a false reading. 2. In addition, do not use oils with a diesel specification...
... maintenance and lubrication chart. Turn the engine off and check for oil leakage. Transfer case oil filler cap Transfer case oil level check bolt Gasket Correct oil level Transfer case oil 4. Check the gasket for damage, and replace it for the cause. 16. Install the oil level check bolt and its gasket, and then check the oil level in a false reading. 2. In addition, do not use oils with a diesel specification...
Owners Manual
Page 63
.... If oil is leaking, immediately turn the engine off and check for damage, and replace it idle for several minutes while checking the transfer case for oil leakage. Check the oil level check bolt gasket for the cause. 1. Clean or, if necessary, replace the air filter element more frequently if you are riding in the periodic maintenance and lubrication chart. Remove the oil filler cap, refill...
.... If oil is leaking, immediately turn the engine off and check for damage, and replace it idle for several minutes while checking the transfer case for oil leakage. Check the oil level check bolt gasket for the cause. 1. Clean or, if necessary, replace the air filter element more frequently if you are riding in the periodic maintenance and lubrication chart. Remove the oil filler cap, refill...
Owners Manual
Page 66
... a Yamaha dealer immediately and have the tire replaced. Tire inflation pressure must be checked and adjusted when the temperature of the tire equals the ambient air temperature. If a tire tread shows crosswise line (minimum tread depth), if the tire has a nail or glass fragments in ) WARNING Never overload your vehicle. Tire inflation pressure should be adjusted according to total weight of rider, passenger, cargo and accessories...
... a Yamaha dealer immediately and have the tire replaced. Tire inflation pressure must be checked and adjusted when the temperature of the tire equals the ambient air temperature. If a tire tread shows crosswise line (minimum tread depth), if the tire has a nail or glass fragments in ) WARNING Never overload your vehicle. Tire inflation pressure should be adjusted according to total weight of rider, passenger, cargo and accessories...
Owners Manual
Page 79
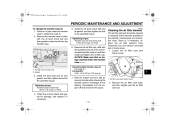
.... 1. Starter relay case cover 2. Turn the key to "OFF" and turn off the electrical circuit in the starter relay case behind panel A. (See page 7-9.) 1 1. Fuel injection system fuse 1. 2. 3. 4. 5. 6. 7. 7 6 54 3 2 Spare fuse Signaling system fuse Ignition fuse Auxiliary DC connector fuse Headlight fuse Backup fuse (for clock) Auto-decompression fuse 3 1 2 The fuse box, which contains the fuses for the individual circuits, is blown, replace it from the slot, and then pull the cover off. 1 1 3 2 1. WARNING! Fuse box If a fuse...
.... 1. Starter relay case cover 2. Turn the key to "OFF" and turn off the electrical circuit in the starter relay case behind panel A. (See page 7-9.) 1 1. Fuel injection system fuse 1. 2. 3. 4. 5. 6. 7. 7 6 54 3 2 Spare fuse Signaling system fuse Ignition fuse Auxiliary DC connector fuse Headlight fuse Backup fuse (for clock) Auto-decompression fuse 3 1 2 The fuse box, which contains the fuses for the individual circuits, is blown, replace it from the slot, and then pull the cover off. 1 1 3 2 1. WARNING! Fuse box If a fuse...
Owners Manual
Page 91
... kg (774 lb) Spark plug(s): Manufacturer/model: NGK/DPR7EA-9 Manufacturer/model: DENSO/X22EPR-U9 Spark plug gap: 0.8-0.9 mm (0.031-0.035 in) Engine: Engine type: Air cooled 4-stroke, OHV Cylinder arrangement: V-type 2-cylinder Displacement: 1670 cm³ Bore × stroke: 97.0 × 113.0 mm (3.82 × 4.45 in) Recommended engine oil grade: API service SG type or higher, JASO standard MA Engine oil quantity: Without oil filter cartridge replacement: 3.70 L (3.91...
... kg (774 lb) Spark plug(s): Manufacturer/model: NGK/DPR7EA-9 Manufacturer/model: DENSO/X22EPR-U9 Spark plug gap: 0.8-0.9 mm (0.031-0.035 in) Engine: Engine type: Air cooled 4-stroke, OHV Cylinder arrangement: V-type 2-cylinder Displacement: 1670 cm³ Bore × stroke: 97.0 × 113.0 mm (3.82 × 4.45 in) Recommended engine oil grade: API service SG type or higher, JASO standard MA Engine oil quantity: Without oil filter cartridge replacement: 3.70 L (3.91...
Owners Manual
Page 93
...SPECIFICATIONS Electrical system: Ignition system: TCI Charging system: AC magneto Engine trouble warning light: LED Fuses: Main fuse: 50.0 A Headlight fuse: 20.0 A Signaling system fuse: 15.0 A Ignition fuse: 20.0 A Fuel injection system fuse: 15.0 A Auxiliary DC connector fuse: 3.0 A Backup fuse: 3.0 A Auto-decompression fuse: 15.0 A Battery: Model: GT14B-4 Voltage, capacity: 12 V, 12.0 Ah Headlight: Bulb type: Halogen bulb Bulb voltage, wattage × quantity: Headlight: 12 V, 60 W/55 W × 1 Tail/brake light: LED Front turn signal/position light: 12 V, 23 W/8.0 W × 2 Rear turn...
...SPECIFICATIONS Electrical system: Ignition system: TCI Charging system: AC magneto Engine trouble warning light: LED Fuses: Main fuse: 50.0 A Headlight fuse: 20.0 A Signaling system fuse: 15.0 A Ignition fuse: 20.0 A Fuel injection system fuse: 15.0 A Auxiliary DC connector fuse: 3.0 A Backup fuse: 3.0 A Auto-decompression fuse: 15.0 A Battery: Model: GT14B-4 Voltage, capacity: 12 V, 12.0 Ah Headlight: Bulb type: Halogen bulb Bulb voltage, wattage × quantity: Headlight: 12 V, 60 W/55 W × 1 Tail/brake light: LED Front turn signal/position light: 12 V, 23 W/8.0 W × 2 Rear turn...

Owners Manual
Page 100
... effect, this warranty. All parts replaced under this warranty shall include parts replaced due to meet these standards within ten (10) days after transfer. c) Abnormal strain, neglect, or abuse. Operate and maintain the motorcycle as specified in materials and workmanship which arise solely as to conform at the time of sale with headlight, stoplight, and turn signals shall be...
... effect, this warranty. All parts replaced under this warranty shall include parts replaced due to meet these standards within ten (10) days after transfer. c) Abnormal strain, neglect, or abuse. Operate and maintain the motorcycle as specified in materials and workmanship which arise solely as to conform at the time of sale with headlight, stoplight, and turn signals shall be...

Owners Manual
Page 101
... maintenance services, non-warranty repairs, accident and collision damages, and oil, oil filters, air filters, spark plugs, and brake shoes. The customer's responsibility includes all costs of the existing warranty can be inspected and re-registered by sending a postcard listing your motorcycle model name, V.I perform any later date. 3. The warranty is compiled from the purchase registrations sent to -date registration record in the Owner's and Service Manual. No. A. CUSTOMER SERVICE...
... maintenance services, non-warranty repairs, accident and collision damages, and oil, oil filters, air filters, spark plugs, and brake shoes. The customer's responsibility includes all costs of the existing warranty can be inspected and re-registered by sending a postcard listing your motorcycle model name, V.I perform any later date. 3. The warranty is compiled from the purchase registrations sent to -date registration record in the Owner's and Service Manual. No. A. CUSTOMER SERVICE...
Owners Manual
Page 104
......10-5 Matte color, caution ...8-1 Model label ...10-2 Multi-function meter unit ...4-3 D Dimmer switch ...4-7 Drive belt slack...7-25 T Tail/brake light...7-34 Throttle grip and cable, checking and lubricating ...7-26 Throttle grip free play, checking ...7-18 Tires ...7-19 Tool kit...7-2 Transfer case oil...7-15 Troubleshooting ...7-37 Troubleshooting chart ...7-38 E Engine break-in...6-3 Engine oil and oil filter cartridge...7-12 Engine stop switch ...4-7 Engine trouble warning light...4-3 N Neutral indicator light...4-2 Noise regulation...10-4 F Front and rear brake pads, checking...
......10-5 Matte color, caution ...8-1 Model label ...10-2 Multi-function meter unit ...4-3 D Dimmer switch ...4-7 Drive belt slack...7-25 T Tail/brake light...7-34 Throttle grip and cable, checking and lubricating ...7-26 Throttle grip free play, checking ...7-18 Tires ...7-19 Tool kit...7-2 Transfer case oil...7-15 Troubleshooting ...7-37 Troubleshooting chart ...7-38 E Engine break-in...6-3 Engine oil and oil filter cartridge...7-12 Engine stop switch ...4-7 Engine trouble warning light...4-3 N Neutral indicator light...4-2 Noise regulation...10-4 F Front and rear brake pads, checking...