
Owners Manual
Page 6
...OF THE WARNING AND SPECIFICATION LABELS...1-1 SAFETY INFORMATION...2-1 DESCRIPTION AND MACHINE IDENTIFICATION ...3-1 Identification number records...3-2 Key identification number...3-2 Vehicle identification number ...3-3 Model label ...3-3 2 3 CONTROL FUNCTIONS...4-1 Main switch ...4-1 Indicator lights...4-2 Handlebar switches ...4-2 Throttle lever ...4-4 Speed limiter ...4-5 Front brake lever...4-6 Brake pedal and rear brake lever ...4-6 Parking brake...4-8 Shift pedal ...4-9 Drive select lever ...4-9 Recoil starter...4-10 Fuel tank cap ...4-11 Fuel cock...4-12 Starter (choke) ...4-13 Seat...
...OF THE WARNING AND SPECIFICATION LABELS...1-1 SAFETY INFORMATION...2-1 DESCRIPTION AND MACHINE IDENTIFICATION ...3-1 Identification number records...3-2 Key identification number...3-2 Vehicle identification number ...3-3 Model label ...3-3 2 3 CONTROL FUNCTIONS...4-1 Main switch ...4-1 Indicator lights...4-2 Handlebar switches ...4-2 Throttle lever ...4-4 Speed limiter ...4-5 Front brake lever...4-6 Brake pedal and rear brake lever ...4-6 Parking brake...4-8 Shift pedal ...4-9 Drive select lever ...4-9 Recoil starter...4-10 Fuel tank cap ...4-11 Fuel cock...4-12 Starter (choke) ...4-13 Seat...
Owners Manual
Page 7
...PRE-OPERATION CHECKS ...5-1 Front and rear brakes ...5-3 Fuel ...5-5 Engine oil ...5-7 Final gear oil...5-7 Throttle lever ...5-7 Fittings and fasteners...5-8 Lights...5-8 Switches...5-8 Battery...5-8 Tires ...5-9 How to measure tire pressure...5-11 Tire wear limit...5-12 OPERATION...6-1 Starting a cold engine ...6-1 Starting a warm engine...6-3 Warming up...6-3 Drive select lever operation and reverse driving...6-4 Shifting ...6-5 To start out and accelerate ...6-6 To decelerate ...6-7 Engine break-in ...6-7 Parking...6-8 Parking on a slope...6-9 Accessories and loading ...6-10 7 RIDING YOUR...
...PRE-OPERATION CHECKS ...5-1 Front and rear brakes ...5-3 Fuel ...5-5 Engine oil ...5-7 Final gear oil...5-7 Throttle lever ...5-7 Fittings and fasteners...5-8 Lights...5-8 Switches...5-8 Battery...5-8 Tires ...5-9 How to measure tire pressure...5-11 Tire wear limit...5-12 OPERATION...6-1 Starting a cold engine ...6-1 Starting a warm engine...6-3 Warming up...6-3 Drive select lever operation and reverse driving...6-4 Shifting ...6-5 To start out and accelerate ...6-6 To decelerate ...6-7 Engine break-in ...6-7 Parking...6-8 Parking on a slope...6-9 Accessories and loading ...6-10 7 RIDING YOUR...
Owners Manual
Page 8
...PERIODIC MAINTENANCE AND ADJUSTMENT...8-1 Owner's manual and tool kit...8-1 Periodic maintenance/ lubrication ...8-3 Engine oil and oil filter element ...8-6 Final gear oil ...8-12 Spark plug inspection...8-15 Air filter element cleaning...8-18 Spark arrester cleaning ...8-22 Carburetor adjustment...8-23 Idle speed adjustment ...8-24 Valve clearance adjustment ...8-24 Throttle lever adjustment...8-25 Select lever safety system cable adjustment...8-25 Front brake pad check ...8-26 Rear brake shoe inspection ...8-26 Brake fluid level check...8-27 Brake fluid replacement...8-28 Front brake lever...
...PERIODIC MAINTENANCE AND ADJUSTMENT...8-1 Owner's manual and tool kit...8-1 Periodic maintenance/ lubrication ...8-3 Engine oil and oil filter element ...8-6 Final gear oil ...8-12 Spark plug inspection...8-15 Air filter element cleaning...8-18 Spark arrester cleaning ...8-22 Carburetor adjustment...8-23 Idle speed adjustment ...8-24 Valve clearance adjustment ...8-24 Throttle lever adjustment...8-25 Select lever safety system cable adjustment...8-25 Front brake pad check ...8-26 Rear brake shoe inspection ...8-26 Brake fluid level check...8-27 Brake fluid replacement...8-28 Front brake lever...
Owners Manual
Page 20
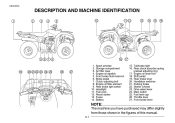
.... Fuel tank cap 26. Tail/brake light 16. Throttle lever 27. Front brake lever NOTE: The machine you have purchased may differ slightly from those shown in the figures of this manual. 3-1 EBU00032 1- Rear brake lever 20. Drive select lever 24. DESCRIPTION AND MACHINE IDENTIFICATION 1. 2. 3. 4. 5. 6. 7. 8. 9. 10. 11. 12. 13. 14. Spark arrester Storage compartment Air filter case Engine oil dipstick Front brake fluid reservoir Brake pedal Clutch adjusting bolt Engine oil filter element Rear brake light switch Headlight Fuel cock Recoil starter Fuses Battery...
.... Fuel tank cap 26. Tail/brake light 16. Throttle lever 27. Front brake lever NOTE: The machine you have purchased may differ slightly from those shown in the figures of this manual. 3-1 EBU00032 1- Rear brake lever 20. Drive select lever 24. DESCRIPTION AND MACHINE IDENTIFICATION 1. 2. 3. 4. 5. 6. 7. 8. 9. 10. 11. 12. 13. 14. Spark arrester Storage compartment Air filter case Engine oil dipstick Front brake fluid reservoir Brake pedal Clutch adjusting bolt Engine oil filter element Rear brake light switch Headlight Fuel cock Recoil starter Fuses Battery...
Owners Manual
Page 24
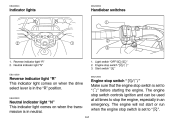
... engine stop switch controls ignition and can be used at all times to stop the engine, especially in neutral. 4-2 Engine stop switch " / " Make sure that the engine stop switch is set to " " before starting the engine. Start switch " " EBU12050 " " EBU12500 Reverse indicator light "R" This indicator light comes on when the transmission is in an emergency. Light switch "OFF/ / 2. Reverse indicator light "R" 2. EBU00043 EBU00053 Indicator lights Handlebar switches 1. Engine stop switch is in the "R" position. The engine...
... engine stop switch controls ignition and can be used at all times to stop the engine, especially in neutral. 4-2 Engine stop switch " / " Make sure that the engine stop switch is set to " " before starting the engine. Start switch " " EBU12050 " " EBU12500 Reverse indicator light "R" This indicator light comes on when the transmission is in an emergency. Light switch "OFF/ / 2. Reverse indicator light "R" 2. EBU00043 EBU00053 Indicator lights Handlebar switches 1. Engine stop switch is in the "R" position. The engine...
Owners Manual
Page 26
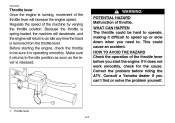
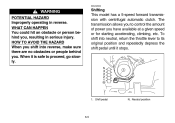
Regulate the speed of throttle. HOW TO AVOID THE HAZARD Check the operation of the throttle lever will return to an idle any time the hand is operating smoothly. EBU00062 Throttle lever Once the engine is released. WARNING POTENTIAL HAZARD Malfunction of the machine by varying the throttle position. If it is removed from the throttle lever. Consult a Yamaha dealer if you start the engine. Make...
Regulate the speed of throttle. HOW TO AVOID THE HAZARD Check the operation of the throttle lever will return to an idle any time the hand is operating smoothly. EBU00062 Throttle lever Once the engine is released. WARNING POTENTIAL HAZARD Malfunction of the machine by varying the throttle position. If it is removed from the throttle lever. Consult a Yamaha dealer if you start the engine. Make...
Owners Manual
Page 43
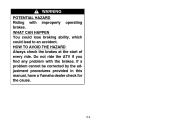
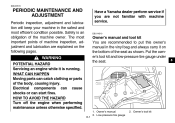
If a problem cannot be corrected by the adjustment procedures provided in this manual, have a Yamaha dealer check for the cause. 5-4 WHAT CAN HAPPEN You could lose braking ability, which could lead to an accident. WARNING POTENTIAL HAZARD Riding with the brakes. Do not ride the ATV if you find any problem with improperly operating brakes. HOW TO AVOID THE HAZARD Always check the brakes at the start of every ride.
If a problem cannot be corrected by the adjustment procedures provided in this manual, have a Yamaha dealer check for the cause. 5-4 WHAT CAN HAPPEN You could lose braking ability, which could lead to an accident. WARNING POTENTIAL HAZARD Riding with the brakes. Do not ride the ATV if you find any problem with improperly operating brakes. HOW TO AVOID THE HAZARD Always check the brakes at the start of every ride.
Owners Manual
Page 52
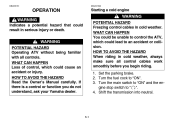
... or collision. Shift the transmission into neutral. WARNING POTENTIAL HAZARD Operating ATV without being familiar with all control cables work smoothly before you do not understand, ask your Yamaha dealer. 6-1 WHAT CAN HAPPEN Loss of control, which could result in serious injury or death. Starting a cold engine WARNING POTENTIAL HAZARD Freezing control cables in cold weather, always make sure all controls. Set the parking brake. 2. If there...
... or collision. Shift the transmission into neutral. WARNING POTENTIAL HAZARD Operating ATV without being familiar with all control cables work smoothly before you do not understand, ask your Yamaha dealer. 6-1 WHAT CAN HAPPEN Loss of control, which could result in serious injury or death. Starting a cold engine WARNING POTENTIAL HAZARD Freezing control cables in cold weather, always make sure all controls. Set the parking brake. 2. If there...

Owners Manual
Page 53
... neutral, the neutral indicator light should come on . If the light does not come on , ask a Yamaha dealer to shift into neutral before starting the engine. _ _ Position 3: Cold engine startambient temperature above 25°C (80°F) and warm engine start switch. 6-2 Position 2: Cold engine startambient temperature at 0°C (30°F)-30°C (90°F) and warming up position. G The engine can be started in any gear if the rear brake lever...
... neutral, the neutral indicator light should come on . If the light does not come on , ask a Yamaha dealer to shift into neutral before starting the engine. _ _ Position 3: Cold engine startambient temperature above 25°C (80°F) and warm engine start switch. 6-2 Position 2: Cold engine startambient temperature at 0°C (30°F)-30°C (90°F) and warming up position. G The engine can be started in any gear if the rear brake lever...
Owners Manual
Page 56
... person behind you , resulting in reverse. To shift into reverse, make sure there are no obstacles or people behind you . Neutral position 6-5 The transmission allows you to control the amount of power you have available at a given speed or for starting accelerating, climbing, etc. Shifting This model has a 5-speed forward transmission with centrifugal automatic clutch. EBU02000 WARNING POTENTIAL HAZARD Improperly operating in serious injury.
... person behind you , resulting in reverse. To shift into reverse, make sure there are no obstacles or people behind you . Neutral position 6-5 The transmission allows you to control the amount of power you have available at a given speed or for starting accelerating, climbing, etc. Shifting This model has a 5-speed forward transmission with centrifugal automatic clutch. EBU02000 WARNING POTENTIAL HAZARD Improperly operating in serious injury.
Owners Manual
Page 58
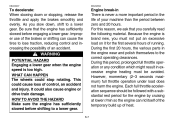
WARNING POTENTIAL HAZARD Engaging a lower gear when the engine speed is brand new, you must be followed with a substantial rest period for the first several hours of heat. WHAT CAN HAPPEN The wheels could also cause engine or drive train damage. During the first 20 hours, the various parts in the engine wear and polish themselves to lose traction, reducing control and...
WARNING POTENTIAL HAZARD Engaging a lower gear when the engine speed is brand new, you must be followed with a substantial rest period for the first several hours of heat. WHAT CAN HAPPEN The wheels could also cause engine or drive train damage. During the first 20 hours, the various parts in the engine wear and polish themselves to lose traction, reducing control and...
Owners Manual
Page 59
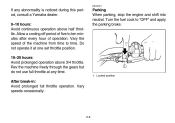
... gears but do not use full throttle at one set throttle position. 10-20 hours: Avoid prolonged operation above half throttle. Vary speeds occasionally. 6-8 Allow a cooling off period of five to ten minutes after every hour of the machine from time to "OFF" and apply the parking brake. 1. Parking When parking, stop the engine and shift into neutral. EBU00211 If any time. Turn the fuel cock to time...
... gears but do not use full throttle at one set throttle position. 10-20 hours: Avoid prolonged operation above half throttle. Vary speeds occasionally. 6-8 Allow a cooling off period of five to ten minutes after every hour of the machine from time to "OFF" and apply the parking brake. 1. Parking When parking, stop the engine and shift into neutral. EBU00211 If any time. Turn the fuel cock to time...
Owners Manual
Page 84
... released before applying the throttle, the front wheels may lift off the ground resulting in this area before trying more difficult to perform on pavement. Apply the throttle slowly and smoothly. Once the ATV has attained adequate speed, release the throttle and lift the shift pedal to coordinate the use only, and handling maneuvers are ready to begin riding your ATV. Set the parking brake...
... released before applying the throttle, the front wheels may lift off the ground resulting in this area before trying more difficult to perform on pavement. Apply the throttle slowly and smoothly. Once the ATV has attained adequate speed, release the throttle and lift the shift pedal to coordinate the use only, and handling maneuvers are ready to begin riding your ATV. Set the parking brake...
Owners Manual
Page 93
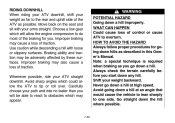
.... Shift your arms straight. Carefully choose your path and ride no faster than you start down a hill at an angle that would cause the vehicle to lean sharply to overturn. Always check the terrain carefully before you will allow the engine compression to obstacles which could allow the ATV to the rear and uphill side of control...
.... Shift your arms straight. Carefully choose your path and ride no faster than you start down a hill at an angle that would cause the vehicle to lean sharply to overturn. Always check the terrain carefully before you will allow the engine compression to obstacles which could allow the ATV to the rear and uphill side of control...
Owners Manual
Page 104
... this owner's manual in the safest and most important points of the seat as shown. Safety is running. Put the owner's tool kit and low-pressure tire gauge under the seat. 1. Have a Yamaha dealer perform service if you are not familiar with machine service. 1 2 3 EBU14510 4 5 6 7 8 9 10 11 12 13 14 WARNING POTENTIAL HAZARD Servicing an engine while it on the following pages. WHAT CAN HAPPEN Moving parts can start fires...
... this owner's manual in the safest and most important points of the seat as shown. Safety is running. Put the owner's tool kit and low-pressure tire gauge under the seat. 1. Have a Yamaha dealer perform service if you are not familiar with machine service. 1 2 3 EBU14510 4 5 6 7 8 9 10 11 12 13 14 WARNING POTENTIAL HAZARD Servicing an engine while it on the following pages. WHAT CAN HAPPEN Moving parts can start fires...
Owners Manual
Page 107
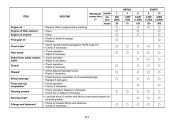
...Engine oil Engine oil filter element Engine oil strainer Final gear oil Front brake* Rear brake* Select lever safety system cable* Clutch* Wheels* Wheel bearings* Front and rear suspension* Steering system* Steering shaft* Fittings and fasteners* • Replace (Warm engine before draining). • Clean. • Clean. • Check oil level/oil leakage. • Replace. • Check operation/fluid... Repair if necessary. • Check bearing assemblies for looseness/damage. • Replace if damaged. • Check operation. • Correct if necessary. • Check operation./Replace ...
...Engine oil Engine oil filter element Engine oil strainer Final gear oil Front brake* Rear brake* Select lever safety system cable* Clutch* Wheels* Wheel bearings* Front and rear suspension* Steering system* Steering shaft* Fittings and fasteners* • Replace (Warm engine before draining). • Clean. • Clean. • Check oil level/oil leakage. • Replace. • Check operation/fluid... Repair if necessary. • Check bearing assemblies for looseness/damage. • Replace if damaged. • Check operation. • Correct if necessary. • Check operation./Replace ...
Owners Manual
Page 137
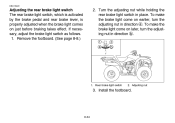
... 3. Rear brake light switch 2. Install the footboard. 8-34 If necessary, adjust the brake light switch as follows. 1. To make the brake light come on just before braking takes effect. EBU15420 Adjusting the rear brake light switch The rear brake light switch, which is activated by the brake pedal and rear brake lever, is properly adjusted when the brake light comes on later, turn the adjusting nut in direction b. 1. Turn the adjusting nut while holding the rear brake light switch...
... 3. Rear brake light switch 2. Install the footboard. 8-34 If necessary, adjust the brake light switch as follows. 1. To make the brake light come on just before braking takes effect. EBU15420 Adjusting the rear brake light switch The rear brake light switch, which is activated by the brake pedal and rear brake lever, is properly adjusted when the brake light comes on later, turn the adjusting nut in direction b. 1. Turn the adjusting nut while holding the rear brake light switch...
Owners Manual
Page 139
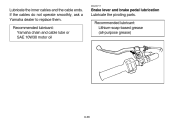
If the cables do not operate smoothly, ask a Yamaha dealer to replace them. Recommended lubricant: Yamaha chain and cable lube or SAE 10W30 motor oil Brake lever and brake pedal lubrication Lubricate the pivoting parts. EBU00717 Lubricate the inner cables and the cable ends. Recommended lubricant: Lithium-soap-based grease (all-purpose grease) 8-36
If the cables do not operate smoothly, ask a Yamaha dealer to replace them. Recommended lubricant: Yamaha chain and cable lube or SAE 10W30 motor oil Brake lever and brake pedal lubrication Lubricate the pivoting parts. EBU00717 Lubricate the inner cables and the cable ends. Recommended lubricant: Lithium-soap-based grease (all-purpose grease) 8-36
Owners Manual
Page 155
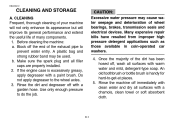
... cloth. 9-1 Make sure the spark plug and all surfaces with a paint brush. Many expensive repair bills have resulted from improper high pressure detergent applications such as those available in coin-operated car washers. 4. A plastic bag and strong rubber band may cause water seepage and deterioration of the exhaust pipe to the wheel axles. 3. If the engine case is handy for hard...
... cloth. 9-1 Make sure the spark plug and all surfaces with a paint brush. Many expensive repair bills have resulted from improper high pressure detergent applications such as those available in coin-operated car washers. 4. A plastic bag and strong rubber band may cause water seepage and deterioration of the exhaust pipe to the wheel axles. 3. If the engine case is handy for hard...

Owners Manual
Page 157
... or the seat cover. 9-3 EBU00530 B. Lubricate all wheels off the ground. 5. Specified amount: 1 oz of stabilizer to each gallon of fuel (or 7.5 cc of stabilizer to each liter of fuel) NOTE: Use of your machine will require some preventive procedures to guard against deterioration. Do not apply oil to coat the cylinder wall with oil. 3. Ground the spark plug wire and turn the engine over the exhaust pipe...
... or the seat cover. 9-3 EBU00530 B. Lubricate all wheels off the ground. 5. Specified amount: 1 oz of stabilizer to each gallon of fuel (or 7.5 cc of stabilizer to each liter of fuel) NOTE: Use of your machine will require some preventive procedures to guard against deterioration. Do not apply oil to coat the cylinder wall with oil. 3. Ground the spark plug wire and turn the engine over the exhaust pipe...