
Owner's Manual
Page 34
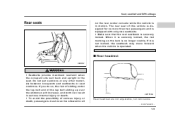
... and is equipped with only two seatbelts. The rear seat of this vehicle is designed for no longer visible. If it is securely locked, the red marking on the rear center console while the vehicle is securely locked.
... and is equipped with only two seatbelts. The rear seat of this vehicle is designed for no longer visible. If it is securely locked, the red marking on the rear center console while the vehicle is securely locked.
Owner's Manual
Page 35
... returning the seatback to its original position, be certain to place all of a sudden stop , a sudden steering maneuver or a rapid acceleration. When securely locked, the red marking on the folded rear seatback. Seat, seatbelt and SRS airbags Folding down during a sudden stop or accident. 1-10
... returning the seatback to its original position, be certain to place all of a sudden stop , a sudden steering maneuver or a rapid acceleration. When securely locked, the red marking on the folded rear seatback. Seat, seatbelt and SRS airbags Folding down during a sudden stop or accident. 1-10
Owner's Manual
Page 36
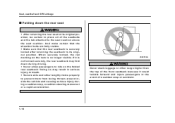
UB1110BA 1. Seat, seatbelt and SRS airbags Folding down the seatback Before folding down . 1 A B UB1109BB A) LOCK B) UNLOCK 1) Red - CONTINUED - 1-11 Unlock the seatback by pulling the release knob up and then fold the seatback down the seatback, check that there is folded. If there is something in the pocket, it could be damaged or cause damage to the seatback and rear center console when the seatback is nothing in the seatback pocket.
UB1110BA 1. Seat, seatbelt and SRS airbags Folding down the seatback Before folding down . 1 A B UB1109BB A) LOCK B) UNLOCK 1) Red - CONTINUED - 1-11 Unlock the seatback by pulling the release knob up and then fold the seatback down the seatback, check that there is folded. If there is something in the pocket, it could be damaged or cause damage to the seatback and rear center console when the seatback is nothing in the seatback pocket.

Owner's Manual
Page 38
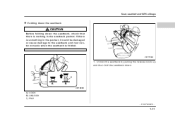
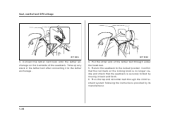
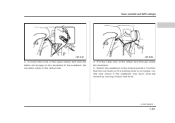
Be careful not to its original position, raise the seatback and seat cushion until they lock into the slot at the top of the seatback. Unlock the seatback by pulling the release knob up and fold the seatback down operation. 5. Seat, seatbelt and SRS airbags 1 A B UB1112CB UB1113BA A) LOCK B) UNLOCK 1) Red 4. Confirm that the pin located at the bottom of the seat cushion is inserted into - CONTINUED - 1-13 To return the rear seat to pinch your hand or fingers with the seat cushion or the seatback when performing the fold down .
Be careful not to its original position, raise the seatback and seat cushion until they lock into the slot at the top of the seatback. Unlock the seatback by pulling the release knob up and fold the seatback down operation. 5. Seat, seatbelt and SRS airbags 1 A B UB1112CB UB1113BA A) LOCK B) UNLOCK 1) Red 4. Confirm that the pin located at the bottom of the seat cushion is inserted into - CONTINUED - 1-13 To return the rear seat to pinch your hand or fingers with the seat cushion or the seatback when performing the fold down .
Owner's Manual
Page 61
... connecting it back and forth. 6. Run the lap and shoulder belt through under the headrest. 5. Return the seatback to the tether anchorage. 4. Confirm that the red mark on the backside of the tether belt through the child restraint system following the instructions provided by moving it to the locked position. Connect...
... connecting it back and forth. 6. Run the lap and shoulder belt through under the headrest. 5. Return the seatback to the tether anchorage. 4. Confirm that the red mark on the backside of the tether belt through the child restraint system following the instructions provided by moving it to the locked position. Connect...
Owner's Manual
Page 68
Seat, seatbelt and SRS airbags UB1144BA UB1146BA 3. Connect the hook of the upper tether belt onto the tether anchorage on the locking knob is no longer visible and check if the seatback has been securely locked by moving it back and forth. - CONTINUED - 1-43 Confirm that the red mark on the backside of the tether belt through under the headrest. 5. Return the seatback to the locked position. Do not allow slack in the tether belt. 4. Put the other end of the seatback.
Seat, seatbelt and SRS airbags UB1144BA UB1146BA 3. Connect the hook of the upper tether belt onto the tether anchorage on the locking knob is no longer visible and check if the seatback has been securely locked by moving it back and forth. - CONTINUED - 1-43 Confirm that the red mark on the backside of the tether belt through under the headrest. 5. Return the seatback to the locked position. Do not allow slack in the tether belt. 4. Put the other end of the seatback.
Owner's Manual
Page 94
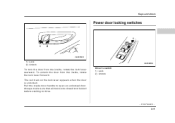
Keys and doors Power door locking switches 1 1 2 2 UB2001BC 1) Lock 2) Unlock UB2008CB To lock the door from the inside, rotate the lock lever forward. Always make sure that all doors are closed and locked before starting to open an unlocked door. Pull the inside , rotate the lock lever rearward. Driver's switch 1) Lock 2) Unlock - CONTINUED - 2-5 To unlock the door from the inside door handle to drive. The red mark on the lock lever appears when the door is unlocked.
Keys and doors Power door locking switches 1 1 2 2 UB2001BC 1) Lock 2) Unlock UB2008CB To lock the door from the inside, rotate the lock lever forward. Always make sure that all doors are closed and locked before starting to open an unlocked door. Pull the inside , rotate the lock lever rearward. Driver's switch 1) Lock 2) Unlock - CONTINUED - 2-5 To unlock the door from the inside door handle to drive. The red mark on the lock lever appears when the door is unlocked.
Owner's Manual
Page 117
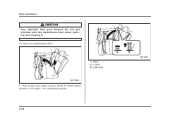
To open the switchback door: A B UB1112CB 1 1) Red A) LOCK B) UNLOCK UB1172BA 1. Pull up the rear seat cushion. Refer to "Rear seats" section in Chapter 1 for operating details. 2-28 Keys and doors Pay attention that your fingers do not get pinched with the switchback door when opening and closing it.
To open the switchback door: A B UB1112CB 1 1) Red A) LOCK B) UNLOCK UB1172BA 1. Pull up the rear seat cushion. Refer to "Rear seats" section in Chapter 1 for operating details. 2-28 Keys and doors Pay attention that your fingers do not get pinched with the switchback door when opening and closing it.
Owner's Manual
Page 119
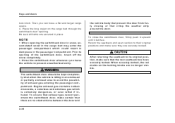
... is idling in an enclosed or partially enclosed area to their original positions and make sure they are no longer visible. When securely locked, the red marks on the cargo bed through the switchback door opening of exhaust gas entering the passenger compartment. Place the long object on the locking knobs...
... is idling in an enclosed or partially enclosed area to their original positions and make sure they are no longer visible. When securely locked, the red marks on the cargo bed through the switchback door opening of exhaust gas entering the passenger compartment. Place the long object on the locking knobs...

Owner's Manual
Page 130
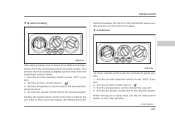
... per minute. Do not operate the engine with the pointer of the knob changes the function alternately. The tachometer shows the engine speed in the red zone. Tachometer 2 UB3027BB 1) A trip meter 2) B trip meter The trip meter shows the distance that the vehicle has been driven since you last set the trip... the knob. Instruments and controls Double trip meter more than 1 second. NOTE 1 If the connection between the combination meter and battery is reduced below the red zone.
... per minute. Do not operate the engine with the pointer of the knob changes the function alternately. The tachometer shows the engine speed in the red zone. Tachometer 2 UB3027BB 1) A trip meter 2) B trip meter The trip meter shows the distance that the vehicle has been driven since you last set the trip... the knob. Instruments and controls Double trip meter more than 1 second. NOTE 1 If the connection between the combination meter and battery is reduced below the red zone.

Owner's Manual
Page 162
... (Refer to "Rear window defogger button" in chapter 3.) Temperature control dial This dial regulates the temperature of air flow from the blue area (cool) to red area (warm). The fan speed control dial is turned to select four fan speeds. Fan speed control dial The fan operates only when the ignition...
... (Refer to "Rear window defogger button" in chapter 3.) Temperature control dial This dial regulates the temperature of air flow from the blue area (cool) to red area (warm). The fan speed control dial is turned to select four fan speeds. Fan speed control dial The fan operates only when the ignition...
Owner's Manual
Page 166
... dial to the desired speed. Set the fan speed control dial to " ". 3. When driving on a dusty road, set the air inlet control button to the red area or blue area decreases the temperature dif- The air from the foot outlets is slightly warmer than from the foot outlets. Setting the temperature...
... dial to the desired speed. Set the fan speed control dial to " ". 3. When driving on a dusty road, set the air inlet control button to the red area or blue area decreases the temperature dif- The air from the foot outlets is slightly warmer than from the foot outlets. Setting the temperature...

Owner's Manual
Page 168
... of the radiator, this area should be kept clean because cooling performance is impaired by any accumulation of snow, leaves, or other obstructions to the red area. 3. Set the fan speed control dial at the highest speed.
... of the radiator, this area should be kept clean because cooling performance is impaired by any accumulation of snow, leaves, or other obstructions to the red area. 3. Set the fan speed control dial at the highest speed.

Owner's Manual
Page 217
... position, make sure that small and light items can be used for access to retain luggage on the folded-down position. When securely locked, the red marks on the locking knobs are four hooks on the back of the back panel, it is in the down rear seatback. 6-14 Fold the...
... position, make sure that small and light items can be used for access to retain luggage on the folded-down position. When securely locked, the red marks on the locking knobs are four hooks on the back of the back panel, it is in the down rear seatback. 6-14 Fold the...
Owner's Manual
Page 249
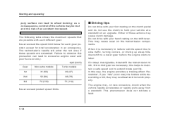
Do not drive with each gear position except for brief acceleration in an emergency. The tachometer's needle will enter the red area if these speeds are possible with your vehicle at a standstill on the transmission components. On steep downgrades, downshift the transmission to 4th, 3rd or ...
Do not drive with each gear position except for brief acceleration in an emergency. The tachometer's needle will enter the red area if these speeds are possible with your vehicle at a standstill on the transmission components. On steep downgrades, downshift the transmission to 4th, 3rd or ...

Owner's Manual
Page 263
... the lamp is on , only upshifting is too high, i.e., when a downshift would push the tachometer needle beyond the red zone, beeps will operate. If you that the tachometer needle does not enter the red zone. The transmission automatically selects 1st gear when the vehicle stops moving. Perform gearshifts in the 1st-to...
... the lamp is on , only upshifting is too high, i.e., when a downshift would push the tachometer needle beyond the red zone, beeps will operate. If you that the tachometer needle does not enter the red zone. The transmission automatically selects 1st gear when the vehicle stops moving. Perform gearshifts in the 1st-to...

Owner's Manual
Page 317
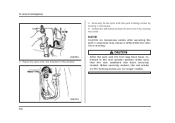
Take the tool bag out of emergency 0 1 A B UB1109BB UB9074BA 1) Red A) LOCK B) UNLOCK 2. Open the left hand pocket lid by turning the knob. 3. In case of the pocket. 1. Pull the rear seatback locks up and fold down the rear seatback to gain access to the rear quarter pockets at both sides. 9-4
Take the tool bag out of emergency 0 1 A B UB1109BB UB9074BA 1) Red A) LOCK B) UNLOCK 2. Open the left hand pocket lid by turning the knob. 3. In case of the pocket. 1. Pull the rear seatback locks up and fold down the rear seatback to gain access to the rear quarter pockets at both sides. 9-4
Owner's Manual
Page 319
UB9075CA 9-6 NOTE Confirm no longer visible. After the jack and the tool bag have been restored in the pocket. When securely locked, the red marks on the locking knobs are no looseness exists after securing the jack. Place the jack onto the bracket in the rear quarter pocket, make ...
UB9075CA 9-6 NOTE Confirm no longer visible. After the jack and the tool bag have been restored in the pocket. When securely locked, the red marks on the locking knobs are no looseness exists after securing the jack. Place the jack onto the bracket in the rear quarter pocket, make ...
Owner's Manual
Page 418
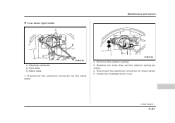
Reconnect the electrical connector for the black cable. 2. Remove the retainer spring. 3. Replace the bulb, then set the retainer spring securely. 4. Maintenance and service Low beam light bulbs 0 1 2 3 UBB041BB UBB042BA 1) Electrical connector 2) Red cable 3) Black cable 1. Disconnect the electrical connector for black cable. 5. Install the headlight bulb cover. - CONTINUED - 11-67
Reconnect the electrical connector for the black cable. 2. Remove the retainer spring. 3. Replace the bulb, then set the retainer spring securely. 4. Maintenance and service Low beam light bulbs 0 1 2 3 UBB041BB UBB042BA 1) Electrical connector 2) Red cable 3) Black cable 1. Disconnect the electrical connector for black cable. 5. Install the headlight bulb cover. - CONTINUED - 11-67
