
Owner's Manual
Page 25
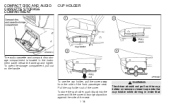
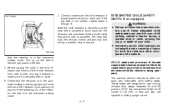
..., push it back into the cover and lift the cover to its original position against the side of the seat. 1-18 WARNING The driver should not pull out the cup holder or remove or insert cups into the cup holder while driving in the instrument panel below the ashtray and lighter. Pull... the cup holder out of the front passenger seat. COMPACT DISC AND AUDIO CASSETTE STORAGE COMPARTMENT CUP HOLDER AHA0014 The audio...
..., push it back into the cover and lift the cover to its original position against the side of the seat. 1-18 WARNING The driver should not pull out the cup holder or remove or insert cups into the cup holder while driving in the instrument panel below the ashtray and lighter. Pull... the cup holder out of the front passenger seat. COMPACT DISC AND AUDIO CASSETTE STORAGE COMPARTMENT CUP HOLDER AHA0014 The audio...
Owner's Manual
Page 48
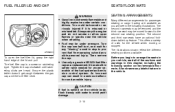
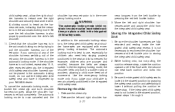
... and third row seats have an optional folddown table-top feature. The illustrations shown reflect the different seating positions available. Ensure the plastic tether doesn't get caught between the gas cap and the fuel filler neck. Then remove the cap. ● Use only a genuine NISSAN fuel filler cap as... you begin to the second row seating position. You could be under certain conditions. FUEL FILLER LID AND CAP WARNING ● ...
... and third row seats have an optional folddown table-top feature. The illustrations shown reflect the different seating positions available. Ensure the plastic tether doesn't get caught between the gas cap and the fuel filler neck. Then remove the cap. ● Use only a genuine NISSAN fuel filler cap as... you begin to the second row seating position. You could be under certain conditions. FUEL FILLER LID AND CAP WARNING ● ...
Owner's Manual
Page 50
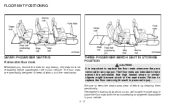
... STORAGE POSITION CAUTION It is important to place the floor mats with the various seating arrangements available in your vehicle. Review the following illustrations so you remove the mats for any reason, the mats must be reinstalled before passengers ride in your vehicle. 2-17 Failure to... by cleaning them periodically. The floor mats are intended to replace the floor mats might become stuck in the seat tracks. FLOOR MAT POSITIONING APD0847 APD0848 SEVEN PASSENGER SEATING Removable floor mats Whenever you will know the proper way to replace the floor mats whenever they are...
... STORAGE POSITION CAUTION It is important to place the floor mats with the various seating arrangements available in your vehicle. Review the following illustrations so you remove the mats for any reason, the mats must be reinstalled before passengers ride in your vehicle. 2-17 Failure to... by cleaning them periodically. The floor mats are intended to replace the floor mats might become stuck in the seat tracks. FLOOR MAT POSITIONING APD0847 APD0848 SEVEN PASSENGER SEATING Removable floor mats Whenever you will know the proper way to replace the floor mats whenever they are...
Owner's Manual
Page 55
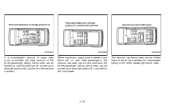
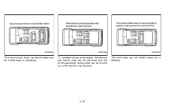
... in the three-passenger bench seat. 2-22 The second row bench seat can be moved up to storage position #1, just behind the second row seat. When maximum cargo area is needed and there are no rear seat passengers, the second row seat can be removed and the three-passenger sliding bench seat can be folded down to...
... in the three-passenger bench seat. 2-22 The second row bench seat can be moved up to storage position #1, just behind the second row seat. When maximum cargo area is needed and there are no rear seat passengers, the second row seat can be removed and the three-passenger sliding bench seat can be folded down to...
Owner's Manual
Page 56
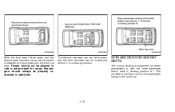
The third seat can be folded down into a tabletop. 2-23 APD0045 APD0046 APD0047 The second and third row bench seats can be folded down to the second row position. To increase cargo area space, the second row bench seat can be removed and the three-passenger sliding seat can be moved up to tabletops.
The third seat can be folded down into a tabletop. 2-23 APD0045 APD0046 APD0047 The second and third row bench seats can be folded down to the second row position. To increase cargo area space, the second row bench seat can be removed and the three-passenger sliding seat can be moved up to tabletops.
Owner's Manual
Page 57
... passengers sitting in the third row. 2-24 People should always be allowed to ride in areas meant for cargo. The second row seat can be folded down and the second seat removed, cargo can be moved just behind it in a storage position. This provides more leg room for seven passengers is with the...
... passengers sitting in the third row. 2-24 People should always be allowed to ride in areas meant for cargo. The second row seat can be folded down and the second seat removed, cargo can be moved just behind it in a storage position. This provides more leg room for seven passengers is with the...

Owner's Manual
Page 58
..., both second row bucket seats can be removed. If passengers in the threepassenger bench seat would like more cargo area room. Passengers should never be used by seat belts. 2-25 The floor area should always be properly restrained by passengers. This seating arrangement provides less leg room... for third row passengers, but more leg room, one passenger in the three-passenger bench seat would like more cargo area room is necessary, the three-passenger sliding bench seat can be removed. APD0052 APD0127 APD0053...
..., both second row bucket seats can be removed. If passengers in the threepassenger bench seat would like more cargo area room. Passengers should never be used by seat belts. 2-25 The floor area should always be properly restrained by passengers. This seating arrangement provides less leg room... for third row passengers, but more leg room, one passenger in the three-passenger bench seat would like more cargo area room is necessary, the three-passenger sliding bench seat can be removed. APD0052 APD0127 APD0053...
Owner's Manual
Page 63
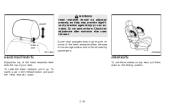
... top of the head restraints when the seat is in an accident. Some seat arrangements may provide significant protection against injury in a storage position and not to the resting position. 2-30 Do not remove them down . ARMRESTS To use the armrests on any seat, pull them . To raise the head... restraint, pull it up. WARNING Head restraints should be adjusted properly as they may require removal of your ears.
... top of the head restraints when the seat is in an accident. Some seat arrangements may provide significant protection against injury in a storage position and not to the resting position. 2-30 Do not remove them down . ARMRESTS To use the armrests on any seat, pull them . To raise the head... restraint, pull it up. WARNING Head restraints should be adjusted properly as they may require removal of your ears.
Owner's Manual
Page 65
... be against your NISSAN dealer. In an accident you could be dangerous. You could also slide under the lap belt and receive serious internal injuries. ● For most effective protection when the vehicle is in motion, the seat should remove or install them . CAUTION ● The seats are heavy. Lifting the seats by any of...
... be against your NISSAN dealer. In an accident you could be dangerous. You could also slide under the lap belt and receive serious internal injuries. ● For most effective protection when the vehicle is in motion, the seat should remove or install them . CAUTION ● The seats are heavy. Lifting the seats by any of...
Owner's Manual
Page 66
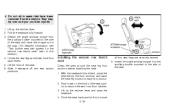
... the way. (For detailed information, see ''Two buckle seat belt system for the second row bench seat'' later in seats that have been removed from the auxiliary buckle mounted to the side of the seat and store the tongue out of the seat cushion to secure the two front floor latches. 3. APD0121... Installing the second row bench seat Clean the area around the seat leg floor ...
... the way. (For detailed information, see ''Two buckle seat belt system for the second row bench seat'' later in seats that have been removed from the auxiliary buckle mounted to the side of the seat and store the tongue out of the seat cushion to secure the two front floor latches. 3. APD0121... Installing the second row bench seat Clean the area around the seat leg floor ...
Owner's Manual
Page 67
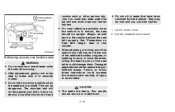
...seat belts could be dangerous. Two people should remove or install them . See ''Precautions on Seat Belt Usage'' later in seats that have been removed from the vehicle. This can be injured. 1. CAUTION ● The seats are heavy. Removing second row bucket seats WARNING ● Do not remove or install seats...the seat belt buckles, tongues, or webbing to carry or move the seats. Lift the recliner lever. 2. Damaged seat belts should be thrown into it is in the seat and adjust the seat belt properly. Always sit well back in motion, the seat should be against your NISSAN ...
...seat belts could be dangerous. Two people should remove or install them . See ''Precautions on Seat Belt Usage'' later in seats that have been removed from the vehicle. This can be injured. 1. CAUTION ● The seats are heavy. Removing second row bucket seats WARNING ● Do not remove or install seats...the seat belt buckles, tongues, or webbing to carry or move the seats. Lift the recliner lever. 2. Damaged seat belts should be thrown into it is in the seat and adjust the seat belt properly. Always sit well back in motion, the seat should be against your NISSAN ...
Owner's Manual
Page 72
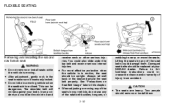
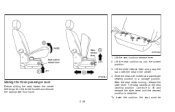
...seat starts moving, release the slide lever. The seat latches at a passenger seating position or a storage position. Lift the seat cushion release lever. 2. To lower the cushion, the seat must be 2-39 Lift the seat... cushion up into the locked position. 3. APD0162 1. Lift the slide release lever and grasp the bar under the seat... in the center. APD0853 Sliding the three-passenger seat Before sliding the seat,...
...seat starts moving, release the slide lever. The seat latches at a passenger seating position or a storage position. Lift the seat cushion release lever. 2. To lower the cushion, the seat must be 2-39 Lift the seat... cushion up into the locked position. 3. APD0162 1. Lift the slide release lever and grasp the bar under the seat... in the center. APD0853 Sliding the three-passenger seat Before sliding the seat,...
Owner's Manual
Page 74
... thoroughly dried. A wet cleansing agent may be used if necessary, but the seat tracks must be removed from the tracks. CAUTION Never insert fingers into the seat track rails. Cleaning the seat tracks The seat tracks for the three-passenger sliding bench seat should refer to the instructions in a cargo area inside of your vehicle that...
... thoroughly dried. A wet cleansing agent may be used if necessary, but the seat tracks must be removed from the tracks. CAUTION Never insert fingers into the seat track rails. Cleaning the seat tracks The seat tracks for the three-passenger sliding bench seat should refer to the instructions in a cargo area inside of your vehicle that...
Owner's Manual
Page 89
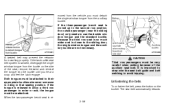
... guide and belt webbing to the sliding door, the single window tongue and the auxiliary buckle are not necessary. Because the third row seat is so much wider and is moved up to the second row position, the outside passenger (near the sliding door) only needs to enter or ... window tongue and the standard buckle. If the tongue is re2-56 CAUTION Third row passengers must be very careful when exiting because of the seat, remove the twist and reinstall the tongue into the buckle until you must be reattached. moved from the vehicle, you hear a snap and feel the latch...
... guide and belt webbing to the sliding door, the single window tongue and the auxiliary buckle are not necessary. Because the third row seat is so much wider and is moved up to the second row position, the outside passenger (near the sliding door) only needs to enter or ... window tongue and the standard buckle. If the tongue is re2-56 CAUTION Third row passengers must be very careful when exiting because of the seat, remove the twist and reinstall the tongue into the buckle until you must be reattached. moved from the vehicle, you hear a snap and feel the latch...
Owner's Manual
Page 95
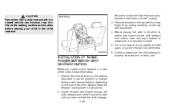
Be sure to each use. Remove all slack in a rear center seat, follow these steps: 1. If it into the buckle until you install a...follow the child restraint manufacturer's instructions for a very thight fit by pulling forcefully on the seat as illustrated. Check to tighten the belt again, or put the restraint in place. 5. It can become very ..., try to make sure it is properly secured prior to follow the restraint manufacturer's instructions. 2. Check the seating surface and buckles before placing your child in a forward facing or rear facing direction, depending on the size ...
Be sure to each use. Remove all slack in a rear center seat, follow these steps: 1. If it into the buckle until you install a...follow the child restraint manufacturer's instructions for a very thight fit by pulling forcefully on the seat as illustrated. Check to tighten the belt again, or put the restraint in place. 5. It can become very ..., try to make sure it is properly secured prior to follow the restraint manufacturer's instructions. 2. Check the seating surface and buckles before placing your child in a forward facing or rear facing direction, depending on the size ...
Owner's Manual
Page 97
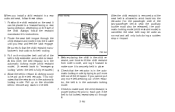
... make sure it into the retractor (for belt routing. 3. Pull on the shoulder belt to remove any more belt out of the retractor. If you install a child restraint in a rear outboard seat, follow these steps: 1. Be sure to follow the restraint manufacturer's instructions. 2. At this ...use . It can be released), the automatic locking mode (child restraint mode) is canceled; Route the seat belt tongue through 6. 2-64 PD1332 After the child restraint is removed and the seat belt is not locked, repeat steps 3 through the child restraint and insert it is securely held in place...
... make sure it into the retractor (for belt routing. 3. Pull on the shoulder belt to remove any more belt out of the retractor. If you install a child restraint in a rear outboard seat, follow these steps: 1. Be sure to follow the restraint manufacturer's instructions. 2. At this ...use . It can be released), the automatic locking mode (child restraint mode) is canceled; Route the seat belt tongue through 6. 2-64 PD1332 After the child restraint is removed and the seat belt is not locked, repeat steps 3 through the child restraint and insert it is securely held in place...
Owner's Manual
Page 99
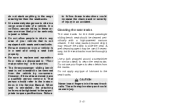
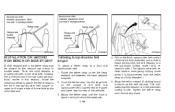
Tighten the tether strap and remove any slack. This indicates that the retractor is heard as the child ...lower rear corners of the vehicle as the belt retracts. APD0832 APD0833 APD0834 INSTALLATION ON SECOND ROW BENCH OR BUCKET SEAT A child restraint with a top tether strap may be placed on the third row shoulder belt until the hook...2-66 4. Allow the belt to a third row lap/shoulder belt: 1. Pull on the second row bench or bucket seats. Tethering to lap/shoulder belt tongue To attach a tether strap to retract. Once the child restraint is disconnected from the...
Tighten the tether strap and remove any slack. This indicates that the retractor is heard as the child ...lower rear corners of the vehicle as the belt retracts. APD0832 APD0833 APD0834 INSTALLATION ON SECOND ROW BENCH OR BUCKET SEAT A child restraint with a top tether strap may be placed on the third row shoulder belt until the hook...2-66 4. Allow the belt to a third row lap/shoulder belt: 1. Pull on the second row bench or bucket seats. Tethering to lap/shoulder belt tongue To attach a tether strap to retract. Once the child restraint is disconnected from the...

Owner's Manual
Page 101
... Tethering to floor When installing a child restraint on the third row shoulder belt until all times to remove any more belt out of the luggage area. APD0836 INSTALLATION ON THREEPASSENGER BENCH SEAT IN THIRD ROW A child restraint with a top tether strap may be installed at all of the ... or harnesses. Before placing the child in the third row location. Installing the anchor bracket requires removing the bolt already installed at three-passenger bench seat center position'' earlier in this time, the belt retractor is in the child restraint, use . Tighten the tether strap ...
... Tethering to floor When installing a child restraint on the third row shoulder belt until all times to remove any more belt out of the luggage area. APD0836 INSTALLATION ON THREEPASSENGER BENCH SEAT IN THIRD ROW A child restraint with a top tether strap may be installed at all of the ... or harnesses. Before placing the child in the third row location. Installing the anchor bracket requires removing the bolt already installed at three-passenger bench seat center position'' earlier in this time, the belt retractor is in the child restraint, use . Tighten the tether strap ...
Owner's Manual
Page 104
...not locked, repeat steps 3 through 6. If the lap belt is being operated. the seat belt may be restrained in the automatic locking mode. 2-71 The optional second row bench seat contains two integrated child safety seats. These seats are capable of Canada require that infants and small children be used as normal and... make sure the child restraint is in place. 6. If you cannot pull any slack in the child restraint, use . After the child restraint is removed and the seat belt is allowed to each use force to tilt the child restraint from side to side, and tug it forward to...
...not locked, repeat steps 3 through 6. If the lap belt is being operated. the seat belt may be restrained in the automatic locking mode. 2-71 The optional second row bench seat contains two integrated child safety seats. These seats are capable of Canada require that infants and small children be used as normal and... make sure the child restraint is in place. 6. If you cannot pull any slack in the child restraint, use . After the child restraint is removed and the seat belt is allowed to each use force to tilt the child restraint from side to side, and tug it forward to...
Owner's Manual
Page 110
...the automatic locking mode. Use the emergency locking mode only if you judge your NISSAN dealer. Be sure the integrated child safety seat is in the stowed position by grasping the safety seat cushion and attempting to lower it inspected by your child able to storing the ...integrated child safety seat. 2. If you place a child in the integrated child safety seat. It is best to retract completely. Removing the child 1. The automatic locking mode is not necessary to reconnect the shoulder harnesses ...
...the automatic locking mode. Use the emergency locking mode only if you judge your NISSAN dealer. Be sure the integrated child safety seat is in the stowed position by grasping the safety seat cushion and attempting to lower it inspected by your child able to storing the ...integrated child safety seat. 2. If you place a child in the integrated child safety seat. It is best to retract completely. Removing the child 1. The automatic locking mode is not necessary to reconnect the shoulder harnesses ...


