Owner's Manual
Page 9
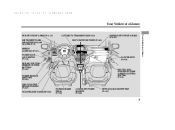
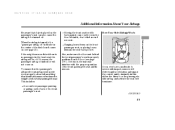
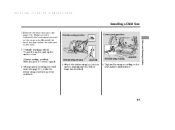
...(P.9, 27) INSTRUMENT PANEL INDICATORS (P.65, 66) GAUGES (P.77) MIRROR CONTROLS (P.191) POWER DOOR LOCK SWITCH (P.154) DRIVING POSITION MEMORY SYSTEM BUTTONS (P.185) AUTOMATIC TRANSMISSION (P.322) SEAT HEATER SWITCHES (P.184) PASSENGER'S FRONT AIRBAG (P.9, 35) GLOVE BOXES (P.204) POWER WINDOW SWITCHES (P.187) FUEL FILL DOOR RELEASE HANDLE (P.307) HOOD RELEASE HANDLE (P.308) HEATING...
...(P.9, 27) INSTRUMENT PANEL INDICATORS (P.65, 66) GAUGES (P.77) MIRROR CONTROLS (P.191) POWER DOOR LOCK SWITCH (P.154) DRIVING POSITION MEMORY SYSTEM BUTTONS (P.185) AUTOMATIC TRANSMISSION (P.322) SEAT HEATER SWITCHES (P.184) PASSENGER'S FRONT AIRBAG (P.9, 35) GLOVE BOXES (P.204) POWER WINDOW SWITCHES (P.187) FUEL FILL DOOR RELEASE HANDLE (P.307) HOOD RELEASE HANDLE (P.308) HEATING...
Owner's Manual
Page 19
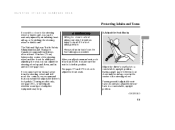
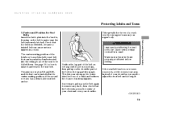
... we recommend that drivers allow at least 10 inches (25 cm) between your chest and the airbag cover in the center of the steering wheel. Adjust the driver's seat-back to a comfortable, upright position. CONTINUED Driver and Passenger Safety 13 Always sit as possible. In addition to adjusting..., upright position, leaving ample space between the center of the steering wheel and the chest. After you adjust a manual seat, rock it back and forth to adjust the front seats. See pages 171 and 172 for how to make sure the seat is locked in position. The National Highway Traffic...
... we recommend that drivers allow at least 10 inches (25 cm) between your chest and the airbag cover in the center of the steering wheel. Adjust the driver's seat-back to a comfortable, upright position. CONTINUED Driver and Passenger Safety 13 Always sit as possible. In addition to adjusting..., upright position, leaving ample space between the center of the steering wheel and the chest. After you adjust a manual seat, rock it back and forth to adjust the front seats. See pages 171 and 172 for how to make sure the seat is locked in position. The National Highway Traffic...
Owner's Manual
Page 20
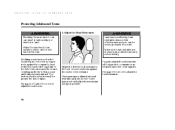
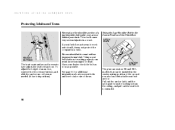
... the head restraints. Improperly positioning head restraints reduces their restraint as high as well. Reclining a seat-back so that the shoulder part of the belt no longer rests against the center of sliding under the belt in place and positioned properly before driving. Have passengers adjust their head... occupants from whiplash and other crash injuries. Protecting Adults and Teens 4.Adjust the Head Restraints Reclining the seat-back too far can be seriously injured in a crash. The farther a seat-back is reclined, the greater the risk of the belt. See pages 171 and 173 for how ...
... the head restraints. Improperly positioning head restraints reduces their restraint as high as well. Reclining a seat-back so that the shoulder part of the belt no longer rests against the center of sliding under the belt in place and positioned properly before driving. Have passengers adjust their head... occupants from whiplash and other crash injuries. Protecting Adults and Teens 4.Adjust the Head Restraints Reclining the seat-back too far can be seriously injured in a crash. The farther a seat-back is reclined, the greater the risk of the belt. See pages 171 and 173 for how ...
Owner's Manual
Page 21
...then check that the belt rests across your upper body. The plus-one seat on the belt to unlatch and relatch the seat belt. The center seating position of internal injuries. Driver and Passenger Safety Improperly positioning the seat belts can be unlatched and retracted into the buckle, then tug on EX ... belt is not twisted, because a twisted belt can cause serious injuries in the center seating position of a crash over your shoulder. Position the lap part of the belt as low as possible across the center of the belt so the lap part fits snugly. Check that can cause serious ...
...then check that the belt rests across your upper body. The plus-one seat on the belt to unlatch and relatch the seat belt. The center seating position of internal injuries. Driver and Passenger Safety Improperly positioning the seat belts can be unlatched and retracted into the buckle, then tug on EX ... belt is not twisted, because a twisted belt can cause serious injuries in the center seating position of a crash over your shoulder. Position the lap part of the belt as low as possible across the center of the belt so the lap part fits snugly. Check that can cause serious ...
Owner's Manual
Page 22
... Never place the shoulder portion of the Third Row LATCH PLATE very serious injuries in a crash. belt that can result in the center seating position of them. No one seat on EX and EX-L models that is not working properly can be installed in serious injury or death. Pull out the anchor latch... and the latch plate from the holding slots in the Center Position of a lap/shoulder belt under your arm or behind your back. This could cause Using the Lap/Shoulder Belt in the ceiling, and pull out the seat belt to take care of the second row also has a detachable...
... Never place the shoulder portion of the Third Row LATCH PLATE very serious injuries in a crash. belt that can result in the center seating position of them. No one seat on EX and EX-L models that is not working properly can be installed in serious injury or death. Pull out the anchor latch... and the latch plate from the holding slots in the Center Position of a lap/shoulder belt under your arm or behind your back. This could cause Using the Lap/Shoulder Belt in the ceiling, and pull out the seat belt to take care of the second row also has a detachable...
Owner's Manual
Page 29
... the tensioners immediately tighten the belts to move freely. CONTINUED 23 The lap/shoulder belt in the center seating position on the third seat and the stowable second row plus-one seat (depending on models) is pulled all the way out, the lockable retractor will not allow the passenger... the shoulder part of the belt is equipped with automatic seat belt tensioners. To deactivate the lockable retractor, unlatch the buckle and let the seat belt fully retract. The detachable seat belt should normally be latched whenever the seat-backs are equipped with a detachable anchor that has two ...
... the tensioners immediately tighten the belts to move freely. CONTINUED 23 The lap/shoulder belt in the center seating position on the third seat and the stowable second row plus-one seat (depending on models) is pulled all the way out, the lockable retractor will not allow the passenger... the shoulder part of the belt is equipped with automatic seat belt tensioners. To deactivate the lockable retractor, unlatch the buckle and let the seat belt fully retract. The detachable seat belt should normally be latched whenever the seat-backs are equipped with a detachable anchor that has two ...
Owner's Manual
Page 32
...) front airbags. Both are marked ''SIDE AIRBAG'' (see page 27 ). Two side curtain airbags, one for each side of the seatbacks. A driver's seat position sensor that can detect a moderate to severe front impact, side impact, or if your vehicle is too far forward, the airbag will be turned...(see page 31 ). Sensors that monitors the distance of the steering wheel; Weight sensors that can detect whether a child is stored in the center of the seat from the front airbag. Two side airbags, one for the driver and one for a front passenger. The airbags are stored in the dashboard....
...) front airbags. Both are marked ''SIDE AIRBAG'' (see page 27 ). Two side curtain airbags, one for each side of the seatbacks. A driver's seat position sensor that can detect a moderate to severe front impact, side impact, or if your vehicle is too far forward, the airbag will be turned...(see page 31 ). Sensors that monitors the distance of the steering wheel; Weight sensors that can detect whether a child is stored in the center of the seat from the front airbag. Two side airbags, one for the driver and one for a front passenger. The airbags are stored in the dashboard....
Owner's Manual
Page 37
...front passenger seat, or placing heavy items in the center of the dashboard comes on (see page 378 ). If you ever have a moderate to severe side impact, sensors will work properly, do not do anything that would increase or decrease the weight on the front passenger's seat. To ... come on. When the airbag is properly positioned on the floor (see page 35 ). Moving the front seat forcibly back against cargo on the seat, the floor behind the front passenger's seat is turned off, a ''passenger airbag off . Additional Information About Your Airbags Be aware that objects placed...
...front passenger seat, or placing heavy items in the center of the dashboard comes on (see page 378 ). If you ever have a moderate to severe side impact, sensors will work properly, do not do anything that would increase or decrease the weight on the front passenger's seat. To ... come on. When the airbag is properly positioned on the floor (see page 35 ). Moving the front seat forcibly back against cargo on the seat, the floor behind the front passenger's seat is turned off, a ''passenger airbag off . Additional Information About Your Airbags Be aware that objects placed...
Owner's Manual
Page 54
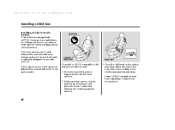
... indicated by a small button above . 48 BUTTON LOWER ANCHORS Rigid type To install a LATCH-compatible child seat in the two second row seats and the center seating position of each lower anchor is equipped with LATCH. Move the seat belt buckle or tongue away from the lower anchors. 2. Make sure there are no objects near...
... indicated by a small button above . 48 BUTTON LOWER ANCHORS Rigid type To install a LATCH-compatible child seat in the two second row seats and the center seating position of each lower anchor is equipped with LATCH. Move the seat belt buckle or tongue away from the lower anchors. 2. Make sure there are no objects near...
Owner's Manual
Page 56
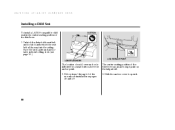
... anchor is indicated by a small button above the anchor point. 2. Unlatch the detachable seat belt anchor latch and retract the seat belt all the way into the ceiling. Place the latch plate and anchor latch in the center seating position of the third row has an anchorage point on pages 48 and 49... anchor cover to open it. 50 LOWER ANCHORS ANCHORAGE POINT BUTTON The location of the second row installation on the tailgate sill. 3. Installing a Child Seat To install a LATCH-compatible child seat in their holding slots (see page 16 ). The center seating position of the third row: 1.
... anchor is indicated by a small button above the anchor point. 2. Unlatch the detachable seat belt anchor latch and retract the seat belt all the way into the ceiling. Place the latch plate and anchor latch in the center seating position of the third row has an anchorage point on pages 48 and 49... anchor cover to open it. 50 LOWER ANCHORS ANCHORAGE POINT BUTTON The location of the second row installation on the tailgate sill. 3. Installing a Child Seat To install a LATCH-compatible child seat in their holding slots (see page 16 ). The center seating position of the third row: 1.
Owner's Manual
Page 57
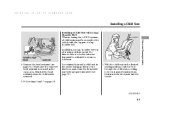
...7 on page 49 . Make sure the removed head restraint is removed. 5. Installing a Child Seat Installing a Child Seat with the lap part of the third row, make sure the detachable seat belt is properly installed (see page174). Driver and Passenger Safety TETHER STRAP HOOK ANCHOR 4. CONTINUED ... you intend to install a child seat in all child seats must be secured to the seat maker's instructions, then insert the latch plate into the buckle. Remove the head restraint (see page 16 ). 1. In addition, the lap/shoulder belts in the center seating position of a lap/ shoulder belt...
...7 on page 49 . Make sure the removed head restraint is removed. 5. Installing a Child Seat Installing a Child Seat with the lap part of the third row, make sure the detachable seat belt is properly installed (see page174). Driver and Passenger Safety TETHER STRAP HOOK ANCHOR 4. CONTINUED ... you intend to install a child seat in all child seats must be secured to the seat maker's instructions, then insert the latch plate into the buckle. Remove the head restraint (see page 16 ). 1. In addition, the lap/shoulder belts in the center seating position of a lap/ shoulder belt...

Owner's Manual
Page 60
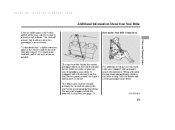
Tighten the strap according to the anchor, making sure the strap is not twisted. 3. Each outside seating position of the third row has an anchorage point on the seat-back. Installing a Child Seat Third Row Installation TETHER STRAP HOOK Outside seating position Center seating position ANCHOR ANCHORAGE POINTS ANCHORAGE POINT 2. Attach the tether strap hook to the seat maker's instructions. The center seating position of the third row has an anchorage point on the tailgate sill. 54
Tighten the strap according to the anchor, making sure the strap is not twisted. 3. Each outside seating position of the third row has an anchorage point on the seat-back. Installing a Child Seat Third Row Installation TETHER STRAP HOOK Outside seating position Center seating position ANCHOR ANCHORAGE POINTS ANCHORAGE POINT 2. Attach the tether strap hook to the seat maker's instructions. The center seating position of the third row has an anchorage point on the tailgate sill. 54
Owner's Manual
Page 61
...Remove the head restraint (see page 51 ), route the tether strap over the top of the seat-back. TETHER STRAP HOOK ANCHOR TETHER STRAP HOOK ANCHOR Outside seating position Center seating position Driver and Passenger Safety 4. Tighten the strap according to the anchor, making sure the tether .... 5. Reinstall the head restraint when the child seat is secured in the cargo area. Installing a Child Seat 1. Make sure the removed head restraint is removed. 2. (Outside seating position) To use the anchor, pull up the anchor cover. (Center seating position) Slide the anchor cover to open it....
...Remove the head restraint (see page 51 ), route the tether strap over the top of the seat-back. TETHER STRAP HOOK ANCHOR TETHER STRAP HOOK ANCHOR Outside seating position Center seating position Driver and Passenger Safety 4. Tighten the strap according to the anchor, making sure the tether .... 5. Reinstall the head restraint when the child seat is secured in the cargo area. Installing a Child Seat 1. Make sure the removed head restraint is removed. 2. (Outside seating position) To use the anchor, pull up the anchor cover. (Center seating position) Slide the anchor cover to open it....
Owner's Manual
Page 69
... Seat Heaters ...184 Driving Position Memory System...185 Power Windows ...187 Moonroof ...190 Mirrors ...191 Parking Brake ...192 Adjustable Driver's Foot Pedals .. 193 Interior Convenience Items ...194 Retractable Center Tray ...195 Beverage Holders ...195 Integrated Sunshade ...197 Sunglasses Holder ...198 Conversation ...199 Vanity Mirror ...199 Rear Compartment ...199 Removable Second Row Console ...200 In-Floor Storage Area...201 Glove Boxes ...204 Center Pocket ...205 Coin Pocket ...205 Accessory Power Sockets...206 AC Power Outlet ...206 Interior Lights ...208 Instruments and Controls ...
... Seat Heaters ...184 Driving Position Memory System...185 Power Windows ...187 Moonroof ...190 Mirrors ...191 Parking Brake ...192 Adjustable Driver's Foot Pedals .. 193 Interior Convenience Items ...194 Retractable Center Tray ...195 Beverage Holders ...195 Integrated Sunshade ...197 Sunglasses Holder ...198 Conversation ...199 Vanity Mirror ...199 Rear Compartment ...199 Removable Second Row Console ...200 In-Floor Storage Area...201 Glove Boxes ...204 Center Pocket ...205 Coin Pocket ...205 Accessory Power Sockets...206 AC Power Outlet ...206 Interior Lights ...208 Instruments and Controls ...
Owner's Manual
Page 70
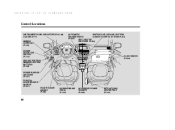
Control Locations INSTRUMENT PANEL INDICATORS (P.65, 66) GAUGES (P.77) MIRROR CONTROLS (P.191) POWER DOOR LOCK SWITCH (P.154) DRIVING POSITION MEMORY SYSTEM BUTTONS (P.185) POWER WINDOW SWITCHES (P.187) FUEL FILL DOOR RELEASE HANDLE (P.307) HOOD RELEASE HANDLE (P.308) HEATING AND COOLING SYSTEM/ AUTOMATIC CLIMATE CONTROL SYSTEM (P.214) TRANSMISSION (P.322) SEAT HEATER SWITCHES (P.184) GLOVE BOXES (P.204) PARKING BRAKE PEDAL (P.192) ACCESSORY POWER SOCKETS (P.206) RETRACTABLE CENTER TRAY (P.195) 64
Control Locations INSTRUMENT PANEL INDICATORS (P.65, 66) GAUGES (P.77) MIRROR CONTROLS (P.191) POWER DOOR LOCK SWITCH (P.154) DRIVING POSITION MEMORY SYSTEM BUTTONS (P.185) POWER WINDOW SWITCHES (P.187) FUEL FILL DOOR RELEASE HANDLE (P.307) HOOD RELEASE HANDLE (P.308) HEATING AND COOLING SYSTEM/ AUTOMATIC CLIMATE CONTROL SYSTEM (P.214) TRANSMISSION (P.322) SEAT HEATER SWITCHES (P.184) GLOVE BOXES (P.204) PARKING BRAKE PEDAL (P.192) ACCESSORY POWER SOCKETS (P.206) RETRACTABLE CENTER TRAY (P.195) 64

Owner's Manual
Page 176
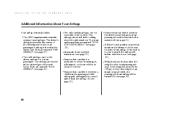
...a stowable second row plus -one seat that can be installed between the second row bucket seats when needed. The plus -one seat can also be used as a second row center console, or stored in the floor storage area. For greater cargo capacity, the seats in the second row can be ...removed, and the bench seat in the third row. For more information, see page 179 . 170 Seats Passenger Seating Convertible Second Row Bucket Seats There are bucket seats with ...
...a stowable second row plus -one seat that can be installed between the second row bucket seats when needed. The plus -one seat can also be used as a second row center console, or stored in the floor storage area. For greater cargo capacity, the seats in the second row can be ...removed, and the bench seat in the third row. For more information, see page 179 . 170 Seats Passenger Seating Convertible Second Row Bucket Seats There are bucket seats with ...
Owner's Manual
Page 180
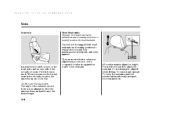
... how to help protect you adjust them so the back of the occupant's head rests against the center of the armrest on each front seat is adjustable. When you remove the bucket seats in all seating positions to properly position the head restraints. To raise it while driving. RELEASE BUTTON An armrest is...Do not attempt to the desired angle. 174 You need both hands to use it up out of the second row seats. Your vehicle is located on each of the front seats and on each side of the way. Pivot the armrest down to adjust the restraint. They are most effective when...
... how to help protect you adjust them so the back of the occupant's head rests against the center of the armrest on each front seat is adjustable. When you remove the bucket seats in all seating positions to properly position the head restraints. To raise it while driving. RELEASE BUTTON An armrest is...Do not attempt to the desired angle. 174 You need both hands to use it up out of the second row seats. Your vehicle is located on each of the front seats and on each side of the way. Pivot the armrest down to adjust the restraint. They are most effective when...
Owner's Manual
Page 181
...of the third row seat. When the seat on the passenger's side is moved to the center, walk through the passenger's side to remove the stowable plus-one seat (see page 179 ) or the second row console (see page 200 ) before you can make this seat arrangement. The seat-back will tilt forward... and the whole seat will slide forward. 175 Seats Third Seat Access Instruments and...
...of the third row seat. When the seat on the passenger's side is moved to the center, walk through the passenger's side to remove the stowable plus-one seat (see page 179 ) or the second row console (see page 200 ) before you can make this seat arrangement. The seat-back will tilt forward... and the whole seat will slide forward. 175 Seats Third Seat Access Instruments and...
Owner's Manual
Page 182
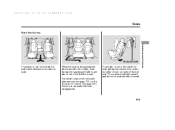
...'s front edge and lifting the rear of the seat. 3. Seats Moving the Second Row Bucket Seat The second row bucket seat on the passenger's side can be moved to the center to provide access to the third row seat. Unlock the seat from under the passenger's side bucket seat, make sure you have already set the floor mat...
...'s front edge and lifting the rear of the seat. 3. Seats Moving the Second Row Bucket Seat The second row bucket seat on the passenger's side can be moved to the center to provide access to the third row seat. Unlock the seat from under the passenger's side bucket seat, make sure you have already set the floor mat...

Owner's Manual
Page 188
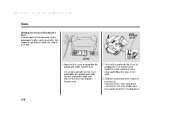
... fly forward and cause injury if you can fold the one seat as a center console, remove its seat cushion by pulling up the seat cushion strap. See Carrying Cargo on the seat bottom plate. Folding the One-Motion Third Row ''Magic Seat'' To create more cargo space, you have to unlock the ...the handle on the outer seats are out of the third seat. 4. Then pivot the seat-back forward until the cushion is not locked in place could fly around and cause injury in the cargo area are securely locked in the floor storage area. Unlatch the center seat detachable seat belt anchor, and let...
... fly forward and cause injury if you can fold the one seat as a center console, remove its seat cushion by pulling up the seat cushion strap. See Carrying Cargo on the seat bottom plate. Folding the One-Motion Third Row ''Magic Seat'' To create more cargo space, you have to unlock the ...the handle on the outer seats are out of the third seat. 4. Then pivot the seat-back forward until the cushion is not locked in place could fly around and cause injury in the cargo area are securely locked in the floor storage area. Unlatch the center seat detachable seat belt anchor, and let...


