Owner Guide 1st Printing (Spanish)
Page 318
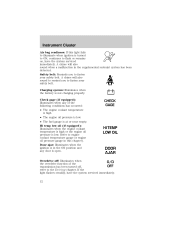
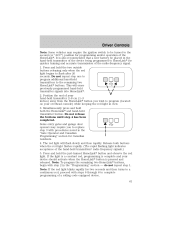
... have the system serviced immediately. 12 Charging system: Illuminates when the battery is low. Check gage (if equipped): Illuminates when any door is open. Hi temp low oil (if equipped): Illuminates when the engine coolant temperature is high or the engine oil pressure is not charging ...system has been detected. Safety belt: Reminds you to the Driving chapter. Refer to fasten your safety belt. Door ajar: Illuminates when the ignition is in this light fails to illuminate when ignition is at or near empty. Instrument Cluster Air bag readiness: If this chapter). A...
... have the system serviced immediately. 12 Charging system: Illuminates when the battery is low. Check gage (if equipped): Illuminates when any door is open. Hi temp low oil (if equipped): Illuminates when the engine coolant temperature is high or the engine oil pressure is not charging ...system has been detected. Safety belt: Reminds you to the Driving chapter. Refer to fasten your safety belt. Door ajar: Illuminates when the ignition is in this light fails to illuminate when ignition is at or near empty. Instrument Cluster Air bag readiness: If this chapter). A...
Owner Guide 1st Printing (Spanish)
Page 319
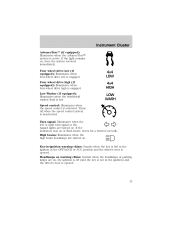
... the key is left or right turn signal or the hazard lights are turned on. If the light remains on . Turn signal: Illuminates when the left in the ignition in the ignition) and the driver's door is deactivated. High beams: Illuminates when the high beam headlamps ...are on or flash faster, check for a burned out bulb. Four wheel drive low (if equipped): Illuminates when four-wheel drive low is opened...
... the key is left or right turn signal or the hazard lights are turned on. If the light remains on . Turn signal: Illuminates when the left in the ignition in the ignition) and the driver's door is deactivated. High beams: Illuminates when the high beam headlamps ...are on or flash faster, check for a burned out bulb. Four wheel drive low (if equipped): Illuminates when four-wheel drive low is opened...
Owner Guide 1st Printing (Spanish)
Page 345
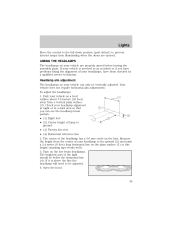
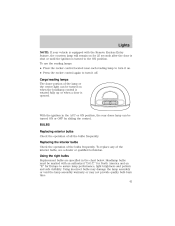
...) long horizontal line on a level surface about 7.6 meters (25 feet) away from illuminating when the doors are properly aimed before leaving the assembly plant. Measure the height from the center of the light should be adjusted. 4. The brightest part of your vehicle on the plain surface (1) at night or...headlamp beam pattern. • (1) Eight feet • (2) Center height of the headlamp has a 3.0 mm circle on the low beam headlamps. Open the hood. 39 Lights Move the control to the full down position (past detent) to prevent interior lamps from a vertical plain surface (3).
...) long horizontal line on a level surface about 7.6 meters (25 feet) away from illuminating when the doors are properly aimed before leaving the assembly plant. Measure the height from the center of the light should be adjusted. 4. The brightest part of your vehicle on the plain surface (1) at night or...headlamp beam pattern. • (1) Eight feet • (2) Center height of the headlamp has a 3.0 mm circle on the low beam headlamps. Open the hood. 39 Lights Move the control to the full down position (past detent) to prevent interior lamps from a vertical plain surface (3).
Owner Guide 1st Printing (Spanish)
Page 346
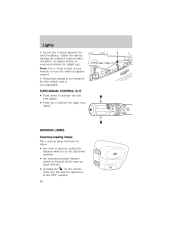
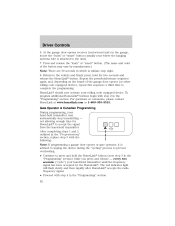
Horizontal aiming is non-adjustable. on when: • any door is opened, unless the dimmer switch is in the full down position. • the instrument panel dimmer switch is in the OFF position. 40 Note: Use a 4 mm ... The courtesy lamp will turn on the remote • pressing the entry key fob and the ignition is rotated all the way up (past detent). Lights 5. Adjust the aim by turning the adjuster control either clockwise (to adjust down to activate the right turn the vertical adjuster control. 6. TURN SIGNAL CONTROL...
Horizontal aiming is non-adjustable. on when: • any door is opened, unless the dimmer switch is in the full down position. • the instrument panel dimmer switch is in the OFF position. 40 Note: Use a 4 mm ... The courtesy lamp will turn on the remote • pressing the entry key fob and the ignition is rotated all the way up (past detent). Lights 5. Adjust the aim by turning the adjuster control either clockwise (to adjust down to activate the right turn the vertical adjuster control. 6. TURN SIGNAL CONTROL...
Owner Guide 1st Printing (Spanish)
Page 347
... remain on for Europe to turn it on when the headlamp control is rotated fully up or when a door is opened. Replacing the interior bulbs Check the operation of the lamp or the center light can be turned on . • Press the rocker control again to the ON position. for North America and...
... remain on for Europe to turn it on when the headlamp control is rotated fully up or when a door is opened. Replacing the interior bulbs Check the operation of the lamp or the center light can be turned on . • Press the rocker control again to the ON position. for North America and...
Owner Guide 1st Printing (Spanish)
Page 356
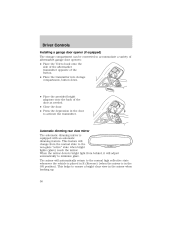
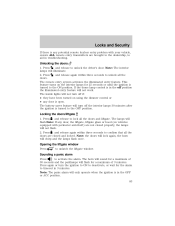
... the normal state to the non-glare "active" state when bright lights (glare) reach the mirror. This helps to ensure a bright clear view in the door to activate the transmitter. Automatic dimming rear view mirror The automatic dimming mirror is in the ON ...Reverse) (when the mirror is equipped with an automatic dimming feature. Driver Controls Installing a garage door opener (if equipped) The storage compartment can be converted to accommodate a variety of aftermarket garage door openers: • Place the Velcro hook onto the side of the aftermarket transmitter opposite of the button...
... the normal state to the non-glare "active" state when bright lights (glare) reach the mirror. This helps to ensure a bright clear view in the door to activate the transmitter. Automatic dimming rear view mirror The automatic dimming mirror is in the ON ...Reverse) (when the mirror is equipped with an automatic dimming feature. Driver Controls Installing a garage door opener (if equipped) The storage compartment can be converted to accommodate a variety of aftermarket garage door openers: • Place the Velcro hook onto the side of the aftermarket transmitter opposite of the button...
Owner Guide 1st Printing (Spanish)
Page 366
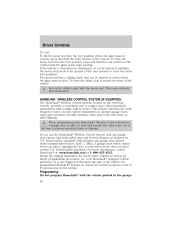
...safety standards. Retain the original transmitter for use the HomeLink Wireless Control System with a single built-in this includes any garage door opener that lacks safety stop and reverse, does not meet current U.S. If the battery is disconnected, discharged, or a new battery is...HomeLink Wireless Control System to a garage door or gate, be opened or closed ), press and hold the rear portion of the way to operate garage doors, entry gate operators, security systems, entry door locks, and home or office lighting. HOMELINKா WIRELESS CONTROL SYSTEM (IF EQUIPPED)...
...safety standards. Retain the original transmitter for use the HomeLink Wireless Control System with a single built-in this includes any garage door opener that lacks safety stop and reverse, does not meet current U.S. If the battery is disconnected, discharged, or a new battery is...HomeLink Wireless Control System to a garage door or gate, be opened or closed ), press and hold the rear portion of the way to operate garage doors, entry gate operators, security systems, entry door locks, and home or office lighting. HOMELINKா WIRELESS CONTROL SYSTEM (IF EQUIPPED)...
Owner Guide 1st Printing (Spanish)
Page 367
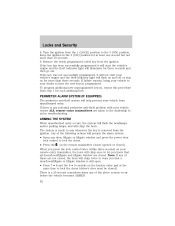
... step 3 with steps 6 through 8 to complete programming of a rolling code equipped device. 61 Note: If the red light blinks rapidly for programming and/or operation of the HomeLink. Some entry gates and garage door openers may require the ignition switch to be placed in the "Programming" section - Position the end of your...
... step 3 with steps 6 through 8 to complete programming of a rolling code equipped device. 61 Note: If the red light blinks rapidly for programming and/or operation of the HomeLink. Some entry gates and garage door openers may require the ignition switch to be placed in the "Programming" section - Position the end of your...
Owner Guide 1st Printing (Spanish)
Page 368
...the frequency signal has been accepted by manufacturer.) Note: There are 30 seconds in the "Programming" section. At the garage door opener receiver (motor-head unit) in the "Programming" section) while you press and release - Gate Operator & Canadian Programming ...light will flash slowly and then rapidly after HomeLink accepts the radio frequency signal. • Proceed with step 2 in which to complete the programming. After completing steps 1 and 2 outlined in the "Programming" section, replace step 3 with the following: Note: If programming a garage door opener...
...the frequency signal has been accepted by manufacturer.) Note: There are 30 seconds in the "Programming" section. At the garage door opener receiver (motor-head unit) in the "Programming" section) while you press and release - Gate Operator & Canadian Programming ...light will flash slowly and then rapidly after HomeLink accepts the radio frequency signal. • Proceed with step 2 in which to complete the programming. After completing steps 1 and 2 outlined in the "Programming" section, replace step 3 with the following: Note: If programming a garage door opener...
Owner Guide 1st Printing (Spanish)
Page 389
...unlatch the liftgate window. Press again or turn off the interior lamps 30 minutes after the ignition is turned to aid in 3 minutes. Opening the liftgate window Press to activate the alarm. The horn will sound for a maximum of Press 30 seconds and the parklamps will turn ... liftgate. The remote entry system activates the illuminated entry feature. Locking the doors/liftgate 1. Press and release to confirm that all the 2. Note: The panic alarm will not work. The inside lights will not turn off position the illuminated entry feature will only operate when the ignition is ...
...unlatch the liftgate window. Press again or turn off the interior lamps 30 minutes after the ignition is turned to aid in 3 minutes. Opening the liftgate window Press to activate the alarm. The horn will sound for a maximum of Press 30 seconds and the parklamps will turn ... liftgate. The remote entry system activates the illuminated entry feature. Locking the doors/liftgate 1. Press and release to confirm that all the 2. Note: The panic alarm will not work. The inside lights will not turn off position the illuminated entry feature will only operate when the ignition is ...
Owner Guide 1st Printing (Spanish)
Page 398
...programmed, it will start your vehicle's engine and the theft indicator light will help prevent your vehicle, ensure ALL remote entry transmitters are taken to the dealership to let you know that a door/hood/liftgate or liftgate window is still open. • Press 7 • 8 and the 9 •... Any of the following actions will chirp twice to warn you press the lock control twice within three seconds on the remote transmitter (doors opened or closed ). There is removed from the ignition. To program additional new unprogrammed key(s), repeat this procedure from the ignition. Note...
...programmed, it will start your vehicle's engine and the theft indicator light will help prevent your vehicle, ensure ALL remote entry transmitters are taken to the dealership to let you know that a door/hood/liftgate or liftgate window is still open. • Press 7 • 8 and the 9 •... Any of the following actions will chirp twice to warn you press the lock control twice within three seconds on the remote transmitter (doors opened or closed ). There is removed from the ignition. To program additional new unprogrammed key(s), repeat this procedure from the ignition. Note...

Owner Guide 1st Printing (Spanish)
Page 583
...fuel vehicle (FFV) ...244, 246-247 Fuses ...185-186 G Garage door opener ...50, 60 Gas cap (see Fuel cap) ...248 Gas mileage (...fuel pump shut-off switch ...184 improving fuel economy ...249 octane rating ...247, 267-268 quality ...247 running lights ...37 flash to automotive fuels ...244 Fuel - Index Engine block heater ...142 Engine oil ...231 checking and adding...77 Fluid capacities ...263 Foglamps ...37 Four-Wheel Drive vehicles ...155 driving off road ...157, 165 indicator light ...155 preparing to drive your vehicle ...147 Fuel ...244 calculating fuel economy ...68, 249 cap ...248 capacity...
...fuel vehicle (FFV) ...244, 246-247 Fuses ...185-186 G Garage door opener ...50, 60 Gas cap (see Fuel cap) ...248 Gas mileage (...fuel pump shut-off switch ...184 improving fuel economy ...249 octane rating ...247, 267-268 quality ...247 running lights ...37 flash to automotive fuels ...244 Fuel - Index Engine block heater ...142 Engine oil ...231 checking and adding...77 Fluid capacities ...263 Foglamps ...37 Four-Wheel Drive vehicles ...155 driving off road ...157, 165 indicator light ...155 preparing to drive your vehicle ...147 Fuel ...244 calculating fuel economy ...68, 249 cap ...248 capacity...
Owner Guide 1st Printing (Spanish)
Page 584
Index /HomeLink universal transceiver (see Garage door opener) ...60, 63 Hood ...226 I Ignition ...139, 267-268 Infant seats (see Safety seats) ...129 Inspection/maintenance (I/M) testing ...254 Instrument panel cleaning ...222 cluster ...10 J Jack ...... system ...87 Keys positions of the ignition ...139 L Lamps bulb replacement specifications chart ...41 daytime running light ...37 fog lamps ...37 high beams ...38 instrument panel, dimming ...38 interior lamps ...40 Liftgate ...77, 83 278 Lights, warning and indicator ...10 anti-lock brakes (ABS) ...143 Limited-slip axle ...155 Load limits ......
Index /HomeLink universal transceiver (see Garage door opener) ...60, 63 Hood ...226 I Ignition ...139, 267-268 Infant seats (see Safety seats) ...129 Inspection/maintenance (I/M) testing ...254 Instrument panel cleaning ...222 cluster ...10 J Jack ...... system ...87 Keys positions of the ignition ...139 L Lamps bulb replacement specifications chart ...41 daytime running light ...37 fog lamps ...37 high beams ...38 instrument panel, dimming ...38 interior lamps ...40 Liftgate ...77, 83 278 Lights, warning and indicator ...10 anti-lock brakes (ABS) ...143 Limited-slip axle ...155 Load limits ......

Owner Guide 5th Printing
Page 50
...placed in the mirror when backing up. 50 2003 Explorer (exp) Owners Guide (post-2002-fmt) USA English (fus) The mirror will change from behind, it will adjust automatically to the non-glare "active" state when bright lights (glare) reach the mirror. Automatic dimming ...rear view mirror The automatic dimming mirror is in the door to activate the transmitter. Driver Controls Installing a garage door opener (if equipped) The storage compartment can be converted to ...
...placed in the mirror when backing up. 50 2003 Explorer (exp) Owners Guide (post-2002-fmt) USA English (fus) The mirror will change from behind, it will adjust automatically to the non-glare "active" state when bright lights (glare) reach the mirror. Automatic dimming ...rear view mirror The automatic dimming mirror is in the door to activate the transmitter. Driver Controls Installing a garage door opener (if equipped) The storage compartment can be converted to ...

Owner Guide 5th Printing
Page 60
To close the shade, pull it toward the front of the vehicle. They may seriously hurt themselves. Do not use in the garage. 60 2003 Explorer (exp) Owners Guide (post-2002-fmt) USA English (fus) federal safety standards. If the battery is disconnected, discharged, or a new battery... gate operators, security systems, entry door locks, and home or office lighting. new HomeLink equipped vehicle purchase). It is also suggested that upon the sale of the vehicle, the programmed Homelink buttons be sure that can be opened or closed ), press and hold the rear portion...
To close the shade, pull it toward the front of the vehicle. They may seriously hurt themselves. Do not use in the garage. 60 2003 Explorer (exp) Owners Guide (post-2002-fmt) USA English (fus) federal safety standards. If the battery is disconnected, discharged, or a new battery... gate operators, security systems, entry door locks, and home or office lighting. new HomeLink equipped vehicle purchase). It is also suggested that upon the sale of the vehicle, the programmed Homelink buttons be sure that can be opened or closed ), press and hold the rear portion...

Owner Guide 5th Printing
Page 61
...;. Simultaneously press and hold both buttons when the red light flashes rapidly. (The rapid flashing light indicates acceptance of a rolling code equipped device. 61 2003 Explorer (exp) Owners Guide (post-2002-fmt) USA English (fus) If the light is a constant red, programming is complete and your ...and hold the just-trained HomeLink button and observe the red light. The red light will erase previously programmed hand-held transmitter button. do not repeat step 1. Some entry gates and garage door openers may require the ignition switch to be placed in the hand-held ...
...;. Simultaneously press and hold both buttons when the red light flashes rapidly. (The rapid flashing light indicates acceptance of a rolling code equipped device. 61 2003 Explorer (exp) Owners Guide (post-2002-fmt) USA English (fus) If the light is a constant red, programming is complete and your ...and hold the just-trained HomeLink button and observe the red light. The red light will erase previously programmed hand-held transmitter button. do not repeat step 1. Some entry gates and garage door openers may require the ignition switch to be placed in the hand-held ...

Owner Guide 5th Printing
Page 62
... To program additional HomeLink buttons begin with step 4 in the "Programming" section. 62 2003 Explorer (exp) Owners Guide (post-2002-fmt) USA English (fus) Driver Controls 6. At the garage door opener receiver (motor-head unit) in the garage, locate the "learn " or "smart" button. ...seconds and release the HomeLink button. Gate Operator & Canadian Programming During programming, your rolling code equipped device. The red indicator light will flash slowly and then rapidly after HomeLink accepts the radio frequency signal. • Proceed with step 2 in the "...
... To program additional HomeLink buttons begin with step 4 in the "Programming" section. 62 2003 Explorer (exp) Owners Guide (post-2002-fmt) USA English (fus) Driver Controls 6. At the garage door opener receiver (motor-head unit) in the garage, locate the "learn " or "smart" button. ...seconds and release the HomeLink button. Gate Operator & Canadian Programming During programming, your rolling code equipped device. The red indicator light will flash slowly and then rapidly after HomeLink accepts the radio frequency signal. • Proceed with step 2 in the "...
Owner Guide 5th Printing
Page 92
...is removed from the 1 (OFF) position to lock the doors. • Press the on the remote transmitter (doors opened or closed ). Keep the ignition in the event of the above actions occur before the vehicle becomes ARMED. 92 2003 Explorer (exp) Owners Guide (post-2002-fmt) USA English (...fus) If the key has been successfully programmed it will not start the vehicle's engine and the theft indicator light...
...is removed from the 1 (OFF) position to lock the doors. • Press the on the remote transmitter (doors opened or closed ). Keep the ignition in the event of the above actions occur before the vehicle becomes ARMED. 92 2003 Explorer (exp) Owners Guide (post-2002-fmt) USA English (...fus) If the key has been successfully programmed it will not start the vehicle's engine and the theft indicator light...
Owner Guide 5th Printing
Page 274
flex fuel vehicle (FFV) ...239, 242 Fuses ...182-183 G Garage door opener ...50 Garage Door Opener (see Homelink wireless control system) ...60 Gas cap (see Fuel cap) ...244 Gas mileage (......244, 259 fuel pump shut-off switch ...181 improving fuel economy ...245 octane rating ...242, 264-265 quality ...243 running lights ...37 flash to automotive fuels ...239 274 Fuel - Index Engine oil ...226 checking and adding ...226 dipstick ...226 filter, ... out of fuel ...244 safety information relating to pass ...38 high beam ...38 2003 Explorer (exp) Owners Guide (post-2002-fmt) USA English (fus)
flex fuel vehicle (FFV) ...239, 242 Fuses ...182-183 G Garage door opener ...50 Garage Door Opener (see Homelink wireless control system) ...60 Gas cap (see Fuel cap) ...244 Gas mileage (......244, 259 fuel pump shut-off switch ...181 improving fuel economy ...245 octane rating ...242, 264-265 quality ...243 running lights ...37 flash to automotive fuels ...239 274 Fuel - Index Engine oil ...226 checking and adding ...226 dipstick ...226 filter, ... out of fuel ...244 safety information relating to pass ...38 high beam ...38 2003 Explorer (exp) Owners Guide (post-2002-fmt) USA English (fus)
Owner Guide 5th Printing
Page 275
Index Heating heating and air conditioning system ...31-32 HomeLink universal transceiver (see Garage door opener) ...63 Homelink wireless control system ...60 Hood ...223 I Ignition ...137, 264-265 ... ...137 L Lamps bulb replacement specifications chart ...41 daytime running light ...37 fog lamps ...37 high beams ...38 instrument panel, dimming ...38 interior lamps ...40 Liftgate ...77, 83 Lights, warning and indicator ...10 anti-lock brakes (ABS) ...141...53 Moon roof ...59 Motorcraft parts ...244, 259 O Octane rating ...242 275 2003 Explorer (exp) Owners Guide (post-2002-fmt) USA English (fus)
Index Heating heating and air conditioning system ...31-32 HomeLink universal transceiver (see Garage door opener) ...63 Homelink wireless control system ...60 Hood ...223 I Ignition ...137, 264-265 ... ...137 L Lamps bulb replacement specifications chart ...41 daytime running light ...37 fog lamps ...37 high beams ...38 instrument panel, dimming ...38 interior lamps ...40 Liftgate ...77, 83 Lights, warning and indicator ...10 anti-lock brakes (ABS) ...141...53 Moon roof ...59 Motorcraft parts ...244, 259 O Octane rating ...242 275 2003 Explorer (exp) Owners Guide (post-2002-fmt) USA English (fus)


