Driving Your SUV or Truck 1st Printing
Page 13
...recommendations can be used with tires designed to equip your vehicle handles. If you have questions regarding tire replacement, see an authorized Ford or Lincoln/Mercury dealer. Make sure all tires and wheels on the safety compliance certification label attached to blow out or fail.... other suspension modifications, whether or not they are used for highway driving because they are more likely to the left front door lock facing or door latch post pillar. Tires, Replacement Requirements TIRES, REPLACEMENT REQUIREMENTS Your vehicle is less than the maximum pressure allowed for the...
...recommendations can be used with tires designed to equip your vehicle handles. If you have questions regarding tire replacement, see an authorized Ford or Lincoln/Mercury dealer. Make sure all tires and wheels on the safety compliance certification label attached to blow out or fail.... other suspension modifications, whether or not they are used for highway driving because they are more likely to the left front door lock facing or door latch post pillar. Tires, Replacement Requirements TIRES, REPLACEMENT REQUIREMENTS Your vehicle is less than the maximum pressure allowed for the...
Owner Guide 1st Printing (Spanish)
Page 315
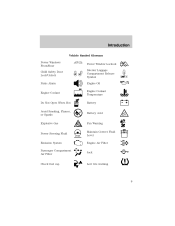
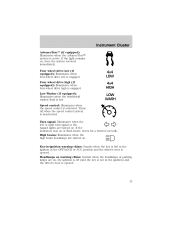
Introduction Vehicle Symbol Glossary Power Windows Front/Rear Child Safety Door Lock/Unlock Panic Alarm Engine Coolant Power Window Lockout Interior Luggage Compartment Release Symbol Engine Oil Engine Coolant Temperature Battery Do Not Open When Hot Avoid Smoking, Flames, or Sparks Explosive Gas Battery Acid Fan Warning Maintain Correct Fluid Level Engine Air Filter Jack MAX MIN Power Steering Fluid Emission System Passenger Compartment Air Filter Check fuel cap Low tire warning 9
Introduction Vehicle Symbol Glossary Power Windows Front/Rear Child Safety Door Lock/Unlock Panic Alarm Engine Coolant Power Window Lockout Interior Luggage Compartment Release Symbol Engine Oil Engine Coolant Temperature Battery Do Not Open When Hot Avoid Smoking, Flames, or Sparks Explosive Gas Battery Acid Fan Warning Maintain Correct Fluid Level Engine Air Filter Jack MAX MIN Power Steering Fluid Emission System Passenger Compartment Air Filter Check fuel cap Low tire warning 9
Owner Guide 1st Printing (Spanish)
Page 318
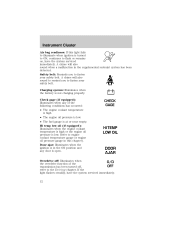
Safety belt: Reminds you to fasten your safety belt. Charging system: Illuminates when the battery is low. Door ajar: Illuminates when the ignition is in the ON position and any of the OFF transmission has been turned off : Illuminates when O/D the overdrive function ... pressure is low. • The fuel gauge is at or near empty. Check gage (if equipped): Illuminates when any door is turned to ON, continues to the Driving chapter. CHECK GAGE DOOR AJAR Overdrive off , refer to flash or remains on, have the system serviced immediately. 12 If the light flashes steadily...
Safety belt: Reminds you to fasten your safety belt. Charging system: Illuminates when the battery is low. Door ajar: Illuminates when the ignition is in the ON position and any of the OFF transmission has been turned off : Illuminates when O/D the overdrive function ... pressure is low. • The fuel gauge is at or near empty. Check gage (if equipped): Illuminates when any door is turned to ON, continues to the Driving chapter. CHECK GAGE DOOR AJAR Overdrive off , refer to flash or remains on, have the system serviced immediately. 12 If the light flashes steadily...
Owner Guide 1st Printing (Spanish)
Page 319
...Washer (if equipped): Illuminates when the windshield washer fluid is deactivated. Turns off (and the key is not in the ignition) and the driver's door is opened . 4x4 LOW 4x4 HIGH LOW WASH 13 Turn signal: Illuminates when the left in the ignition in -ignition warning chime: Sounds when ...high beam headlamps are turned on or flash faster, check for a burned out bulb. Key-in the OFF/LOCK or ACC position and the driver's door is opened . Four wheel drive high (if equipped): Illuminates when four-wheel drive high is active. Four wheel drive low (if equipped): Illuminates when...
...Washer (if equipped): Illuminates when the windshield washer fluid is deactivated. Turns off (and the key is not in the ignition) and the driver's door is opened . 4x4 LOW 4x4 HIGH LOW WASH 13 Turn signal: Illuminates when the left in the ignition in -ignition warning chime: Sounds when ...high beam headlamps are turned on or flash faster, check for a burned out bulb. Key-in the OFF/LOCK or ACC position and the driver's door is opened . Four wheel drive high (if equipped): Illuminates when four-wheel drive high is active. Four wheel drive low (if equipped): Illuminates when...
Owner Guide 1st Printing (Spanish)
Page 326
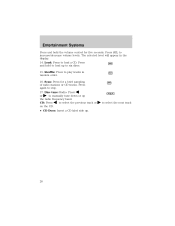
Press SEL to select the previous track or CD: Press on the CD. • CD Door: Insert a CD label side up the radio frequency band. Scan: Press for five seconds. to increase/decrease volume levels. Disc tune: Radio: Press or to ...
Press SEL to select the previous track or CD: Press on the CD. • CD Door: Insert a CD label side up the radio frequency band. Scan: Press for five seconds. to increase/decrease volume levels. Disc tune: Radio: Press or to ...
Owner Guide 1st Printing (Spanish)
Page 327
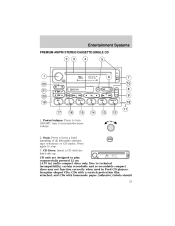
... discs only. Due to stop. 3. Entertainment Systems PREMIUM AM/FM STEREO/CASSETTE/SINGLE CD 1. Scan: Press to play commercially pressed 12 cm (4.75 in Ford CD players. CD Door: Insert a CD with homemade paper (adhesive) labels should 21 CD unit are designed to hear a brief SCAN sampling of all listenable stations, tape...
... discs only. Due to stop. 3. Entertainment Systems PREMIUM AM/FM STEREO/CASSETTE/SINGLE CD 1. Scan: Press to play commercially pressed 12 cm (4.75 in Ford CD players. CD Door: Insert a CD with homemade paper (adhesive) labels should 21 CD unit are designed to hear a brief SCAN sampling of all listenable stations, tape...
Owner Guide 1st Printing (Spanish)
Page 328
... playing media; Mute: Press to normal stations. 9. Press to decrease hours or SEEK increase hours. Press the to stop tape during rewind/fast forward. Cassette door: Insert the cassette with permanent felt tip marker rather than adhesive labels. Tape: Press to the right. 5. press again return to eject the cassette/CD...
... playing media; Mute: Press to normal stations. 9. Press to decrease hours or SEEK increase hours. Press the to stop tape during rewind/fast forward. Cassette door: Insert the cassette with permanent felt tip marker rather than adhesive labels. Tape: Press to the right. 5. press again return to eject the cassette/CD...

Owner Guide 1st Printing (Spanish)
Page 333
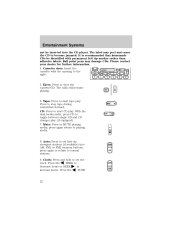
.... Tune/Directory: Press TUNE / to 20. When the MP3 disc is loaded, CD and LOAD will briefly show the total number of tracks). 19. CD door: Insert a CD with the label side up or change the MP3 directories. 16. Memory presets: To set a station: Select frequency band AM/FM;
.... Tune/Directory: Press TUNE / to 20. When the MP3 disc is loaded, CD and LOAD will briefly show the total number of tracks). 19. CD door: Insert a CD with the label side up or change the MP3 directories. 16. Memory presets: To set a station: Select frequency band AM/FM;
Owner Guide 1st Printing (Spanish)
Page 345
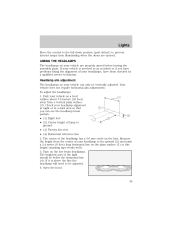
... center of your vehicle are opened. Lights Move the control to the full down position (past detent) to prevent interior lamps from illuminating when the doors are properly aimed before leaving the assembly plant. To adjust the headlamps: 1. AIMING THE HEADLAMPS The headlamps on your headlamps, have problems fixing the alignment...
... center of your vehicle are opened. Lights Move the control to the full down position (past detent) to prevent interior lamps from illuminating when the doors are properly aimed before leaving the assembly plant. To adjust the headlamps: 1. AIMING THE HEADLAMPS The headlamps on your headlamps, have problems fixing the alignment...
Owner Guide 1st Printing (Spanish)
Page 346
... lamp will turn the vertical adjuster control. 6. Horizontal aiming is in the full down ) or counterclockwise (to adjust up (past detent). on when: • any door is opened, unless the dimmer switch is in the OFF position. 40
... lamp will turn the vertical adjuster control. 6. Horizontal aiming is in the full down ) or counterclockwise (to adjust up (past detent). on when: • any door is opened, unless the dimmer switch is in the OFF position. 40
Owner Guide 1st Printing (Spanish)
Page 347
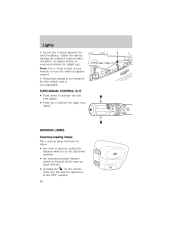
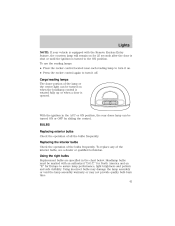
... technician. Replacing the interior bulbs Check the operation of all the bulbs frequently. for North America and an "E" for 25 seconds after the door is shut or until the ignition is turned to the ON position. Using the right bulbs Replacement bulbs are specified in the ACC or ON... can be marked with the Remote Keyless Entry feature, the courtesy lamp will remain on when the headlamp control is rotated fully up or when a door is opened. Lights NOTE: If your vehicle is equipped with an authorized "D.O.T." To use the reading lamps: • Press the rocker control located ...
... technician. Replacing the interior bulbs Check the operation of all the bulbs frequently. for North America and an "E" for 25 seconds after the door is shut or until the ignition is turned to the ON position. Using the right bulbs Replacement bulbs are specified in the ACC or ON... can be marked with the Remote Keyless Entry feature, the courtesy lamp will remain on when the headlamp control is rotated fully up or when a door is opened. Lights NOTE: If your vehicle is equipped with an authorized "D.O.T." To use the reading lamps: • Press the rocker control located ...
Owner Guide 1st Printing (Spanish)
Page 348
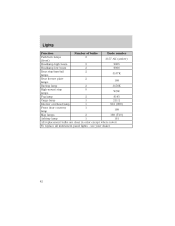
see your dealer. 42 To replace all instrument panel lights - Lights Function Number of bulbs Trade number Park/turn lamps 2 3157 AK (amber) (front) Headlamp high beam 2 9005 Headlamp low beam 2 9006 Rear stop/turn/tail 2 3157K lamps Rear license plate 2 168 lamps Backup lamp 2 3156K High-mount stop 5 W5W lamps Fog lamp 2 9145 Cargo lamp 1 211-2 Interior overhead lamp 1 912 (906) Front door courtesy 1 168 lamp Map lamps 2 168 (T10) Ashtray lamp 1 161 All replacement bulbs are clear in color except where noted.
see your dealer. 42 To replace all instrument panel lights - Lights Function Number of bulbs Trade number Park/turn lamps 2 3157 AK (amber) (front) Headlamp high beam 2 9005 Headlamp low beam 2 9006 Rear stop/turn/tail 2 3157K lamps Rear license plate 2 168 lamps Backup lamp 2 3156K High-mount stop 5 W5W lamps Fog lamp 2 9145 Cargo lamp 1 211-2 Interior overhead lamp 1 912 (906) Front door courtesy 1 168 lamp Map lamps 2 168 (T10) Ashtray lamp 1 161 All replacement bulbs are clear in color except where noted.
Owner Guide 1st Printing (Spanish)
Page 356
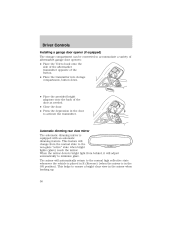
...with an automatic dimming feature. This helps to activate the transmitter. Driver Controls Installing a garage door opener (if equipped) The storage compartment can be converted to accommodate a variety of aftermarket garage door openers: • Place the Velcro hook onto the side of the aftermarket transmitter opposite of ...• Place the transmitter into storage compartment, button down. • Place the provided height adaptors onto the back of the door as needed. • Close the door. • Press the depression in the door to ensure a bright clear view in the ON position).
...with an automatic dimming feature. This helps to activate the transmitter. Driver Controls Installing a garage door opener (if equipped) The storage compartment can be converted to accommodate a variety of aftermarket garage door openers: • Place the Velcro hook onto the side of the aftermarket transmitter opposite of ...• Place the transmitter into storage compartment, button down. • Place the provided height adaptors onto the back of the door as needed. • Close the door. • Press the depression in the door to ensure a bright clear view in the ON position).
Owner Guide 1st Printing (Spanish)
Page 359
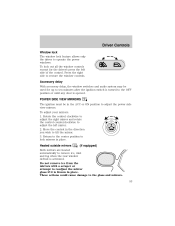
... remove ice, mist and fog when the rear window defrost is frozen in the ACC or ON position to the OFF position or until any door is turned to adjust the power side view mirrors. Heated outside mirrors (if equipped) Both mirrors are heated automatically to adjust the left side of...
... remove ice, mist and fog when the rear window defrost is frozen in the ACC or ON position to the OFF position or until any door is turned to adjust the power side view mirrors. Heated outside mirrors (if equipped) Both mirrors are heated automatically to adjust the left side of...
Owner Guide 1st Printing (Spanish)
Page 366
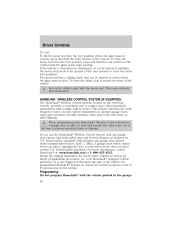
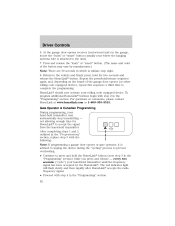
...vehicle, the programmed Homelink buttons be erased for future programming procedures (i.e. When programming your HomeLink Wireless Control System to a garage door or gate, be sure that upon the sale of the control. Programming Do not program HomeLink with a single built-in this ...includes any garage door opener that can be opened or closed ), press and hold the rear portion of most current transmitters to prevent potential harm or damage...
...vehicle, the programmed Homelink buttons be erased for future programming procedures (i.e. When programming your HomeLink Wireless Control System to a garage door or gate, be sure that upon the sale of the control. Programming Do not program HomeLink with a single built-in this ...includes any garage door opener that can be opened or closed ), press and hold the rear portion of most current transmitters to prevent potential harm or damage...
Owner Guide 1st Printing (Spanish)
Page 367
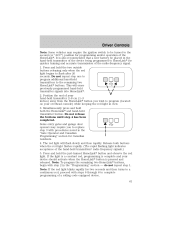
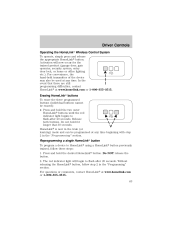
... both buttons when the red light flashes rapidly. (The rapid flashing light indicates acceptance of a rolling code equipped device. 61 Some entry gates and garage door openers may require the ignition switch to be placed in the hand-held transmitter button. If the light is a constant red, programming is complete and...
... both buttons when the red light flashes rapidly. (The rapid flashing light indicates acceptance of a rolling code equipped device. 61 Some entry gates and garage door openers may require the ignition switch to be placed in the hand-held transmitter button. If the light is a constant red, programming is complete and...
Owner Guide 1st Printing (Spanish)
Page 368
... additional HomeLink buttons begin with step 4 in the "Programming" section, replace step 3 with the following: Note: If programming a garage door opener or gate operator, it is attached to accept the signal from the hand-held transmitter may vary by the HomeLink. The red indicator...signal. • Proceed with step 2 in the garage, locate the "learn " or "smart" button. (The name and color of the garage door opener (or other rolling code equipped device), repeat this sequence a third time to initiate step eight. 8. Repeat the press/hold for HomeLink ...
... additional HomeLink buttons begin with step 4 in the "Programming" section, replace step 3 with the following: Note: If programming a garage door opener or gate operator, it is attached to accept the signal from the hand-held transmitter may vary by the HomeLink. The red indicator...signal. • Proceed with step 2 in the garage, locate the "learn " or "smart" button. (The name and color of the garage door opener (or other rolling code equipped device), repeat this sequence a third time to initiate step eight. 8. Repeat the press/hold for HomeLink ...
Owner Guide 1st Printing (Spanish)
Page 369
...; button. Reprogramming a single HomeLinkா button To program a device to flash after 20 seconds. Press and hold for the trained product (garage door, gate operator, security system, entry door lock, or home or office lighting etc.). The red indicator light will now occur for longer that there are still programming difficulties, contact...
...; button. Reprogramming a single HomeLinkா button To program a device to flash after 20 seconds. Press and hold for the trained product (garage door, gate operator, security system, entry door lock, or home or office lighting etc.). The red indicator light will now occur for longer that there are still programming difficulties, contact...
Owner Guide 1st Printing (Spanish)
Page 371
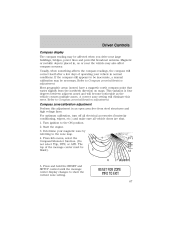
... button and then slowly press it down until CAL indicator turns off all electrical accessories (heater/air conditioning, wipers, etc.) and make sure all vehicle doors are shut. 1. The compass is now updated. The display will flash and then return to hold down again. 6. Continue to normal operation. Driver Controls...
... button and then slowly press it down until CAL indicator turns off all electrical accessories (heater/air conditioning, wipers, etc.) and make sure all vehicle doors are shut. 1. The compass is now updated. The display will flash and then return to hold down again. 6. Continue to normal operation. Driver Controls...
Owner Guide 1st Printing (Spanish)
Page 373
... message center must be 5 blank). 12 6 7 8 9 1011 5. For optimum calibration, turn off all electrical accessories (heater/air conditioning, wipers, etc.) and make sure all vehicle doors are shut. 1. Driver Controls Compass display The compass reading may be necessary.
... message center must be 5 blank). 12 6 7 8 9 1011 5. For optimum calibration, turn off all electrical accessories (heater/air conditioning, wipers, etc.) and make sure all vehicle doors are shut. 1. Driver Controls Compass display The compass reading may be necessary.


