
Owner's Manual
Page 2
...aim. Simply avoid driving too fast during the first 1 600 km (1 000 miles). Vary speeds frequently. We must all play our part in comments highlighted by the warning triangle symbol. BREAKING IN YOUR VEHICLE There are significant steps toward this owner's guide, answers to others... a warning. Indicates that vehicle information related to break in rules for a full explanation. This is necessary to give the moving parts a chance to recycling and other environmental concerns will follow. Correct vehicle usage and the authorized disposal of personal injury and prevent possible...
...aim. Simply avoid driving too fast during the first 1 600 km (1 000 miles). Vary speeds frequently. We must all play our part in comments highlighted by the warning triangle symbol. BREAKING IN YOUR VEHICLE There are significant steps toward this owner's guide, answers to others... a warning. Indicates that vehicle information related to break in rules for a full explanation. This is necessary to give the moving parts a chance to recycling and other environmental concerns will follow. Correct vehicle usage and the authorized disposal of personal injury and prevent possible...

Owner's Manual
Page 61
... control again. Open/Lift Close 61 To open and close it. To lift the rear of the sunroof Close the sunroof and press the front part of the control on the rocker switch in the roof console to point in the desired direction. 12 SEC On Off 12 SEC Sunroof (if...
... control again. Open/Lift Close 61 To open and close it. To lift the rear of the sunroof Close the sunroof and press the front part of the control on the rocker switch in the roof console to point in the desired direction. 12 SEC On Off 12 SEC Sunroof (if...
Owner's Manual
Page 68
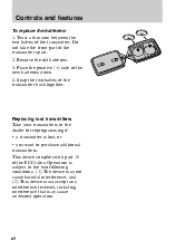
Snap the two halves of the transmitter apart. 2. Do not take the front part of the transmitter back together. Operation is lost transmitters Take your transmitters to the dealer for reprogramming if: • a transmitter is subject to purchase additional ... device must accept any interference received, including interference that may cause undesired operation. 68 Place the positive (+) side of the transmitter. This device complies with part 15 of the FCC rules. Remove the old batteries. 3. Controls and features To replace the batteries: 1.
Snap the two halves of the transmitter apart. 2. Do not take the front part of the transmitter back together. Operation is lost transmitters Take your transmitters to the dealer for reprogramming if: • a transmitter is subject to purchase additional ... device must accept any interference received, including interference that may cause undesired operation. 68 Place the positive (+) side of the transmitter. This device complies with part 15 of the FCC rules. Remove the old batteries. 3. Controls and features To replace the batteries: 1.

Owner's Manual
Page 81
... by the same supplier as the safety belt. Approximately 20 cm (8 inches) may be added to the length of the belt with a safety belt extension (part number 611C22). Safety belt extensions are available at the end of the webbing. Manufacturer identification is on , the safety belt indicator illuminates for 1-2 minutes and...
... by the same supplier as the safety belt. Approximately 20 cm (8 inches) may be added to the length of the belt with a safety belt extension (part number 611C22). Safety belt extensions are available at the end of the webbing. Manufacturer identification is on , the safety belt indicator illuminates for 1-2 minutes and...

Owner's Manual
Page 82
... of the anchorage points and the locking action of collision. Failure to follow these instructions will pull out of the sleeve so that all or part of the orange portion of personal injury. AVERTISSEMENT Remplacer l'ensemble de boucle de ceinture en cas de collision avec ce véhicule, ou si la...
... of the anchorage points and the locking action of collision. Failure to follow these instructions will pull out of the sleeve so that all or part of the orange portion of personal injury. AVERTISSEMENT Remplacer l'ensemble de boucle de ceinture en cas de collision avec ce véhicule, ou si la...
Owner's Manual
Page 103
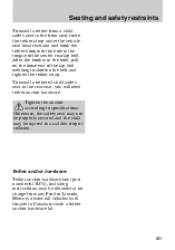
... lap belt webbing to specifications. Tighten the anchor according to shorten the belt and tighten the tether strap. Tether anchor hardware Tether anchor hardware kits (part number 613D74), including instructions, may be obtained at no charge from a child safety seat in the front seat, route the tether strap under the vehicle... the hole in the hole, pull on the loose end of the center rear lap belt. Seating and safety restraints To install a tether from any Ford or LincolnMercury dealer.
... lap belt webbing to specifications. Tighten the anchor according to shorten the belt and tighten the tether strap. Tether anchor hardware Tether anchor hardware kits (part number 613D74), including instructions, may be obtained at no charge from a child safety seat in the front seat, route the tether strap under the vehicle... the hole in the hole, pull on the loose end of the center rear lap belt. Seating and safety restraints To install a tether from any Ford or LincolnMercury dealer.
Owner's Manual
Page 151
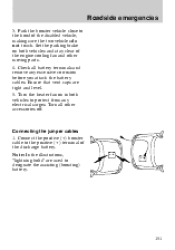
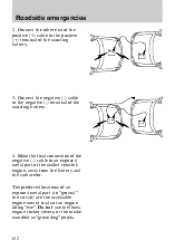
... excessive corrosion before you attach the battery cables. Turn all battery terminals and remove any electrical surges. Connecting the jumper cables 1. Check all other moving parts. 4. Note: In the illustrations, "lightning bolts" are tight and level. 5. Set the parking brake on in both vehicles and stay clear of the engine cooling...
... excessive corrosion before you attach the battery cables. Turn all battery terminals and remove any electrical surges. Connecting the jumper cables 1. Check all other moving parts. 4. Note: In the illustrations, "lightning bolts" are tight and level. 5. Set the parking brake on in both vehicles and stay clear of the engine cooling...
Owner's Manual
Page 152
The preferred locations of an exposed metal part (to an exposed metal part of the negative (-) cable to "ground" the circuit) are the accessible engine mount studs or an engine lifting "eye". Make the final connection of the ...
The preferred locations of an exposed metal part (to an exposed metal part of the negative (-) cable to "ground" the circuit) are the accessible engine mount studs or an engine lifting "eye". Make the final connection of the ...
Owner's Manual
Page 154
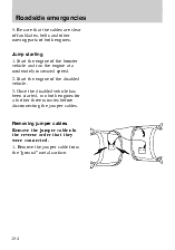
Be sure that they were connected. 1. Jump starting 1. Once the disabled vehicle has been started, run the engine at a moderately increased speed. 2. Remove the jumper cable from the "ground" metal surface. 154 Start the engine of the booster vehicle and run both engines. Removing jumper cables Remove the jumper cables in the reverse order that the cables are clear of fan blades, belts and other moving parts of both engines for a further three minutes before disconnecting the jumper cables. Start the engine of the disabled vehicle. 3. Roadside emergencies 5.
Be sure that they were connected. 1. Jump starting 1. Once the disabled vehicle has been started, run the engine at a moderately increased speed. 2. Remove the jumper cable from the "ground" metal surface. 154 Start the engine of the booster vehicle and run both engines. Removing jumper cables Remove the jumper cables in the reverse order that the cables are clear of fan blades, belts and other moving parts of both engines for a further three minutes before disconnecting the jumper cables. Start the engine of the disabled vehicle. 3. Roadside emergencies 5.

Owner's Manual
Page 158
...tracking routine service for easy location. • As possible, we design parts that can provide necessary parts and service. Check your "Warranty Guide" to specifications. If your vehicle requires professional service, your Ford dealership can be replaced without tools. • We provide you with a... maintenance guide and or service guide which parts and services are designed and built to provide the best performance in the...
...tracking routine service for easy location. • As possible, we design parts that can provide necessary parts and service. Check your "Warranty Guide" to specifications. If your vehicle requires professional service, your Ford dealership can be replaced without tools. • We provide you with a... maintenance guide and or service guide which parts and services are designed and built to provide the best performance in the...
Owner's Manual
Page 159
...: • Do not work on at any time. If you disconnect the battery, the engine must work on a vehicle with the engine running in moving parts. Always disconnect the negative terminal of the battery before your vehicle. Here are sure you must "relearn" its idle conditions before working near the fan.... • If you have enough ventilation. • Keep all lit cigarettes, open flames and other lit material away from the battery and all fuel related parts. The cooling fan is automatic and may come on a hot engine.
...: • Do not work on at any time. If you disconnect the battery, the engine must work on a vehicle with the engine running in moving parts. Always disconnect the negative terminal of the battery before your vehicle. Here are sure you must "relearn" its idle conditions before working near the fan.... • If you have enough ventilation. • Keep all lit cigarettes, open flames and other lit material away from the battery and all fuel related parts. The cooling fan is automatic and may come on a hot engine.

Owner's Manual
Page 181
... Remove the screws. 3. Maintenance and care 2. Open the hood. Slide the filter out of the housing, replace with the new filter and slide the top part of the housing and filter. 5. Pull off the rubber weatherstrip at the back of the housing. Pull off the two clips on the grille. Slide... out the top part of the housing and cabin air filter back into place. Remove the plastic caps from the screws on the sides of the engine compartment, on...
... Remove the screws. 3. Maintenance and care 2. Open the hood. Slide the filter out of the housing, replace with the new filter and slide the top part of the housing and filter. 5. Pull off the rubber weatherstrip at the back of the housing. Pull off the two clips on the grille. Slide... out the top part of the housing and cabin air filter back into place. Remove the plastic caps from the screws on the sides of the engine compartment, on...

Owner's Manual
Page 182
... not apply to 12 inches or limited production tires as the government has written it. 182 Department of Transportation has set. Department of Transportation requires Ford to give you the following information about tire grades exactly as defined in Title 49 Code of 10 to deep tread, winter-type snow tires...
... not apply to 12 inches or limited production tires as the government has written it. 182 Department of Transportation has set. Department of Transportation requires Ford to give you the following information about tire grades exactly as defined in Title 49 Code of 10 to deep tread, winter-type snow tires...
Owner's Manual
Page 194
... before completely removing the fuel filler cap. If the fuel filler cap is not used. There should be properly installed. Maintenance and care Cleaner air Ford approves the use of 10% ethanol or 15% MTBE. Turn off the engine, remove the fuel filler cap and reinstall it with cosolvents and additives... oxygenates such as a maximum of gasolines to protect the fuel system. The fuel system may not be no more than 5% methanol with an authorized Motorcraft part. Fuel filler cap If the "check engine" indicator comes on and stays on when you or others. 194
... before completely removing the fuel filler cap. If the fuel filler cap is not used. There should be properly installed. Maintenance and care Cleaner air Ford approves the use of 10% ethanol or 15% MTBE. Turn off the engine, remove the fuel filler cap and reinstall it with cosolvents and additives... oxygenates such as a maximum of gasolines to protect the fuel system. The fuel system may not be no more than 5% methanol with an authorized Motorcraft part. Fuel filler cap If the "check engine" indicator comes on and stays on when you or others. 194

Owner's Manual
Page 196
...continue to work properly: • Use unleaded fuel only. • Avoid running out of components affecting emissions control, such non-Ford parts should be equivalent to the specified schedule. Maintenance and care EMISSION CONTROL SYSTEM Your vehicle is moving, especially at high speeds. ...your vehicle is equipped with applicable exhaust emission standards. To make sure that the catalytic converter and other than Ford, Motorcraft, or Ford authorized parts are considered essential to the life and performance of your vehicle to comply with various emission control components and ...
...continue to work properly: • Use unleaded fuel only. • Avoid running out of components affecting emissions control, such non-Ford parts should be equivalent to the specified schedule. Maintenance and care EMISSION CONTROL SYSTEM Your vehicle is moving, especially at high speeds. ...your vehicle is equipped with applicable exhaust emission standards. To make sure that the catalytic converter and other than Ford, Motorcraft, or Ford authorized parts are considered essential to the life and performance of your vehicle to comply with various emission control components and ...
Owner's Manual
Page 201
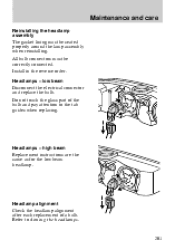
... tab guides when replacing. Install in the reverse order. Headlamps - low beam Disconnect the electrical connector and replace the bulb. Do not touch the glass part of a bulb. Headlamp alignment Check the headlamp alignment after each replacement of the bulb and pay attention to Aiming the headlamps. 201 Headlamps - high beam...
... tab guides when replacing. Install in the reverse order. Headlamps - low beam Disconnect the electrical connector and replace the bulb. Do not touch the glass part of a bulb. Headlamp alignment Check the headlamp alignment after each replacement of the bulb and pay attention to Aiming the headlamps. 201 Headlamps - high beam...
Owner's Manual
Page 202
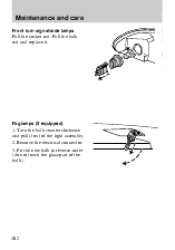
Foglamps (if equipped) 1. Remove the electrical connector. 3. Maintenance and care Front turn signal/side lamps Pull the socket out. Pull the bulb out and replace it out of the bulb). 202 Fit the new bulb in reverse order (do not touch the glass part of the light assembly. 2. Turn the bulb counterclockwise and pull it .
Foglamps (if equipped) 1. Remove the electrical connector. 3. Maintenance and care Front turn signal/side lamps Pull the socket out. Pull the bulb out and replace it out of the bulb). 202 Fit the new bulb in reverse order (do not touch the glass part of the light assembly. 2. Turn the bulb counterclockwise and pull it .
Owner's Manual
Page 213
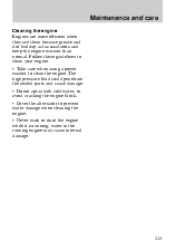
.... • Never wash or rinse the engine while it is running engine may cause internal damage. 213 The high pressure fluid could penetrate the sealed parts and cause damage. • Do not spray with cold water, to avoid cracking the engine block. • Cover the alternator to clean the engine. water...
.... • Never wash or rinse the engine while it is running engine may cause internal damage. 213 The high pressure fluid could penetrate the sealed parts and cause damage. • Do not spray with cold water, to avoid cracking the engine block. • Cover the alternator to clean the engine. water...

Owner's Manual
Page 214
Do not clean plastic parts with a tar remover if necessary. To avoid damaging the blades, do not use a dry paper towel, chemical solvents or abrasive cleaners to wash the exterior ... remover if necessary. Rinse thoroughly with the same detergent you use fuel, kerosene, paint thinner or other solvents. 214 Maintenance and care Cleaning plastic exterior parts Use a vinyl cleaner for routine cleaning of your vehicle.
Do not clean plastic parts with a tar remover if necessary. To avoid damaging the blades, do not use a dry paper towel, chemical solvents or abrasive cleaners to wash the exterior ... remover if necessary. Rinse thoroughly with the same detergent you use fuel, kerosene, paint thinner or other solvents. 214 Maintenance and care Cleaning plastic exterior parts Use a vinyl cleaner for routine cleaning of your vehicle.
Owner's Manual
Page 217
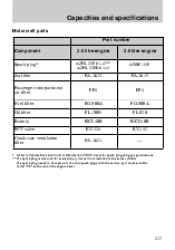
Capacities and specifications Motorcraft parts Part number Component Spark plug* Air filter Passenger compartment air filter Fuel filter Oil filter Battery PCV valve Crankcase ventilation filter 2.0 litre engine AZFS-22F # 1+2** AZFS-...) decal for spark plug and gap specifications. ** If a spark plug is removed for examination, it must be replaced, use only spark plugs with the service part number suffix letter "FE" as shown on the engine decal. 217
Capacities and specifications Motorcraft parts Part number Component Spark plug* Air filter Passenger compartment air filter Fuel filter Oil filter Battery PCV valve Crankcase ventilation filter 2.0 litre engine AZFS-22F # 1+2** AZFS-...) decal for spark plug and gap specifications. ** If a spark plug is removed for examination, it must be replaced, use only spark plugs with the service part number suffix letter "FE" as shown on the engine decal. 217

