
Owner's Manual
Page 139
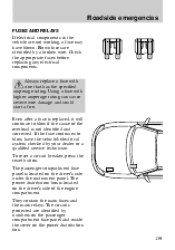
... by numbers on the passenger compartment fuse panel and inside the cover on the power distribution box. 139 Always replace a fuse with higher amperage rating can cause severe wire damage and could start a fire. The circuits protected are identified by a broken wire. Even after a fuse is replaced, it will continue to blow, have...
... by numbers on the passenger compartment fuse panel and inside the cover on the power distribution box. 139 Always replace a fuse with higher amperage rating can cause severe wire damage and could start a fire. The circuits protected are identified by a broken wire. Even after a fuse is replaced, it will continue to blow, have...
Owner's Manual
Page 143
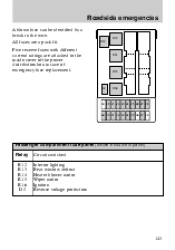
R12 R13 R14 R15 D2 R16 19 20 21 22 23 24 25 26 27 28 29 30 31 32 33 34 35 36 37 38 Passenger compartment fuse panel (below instrument panel) Relay R 12 R 13 R 14 R 15 R 16 D2 Circuit switched Interior lighting Rear window defrost Heater blower motor Wiper motor Ignition Reverse voltage protection 143 All fuses are attached to the inside cover of the power distribution box in the wire. Roadside emergencies A blown fuse can be identified by a break in case of emergency fuse replacement. Five reserve fuses with different current ratings are a push fit.
R12 R13 R14 R15 D2 R16 19 20 21 22 23 24 25 26 27 28 29 30 31 32 33 34 35 36 37 38 Passenger compartment fuse panel (below instrument panel) Relay R 12 R 13 R 14 R 15 R 16 D2 Circuit switched Interior lighting Rear window defrost Heater blower motor Wiper motor Ignition Reverse voltage protection 143 All fuses are attached to the inside cover of the power distribution box in the wire. Roadside emergencies A blown fuse can be identified by a break in case of emergency fuse replacement. Five reserve fuses with different current ratings are a push fit.

Owner's Manual
Page 162
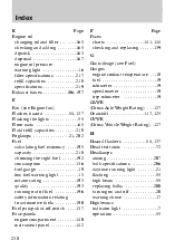
Maintenance and care Opening the hood • Pull the handle (1) located under the instrument panel. 4 55 60 70 80 50 100 120 90 140 40 60 800 0 0 1 2 3 160100 30 40 ... MPH CHECK ENGINE O/D OFF MI RRORS 1 • Release the safety catch by reaching under the hood (2) (adjacent to the Ford emblem) and pushing it to ensure that the hood lock is secure. Always check to the left. 2 • Raise the ...its retaining clip, lower the hood and allow it is fully engaged. 3 162 To close, replace the support strut in the yellow colored retainer, ensuring it to drop into the catch for the...
Maintenance and care Opening the hood • Pull the handle (1) located under the instrument panel. 4 55 60 70 80 50 100 120 90 140 40 60 800 0 0 1 2 3 160100 30 40 ... MPH CHECK ENGINE O/D OFF MI RRORS 1 • Release the safety catch by reaching under the hood (2) (adjacent to the Ford emblem) and pushing it to ensure that the hood lock is secure. Always check to the left. 2 • Raise the ...its retaining clip, lower the hood and allow it is fully engaged. 3 162 To close, replace the support strut in the yellow colored retainer, ensuring it to drop into the catch for the...
Owner's Manual
Page 238
...of fuel ...196 safety information relating to automotive fuels ...190 Fuel pump shut-off switch ...137 Fuse panels engine compartment ...140 instrument panel ...142 238 F Page Fuses charts ...141, 144 checking and replacing ...139 G Gas mileage (see Fuel) Gauges engine coolant temperature ...18 fuel ...19 odometer ...19 speedometer...flashers ...54, 137 Head restraints ...72 Headlamps aiming ...207 bulb specifications ...206 daytime running light ...21 flashing ...55 high beam ...55 replacing bulbs ...200 turning on and off ...20 warning chime ...17 High beams indicator light ...7 operation ...55
...of fuel ...196 safety information relating to automotive fuels ...190 Fuel pump shut-off switch ...137 Fuse panels engine compartment ...140 instrument panel ...142 238 F Page Fuses charts ...141, 144 checking and replacing ...139 G Gas mileage (see Fuel) Gauges engine coolant temperature ...18 fuel ...19 odometer ...19 speedometer...flashers ...54, 137 Head restraints ...72 Headlamps aiming ...207 bulb specifications ...206 daytime running light ...21 flashing ...55 high beam ...55 replacing bulbs ...200 turning on and off ...20 warning chime ...17 High beams indicator light ...7 operation ...55
Owner's Manual
Page 239
... the lamps ...55 foglamps ...21, 202 hazard flashers ...54, 137 headlamps ...20 high beams ...55 high-mounted brake lamp ...204 instrument panel, dimming ...22 interior lamps ...60 reading lamps ...61 replacing bulbs ...200 rear lamps ...203 Lights, warning and indicator air bag ...13 anti-lock brakes (ABS) ...15 brake ...14 charging system...
... the lamps ...55 foglamps ...21, 202 hazard flashers ...54, 137 headlamps ...20 high beams ...55 high-mounted brake lamp ...204 instrument panel, dimming ...22 interior lamps ...60 reading lamps ...61 replacing bulbs ...200 rear lamps ...203 Lights, warning and indicator air bag ...13 anti-lock brakes (ABS) ...15 brake ...14 charging system...
Owner's Manual
Page 240
... Oil (see Engine oil) Oil filter ...165, 217 On-board diagnostic (OBD II) system ...198 Overdrive ...9, 120 Overhead controls ...61 P Panel dimmer control ...22 Panic alarm, remote entry sytem 67 Parking brake ...114 Parts (see Motorcraft parts) ...217 Passenger compartment air filter (see Cabin... luggage compartment ...64 Remote entry system locking/unlocking doors ...66 opening the trunk ...67 panic alarm ...67 replacing the batteries ...67 replacement/additional transmitters ...68 Repairing paint chips ...212 Reporting safety defects ...235 Restraints, safety ...75 Rotating the tires ...185
... Oil (see Engine oil) Oil filter ...165, 217 On-board diagnostic (OBD II) system ...198 Overdrive ...9, 120 Overhead controls ...61 P Panel dimmer control ...22 Panic alarm, remote entry sytem 67 Parking brake ...114 Parts (see Motorcraft parts) ...217 Passenger compartment air filter (see Cabin... luggage compartment ...64 Remote entry system locking/unlocking doors ...66 opening the trunk ...67 panic alarm ...67 replacing the batteries ...67 replacement/additional transmitters ...68 Repairing paint chips ...212 Reporting safety defects ...235 Restraints, safety ...75 Rotating the tires ...185
Warranty Guide 5th Printing
Page 10
... materials or workmanship. When making warranty repairs on your vehicle, the dealer will repair, replace, or adjust all parts on your vehicle (except tires) that are two types of the...36,000 miles, whichever occurs first. During this coverage period, authorized Ford Motor Company dealers will use Ford or Motorcraft parts or remanufactured parts that are described on the type ...Vehicle Limited Warranty, Corrosion Coverage begins at the warranty start date and covers body sheet metal panels against defects in the body sheet metal, coverage lasts for five years, regardless of damage:...
... materials or workmanship. When making warranty repairs on your vehicle, the dealer will repair, replace, or adjust all parts on your vehicle (except tires) that are two types of the...36,000 miles, whichever occurs first. During this coverage period, authorized Ford Motor Company dealers will use Ford or Motorcraft parts or remanufactured parts that are described on the type ...Vehicle Limited Warranty, Corrosion Coverage begins at the warranty start date and covers body sheet metal panels against defects in the body sheet metal, coverage lasts for five years, regardless of damage:...


