

Owner's Manual
Page 4
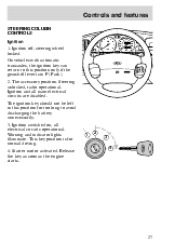
... TRACTION CONTROL O/D OFF On Res MI RRORS Set Acc Off Coast Page 132 Hood release Page 17 Headlamp control/ Foglamp control* 4 Page 28 Tilt steering wheel lever Page 27 Ignition switch Page 32 Speed control* Page 29 Horn
... TRACTION CONTROL O/D OFF On Res MI RRORS Set Acc Off Coast Page 132 Hood release Page 17 Headlamp control/ Foglamp control* 4 Page 28 Tilt steering wheel lever Page 27 Ignition switch Page 32 Speed control* Page 29 Horn
Owner's Manual
Page 27
... ENGINE UNLEADED FUEL ONLY IR R O R S 1 2 3 4 27 On vehicles with automatic transaxles, the ignition key can return to this position for normal driving. 4. Ignition off, steering wheel locked. Starter motor activated. Controls and features STEERING COLUMN CONTROLS 3 4 5 6 7 0 x 1000 TRACTION CONTROL O/D OFF Ignition 1.
... ENGINE UNLEADED FUEL ONLY IR R O R S 1 2 3 4 27 On vehicles with automatic transaxles, the ignition key can return to this position for normal driving. 4. Ignition off, steering wheel locked. Starter motor activated. Controls and features STEERING COLUMN CONTROLS 3 4 5 6 7 0 x 1000 TRACTION CONTROL O/D OFF Ignition 1.
Owner's Manual
Page 28
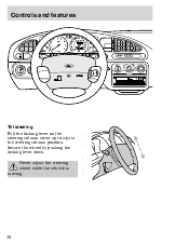
... ANS SEEK EJECT Tilt steering Pull the locking lever on the steering column cover up to adjust the steering column position. Never adjust the steering wheel while the vehicle is moving. 28 Secure the...
... ANS SEEK EJECT Tilt steering Pull the locking lever on the steering column cover up to adjust the steering column position. Never adjust the steering wheel while the vehicle is moving. 28 Secure the...
Owner's Manual
Page 31
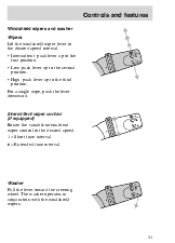
... the second position. • High: push lever up to the desired speed. 1 = Short time interval 6 = Extended time interval Washer Pull the lever toward the steering wheel.
... the second position. • High: push lever up to the desired speed. 1 = Short time interval 6 = Extended time interval Washer Pull the lever toward the steering wheel.

Owner's Manual
Page 87
The wheels are prevented from locking even when the brakes are firmly applied, helping to the "Service Guide" ...employed during brake applications and compensating for maintenance intervals. It becomes operational only when it senses differences in the rotational speed of wheel lock up . Driving BRAKES Your brakes are about to lock up during normal braking. Anti-lock braking system (ABS) (if...-lock braking system The anti-lock braking system is indicated by detecting the onset of the road wheels, indicating that the vehicle can be steered and the driver can avoid obstacles.
The wheels are prevented from locking even when the brakes are firmly applied, helping to the "Service Guide" ...employed during brake applications and compensating for maintenance intervals. It becomes operational only when it senses differences in the rotational speed of wheel lock up . Driving BRAKES Your brakes are about to lock up during normal braking. Anti-lock braking system (ABS) (if...-lock braking system The anti-lock braking system is indicated by detecting the onset of the road wheels, indicating that the vehicle can be steered and the driver can avoid obstacles.
Owner's Manual
Page 92
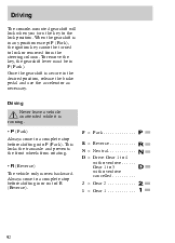
... come to a complete stop before shifting into P (Park). Always come to a complete stop before shifting in P (Park). This locks the transaxle and prevents the front wheels from the steering column.
... come to a complete stop before shifting into P (Park). Always come to a complete stop before shifting in P (Park). This locks the transaxle and prevents the front wheels from the steering column.
Owner's Manual
Page 93
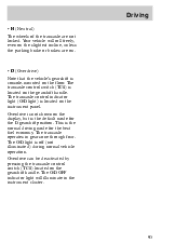
... slightest incline, unless the parking brake or brakes are not locked. This is the normal driving mode for the D gearshift position. Driving • N (Neutral) The wheels of the transaxle are on. • D (Overdrive) Note that the vehicle's gearshift is console-mounted on the instrument panel. The transaxle control indicator light (O/D light...
... slightest incline, unless the parking brake or brakes are not locked. This is the normal driving mode for the D gearshift position. Driving • N (Neutral) The wheels of the transaxle are on. • D (Overdrive) Note that the vehicle's gearshift is console-mounted on the instrument panel. The transaxle control indicator light (O/D light...

Owner's Manual
Page 119
If parking on a slope is on firm, level ground. If necessary, secure your vehicle in such a position that the vehicle is unavoidable, secure the wheels with chocks. Apply the parking brake and engage first or reverse gear or, if the vehicle has an automatic transaxle, select the P (Park) position. Ensure that neither the traffic nor you are hindered or endangered when changing the tire. Roadside emergencies CHANGING TIRES Park your vehicle further by blocking the wheels with suitable chocks. 119 Activate the hazard lights.
If parking on a slope is on firm, level ground. If necessary, secure your vehicle in such a position that the vehicle is unavoidable, secure the wheels with chocks. Apply the parking brake and engage first or reverse gear or, if the vehicle has an automatic transaxle, select the P (Park) position. Ensure that neither the traffic nor you are hindered or endangered when changing the tire. Roadside emergencies CHANGING TIRES Park your vehicle further by blocking the wheels with suitable chocks. 119 Activate the hazard lights.
Owner's Manual
Page 120
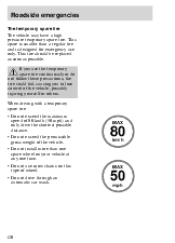
... fail, causing you to lose control of the vehicle. • Do not install more than a regular tire and is smaller than one spare wheel on this type of wheel. • Do not drive through an automatic car wash. When driving with a temporary spare tire: • Do not exceed the maximum speed of...
... fail, causing you to lose control of the vehicle. • Do not install more than a regular tire and is smaller than one spare wheel on this type of wheel. • Do not drive through an automatic car wash. When driving with a temporary spare tire: • Do not exceed the maximum speed of...

Owner's Manual
Page 121
Roadside emergencies Spare tire location The spare tire and tools are located under the floor cover in the luggage compartment and fold it forward. 2. Completely unscrew the bolt and remove the wheel cover panel with the holder. 3. Remove the wheel cover panel. 4. Removing the spare tire and tools 1. Lift out the spare wheel. 5. Raise the rear of the floor cover in the luggage compartment. Remove the jack which is located in the tool pack. 121
Roadside emergencies Spare tire location The spare tire and tools are located under the floor cover in the luggage compartment and fold it forward. 2. Completely unscrew the bolt and remove the wheel cover panel with the holder. 3. Remove the wheel cover panel. 4. Removing the spare tire and tools 1. Lift out the spare wheel. 5. Raise the rear of the floor cover in the luggage compartment. Remove the jack which is located in the tool pack. 121
Owner's Manual
Page 122
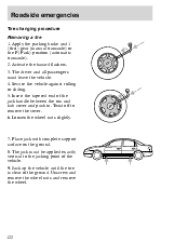
Apply the parking brake and 1 (first) gear (manual transaxle) or the P (Park) position (automatic transaxle). 2. Activate the hazard flashers. 3. Loosen the wheel nuts slightly. 7. The jack must leave the vehicle. 4. Jack up the vehicle until the tire is clear of the jack handle between the rim and .... 9. Roadside emergencies Tire changing procedure Removing a tire 1. Insert the tapered end of the ground. Secure the vehicle against rolling or sliding. 5. Unscrew and remove the wheel nuts and remove the wheel. 122 Place jack with complete support surface on the ground. 8.
Apply the parking brake and 1 (first) gear (manual transaxle) or the P (Park) position (automatic transaxle). 2. Activate the hazard flashers. 3. Loosen the wheel nuts slightly. 7. The jack must leave the vehicle. 4. Jack up the vehicle until the tire is clear of the jack handle between the rim and .... 9. Roadside emergencies Tire changing procedure Removing a tire 1. Insert the tapered end of the ground. Secure the vehicle against rolling or sliding. 5. Unscrew and remove the wheel nuts and remove the wheel. 122 Place jack with complete support surface on the ground. 8.
Owner's Manual
Page 123
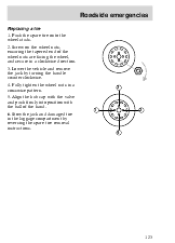
Push the spare tire onto the wheel studs. 2. Screw on the wheel nuts, ensuring the tapered end of the hand. 6. Align the hub cap with the valve and push firmly into position with the ball of the wheel nuts are facing the wheel, and secure in a crosswise pattern. 5. Roadside emergencies Replacing a tire 1. Fully tighten the wheel nuts in a clockwise direction. 3. Lower the vehicle and remove the jack by reversing the spare tire removal instructions. 3 1 2 4 123 Stow the jack and damaged tire in the luggage compartment by turning the handle counterclockwise. 4.
Push the spare tire onto the wheel studs. 2. Screw on the wheel nuts, ensuring the tapered end of the hand. 6. Align the hub cap with the valve and push firmly into position with the ball of the wheel nuts are facing the wheel, and secure in a crosswise pattern. 5. Roadside emergencies Replacing a tire 1. Fully tighten the wheel nuts in a clockwise direction. 3. Lower the vehicle and remove the jack by reversing the spare tire removal instructions. 3 1 2 4 123 Stow the jack and damaged tire in the luggage compartment by turning the handle counterclockwise. 4.
Owner's Manual
Page 127
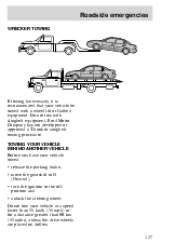
... have your vehicle at a speed faster than 55 km/h (35 mph) or for a distance greater than 80 km (55 miles) unless the drive wheels are placed on dollies. 127 Do not tow your vehicle towed: • release the parking brake, • move the gearshift to N (Neutral), ...• turn the ignition to the off position and • unlock the steering wheel. Ford Motor Company has not developed or approved a T-hook or slingbelt towing procedure. Roadside emergencies WRECKER TOWING If towing is necessary, it is recommended that your...
... have your vehicle at a speed faster than 55 km/h (35 mph) or for a distance greater than 80 km (55 miles) unless the drive wheels are placed on dollies. 127 Do not tow your vehicle towed: • release the parking brake, • move the gearshift to N (Neutral), ...• turn the ignition to the off position and • unlock the steering wheel. Ford Motor Company has not developed or approved a T-hook or slingbelt towing procedure. Roadside emergencies WRECKER TOWING If towing is necessary, it is recommended that your...
Owner's Manual
Page 130
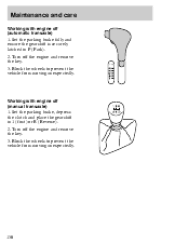
Block the wheels to prevent the vehicle from moving unexpectedly. 130 Turn off the engine and remove the key. 3. Set the parking brake fully and ensure the gearshift is securely latched in 1 (first) or R (Reverse). 2. Maintenance and care Working with engine off (manual transaxle) 1. Working with engine off (automatic transaxle) 1. Turn off the engine and remove the key. 3. Set the parking brake, depress the clutch and place the gearshift in P (Park). 2. Block the wheels to prevent the vehicle from moving unexpectedly.
Block the wheels to prevent the vehicle from moving unexpectedly. 130 Turn off the engine and remove the key. 3. Set the parking brake fully and ensure the gearshift is securely latched in 1 (first) or R (Reverse). 2. Maintenance and care Working with engine off (manual transaxle) 1. Working with engine off (automatic transaxle) 1. Turn off the engine and remove the key. 3. Set the parking brake, depress the clutch and place the gearshift in P (Park). 2. Block the wheels to prevent the vehicle from moving unexpectedly.
Owner's Manual
Page 131
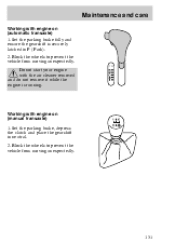
Do not start your engine with engine on (manual transaxle) 1. Block the wheels to prevent the vehicle from moving unexpectedly. 131 Set the parking brake fully and ensure the gearshift is running. Block the wheels to prevent the vehicle from moving unexpectedly. Set the parking brake, depress the clutch and place the gearshift in P (Park). 2. Maintenance and care Working with the air cleaner removed and do not remove it while the engine is securely latched in neutral. 2. Working with engine on (automatic transaxle) 1.
Do not start your engine with engine on (manual transaxle) 1. Block the wheels to prevent the vehicle from moving unexpectedly. 131 Set the parking brake fully and ensure the gearshift is running. Block the wheels to prevent the vehicle from moving unexpectedly. Set the parking brake, depress the clutch and place the gearshift in P (Park). 2. Maintenance and care Working with the air cleaner removed and do not remove it while the engine is securely latched in neutral. 2. Working with engine on (automatic transaxle) 1.
Owner's Manual
Page 154
... life, and excess temperature can cause heat buildup and possible tire failure. 154 Grades B and A represent higher levels of performance on a specified indoor laboratory test wheel. The grade C corresponds to a level of the tire to sudden tire failure. Sustained high temperature can cause the material of performance which all passenger cars...
... life, and excess temperature can cause heat buildup and possible tire failure. 154 Grades B and A represent higher levels of performance on a specified indoor laboratory test wheel. The grade C corresponds to a level of the tire to sudden tire failure. Sustained high temperature can cause the material of performance which all passenger cars...
Owner's Manual
Page 157
Refer to the Safety Compliance Certification label to determine the specific size tire and wheel Ford Motor Company recommends for your vehicle, consult your dealer or a qualified service technician to ensure that the correct tire type is used. 157 When purchasing replacement tires for use on this vehicle. Maintenance and care Dispose of worn tires in accordance with local environmental regulations.
Refer to the Safety Compliance Certification label to determine the specific size tire and wheel Ford Motor Company recommends for your vehicle, consult your dealer or a qualified service technician to ensure that the correct tire type is used. 157 When purchasing replacement tires for use on this vehicle. Maintenance and care Dispose of worn tires in accordance with local environmental regulations.

Owner's Manual
Page 181
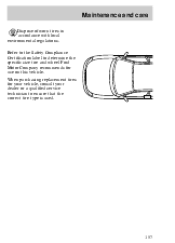
Cleaning the wheels Wash the wheels with touch-up paint, paint repair foil or aerosol spray from road debris may be repaired with the same detergent you use to remove grease and tar. 181 Never use acid-based wheel cleaners, steel wool, fuel or strong detergents. Do not use abrasives that will damage the finish of your vehicle. Use a tar remover to clean the body of special wheel surfaces. Observe the application instructions on the products. Maintenance and care Repairing paint chips Minor scratches or paint damage from the Ford accessories line.
Cleaning the wheels Wash the wheels with touch-up paint, paint repair foil or aerosol spray from road debris may be repaired with the same detergent you use to remove grease and tar. 181 Never use acid-based wheel cleaners, steel wool, fuel or strong detergents. Do not use abrasives that will damage the finish of your vehicle. Use a tar remover to clean the body of special wheel surfaces. Observe the application instructions on the products. Maintenance and care Repairing paint chips Minor scratches or paint damage from the Ford accessories line.
Owner's Manual
Page 194
... ...13 Circuit breakers ...112 Cleaning your vehicle engine compartment ...182 exterior lamps ...183 fabric ...184 instrument panel ...184 plastic exterior parts ...183 safety belts ...185 wheels ...181 wiper blades ...183 Climate control system air conditioning ...24 controlling airflow ...23 defrosting ...26 temperature ...23 vents ...22 Clock ...21 Clutch operation ...96 recommended...
... ...13 Circuit breakers ...112 Cleaning your vehicle engine compartment ...182 exterior lamps ...183 fabric ...184 instrument panel ...184 plastic exterior parts ...183 safety belts ...185 wheels ...181 wiper blades ...183 Climate control system air conditioning ...24 controlling airflow ...23 defrosting ...26 temperature ...23 vents ...22 Clock ...21 Clutch operation ...96 recommended...
Owner's Manual
Page 198
... turn speed control on ...32 Speedometer ...15 Starting your vehicle preparing to start the vehicle . .82 starting the engine ...85 Steering column controls ...27 Steering wheel horn ...29 speed control ...32 tilting ...28 Sunroof ...36 Supplemental restraint system ...13, 58 T Tachometer ...14 Tail lamps (see Rear lamps) Temperature control (see Climate...
... turn speed control on ...32 Speedometer ...15 Starting your vehicle preparing to start the vehicle . .82 starting the engine ...85 Steering column controls ...27 Steering wheel horn ...29 speed control ...32 tilting ...28 Sunroof ...36 Supplemental restraint system ...13, 58 T Tachometer ...14 Tail lamps (see Rear lamps) Temperature control (see Climate...


