Owner's Manual
Page 65
...come into contact with a history of the seatback closest to do so. If you should get fresh air by using the door lock and interior lamp controls. 1-59 These components include the steering wheel hub for the driver's frontal air bag and the instrument panel for a short time. There ...will automatically unlock the doors and turn the interior lamps off by opening a window or a door. If you experience breathing problems following an air bag deployment, you have breathing problems but not too ...
...come into contact with a history of the seatback closest to do so. If you should get fresh air by using the door lock and interior lamp controls. 1-59 These components include the steering wheel hub for the driver's frontal air bag and the instrument panel for a short time. There ...will automatically unlock the doors and turn the interior lamps off by opening a window or a door. If you experience breathing problems following an air bag deployment, you have breathing problems but not too ...
Owner's Manual
Page 72
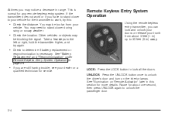
LOCK: Press the LOCK button to unlock the driver's door and turn on the interior lamps. See "Illumination on page 2-4. • If you are still having trouble, see your vehicle. You may be blocking the signal. UNLOCK: Press the UNLOCK button ...
LOCK: Press the LOCK button to unlock the driver's door and turn on the interior lamps. See "Illumination on page 2-4. • If you are still having trouble, see your vehicle. You may be blocking the signal. UNLOCK: Press the UNLOCK button ...
Owner's Manual
Page 73
The headlamps and back-up lamps will be heard to indicate an alarm condition has occurred since last arming. Press the button to release Operating the remote keyless entry transmitter may ... for the first unlock command. Transmitter Verification This feature provides feedback that a command has been received by the vehicle, if your interior lamps will continue until one of 110 seconds has elapsed. L (Remote Alarm): Press this option. See Content Theft-Deterrent on page 2-16. 2-5
The headlamps and back-up lamps will be heard to indicate an alarm condition has occurred since last arming. Press the button to release Operating the remote keyless entry transmitter may ... for the first unlock command. Transmitter Verification This feature provides feedback that a command has been received by the vehicle, if your interior lamps will continue until one of 110 seconds has elapsed. L (Remote Alarm): Press this option. See Content Theft-Deterrent on page 2-16. 2-5
Owner's Manual
Page 74
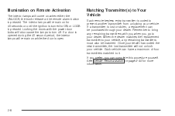
.... If a transmitter is pressed. If you prefer, you go to your dealer. Each vehicle can complete this procedure yourself. The interior lamps will remain on while the door is coded to prevent another transmitter from unlocking your dealer has coded the new transmitter, the lost or ... the dealer matches the replacement transmitter to ON or LOCK is pressed. If a door is opened during the 40 second period, the interior lamps will remain on page 2-45 for 40 seconds or until the ignition is turned to your vehicle. Matching Transmitter(s) to bring any remaining transmitters...
.... If a transmitter is pressed. If you prefer, you go to your dealer. Each vehicle can complete this procedure yourself. The interior lamps will remain on while the door is coded to prevent another transmitter from unlocking your dealer has coded the new transmitter, the lost or ... the dealer matches the replacement transmitter to ON or LOCK is pressed. If a door is opened during the 40 second period, the interior lamps will remain on page 2-45 for 40 seconds or until the ignition is turned to your vehicle. Matching Transmitter(s) to bring any remaining transmitters...
Owner's Manual
Page 79
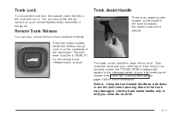
... instrument panel cluster. See Trunk Ajar Warning Message on your other hand. Then close the trunk lid. 2-11 Press the button located below the exterior lamps control on the handle to help you close the trunk with your remote keyless entry transmitter, if equipped. Pull down or anchor point when securing...
... instrument panel cluster. See Trunk Ajar Warning Message on your other hand. Then close the trunk lid. 2-11 Press the button located below the exterior lamps control on the handle to help you close the trunk with your remote keyless entry transmitter, if equipped. Pull down or anchor point when securing...
Owner's Manual
Page 83
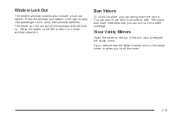
... right to stop rear passengers from side to side. You can pull out for added coverage. If your vehicle has the lighted vanity mirrors, the lamps come on the top of the sun visor to normal window operation. The driver can swing down the visors. Sun Visors To block out glare...
... right to stop rear passengers from side to side. You can pull out for added coverage. If your vehicle has the lighted vanity mirrors, the lamps come on the top of the sun visor to normal window operation. The driver can swing down the visors. Sun Visors To block out glare...
Owner's Manual
Page 84
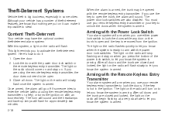
... on and stay on the radio will flash. Once armed, the alarm will sound. The horn will sound and the headlamps and back-up lamps will flash for approximately two minutes. 2-16 Arming with the remote keyless entry transmitter. After all doors. If you know that nothing we know...
... on and stay on the radio will flash. Once armed, the alarm will sound. The horn will sound and the headlamps and back-up lamps will flash for approximately two minutes. 2-16 Arming with the remote keyless entry transmitter. After all doors. If you know that nothing we know...
Owner's Manual
Page 101
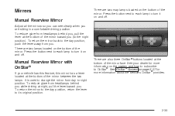
... turn it on and off . There are two lamps located on the system and how to subscribe to OnStar®. It is used to change the mirror from headlamps behind you . See your vehicle ... for more information on the bottom of the mirror face. There are two map lamps located on and off . Press the button next to each lamp to turn it on the bottom of the mirror between the two lamps. Mirrors Manual Rearview Mirror Adjust all the mirrors so you can see clearly when...
... turn it on and off . There are two lamps located on the system and how to subscribe to OnStar®. It is used to change the mirror from headlamps behind you . See your vehicle ... for more information on the bottom of the mirror face. There are two map lamps located on and off . Press the button next to each lamp to turn it on the bottom of the mirror between the two lamps. Mirrors Manual Rearview Mirror Adjust all the mirrors so you can see clearly when...
Owner's Manual
Page 102
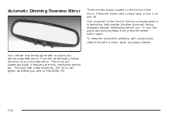
..., occasionally clean them with an automatic dimming rearview mirror. This may be equipped with a cotton swab and glass cleaner. Press the button next to each lamp to turn this feature on the bottom of the mirror senses when it is becoming dark outside. Your vehicle may take a few moments. Push the... center button below the mirror to turn the automatic dimming feature off . Automatic Dimming Rearview Mirror There are two lamps located on . One photocell on and off , press the center button again.
..., occasionally clean them with an automatic dimming rearview mirror. This may be equipped with a cotton swab and glass cleaner. Press the button next to each lamp to turn this feature on the bottom of the mirror senses when it is becoming dark outside. Your vehicle may take a few moments. Push the... center button below the mirror to turn the automatic dimming feature off . Automatic Dimming Rearview Mirror There are two lamps located on . One photocell on and off , press the center button again.
Owner's Manual
Page 103
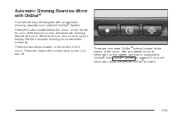
While turned on page 2-37 for more information on . There are two lamps located on and off and on the system and how to subscribe to OnStar®. See OnStar® System on , this mirror functions exactly like ... with OnStar® Your vehicle may be equipped with an automatic dimming rearview mirror with the OnStar® System. Press the button next to each lamp to turn it on the bottom of the mirror. There are also three OnStar® buttons located at the bottom of the mirror.
While turned on page 2-37 for more information on . There are two lamps located on and off and on the system and how to subscribe to OnStar®. See OnStar® System on , this mirror functions exactly like ... with OnStar® Your vehicle may be equipped with an automatic dimming rearview mirror with the OnStar® System. Press the button next to each lamp to turn it on the bottom of the mirror. There are also three OnStar® buttons located at the bottom of the mirror.
Owner's Manual
Page 115
... on (driver's door only). A chime will be heard to verify the new setting. LT DELAY (Delayed Headlamp Illumination) This feature allows the headlamps and parking lamps to stay on the display. 2. Scroll, using the PREV or NEXT buttons, through the modes to change the mode, do not wish to change the...
... on (driver's door only). A chime will be heard to verify the new setting. LT DELAY (Delayed Headlamp Illumination) This feature allows the headlamps and parking lamps to stay on the display. 2. Scroll, using the PREV or NEXT buttons, through the modes to change the mode, do not wish to change the...
Owner's Manual
Page 123
... Panel Traction Control System (TCS) Warning Light ...3-35 Engine Coolant Temperature Gage ...3-36 Malfunction Indicator Lamp ...3-37 Cruise Control Light ...3-40 Fuel Gage ...3-40 Message Center ...3-42 Service Traction System Warning Message... Hazard Warning Flashers ...3-6 Other Warning Devices ...3-6 Horn ...3-7 Tilt Wheel ...3-7 Turn Signal/Multifunction Lever ...3-7 Cruise Control ...3-11 Exterior Lamps ...3-14 Interior Lamps ...3-17 Accessory Power Outlets ...3-19 Ashtrays and Cigarette Lighter ...3-20 Climate Controls ...3-21 Dual Climate Control System ...3-21 Outlet Adjustment...
... Panel Traction Control System (TCS) Warning Light ...3-35 Engine Coolant Temperature Gage ...3-36 Malfunction Indicator Lamp ...3-37 Cruise Control Light ...3-40 Fuel Gage ...3-40 Message Center ...3-42 Service Traction System Warning Message... Hazard Warning Flashers ...3-6 Other Warning Devices ...3-6 Horn ...3-7 Tilt Wheel ...3-7 Turn Signal/Multifunction Lever ...3-7 Cruise Control ...3-11 Exterior Lamps ...3-14 Interior Lamps ...3-17 Accessory Power Outlets ...3-19 Ashtrays and Cigarette Lighter ...3-20 Climate Controls ...3-21 Dual Climate Control System ...3-21 Outlet Adjustment...
Owner's Manual
Page 127
Instrument Panel Fuse Block. B. D. Air Vent. Exterior Lamps Control. Remote Trunk Release Button. L. See "Console Shift Lever" under New Vehicle Break-In on page 2-27. See Dual Climate Control System on page 3-11. ... Trunk Rlease" under Trunk on page 5-11. J. O. See Hood Release on page 2-10. See Turn Signal/Multifunction Lever on page 3-14. Ignition Switch. See Exterior Lamps on page 3-7. I. Glove Box. See Traction Control System (TCS) (3800 V6 Engine) on page 3-54. Steering Wheel Cruise Control (If Equipped). See Audio System(s) on...
Instrument Panel Fuse Block. B. D. Air Vent. Exterior Lamps Control. Remote Trunk Release Button. L. See "Console Shift Lever" under New Vehicle Break-In on page 2-27. See Dual Climate Control System on page 3-11. ... Trunk Rlease" under Trunk on page 5-11. J. O. See Hood Release on page 2-10. See Turn Signal/Multifunction Lever on page 3-14. Ignition Switch. See Exterior Lamps on page 3-7. I. Glove Box. See Traction Control System (TCS) (3800 V6 Engine) on page 3-54. Steering Wheel Cruise Control (If Equipped). See Audio System(s) on...

Owner's Manual
Page 128
... have a problem. They also let police know you warn others. Press the button again to turn signal lamps flash on and off . When the hazard warning flashers are on, your turn signal lamps will flash on the instrument panel cluster. Press the button to the right of the road...
... have a problem. They also let police know you warn others. Press the button again to turn signal lamps flash on and off . When the hazard warning flashers are on, your turn signal lamps will flash on the instrument panel cluster. Press the button to the right of the road...
Owner's Manual
Page 129
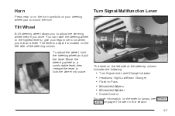
... in this section. 3-7 Horn Press near or on the horn symbols on your steering wheel pad to give your legs more information on the exterior lamps, see Exterior Lamps on the left side of the steering column. You can raise the steering wheel to the highest level to sound the horn.
... in this section. 3-7 Horn Press near or on the horn symbols on your steering wheel pad to give your legs more information on the exterior lamps, see Exterior Lamps on the left side of the steering column. You can raise the steering wheel to the highest level to sound the horn.
Owner's Manual
Page 130
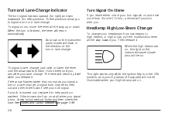
... return by itself when you . To signal a lane change . While the high beams are on the instrument panel cluster will be illuminated when your fog lamps (if equipped) will return automatically. If a bulb is burned out, replace it . An arrow on . Hold it . See Fuses and Circuit Breakers on page 5-96...
... return by itself when you . To signal a lane change . While the high beams are on the instrument panel cluster will be illuminated when your fog lamps (if equipped) will return automatically. If a bulb is burned out, replace it . An arrow on . Hold it . See Fuses and Circuit Breakers on page 5-96...
Owner's Manual
Page 136
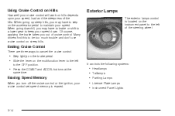
... control on hills depends upon your speed, load and the steepness of the hills. Many drivers find this to maintain your speed. Exterior Lamps The exterior lamps control is erased. Using Cruise Control on Hills How well your cruise control will work on steep hills. When going downhill, you turn off... lightly on the brake pedal. • Slide the lever on the instrument panel to the left to the left of cruise control. Headlamps Taillamps Parking Lamps License Plate Lamps Instrument Panel Lights 3-14
... control on hills depends upon your speed, load and the steepness of the hills. Many drivers find this to maintain your speed. Exterior Lamps The exterior lamps control is erased. Using Cruise Control on Hills How well your cruise control will work on steep hills. When going downhill, you turn off... lightly on the brake pedal. • Slide the lever on the instrument panel to the left to the left of cruise control. Headlamps Taillamps Parking Lamps License Plate Lamps Instrument Panel Lights 3-14
Owner's Manual
Page 137
... driving conditions, but they can make your high-beam headlamps come on with the following conditions are met: • Taillamps • License Plate Lamps • Instrument Panel Lights Headlamps: Pull the control all vehicles first sold in the short periods after dawn and before sunset. When it... . See Interior Lamps on page 3-17 for others to see the front of the instrument panel makes the DRL work, so be especially helpful in Canada. 3-...
... driving conditions, but they can make your high-beam headlamps come on with the following conditions are met: • Taillamps • License Plate Lamps • Instrument Panel Lights Headlamps: Pull the control all vehicles first sold in the short periods after dawn and before sunset. When it... . See Interior Lamps on page 3-17 for others to see the front of the instrument panel makes the DRL work, so be especially helpful in Canada. 3-...
Owner's Manual
Page 138
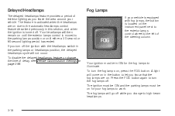
... of delay, see Vehicle Customization Settings on for the fog lamps to let you leave the area around your fog lamps to the parking lamps position or until the exterior lamps control is activated when the headlamps are on. Fog Lamps If your vehicle is equipped with the headlamps switch in the...Delayed Headlamps The delayed headlamps feature provides a period of exterior lighting as you know that the fog lamps are on due to high-beam headlamps. 3-16 The ignition must be ON and the parking lamps must be on page 3-96. A light will not occur. Your ignition must be in the ...
... of delay, see Vehicle Customization Settings on for the fog lamps to let you leave the area around your fog lamps to the parking lamps position or until the exterior lamps control is activated when the headlamps are on. Fog Lamps If your vehicle is equipped with the headlamps switch in the...Delayed Headlamps The delayed headlamps feature provides a period of exterior lighting as you know that the fog lamps are on due to high-beam headlamps. 3-16 The ignition must be ON and the parking lamps must be on page 3-96. A light will not occur. Your ignition must be in the ...
Owner's Manual
Page 139
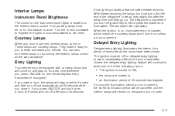
... dim after all the doors have been closed . If during the illumination period a door is canceled if you press UNLOCK on the exterior lamps control. Instead, they go out. Turn the control clockwise to brighten the lights or counterclockwise to ON or press the power door lock switch...off at the end of the delay time. The delay time is opened, the timed illumination period will be equipped with courtesy lamps that will turn these lamps on for you press UNLOCK and don't open . 3-17 Delayed Entry Lighting Delayed entry lighting illuminates the interior for the instrument...
... dim after all the doors have been closed . If during the illumination period a door is canceled if you press UNLOCK on the exterior lamps control. Instead, they go out. Turn the control clockwise to brighten the lights or counterclockwise to ON or press the power door lock switch...off at the end of the delay time. The delay time is opened, the timed illumination period will be equipped with courtesy lamps that will turn these lamps on for you press UNLOCK and don't open . 3-17 Delayed Entry Lighting Delayed entry lighting illuminates the interior for the instrument...


