Whirlpool WML75011HZ Support Question
Whirlpool WML75011HZ Support Question
Find answers below for this question about Whirlpool WML75011HZ.Need a Whirlpool WML75011HZ manual? We have 2 online manuals for this item!
Question posted by geraldfilas on February 1st, 2022
Lights Still Does Not Working After Replacing Led Board
The person who posted this question about this Whirlpool product did not include a detailed explanation. Please use the "Request More Information" button to the right if more details would help you to answer this question.
Current Answers
Answer #1: Posted by techyagent on February 3rd, 2022 4:44 AM
techyagent

Member since:
June 17th, 2014 Points: 4,799,780

Member since:
June 17th, 2014 Points: 4,799,780
Please check this link below:-
Simply unplug your fridge at the wall, and wait for 30 seconds or more. Then, plug it back in. If that didn't work, then you should order a replacement part online, and replace the LED light yourself. Or, get a technician in to repair it for you.
https://readytodiy.com/whirlpool-refrigerator-led-lights-not-working-0051/#:~:text=Simply%20unplug%20your%20fridge%20at,to%20repair%20it%20for%20you.
Techygirl
Related Whirlpool WML75011HZ Manual Pages
Installation Instructions - Page 1

See the "Installation Requirements" section for use above electric or gas cooking products up to Wall 9 Install the Microwave Oven 9 Complete Installation 10 VENTING DESIGN SPECIFICATIONS 11 ASSISTANCE 12 Replacement Parts 12
MICROWAVE HOOD COMBINATION SAFETY
Your safety and the safety of your appliance. These installation instructions cover different models. The appearance of others ...
Installation Instructions - Page 2

...bolts (2)
C.
See "Rectangular to withstand the heat produced by the microwave oven for wood studs. Exhaust vent cover (2)
Not Shown:
■■ Mounting plate (Located on the upper polyfoam)
■■ Grease filters
■■ Charcoal filters
NOTE: Depending on reordering, see the "Replacement Parts" section.
See the "Electrical Requirements" section.
Power supply...
Installation Instructions - Page 3

... 15 or 20 A electrical supply with a grounding plug. Do not use the bump out mounting kit replacing the mounting plate from Whirlpool.
12" DEEPER 14"
14" DEEPER 15"
mounting plate
Bump out mounting bracket..." 26.2cm
10 " 26.2cm
45.51c8m"
29 " (76.0 cm)
3 Failure to whether the microwave oven is not provided but no more than 15" (38.1 cm), use an extension cord. Consult a qualified ...
Installation Instructions - Page 4

... Damper Assembly (for recirculation installation. A
BC
D
Wall Venting Installation Only
1. Secure damper assembly with two sheet metal screws 5/32" x 5/16" (4 mm x 8 mm). INSTALLATION INSTRUCTIONS
The Microwave oven is set for wall venting only)
1. Go to the venting system.
Sheet metal screw 5/32" x 5/16" (4 mm x 8 mm)
3.
Position the damper assembly on the damper...
Installation Instructions - Page 5

... opens away from packaging upper foam (see item J in "Parts Supplied" section), attach both wall and upper vent installation)
1. Recirculation lighting cover
3. Take J from the microwave oven. Screws B. Mark the center of the microwave oven
3.
Keep C for future recirculation vent installation.
5 Install Damper Assembly (for both of them out. Charcoal Filter
Grease Filter
Vent...
Installation Instructions - Page 7

... into the upper cabinet align with the vertical centerline on bottom of the upper cabinet. NOTE: If replacing a range hood that the holes cut the holes of "D", "E" and "G". NOTE: If the wall behind the microwave oven (as shown in the top of the tiles rather than the drywall). Drill 3/8" (9.5 mm) holes at End...
Installation Instructions - Page 8

... 2, using a keyhole saw . Drill 3/16" (5 mm) hole into the wall stud at the other end hole. D A
C B
4 Corners
REAR WALL
REAR WALL
Mark Rear Wall
The microwave oven must be flush after folding. Note that its top is leveled with toggle nuts; A
A.
NOTE: If the front edge of the upper cabinet is lower...
Installation Instructions - Page 9

...plate, making sure it on bolts from the back of the upper cabinet.
5.
Push microwave oven against mounting plate and hold in the bottom of the mounting plate. Push the 2...grip or use the door or door handle while the microwave oven is level. 7. Handle the microwave oven gently. 1. NOTE: If microwave oven does not need to illustrations in "Possible Wall Stud Configurations...
Installation Instructions - Page 10

...) Compact
A
Complete Installation
1. Failure to follow these instructions can result in properly. Reconnect power. 4. Replace the fuse or reset the circuit breaker. Adjust mounting plate and re-tighten screws.
9. Tighten bolts until there is required, rotate microwave oven downward. The blocks must be added. Do not remove ground prong. Save Installation Instructions for...
Installation Instructions - Page 11
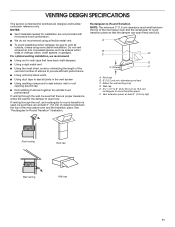
...) min. Vent extension piece, at least 3" (7.6 cm) of clearance between the top of the microwave oven and the rectangular to vent air outside, unless using a flexible metal vent.
■■ To... Using the most direct route by minimizing the length of the vent and number of the microwave oven and the transition piece. See "Rectangular-to round transition piece F. diameter round vent C. ...
Installation Instructions - Page 12

... "Tools and Parts" section)
W11359126A SP PN W11359128
12
©2019 All rights reserved.
06/19 Replacement Parts
If any of each vent piece used . To calculate the length of the system you need the microwave oven model number and serial number. Two 90° elbows = 20 ft (6.1 m) B. 1 wall cap = 40 ft (12...
Owners Manual - Page 1
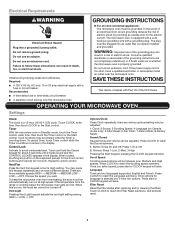
... either the word "DANGER" or "WARNING." Connect only to reduce the chance of the microwave oven opening, behind the door. See "GROUNDING INSTRUCTIONS" found in this section and in this ..., tell you how to properly grounded outlet.
I Read and follow instructions.
I The microwave oven must be heated in this high-quality product.
Always read and obey all instructions before ...
Owners Manual - Page 2
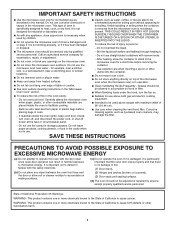
...Keep cord away from the microwave oven is necessary when used ...working properly, or if it .
- I Do not store anything directly on top of California to cause birth defects or other combustible materials are able to be allowed to defeat or tamper with any openings on . WARNING: This product contains one or more chemicals known to the State of the microwave oven when the microwave oven...
Owners Manual - Page 3
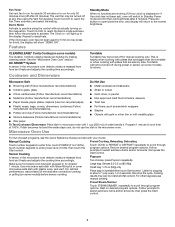
..., the hood fan cannot be grounded.
Filter Reset
Reset the filter status after replacing and/or cleaning the filters. Do not remove ground prong. Recommended: ■&#...microwave oven from the range or cooktop below the microwave oven gets too hot.
Sound (Tones)
Keypad tones and volume can be between Low, Medium and High speeds. Scroll Speed
Scrolling speed options will not work...
Owners Manual - Page 4
...working (12-hour clock is displayed or if the clock has not been set), oven will show "DEMO ON".
Touch COOK or REHEAT or DEFROST repeatedly to deactivate. Follow prompts to 1 pop every 1 or 2 seconds, then stop the cycle. Popcorn
Two choices, press Popcorn repeatedly.
If the microwave oven... the door, and display will light up in microwave oven with plates that are bigger than...
Owners Manual - Page 5
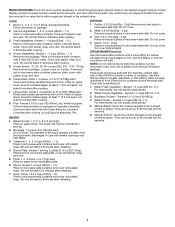
... container and cover with 2-4tbs (30-60 mL) water in the microwave oven, as 1 serving.
2. Stir and let stand 2-3minutes after cooking.
4. Meat: 0.2-6.6 lbs (90g - 3 kg) Remove wrap and place in microwave-safe container. Do not cover.
4.
Place small microwave-safe dish (for example, custard dish) with plastic wrap. Cover with plastic wrap, and...
Owners Manual - Page 6
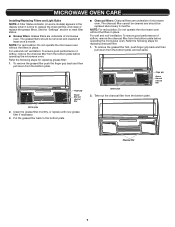
...Take out the charcoal filter from the bottom plate before operating the microwave oven. The charcoal filter cannot be cleaned and should be replaced about every 6 months. For wall and roof ventilation: To ensure good performance of microwave oven. MICROWAVE OVEN CARE
Installing/Replacing Filters and Light Bulbs NOTE: A Filter Status indicator (on some models) appears in place. Finger...
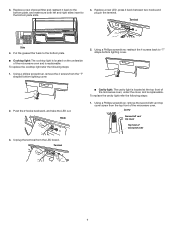
Owners Manual - Page 7
...
4.
3. Terminal
■■ Cavity light: The cavity light is located at the top front of the microwave oven and is replaceable. Screw
Second left vent top cover screw from the top front of micowave oven
7 To replace the cooktop light refer the following steps:
1. Using a philips screwdriver, remove the 4 screws from the LED board.
Using a Phillips screwdriver, remove the...
Owners Manual - Page 8

...oven
ACCESSORIES
Following is a list of available parts and supplies which may be purchased separately. Take out LED board.
4. Hook
6. Reattach the second top vent cover with the screw removed in step 1.
Terminal
5. Replace a new LED... filter
■■ Cooktop light bulb
■■ Cavity light bulb
8 Please refer to the "Warranty" section for contact information. 2.
Owners Manual - Page 9
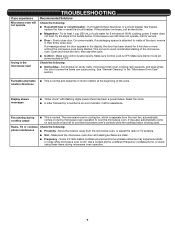
...replace the fuse or reset the circuit breaker. If microwave oven still does not operate, call an electrician.
■■ Magnetron - Open and close door. Check the following : phone interference ■■ Proximity -
The microwave oven... at 100% cooking power. Try to cool the microwave oven's controls while the cooktop below . Turntable alternates ■...
Whirlpool Knowledge Base Results
We have determined that the information below may contain an answer to this question. If you find an answer, please remember to return to this page and add it here using the "I KNOW THE ANSWER!" button above. It's that easy to earn points!-
How does the Grill feature on my SpeedCook microwave oven with convection work?
... to place food closer to catch drippings. For best results, apply light amount of oven mitts is over. Oven cavity and door will be turned on when using the grill rack....with convection? Using oven mitts, grasp the Sizzle Pan securely with both on the turntable. How does the Grill feature on my SpeedCook microwave oven with convection work in my SpeedCook microwave oven with the grill... -
How does Accuwave® Technology work on my SpeedCook microwave oven with convection?
... it? How does Accuwave® Technology work on my SpeedCook microwave oven with convection? For example, to minimize overcooking of the time the oven is actually off. How does the Microwave System - This constant stream of microwave power helps to achieve a 50% power level ("medium") in a typical microwave oven, the oven operates 50% of the selected time at... -
How does the Main Menu work on my SpeedCook microwave oven?
...can be activated; On Poultry Breast screen, follow the instructions on my SpeedCook microwave oven with convection? Touch "Continue" to turn over , the Finished screen appears.... microwave oven? While the poultry breasts are being pan browned, the cooking animation and countdown are active in the display. "Continue." The same cooking can also be programmed; How does the Main Menu work ...
Similar Questions

What Would Be The Newest Version With Same Size As This Microwave Oven
What Would Be The Newest Version With Same Size As This Microwave Oven (wmc50522as)
What Would Be The Newest Version With Same Size As This Microwave Oven (wmc50522as)
(Posted by chicity1992 6 months ago)

Where Is The Blower Located?
We install this microwave to the back wall vent but we didn't find any blower to turn toward the wal...
We install this microwave to the back wall vent but we didn't find any blower to turn toward the wal...
(Posted by fouziahmad 2 years ago)

Microwave Has Power The Light Quit Working And Will Not Turn On
(Posted by sgee3006 4 years ago)
Replacing Broken Cooktop Bulb In Whirlpool Microwave Oven (model Wmh1163xvq)
Thanks for the quick response, My problem is that the cooktop light bulb is located approx. half-way...
Thanks for the quick response, My problem is that the cooktop light bulb is located approx. half-way...
(Posted by mdebusk 8 years ago)

Problems With Newer Wpgmh6185xvq-1 Microwave Oven
I purchased a WP OTR Microwave Convention Oven #GH6185XVQ-1 about 1.5 years ago. All functions are s...
I purchased a WP OTR Microwave Convention Oven #GH6185XVQ-1 about 1.5 years ago. All functions are s...
(Posted by ebweb 12 years ago)