Whirlpool WED5500XW Support Question
Whirlpool WED5500XW Support Question
Find answers below for this question about Whirlpool WED5500XW.Need a Whirlpool WED5500XW manual? We have 4 online manuals for this item!
Question posted by Anonymous-164626 on May 15th, 2018
Dry
my place don't have a three opt-out let it is a four out lite. We're can I go get a four out lite cord
Current Answers
Related Whirlpool WED5500XW Manual Pages
Installation Instructions - Page 4

...dryer.
Large opening hamper door
*Most installations require a minimum 5½" (140 mm) clearance behind the dryer for the exhaust vent with vents
*Additional spacing recommended
3"* (76 mm)
Mobile home - Drying...The dimensions shown following are using power supply cord, a grounded electrical outlet located within 2 ft. (610 mm) of either side of the dryer in .2*
(310 cm ) 2
3"*...
Installation Instructions - Page 6

... diamond marking is close to finish turning legs until it is no longer visible. place under entire back edge of cardboard from dryer carton; Screw legs into leg holes by hand, use a large flat piece of dryer.
Now stand the dryer on cardboard.
6 Leave enough room for leveling legs
Examine leveling legs, find diamond...
Installation Instructions - Page 8
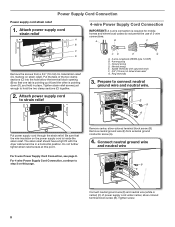
Tighten strain relief screws just enough to strain relief
4-wire Power Supply Cord Connection
IMPORTANT: A 4-wire connection is inside the strain relief. Spade terminals with the dryer cabinet and be in place.
Ring terminals
3. Be sure that one tab is pointing up (A) and the other is pointing down (D), and hold the two clamp sections...
Installation Instructions - Page 10
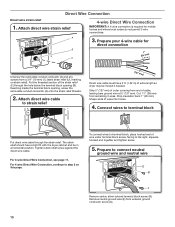
... to the right, squeeze hooked end together and tighten screw.
5. Prepare to terminal block, place hooked end of wires into hooks.
4.
Shape ends of wire under terminal block screw, facing..."mm)
C
Unscrew the removable conduit connector (A) and any screws from end of extra length so dryer may be in a horizontal position. Put the threaded section of outer covering from a 3/4" (19...
Installation Instructions - Page 11
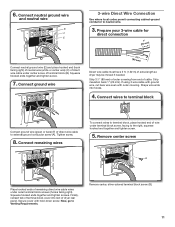
...hold-down screw. Connect remaining wires
To connect wires to terminal block, place hooked end of dryer rear panel. Squeeze hooked ends together and tighten screws. Remove center, ... Tighten screw.
8. Now, go to external ground conductor screw (A). Remove center screw
B
Place hooked ends of direct wire cable to Venting Requirements.
Squeeze hooked ends together and tighten screw...
Installation Instructions - Page 12
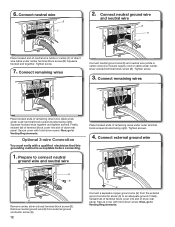
... terminal block screw (B). Tighten screw.
3. Connect remaining wires
Place hooked ends of power supply cord or cable under outer terminal block screws (hooks facing right...conductor screw (A) to Venting Requirements. Now, go to connect neutral
ground wire and neutral wire
Place hooked ends of dryer rear panel. Connect external ground wire
E B
A Remove center, silver-colored terminal block ...
Installation Instructions - Page 13

...(102 mm) heavy metal exhaust vent and clamps may be fully extended and supported in final dryer location. ■■ Remove excess to seal all governing codes and ordinances. Review Vent system.... Failure to follow these instructions can cause moisture and lint to achieve best drying performance. Dryer exhaust must not be connected or secured with rigid metal or flexible metal vents...
Installation Instructions - Page 15
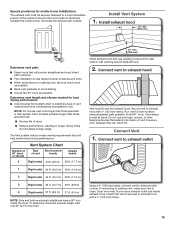
.... Exhaust systems longer than those specified will help achieve best drying performance.
Secure vent to exhaust hood with 4" (102 mm) clamp. Connect Vent
1.
Connect vent to exhaust hood
Vent must fit over dryer exhaust outlet and inside the dryer. Avoid 90° turns. Dryer vent must not terminate beneath the mobile home. Check that...
Installation Instructions - Page 16

... intact and tight, or circuit breaker has not tripped.
■■ Dryer door is in place, remove corner posts and cardboard from side to see what was skipped. q Read "Dryer Use" in a running for 5 minutes, open the dryer door and feel heat, turn off dryer, and check the following : ■■ Controls are intact and...
Installation Instructions - Page 17
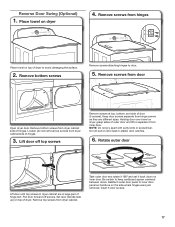
... where hinges were just removed.
Take outer door and rotate it 180º and set it from dryer cabinet side of hinges. Rotate outer door
Lift door until top screws in large part of dryer. Place towel on door seal or plastic door catches.
6. Loosen (do not remove) top screws from inner door...
Owners Manual - Page 3
...
surrounding areas free from service or discarded, remove the door to the drying compartment.
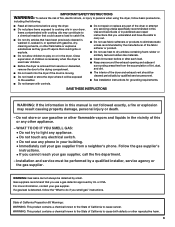
■ Do not reach into the dryer if the drum is not followed exactly, a fire or explosion may ... that you use heat to dry articles containing foam rubber or similarly textured rubber-like materials.
■ Clean lint screen before using the dryer.
■ Do not place items exposed to do if you...
Owners Manual - Page 4
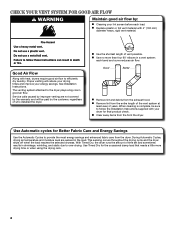
... and sometimes results in a vent system;
Use Automatic cycles for Better Fabric Care and Energy Savings
Use the Automatic Cycles to efficiently dry laundry.
n Remove lint from the front the dryer. When cleaning is complete, be paid by :
n Cleaning your lint screen before each bend and curve reduces air flow. During Automatic Cycles...
Owners Manual - Page 5

... the tone will depend on your load. Timed Dry Will run the dryer for models with ACCUDRY™ Control Senses moisture in your dryer. Automatic Cycles with only one choice of heat-...; feature periodically tumbles, rearranges, and fluffs the load to select available cycles on your laundry load. Appearance may need ironing.
6 CYCLE STATUS LIGHTS Lights indicate the progress of the...
Owners Manual - Page 6
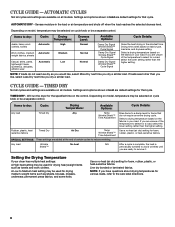
..., athletic wear
Automatic
Low
Dryness Level:
Normal
Normal
Normal
Available Options:
Damp Dry Signal Wrinkle Shield™
Cycle Signal
Damp Dry Signal Wrinkle Shield™
Cycle Signal
Damp Dry Signal Wrinkle Shield™
Cycle Signal
Cycle Details:
Gives the best drying in your dryer has multiple heat settings:
A High heat setting may be a separate control...
Owners Manual - Page 7
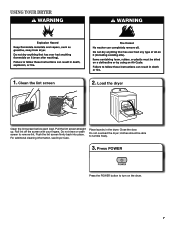
... wash screen to tumble freely.
3.
Clean the lint screen
2. Close the door. USING YOUR DRYER
1. Roll lint off the screen with your fingers. Place laundry in the dryer. Pull the lint screen straight up. For additional cleaning information, see Dryer Care. clothes should be able to remove lint. Push the lint screen firmly back into...
Owners Manual - Page 8
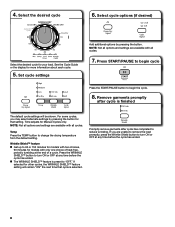
... some cycles, you are available with all cycles.
7. Press START/PAUSE to begin the cycle.
8. Remove garments promptly
after cycle has completed to change the drying temperature from the default setting. Wrinkle Shield™ feature n Get up to 60 or 150 minutes for models with two choices,
90 minutes for that...
Owners Manual - Page 9

...place. Reinstall screen in the dryer.
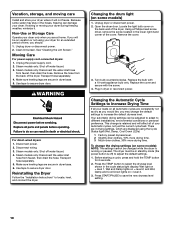
Removing accumulated lint
From Inside the Dryer Cabinet Lint should be removed every 2 years, or more often, depending on the lint screen. As needed cleaning Laundry...often, depending on dryer usage.
2. Wet both the dryer and fabrics.
Do not rinse or wash screen to dry the drum. Dry these items inside out to your dryer and will not ...
Owners Manual - Page 10
...hand corner of the dryer. Replace the bulb with the screw.
4. Your automatic drying settings can damage your dryer only when you may stay in dryer base. 6. To change...dryness level
shown in dryer or reconnect power.
Unplug dryer or disconnect power. 2.
Non-Use or Storage Care
Operate your dryer.
Moving Care
For power supply cord-connected dryers: 1. Plug in ...
Owners Manual - Page 11
... softener sheet, and use . Use 4" (102 mm) diameter vent material.
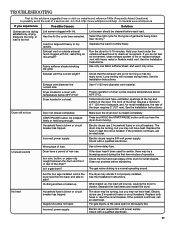
Unusual sounds
Dryer have heat.
Make sure the dryer door is blown or circuit breaker has tripped. Supply line valve not open on the supply line. Dryer will increase drying times. Electric dryers use 2 household fuses or circuit breakers. The drum may be turning, but...
Owners Manual - Page 12
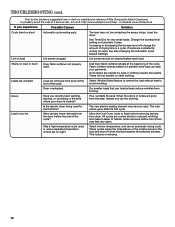
... freely reduce wrinkles from the area, rewash and dry the clothing.
When the odors or fumes are wrinkled
Load not removed from dryer at the beginning of a service call...In U.S.A.
Were laundry items removed from dryer. Fabric softener sheets added to finish before removing laundry from the dryer before each load.
Increasing or decreasing the dryness...
Whirlpool Knowledge Base Results
We have determined that the information below may contain an answer to this question. If you find an answer, please remember to return to this page and add it here using the "I KNOW THE ANSWER!" button above. It's that easy to earn points!-
Cleaning Air Purifier Model AP51030S
Dryer Use the following procedure to start the air purifier. Place the bottom tabs on the front grille into place. Push the top of the grille forward until the grille locks into the bottom slots in base of the air purifier. ...air purifier? Purchasing replacement air purifier filters Air purifier will not run Air purifier filters Proposition 65 Warnings Damp loads or long drying times - -
Loads are wrinkled - Dryer
... wrinkled. If the load sits for more information on the Automatic Drying cycle. It is also important to avoid the same problem. Were the laundry items removed from the washer to promptly remove loads from the dryer before removing the laundry items from tumbling freely, which will periodically tumble the... -
Damp loads or long drying times - Dryer
... metal vent. Replace any plastic or metal foil vent with a rigid or flexible heavy metal vent. Loads are recommended. Electric dryer Or Dryer does not heat - Damp loads or long drying times - Dryer does not heat - Box or louvered hoods are damp; Lint should not have too many turns. Heavy rigid metal vent...
Similar Questions

What Size Is The Whirlpool Wed5500xw???
What size is the Whirlpool WED5500XW.....7.0, 7.2 or 7.4??
What size is the Whirlpool WED5500XW.....7.0, 7.2 or 7.4??
(Posted by kycwright 2 years ago)


Dryer Will Not Turn On.
my dryer wil not turn on. I have checked a fuses and they are good. What's next?
my dryer wil not turn on. I have checked a fuses and they are good. What's next?
(Posted by Dtidavid54 7 years ago)

Why My Whirlpool Cabrio Shuts Off In The Middle Of Drying.
(Posted by amanda08 11 years ago)

Can The Whirlpool Wed5500xw Dryer Be Converted To Use The Side Vent?
I purchased the whirlpool side vent kit, but there is not access to the vent on the rear of this dry...
I purchased the whirlpool side vent kit, but there is not access to the vent on the rear of this dry...
(Posted by rmoors 12 years ago)