Singer 7463 Confidence Support Question
Singer 7463 Confidence Support Question
Find answers below for this question about Singer 7463 Confidence.Need a Singer 7463 Confidence manual? We have 1 online manual for this item!
Question posted by Hannemaj on November 15th, 2020
Jeg Har Det Problem Med Min Maskine At Undertråden Filtrerer Sig Sammen
The person who posted this question about this Singer product did not include a detailed explanation. Please use the "Request More Information" button to the right if more details would help you to answer this question.
Current Answers
Answer #1: Posted by Troubleshooter101 on November 18th, 2020 6:53 AM
Troubleshooter101

Member since:
September 30th, 2015 Points: 2,927,060

Member since:
September 30th, 2015 Points: 2,927,060
Du kan have en perfekt lige søm på toppen, men der dannes en "fuglerede" i bunden. Så hvorfor inkonsekvensen? Folk har tendens til at tro, at spolen er skyld; faktisk kunne dette ikke være længere væk fra sandheden. Tråden snurrer - normalt under stoffet - fordi der ikke er nogen spænding i overtråden. Virker modstridende, ikke? Her er stadig hvad du skal gøre: Først løftes trykfodsløfteren og tråd maskinen på igen. Dette åbner spændingsmekanismen for at modtage tråden. For det andet skal du løfte optagelseshåndtaget og nålen til den højeste position i henhold til din maskine manual. Dette skal hjælpe med at bekræfte, at du har den rigtige spænding.
Thanks
Please respond to my effort to provide you with the best possible solution by using the "Acceptable Solution" and/or the "Helpful" buttons when the answer has proven to be helpful. Please feel free to submit further info for your question, if a solution was not provided. I appreciate the opportunity to serve you!
Troublshooter101
Related Singer 7463 Confidence Manual Pages
Instruction Manual - Page 3
... Rated input: 65W Rated ambient temperature: 15 - 35°C Acoustic noise level: less than 70db(A)
CARING FOR YOUR MACHINE Cleaning hook area and feed dogs 60 - 61
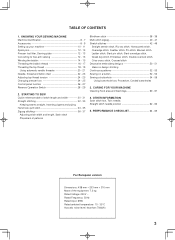
4. KNOWING YOUR SEWING MACHINE Machine identification 6 - 7 Accessories 8 - 9 Setting up your machine 10 - 11 Spool pins 12 - 13 Presser foot lifter, Darning plate 12 - 13 Converting to free-arm...
Instruction Manual - Page 6

... 5. Foot release button 27. Presser foot 29. Bobbin cover release button 32. Extension table (Accessory box) 7. Cord socket 15. Bobbin cover plate 24. KNOWING YOUR SEWING MACHINE
MACHINE IDENTIFICATION
1. Foot control 34. 1. Needle threader Thread Guide 20. Feed dogs 30. Thread guide 2.
Instruction Manual - Page 8
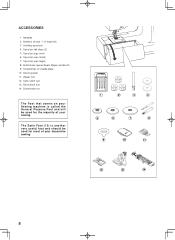
...) is called the General Purpose Foot and will be used for needle plate 10. Bobbins (4 total - 1 in machine) 3. Blind stitch foot 14. Needles 2. Screwdriver for the majority of your sewing. Buttonhole foot
The Foot that comes on your Sewing machine is another very useful foot and should be used for most of your decorative...
Instruction Manual - Page 10

... is turned on.
Poner el Interruptor de corriente/ luz de velocidad en "OFF"
machine socket
Connecteur de la machine Conector de la máquina
2
1
Pin plug Butée Pasador
3
Foot ... de la linea eléctrica
POWER/LIGHT SWITCH
Your machine will not operate.
When servicing the machine, or changing needles, etc., machine must be disconnected from the wall-outlet.
The same switch...
Instruction Manual - Page 12
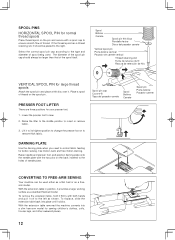
... plate.
bed or as a standard flat-bed model.
With the extension table removed the machine converts into place until it should always be used . Spool Bobine Carrete
Spool pin felt ...the needle plate with a spool cap to ensure smooth flow of thread. CONVERTING TO FREE-ARM SEWING
Your machine can be larger than that of the spool itself. Lift it provides a large working surface ...
Instruction Manual - Page 14

... stop turning when completely filled. Place a spool of thread on the spool pin, and secure it with end of bobbin. Put end of thread.
4. Start machine and the bobbin starts to the left position, if it clicks. Place bobbin onto shaft with the spool pin cap. Push
4
shaft to wind. WINDING...
Instruction Manual - Page 16
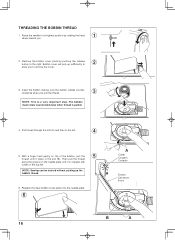
... thread.
6.
Raise the needle to the left . Replace the clear bobbin cover plate onto the needle plate.
6
A
Cutter Coupeur Cortador
Groove Cannelure Surco
B
A
16 NOTE: Sewing can be started without picking up sufficiently to
2
allow you pull the thread.
3
NOTE: This is pulled.
4. Insert the bobbin making sure the bobbin rotates...
Instruction Manual - Page 18

...1.) With the presser foot raised, pull the thread towards the the back
of plate (2). Thread the machine with your left .
4
* Pull the thread into the thread guide (5).
* Pass the thread through...the thread through the eye of the needle (6) from front to the left of the machine.
You should detect a considerable amount of
5
resistance and much more deflection
of the...
Instruction Manual - Page 20

... the lever and pull thread away from you select straight stitching when using the needle threader.
1
2
3
4
5
6
20 Pull down lever holding the end of the machine.
4. Return the lever and needle will be threaded automatically.
6. NOTE: For smooth threading it is recommended you . Hook thread to the rear of thread.
3.
Rotate...
Instruction Manual - Page 22
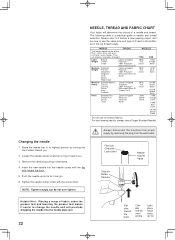
...the hand wheel toward the back. 5. Push the needle up as far as it before a new sewing project. And be of any fiber: cotton, linen, silk, wool, synthetic, rayon, blends.
Changing the... new needle into the needle plate slot.
22
Flat side toward you .
2. Always disconnect the machine from the wall-outlet. Flat side Côté plat Lado plano
Needle Aiguille Aguja
Stop pin ...
Instruction Manual - Page 24

... you start to adjust the tension control.
Raise presser foot lifter. 1. Place the desired foot on top of the machine. Lower the presser foot lifter so that the stitching is usually only desireable for straight stitch sewing.
BOBBIN TENSION
The bobbin tension has been correctly set at the factory, so you are...
Instruction Manual - Page 26
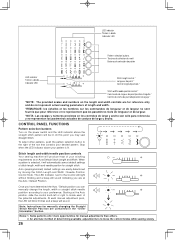
...and width/needle position controls
Your sewing machine will produce most of your desired pattern. Note: Instructions for reference only and do not represent actual sewing parameters of the potential adjustments.... each manual adjustment point, the LED will blink 3 times and a beep will automatically sew at the Auto / Default Position.
An alternate method of stitch length, width and needle...
Instruction Manual - Page 28
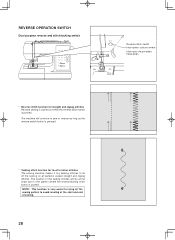
...
* Reverse stitch function for tie-off of other stitches The sewing machine makes 4 tiny tacking stitches to tie off the sewing pattern to sew in the pattern where the reverse/tacking stitch button is pushed.... NOTE: This function is very useful for tying off the sewing on all patterns except straight and zigzag stitches. The machine will be at the start and end of the tacking stitches...
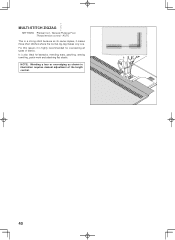
Instruction Manual - Page 32
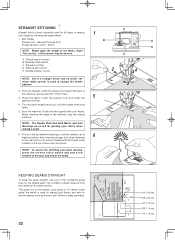
... E
NOTE: Based upon the weight of the fabric, slight
"fine tuning" of the material, stop the sewing machine. Stitch length control E. NOTE: To secure the stitching and avoid raveling, press the reverse stitch switch and sew a few stitches at its highest position, then raise the presser foot, draw materials
6
to change the needle...
Instruction Manual - Page 34
.... 3.
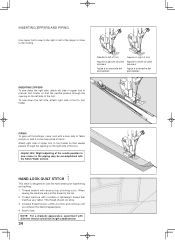
Helpful Hint: Slight adjusting of the needle position to sew closer to the piping may be accomplished with desired top stitching color. HAND-LOOK QUILT STITCH
This stitch is designed to the top. 2.
Thread bobbin with the Stitch Width Control. Thread machine with a bias strip of fabric and pin or tack it...
Instruction Manual - Page 36
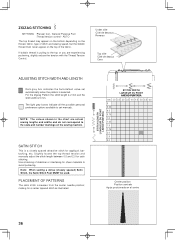
...depending on the thread, fabric, type of stitch and sewing speed, but the bobbin thread must never appear on the sewing machine.
Slightly loosen the top thread tension and manually adjust the...chart are experiencing puckering, slightly reduce the tension with the Thread Tension Control.
Note: When sewing a dense (closely spaced) Satin Stitch, the Satin Stitch Foot MUST be used.
General ...
Instruction Manual - Page 38
... of the guide. When completed, the stitching is primarily used . On medium to the
left. Sew slowly, guiding the fabric carefully along the edge of the needle for hemming curtains, trousers, skirts,...foot.
Elastic blind stitch for normal firm fabrics
- NOTE: In addition to sew blind hems. Always make a sewing test first.
4
Top side Cara Endroit
38
It should just pierce the...
Instruction Manual - Page 40
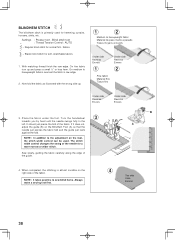
... because as shown in illustration requires manual adjustment of fabrics.
General Purpose Foot :Thread tension control - It is highly recommended for bartacks, mending tears, patching, sewing towelling, patch-work and attaching flat elastic. For this reason it makes three short stitches where the normal zig-zag makes only one.
Instruction Manual - Page 44
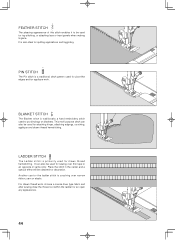
... STITCH
The Pin stitch is traditionally a hand embroidery stitch used for picot-like edges and for applique work , choose a coarse linen type fabric and after sewing draw the thread out within the ladder for an open airy appearance.
44 Place the stitch in the center and a special effect will be used...
Instruction Manual - Page 64
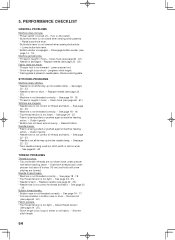
... for thread and fabric - Remove lint (see page 60 - 61). 5. PERFORMANCE CHECKLIST
GENERAL PROBLEMS
Machine does not sew. * Power switch is not correct for sheer or soft fabric. - Turn on needle place -
STITCHING PROBLEMS
Machine skips stitches. * Needle is not raised when sewing stitch patterns.
- See page 18 - 19. * Thread is not threaded correctly. - Clean hook...
Similar Questions

Singer Confidence 7463 Support - Flashing Lights After All Checks.
When starting to sew, a beep sounds and all the lights begin flashing. I have done all the following...
When starting to sew, a beep sounds and all the lights begin flashing. I have done all the following...
(Posted by RobinMom12 1 year ago)

Reverse Caused Nesting?
Works fine stitching in forward, when reverse material rolls up and stitching nests. Have new needle...
Works fine stitching in forward, when reverse material rolls up and stitching nests. Have new needle...
(Posted by dwdsad 7 years ago)

Curvy 8780 Feed Dog Problem
I am having a problem with the fabric feeding through. I have used the machine 4.5 years with no pro...
I am having a problem with the fabric feeding through. I have used the machine 4.5 years with no pro...
(Posted by sandymorgan258 8 years ago)
Auto Needle Threader Problem
hi my auto needle threader has stopped working any suggestions
hi my auto needle threader has stopped working any suggestions
(Posted by joolie10 9 years ago)

Beeping From Singer Sewing Machine Stylist Ii 5625
My sewing machine will beep and stop sewing after three inches of sewing. I have taken it to be repa...
My sewing machine will beep and stop sewing after three inches of sewing. I have taken it to be repa...
(Posted by arusheria 9 years ago)