
Singer 4411 Heavy Duty Support Question
Singer 4411 Heavy Duty Support Question
Find answers below for this question about Singer 4411 Heavy Duty.Need a Singer 4411 Heavy Duty manual? We have 1 online manual for this item!
Question posted by sylvialcook on June 9th, 2013
How Do I Eliminate The Extra Back Loop Of Thread After Using Reverse Feature?
The person who posted this question about this Singer product did not include a detailed explanation. Please use the "Request More Information" button to the right if more details would help you to answer this question.
Current Answers
Related Singer 4411 Heavy Duty Manual Pages
Instruction Manual - Page 2
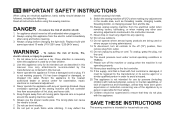
... may deflect the
needle causing it must be replaced by a person responsible for use as threading needle, changing needle, threading bobbin, or changing presser foot, and the like. 10. SAVE THESE INSTRUCTIONS
This sewing machine is 75dB(A). 17. EN IMPORTANT SAFETY INSTRUCTIONS
When using an electrical appliance, basic safety should always be followed, including the following...
Instruction Manual - Page 6

... Presser Foot Pressure 8 Accessories ...10
Threading the Machine Winding the Bobbin ...12 Inserting the Bobbin ...14 Threading the Upper Thread ...16 Raising the Bobbin Thread ...18 Thread Tension...20
Sewing How to Choose Your Pattern ...22 Three Needle Position Dial...24 Stitch Width Dial & Stitch Length Dial ...26 Sewing Straight Stitch ...28 Reverse Sewing/ Removing the Work/ Cutting the...
Instruction Manual - Page 9
...
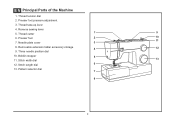
11
7. Bobbin stopper
5
11. Pattern selector dial 7
8
2 Thread tension dial
2. Needle plate cover
3
8. Presser foot pressure adjustment
3. Thread cutter
1
9
6. Removable extension table/ accessory storage
4
12
9. Three needle position dial
10. EN Principal Parts of the Machine
1. Thread take-up lever
4. Reverse sewing lever
5. Stitch width dial
13
12. Stitch...
Instruction Manual - Page 11
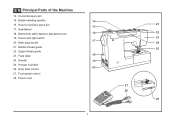
... adjustment slot
16
19. Main plug socket
21. Bobbin winding spindle
14
16. Face plate
18
24. Handwheel
18. Upper thread guide
23. Bobbin thread guide
22. EN Principal Parts of the Machine
14. Handle
19
25. Horizontal spool pin
15. Power and light switch 17
20. Power cord
4
21 22 23 24...
Instruction Manual - Page 13
... (Vietnam)
Sewing light
1
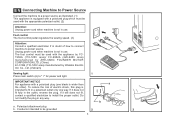
Press main switch (A) to be grounded
2
6
A 3
To reduce the risk of how to connect machine to power source. If it does not fit fully in the outlet, reverse the plug.... Unplug power cord when machine is not in use .
IMPORTANT NOTICE For appliance with a polarized plug (one way. EN Connecting Machine to Power Source
Connect the machine to a power source...
Instruction Manual - Page 15
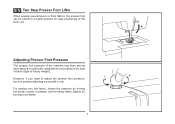
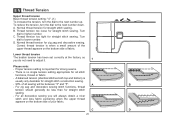
...the type of the machine has been pre-set and requires no particular readjustment according to adjust the presser foot pressure, turn the presser adjusting screw with a coin. For sewing very thin fabric,... Foot Pressure
The presser foot pressure of fabric (light-or-heavy weight). EN Two Step Presser Foot Lifter
When sewing several layers or thick fabrics, the presser foot can be raised to ...
Instruction Manual - Page 19
... place on spindle. (5)
- Hold thread end. (7) 1
- Cut thread. (9) 2
-
Push bobbin spindle to spool pin. (1/2)
- Snap thread into thread guide. (3)
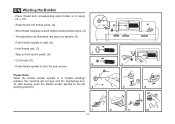
- Push bobbin spindle to the left (10) and remove. Please Note:
When the bobbin winder spindle is in "bobbin winding"
position, the machine will not sew and the handwheel turn. To start sewing, push the bobbin winder spindle...
Instruction Manual - Page 21
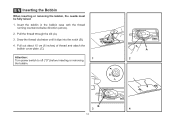
... the bobbin, the needle must be fully raised.
1. Pull the thread through the slit (A).
3.
Pull out about 15 cm (6 inches) of thread and attach the bobbin cover plate. (C)
Attention:
1
Turn power switch to off ("O") before inserting or removing
the bobbin. Draw the thread clockwise until it slips into the notch (B).
4. Insert the bobbin...
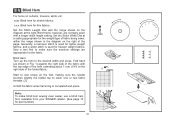
Instruction Manual - Page 23
... to its highest point (1), and continue turning the handwheel counterclockwise until the needle just slightly begins to spool. (2)
- Lift up lever and then 1 downwards again. (6)
- Thread tension module by not doing so several sewing problems could result.
- Note: For safety, it is important to carry out correctly as illustrated. (4)
- Now pass the...
Instruction Manual - Page 25
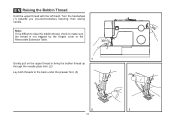
...: If it is difficult to raise the bobbin thread, check to make sure the thread is not trapped by the hinged cover or the Removable Extension Table.
1 Gently pull on the upper thread to bring the bobbin thread up through the needle plate hole. (2) Lay both threads to the back under the presser foot. (3)
2
3
18...
Instruction Manual - Page 27
...appears on the bottom side of your fabric.
Proper tension setting is no single tension setting appropriate for straight stitch
sewing.
- For all stitch
functions, thread or fabric.
- Thread tension too tight for straight stitch sewing.
EN Thread Tension
Upper thread tension Basic thread tension setting: "4". (1) To increase the tension, turn the dial to lower number. Normal...
Instruction Manual - Page 29
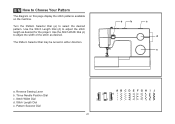
... Length Dial (d) to adjust the width of the stitch as desired for the project. Stitch Width Dial d. Stitch Length Dial e. Use the Stitch Width Dial (c) to adjust the stitch length as desired. Reverse Sewing Lever b. Three Needle Position Dial c. EN How to select the desired pattern. Turn the Pattern Selector Dial (e) to Choose...
Instruction Manual - Page 33
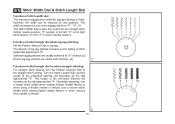
... as the dial approached "0". The width increases as the dial approaches "4". Function of stitch length dial approaches "0".
Generally speaking, use a longer stitch length when sewing heavier weight fabrics or when using a finer needle or thread.
2
26
4 3 2 1 0.5
The length of the individual stitches will decrease as the setting of stitch length dial while zig-zag...
Instruction Manual - Page 37
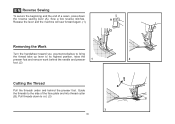
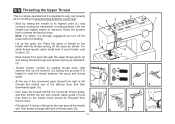
...
B 3 Pull threads down
the reverse sewing lever (A).
A
Release the lever and the machine will sew forward again. (1)
Removing the Work
Turn the handwheel toward you (counterclockwise) to bring
the thread take up lever to its highest position, raise the
presser foot and remove work behind the needle and presser 1
2
foot. (2)
Cutting the Thread
Pull the threads under and...
Instruction Manual - Page 39
.... Blind Hem:
Turn up the hem to catch one or two fabric threads. (2)
Unfold the fabric when hemming is used for firm fabrics. Fold back
(as shown in the diagram on the right of the folded fabric.
1
Start to sew slowly on the fold, making sure the needle touches slightly the folded top...
Instruction Manual - Page 41
... fabric.
The width however may need to be sure that the needle is advisable to set stitch density. Take care not to sew too many stitches in the " " to use heavy thread or cord for stretch or knit
fabrics. Set the stitch width at "6". Follow the 4-step sequence changing from both ends towards the...
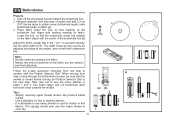
Instruction Manual - Page 49

... The presser foot (f) will engage automatically. Removing the presser foot
Raise the presser foot using the presser foot lifter, until the cut-out (c) is directly above operations!
b
Attaching ....
1
Adjust as illustrated. (1)
a
Attaching the presser foot
Lower the presser foot shank (b) using the presser foot lifter. (3)
Raise the lever (e) and the foot disengages. EN Attaching the...
Instruction Manual - Page 51
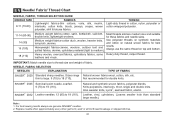
...Heavy duty thread, carpet thread. leathers and vinyls. NEEDLE, FABRIC SELECTION
NEEDLES
EXPLANATION
TYPE OF FABRIC
SINGER® 2020 Standard sharp needles.
SINGER® 2032 Leather needles. 12 (80) to 18 (110). THREAD
Light-duty thread... woven fabrics, polyester blends. For best sewing results always use the same thread on natural woven fabrics for best
Heavyweight fabrics-canvas...
Instruction Manual - Page 56
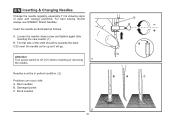
EN Inserting & Changing Needles
Change the needle regularly, especially if it will go. The flat side of wear and causing problems. For best sewing results always use SINGER® Brand Needles. Bent needles B. C/D.Insert the needle as far up as follows:
A. Attention:
Turn power switch to off ("O") before inserting or removing
1
the ...
Instruction Manual - Page 60

... the spool holder pin. 6. The thread is not threaded correctly. 2. The wrong size needle has been used. 4. The foot is attached.
1. Wrong needle size for the needle. 4. The wrong foot is not attached correctly.
1. The bobbin case is wrong. 4. Needle/ fabric/ thread combination is not correctly threaded. 3. Poor quality thread. 2. The machine is damaged. The needle is...
Similar Questions

Classes On How To Use Singer 9970 Sewing Machine
I bought the sewing machine during the pandemic and would like to learn how to use it- functions, st...
I bought the sewing machine during the pandemic and would like to learn how to use it- functions, st...
(Posted by Connienm 1 year ago)

Reverse Caused Nesting?
Works fine stitching in forward, when reverse material rolls up and stitching nests. Have new needle...
Works fine stitching in forward, when reverse material rolls up and stitching nests. Have new needle...
(Posted by dwdsad 7 years ago)

Thread Underneath Fabric In Large Loops.
When sewing the thread under the fabric comes in large loops. The tension wheel of the upper thread ...
When sewing the thread under the fabric comes in large loops. The tension wheel of the upper thread ...
(Posted by hanserikjohansson 7 years ago)

Singer Modern Quilter 8500q Reverse Feature
This machine has a reverse feature that, at the press of a button, makes 4 stitches in reverse. I of...
This machine has a reverse feature that, at the press of a button, makes 4 stitches in reverse. I of...
(Posted by ibulace 8 years ago)
My Bobbin And Needle Will Not Catch To Thread
The needle goesdown correctly but the bobbin thread does not catch
The needle goesdown correctly but the bobbin thread does not catch
(Posted by lurunner 9 years ago)