Singer 9970 Support Question
Singer 9970 Support Question
Find answers below for this question about Singer 9970.Need a Singer 9970 manual? We have 1 online manual for this item!
Question posted by Connienm on November 23rd, 2022
Classes On How To Use Singer 9970 Sewing Machine
I bought the sewing machine during the pandemic and would like to learn how to use it- functions, stitch options.Any online classes offered? Thx in advanc
Current Answers
Answer #1: Posted by SonuKumar on November 23rd, 2022 8:03 PM
SonuKumar

Member since:
May 9th, 2021 Points: 16,609,800

Member since:
May 9th, 2021 Points: 16,609,800
https://www.youtube.com/watch?v=o0XmbKU1MKE
https://www.youtube.com/watch?v=1h3HpdbP-lQ
Please respond to my effort to provide you with the best possible solution by using the "Acceptable Solution" and/or the "Helpful" buttons when the answer has proven to be helpful.
Regards,
Sonu
Your search handyman for all e-support needs!!
Related Singer 9970 Manual Pages
Instruction Manual - Page 2
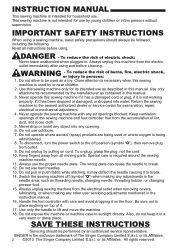
... not pull or push fabric while stitching. It may deflect the needle causing it in this sewing machine is required around the sewing machine needle. 11. Be sure not to the off (symbol "O") when making any other user servicing adjustments mentioned in this machine from all instructions before cleaning.
SINGER is being used by young children or infirm...
Instruction Manual - Page 3
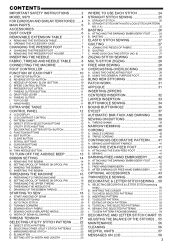
... MACHINE 16 B. SETTING SPOOL OF THREAD ON SPOOL PIN 16 C. SCROLL BUTTONS 13 K. REVERSE STITCHING 19 C. FREE-HAND EMBROIDERY 42 D. FUNCTION BUTTONS 12 H. THREAD CUTTER 11 I. AUTO TACK STITCH 19 D. USING THE GENERAL PURPOSE FOOT 29
BLIND HEM STITCHING 30 PATCH WORK 31 APPLIQUE 31 INSERTING ZIPPERS CENTERED INSERTION 32 LAPPED INSERTION 33 BUTTONHOLE SEWING...
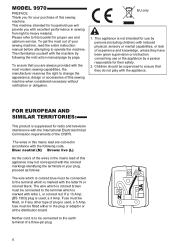
Instruction Manual - Page 4
... the machine. Then familiarize yourself with the most out of the CISPR.
MODEL 9970
PREFACE Thank you for their safety.
2. This machine intended for proper use will ... design or accessories of this sewing machine when considered necessary without notification or obligation. This appliance is used , a 3 Amp. To get the most modern sewing capabilities, the manufacturer reserves the...
Instruction Manual - Page 6
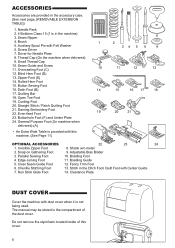
... and Screw 11. Rolled Hem Foot
15. Button Sewing Foot
16. Even-feed Foot
19
20
21
23. Adjustable Bias Binder
3. Fancy Trim Foot
6. Stitch in the compartment of this machine. (See Page 11)
OPTIONAL ACCESSORIES
22
23
24
1. Needle Pack
2. 4 Bobbins Class 15 (1 is not being used. Brush 5. Auxiliary Spool Pin with Center Guide
7. Small...
Instruction Manual - Page 12
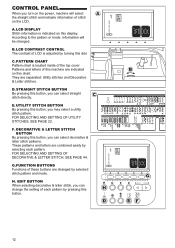
... chart is indicated on this button, you turn on the power, machine will be changed by selecting each pattern by turning this chart. STRAIGHT STITCH BUTTON By pressing this button.
12 FOR SELECTING AND SETTING OF UTILITY STITCHES, SEE PAGE 22. G.FUNCTION BUTTONS Functions of stitch on this dial.
F.
E. A. LCD CONTRAST CONTROL The contrast of each...
Instruction Manual - Page 14
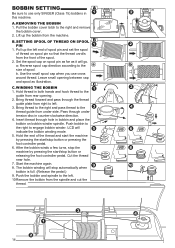
... bobbin cover. 2. A. B. Set the spool cap on bobbin winder spindle. Use the small spool cap when you use only SINGER (Class 15) bobbins in both hands and hook thread to the size of the spool.
2.
After the bobbin winds a few turns, stop the machine by pressing the start /stop button or releasing the foot controller...
Instruction Manual - Page 15

...bobbin holder with the thread
unwinding counter clockwise.
2. D. NOTE: Be sure to use only SINGER (Class 15) bobbins in needle plate and push the right side of notch (a).
4. ...INSERTING THE BOBBIN 1. Pull thread out about 10 cm (4 inches).
Pull thread toward the left tab into the hole in this machine...
Instruction Manual - Page 19
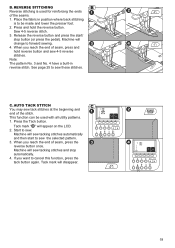
... seams. 1. Machine will sew tacking stitches and stop button (or press the pedal). B. This function can be made and lower the presser foot. 2. When you reach the end of the stitch. Start to sew these stitches. Sew 4-5 reverse stitch. 3.
C. Place the fabric in reverse stitch. Note: The pattern No. 3 and No. 4 have a built-in position where back stitching
is used with all...
Instruction Manual - Page 21
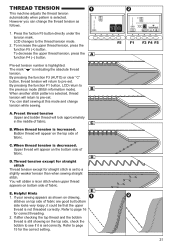
... bobbin thread is highlighted. By pressing the function F3 (AUTO) or clear "C" button, thread tension will return to pre-set correctly. B. Refer to the previous mode (Stitch information mode). THREAD TENSION
This machine adjusts the thread tension automatically when pattern is decreased. However you can start sewing at this mode and change the thread...
Instruction Manual - Page 22

...directly by pressing the utility button.)
3.
Regular stitch (normal stitch) b.
Reverse stitch (reverse front and back) d. Mirror and Reverse stitch If the mark is selected, LCD will appear. When you turn on the LCD indicates the selected stitch as follows. B. The icon on the machine, straight stitch will be used. DIRECT STITCH PATTERN You can not be indicated on...
Instruction Manual - Page 23
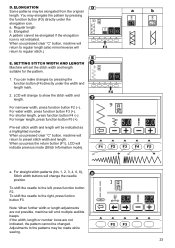
... and length suitable for the pattern.
1.
You can make changes by pressing the function button (F3) directly under the width and length mark.
2.
For shorter length, press function button F4 (-). When you pressed clear "C" button, machine will return to regular stitch.)
E. To shift the needle to the right, press funtion button F3. Note: When...
Instruction Manual - Page 24
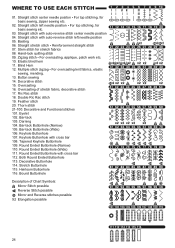
Button sewing 14. Bar-tack 103. Tapered Keyhole Buttonhole 109. Both Round Ended Buttonhole 113. WHERE TO USE EACH STITCH
01. Basting 06. Zigzag stitch • For overcasting, applique, patch work etc. 10. Blind Hem 12. Decorative stitch 15. Decorative and Functional stitches 101. Darning 104. Keyhole Buttonhole 107. Keyhole Buttonhole with cross bar 112. Decorative...
Instruction Manual - Page 26
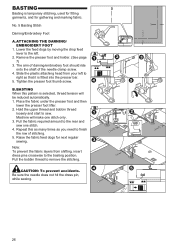
...BASTING When this as many times as you need to remove the stitching. Machine will be reduced automatically. 1. Remove the presser foot and holder. ... and sew one stitch only. 3. Pull the fabric required amount to sew. Be sure the needle does not hit the dress pin, while sewing.
26 BASTING
Basting is temporary stitching, used for fitting garments, and for next regular sewing. ATTACHING...
Instruction Manual - Page 44

... Guide. Stabilize the underside of the machine and bobbin with all -purpose sewing thread.
2. Select a Straight Stitch. 6. The Chenille Stitch Foot will be visible.
2. Braiding Foot : This is used to stitch trims, braids or cords for decorative embellishment.
1. The Braiding Foot is an optional accessory. Select the ZigZag Stitch with chenille effects.
1. Braiding Guide...
Instruction Manual - Page 45
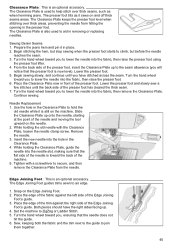
...Joining
Foot's guide. Clearance Plate : This is an optional accessory. Sewing Denim Seams 1. Prepare the jeans hem and pin it... you , ensuring that the flat side of the needle is used to lower the needle into the fabric, then raise the presser...the guide. 6. Set the machine to climb, but stop sewing when the presser foot starts to ZigZag or Ladder Stitch. 5.
While holding the Clearance...
Instruction Manual - Page 46
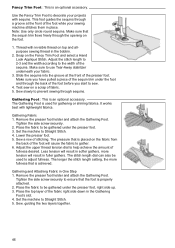
... to use Tear-Away stabilizer underneath your projects with lightweight fabrics. Make sure that the sequin trim flows freely through sequins. Make sure to decorate your fabric.
3. Sew slowly to help achieve the amount of stitching. The Gathering Foot is an optional accessory. It works best with sequins. Gathering Fabric 1.
Set the machine to Straight Stitch. 5. Sew...
Instruction Manual - Page 49

... the twin needle button again or turn off the machine.
Use only needle designed for this machine. Thread second thread the same as usual, following threading route.
3. Always test sew selected stitch. 10. Contact your authorized SINGER dealer to twin needle mode, needle may be sewn with this machine
(SINGER Style 2025). a. Place second spool of thread. Thread...
Instruction Manual - Page 50

...stitch by selecting each pattern. DECORATIVE & LETTER STITCH SEWING
You can combine decorative & letter stitches into a sequence by pressing the tack button. Press the decorative & letter stitch button. To select a pattern, press the function button directly under the indicated pattern. Using...page)
NOTE: Machine can memorize a maximum of LCD.
5. This is used for sewing a single combination...
Instruction Manual - Page 53
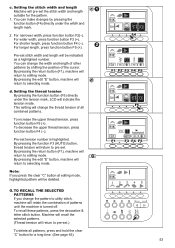
... the tension mode. Pre-set tension number is turned off.
For longer length, press function button F5 (+). By pressing the return button (F1), machine will return to utility stitch, machine will change the width and length of patterns until the machine is highlighted. Note: If you change the pattern to selecting mode. c. Setting the thread...
Instruction Manual - Page 54
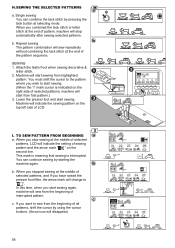
... the cursor by using the cursor buttons. (Arrow icon will stop sewing at the end of LCD. This mark is meaning that sewing is indicated on the right side of pattern, machine will disappear)
54
When you wish to the pattern where you combined the tack stitch or letter stitch at selecting mode.
Machine will indicate the...
Similar Questions

Why Won't My Machine Sew, Checked Bobbin And Retreaded. Has Power Just Will Not
the machine has power and threade correctly and bobbin is in right. It did freeze on me when sewing....
the machine has power and threade correctly and bobbin is in right. It did freeze on me when sewing....
(Posted by alewis41 7 years ago)

Singer Sew Mate 5400 How To Choose Stitches And Tension.
(Posted by gbjbird 8 years ago)

9970 Beeps 3 Times And Won't Sew
I have a 9970. The needle broke, I have replaced it and made sure nothing is caught in the bobbin ar...
I have a 9970. The needle broke, I have replaced it and made sure nothing is caught in the bobbin ar...
(Posted by Gawlynn 8 years ago)

My Machine Was Working Then It Stop Sewing. Singer9970
had it in repair shop twice,replace bobbing case twice. it wont sewing. power on but wont sew.
had it in repair shop twice,replace bobbing case twice. it wont sewing. power on but wont sew.
(Posted by sdallas624 9 years ago)

Does The Singer Sew Mate 5400 Have A Serger Stitch
(Posted by littMrFlam 10 years ago)