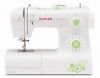
Singer 2273 Esteem II Support Question
Singer 2273 Esteem II Support Question
Find answers below for this question about Singer 2273 Esteem II.Need a Singer 2273 Esteem II manual? We have 2 online manuals for this item!
Question posted by dinrick5 on June 3rd, 2014
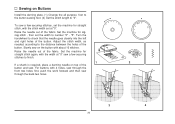
How To Make A Blind Stitch Singer Esteem 2
The person who posted this question about this Singer product did not include a detailed explanation. Please use the "Request More Information" button to the right if more details would help you to answer this question.
Current Answers
Related Singer 2273 Esteem II Manual Pages
Instruction Manual 2 - Page 1
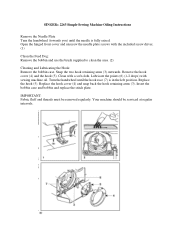
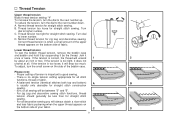
... the bobbin case. Replace the hook (5). Insert the bobbin case and bobbin and replace the stitch plate. IMPORTANT: Fabric fluff and threads must be serviced at regular intervals. Your machine should be removed regularly. SINGER® 2263 Simple Sewing Machine Oiling Instructions
Remove the Needle Plate Turn the handwheel (towards you) until the hook race...
Instruction Manual - Page 2
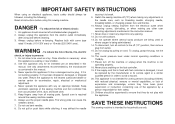
... ("O") when making any opening. 12. Do not unplug by the manufacturer or its intended use of experience and knowledge, unless they do not play with the appliance. Never place anything on cord. SAVE THESE INSTRUCTIONS
This sewing machine is intended for their safety. 21.
Do not pull or push fabric while stitching. It may...
Instruction Manual - Page 3

... will know you are always provided with the most modern sewing capabilities, the manufacturer reserves the right to use your machine. To ensure that , before you are about to use sewing machines ever made. SINGER is a registered trademark of a new Singer sewing machine, you start to begin an exciting adventure in creativity. Congratulations
As the owner of The...
Instruction Manual - Page 4
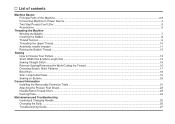
... the Machine Winding the Bobbin ...7 Inserting the Bobbin ...8 Thread Tension ...9 Threading the Upper Thread ...10 Automatic needle threader ...11 Raising the Bobbin Thread...12
Sewing How to Choose Your Pattern...13 Stitch Width Dial & Stitch Length Dial ...14 Sewing Straight Stitch ...15 Reverse Sewing/Removing the Work/Cutting the Thread...16 Choosing Stretch Stitch Patterns ...17 Blind Hem...
Instruction Manual - Page 5
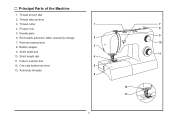
... Stitch length dial 11. One step buttonhole lever 13. Stitch width dial 10. Thread take-up lever 3. Automatic threader
1
7
8
2
9
10 3
PUSH
4
11
5
6
12
PUSH
13
2 Needle plate 6. Bobbin stopper 9. Removable extension table/ accessory storage 7. Thread tension dial 2. Reverse sewing lever 8. Presser foot 5. Pattern selector dial 12. Principal Parts of the Machine...
Instruction Manual - Page 7
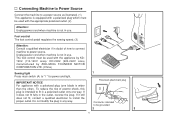
... pedal regulates the sewing speed. (3)
Attention: Consult a qualified electrician if in doubt of electric shock, this plug is intended to fit in a polarized outlet only one blade is wider than the other). IMPORTANT NOTICE For appliance with a polarized plug (one way. To reduce the risk of how to connect machine to power...
Instruction Manual - Page 9
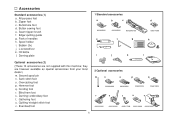
...Cording foot r. Button sewing foot e. Pack of needles h. Evenfeed foot
2 Optional accessories
m
n
o
p
q
006804008
006803008
006800008
006810008
r
s
t
u
v
006812008
006016008 006917008 006916008 006815008
6 L-screwdriver k. Second spool pin n. Quilting/ straight stitch foot v. Overcasting foot p. they are not supplied with this machine; Hemmer foot q. Seam...
Instruction Manual - Page 10
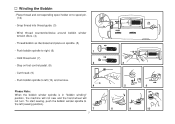
... as illustrated and place on to the left (10) and remove.
4
Please Note: When the bobbin winder spindle is in "bobbin winding" position, the machine will not sew and the hand wheel will not turn. Push bobbin spindle to right. (6)
1
- Step on foot control pedal. (8)
- Wind thread counterclockwise around bobbin winder tension...
Instruction Manual - Page 12
... turn the dial to the next number down. Normal thread tension for straight stitch sewing. Lower thread tension
To test the bobbin thread tension, remove the bobbin case
...thread tension setting: "4" To increase the tension, turn the dial to good sewing.
- For zig zag and decorative sewing stitch functions, thread
tension should generally be between "3" and "5".
- Correct thread ...
Instruction Manual - Page 16
... black. a
b
c
d
a. Stitch Width Dial c. Use the Stitch Width Dial (b) to adjust the stitch length as desired.
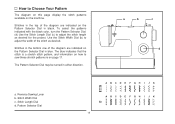
The blue indicates that the stitch is on page 17. How to sew these stretch patterns is a stretch stitch pattern, and information on how to Choose Your Pattern
The diagram on this page display the stitch patterns available on the machine.
Stitch Length...
Instruction Manual - Page 17
... weight fabrics or when using a finer needle or thread.
2
14
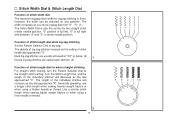
4 3 2 1 0.5 "5". (1) The Stitch Width Dial is 5mm; Stitch Width Dial & Stitch Length Dial
Function of stitch width dial The maximum zigzag stitch width for zigzag stitching is also the control for when straight stitching For straight stitch sewing, turn the Pattern Selector Dial to zig-zag. however, the width can...
Instruction Manual - Page 18
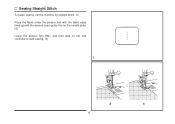
Sewing Straight Stitch
To begin sewing, set the machine for straight stitch. (1) Place the fabric under the presser foot with the fabric edge lined up with the desired seam guide line on the needle plate. (2) Lower the presser foot lifter, and then step on the foot controller to start sewing. (3)
1
2
3
15
Instruction Manual - Page 19
... the Thread
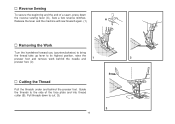
Pull the threads under and behind the presser foot. Release the lever and the machine will sew forward again. (1)
A
Removing the Work
Turn the handwheel toward you (counterclockwise) to bring
...
PUSH
3
16 Pull threads down
the reverse sewing lever (A). Sew a few reverse stitches. Reverse Sewing
To secure the beginning and the end of the face plate and into thread cutter...
Instruction Manual - Page 20
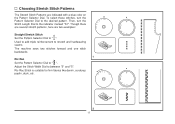
... to the desired pattern. Used to add triple reinforcement to stretch and hardwearing seams. The machine sews two stitches forward and one stitch backwards.
1 Ric Rac Set the Pattern Selector Dial to between "3" and "5". To select these stitches, turn the Stitch Length Dial to the indicator marked "S1". Though there are several stretch patterns, here are...
Instruction Manual - Page 21
... fabrics, and a wider stitch is completed and press.
2
Note: To make sure the machine settings are normally sewn with a longer stitch length setting.
Blind hem for stretch fabrics.
Blind Hem
For hems on the fold, making sure the needle touches slightly the folded top to make blind hem sewing even easier, use a blind hem foot, available from your SINGER retailer. (See page...
Instruction Manual - Page 22
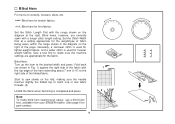
...The front bar tack will overcast the cord.
1. Set stitch length dial to
" ". a
b
A
PUSH
B
C
Making a Buttonhole on Stretch Fabrics (E)
When sewing buttonholes on a sample of your fabric and stabilizer. ... presser foot and start the machine. 7. Attach the buttonhole foot and set the pattern
selector dial to the front of the gimp thread.
Making a Buttonhole 1. Hook the ...
Instruction Manual - Page 23
"5". Set the machine for zigzag stitch , then set the machine for straight stitch again, with about 10 stitches. Set the machine for straight stitch, with 4 holes, sew through the
front two holes first, push the work forward and then sew
through the back two holes.
3
4
20 Adjust the stitch width, as needed, according to check that the needle goes cleanly into...
Instruction Manual - Page 26
..., denims.
and cotton on top and bottom. Always use genuine SINGER® needles. 2.
Knits-polyesters, interlocks, tricot, single and ... garment ) and/ or at first thread breakage or skipped stitches.
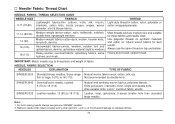
23 Needle/ Fabric/ Thread Chart
NEEDLE, FABRIC, THREAD SELECTION...thin to large. 9 (70) to 18 (110). For best sewing results always use the same thread on natural woven fabrics for these ...
Instruction Manual - Page 27
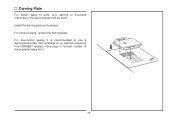
... is recommended to use a darning/embroidery foot, available as illustrated. Install the darning plate as an optional accessory from SINGER® retailers. (See page 6 for part number of work, (e.g. For normal sewing, remove the darning plate. Darning Plate
For certain types of darning/embroidery foot )
24 darning or free-hand embroidery), the...
Instruction Manual - Page 30
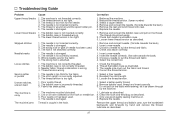
.... (lower number) 3.
Check both bobbin and bobbin case. 3. Select a better quality thread. 2. Only use good quality sewing machine oil. 4. The needle is incorrectly threaded. 3. The thread tension is damaged. The needle is too tight. 1. Readjust the stitch length. 3. Remove bobbin case, thread and insert correctly. 3. Wrong needle size for the fabric. 2. Remove the...
Similar Questions

How To Loosen The Stitch Length? How Do You Make Bigger Stitches?
(Posted by dsarauw 11 months ago)

Is A Special Foot Required To Free Form Stitch On Singer Sewing Machine Model 55
(Posted by kopitkin 9 years ago)

Singer Esteem 2273. The Needle Is Not Centered Over The Base Plate.
(Posted by marshase2 9 years ago)

Waking Foot
I would like to know what walking foot would fit on my singer sewing machine model 2273 esteem ii?
I would like to know what walking foot would fit on my singer sewing machine model 2273 esteem ii?
(Posted by eddiemelanson 11 years ago)