
Sanyo DP55441 Support Question
Sanyo DP55441 Support Question
Find answers below for this question about Sanyo DP55441.Need a Sanyo DP55441 manual? We have 1 online manual for this item!
Question posted by dsswish on December 13th, 2012
Manual For Model Dp55441
I did not receive a manual for my new tv. I only got a brief set up sheet.
Current Answers
Related Sanyo DP55441 Manual Pages
Owners Manual - Page 3

...power lines
3. If an outside antenna is connected to the television equipment, be sure the antenna system is grounded so as ...THERE ARE IMPORTANT OPERATING AND MAINTENANCE INSTRUCTIONS IN THE OWNER'S MANUAL WITH THIS UNIT.
IMPORTANT SAFETY INSTRUCTIONS
1. Read these ... a cart is to obtain maximum benefit of the LCD TV cabinet for the grounding electrodes.
16. Unplug this apparatus...
Owners Manual - Page 4

... experienced radio/TV technician for energy efficiency." CAUTION: FCC Regulations state that this equipment does cause harmful interference to radio or television reception, which the receiver is not ...maintained properly.
ENERGY STAR® USER INFORMATION
ENERGY STAR User Information Statement: the factory default settings of the ...
Owners Manual - Page 6

...
CAUTION INSTALLING STAND
• When holding the attached accessory parts (speakers), otherwise it may result in 4 holes with 4 screws. Installing Stand (55")
1 Place the LCD TV on a flat surface with soft materials (such as a blanket) for protecting the display screen.
2 Remove screws in damage.
• Before installing, provide a desk (or a part of...
Owners Manual - Page 7

English
INSTALLATION POSITIONING THE LCD HDTV
Always use a firm-flat surface when positioning your HDTV to secure it to ...14.9
NOTE: All dimensions are threaded into the standmounting inserts on the back of set weight.
VESA standard interface: TV 200 x 400mm
Wall Mounting Inserts
Mounting screws measurements: 55" TV M8 Diameter, Length - 13mm (min.); 16mm (max.)
Wall
• (60mm)
6...
Owners Manual - Page 8

... dry cells, other types, mixed new and old or batteries with marks inside the Remote Control. Do not expose the Remote or batteries to Search for off -air signals from a direct Cable TV connection.
OR
b. ANTENNA
OR
ANALOG/DIGITAL ANTENNA IN
CABLE
THE TUNER IN THIS HDTV CAN RECEIVE:
a.
PReCAUTIONS
Do not use...
Owners Manual - Page 9

...PANEL
Y
PC INPUT
PC AUDIO
INPUT
Pb
Pr
Pb
L
Pr
R
L
R
DEO3 INPUT V DEO2 INPUT
Y/VIDEO
DV
L
INPUT1
INPUT2
ANT R
COMPOSITE VIDEO INPUT VIDEO1, PAGE 10 - HDMI INPUT (INPUT1, INPUT2 or INPUT3), PAGE 12 - PC AUDIO INPUT, PAGE 12, 20 - USB PORT, PAGE 25 - These jacks will automatically detect the received... signals for updating the television's firmware and accessing JPEG files.
8
Owners Manual - Page 10

... about the current channel on your HDTV screen.( only for digital channels).
Press to view: TV, VIDEO1, VIDEO2, VIDEO3, HDMI1, HDMI2, HDMI3, PC or USB Input. Digital Captions can be changed through the SYSTEM CC Stytle Settings from the menu, when required. English
REMOTE CONTROL OPERATION
MUTE Button- Numeric Buttons- Press 6 then...
Owners Manual - Page 11

...-Y).
English
GETTING STARTED-CONNECTIONS
3 Analog Signal Connections -
ANALOG DEVICE
DVD PLAYER
SATELLITE RECEIVER
4 Component Signal Connections - Match the connector colors to jack colors.
2 Press the...YPbPr) for Component when connecting your compatible external devices.
1 Connect a COMPONENT cable to set Green, Blue, and Red video jacks asVIDEO2 or VIDEO3(YPbPr) on the HDTV and...
Owners Manual - Page 12
...; and ▼ buttons to highlight the
Channel Scan.
Move
OK Enter
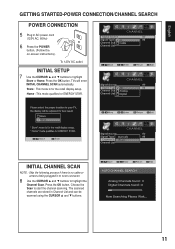
INITIAL CHANNEL SCAN
NOTE : Skip the following process if there is for ENERGY STAR. TVs will enter INITIAL CHANNEL SCAN automatically. English
GETTING STARTED-POWER CONNECTION/CHANNEL SEARCH
POWER CONNECTION
5 Plug in AC power cord (120V AC, 60Hz)
6 Press the...
Owners Manual - Page 13

...setting is compatible with HDMI cable. BACK-SIDE VIEW OF HDTV
(Coaxial) DIGITAL AUDIO CABLE (Not supplied)
MULTICHANNEL RECEIVER
AUDIO OUT JACKS 1 Connect the Audio output to a
multichannel receiver as shown. BACK-SIDE VIEW OF HDTV
SATELLITE
PC
RECEIVER... to select the input signal as a HD Cable Box, HD Satellite Receiver, DVD Player, and Game System.
NOTE : Press the INPUT button to...
Owners Manual - Page 14

...settings. PC MENU OPERATING TIPS
The Picture settings in the PC menu. PC MENU NAVIGATION MAP
PC MENU- MANUAL ADJUSTMENT OPERATION
The Clock, Phase, Horizontal Position, and Vertical Position are set...and tighten the screws. (Monitor Cable not supplied).
2 Insert one end of setting.
English
PC CONNECTIONS
NOTE: Before connecting any other peripheral equipment before you disconnect ...
Owners Manual - Page 15

... MODE
By simply pressing the " SPORTS" button on the remote control, the TV will automatically optimize both picture and sound settings for the programs shown.
■■ Off ■■ Football
−&#...banging sounds
NOTE : When the "SPORTS" button is changed , the sports mode will automatically be set to "Off", and the "Sports Off" OSD will appear on the upper right of the screen....
Owners Manual - Page 18

... button.
2 Use the 0 - 9 buttons to enter "NEW PIN" (the new password you
forget the former password, press 1-- V-Chip OPERATION
This TV follows the restricted channels broad casting setting within MPAA and TV Rating option in the squared region). 17
ON-SCREEN MENU OPERATION (CONTINUED)
English
PARENT ADJUSTMENT
This SANYO television is equipped with an electronic V-Chip...
Owners Manual - Page 19

.... If the password is correct, it will appear beside the selected rating option indicating that are received with an antenna. Press the OK button.
2 Enter your password. Then the option you want...
MPAA- Press the OK button.
5 Use the CURSOR ▲ and ▼ buttons to select the setting you selected will be locked. (A yellow lock will be viewed.
1 Press the MENU button and then use...
Owners Manual - Page 20

... from the factory default value.
1 Use the CURSOR ◄ and ► buttons to adjust the
frequency setting.
19
English Press the OK button to select
Warm, Normal or Cool. Press the OK button.
4 Use... to display the Main menu.
2 Use the CURSOR ◄ and ► buttons to adjust the
audio setting.(Off/Rock/Pop/Jazz/Vocal/User). Press the OK button.
3 Use the CURSOR ▲ and ▼...
Owners Manual - Page 21

...is pure HDMI type, the audio still is pure HDMI or DVI signal. It can reset previous adjusting settings during the AUDIO mode to the factory default value.
1 Use the CURSOR ◄ and ► ...Reset Audio- Press the OK button.
4 Use the CURSOR ▲ and ▼ buttons to adjust the
audio setting. Press the OK button.
4 Use the CURSOR ◄ and ► buttons to select Off,
Weak, Medium...
Owners Manual - Page 22

...
3 Use the CURSOR ▲ and ▼ buttons to select Light Sensor.
Try having the TV setting on the remote control to display the Main menu.
2 Use the CURSOR ◄ and ►...Condition option.
5 Use the CURSOR ◄ and ► buttons to adjust the 120Hz Condition setting to select
Backlight. Divided into three categories.
Press the OK button. PICTURE (PIX) SHAPE OPERATION
...
Owners Manual - Page 23

...5 Use the CURSOR◄ and ► buttons to the previous
ADVANCED menu. Reset the previous adjustment settings under the ADVANCED mode to the factory default value.
1 Use the CURSOR ◄ and ►...
NOTES : • When you select to PC source or USB mode, the120Hz
CONDITION default setting is set to highlight
Language option. Current Year
1 Press the MENU button on the remote control to...
Owners Manual - Page 24

... ▲ and ▼ buttons to highlight
Digital CC. Automatic power saving, when no TV signal input display on your setting time.
1 Press the MENU button on the remote control to display the Main menu.
...button.
6 Use the CURSOR◄ and ► buttons to select On
or Off.
turn on TV at your panel.
1 Press the MENU button on the remote control to display the Main menu.
2 Use the ...
Owners Manual - Page 30
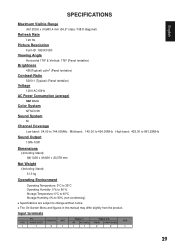
...Resolution
Full HD 1920X1080
Viewing Angle
Horizontal 178° & Vertical: 178° (Panel tentative)
Brightness
450(Typical) cd/m2 (Panel tentative)
Contrast Ratio
5000:1 (Typical) (Panel tentative)
Voltage
120V AC 60Hz
AC Power Consumption (average)
342 Watts
Color System...change without notice. ■■ The On-Screen Menu and figures in this manual may differ slightly from the product.
Similar Questions

Sanyo 55' Lcd Model Dp55441: No Picture, No Sound, No Backlight?
Sanyo 55" LCD TV. Model DP55441. A little more than 3 years old. Green power button is on but there'...
Sanyo 55" LCD TV. Model DP55441. A little more than 3 years old. Green power button is on but there'...
(Posted by Klau1210 9 years ago)

How Do I Set My Sanyo Television Model Dp55441 To A Permanent Setup Setting
(Posted by tuvshchr 10 years ago)

What Size\number Of Screws Are Needed For Base Stand Model Dp55441?
(Posted by 1992swissmiss 10 years ago)

Sanyo Tv Model Dp55441 How Do You Get To Menu Without Remote
(Posted by whwpunkpa 10 years ago)

How Do I Connect A Sound System And Blue Ray To Model Dp55441 Tv
(Posted by lug0747 11 years ago)