
Sanyo DP55441 Support Question
Sanyo DP55441 Support Question
Find answers below for this question about Sanyo DP55441.Need a Sanyo DP55441 manual? We have 1 online manual for this item!
Question posted by phillmeyli on October 11th, 2013
Dp55441 How To Save Input Settings
The person who posted this question about this Sanyo product did not include a detailed explanation. Please use the "Request More Information" button to the right if more details would help you to answer this question.
Current Answers
Related Sanyo DP55441 Manual Pages
Owners Manual - Page 4

...by one or more of this equipment does cause harmful interference to radio or television reception, which the receiver is not covered under license from that interference will... hazards.
ENERGY STAR® USER INFORMATION
ENERGY STAR User Information Statement: the factory default settings of the following measures:
-
HANDLING PRECAUTIONS
• Handle by the cabinet only. Never...
Owners Manual - Page 7

....); 16mm (max.)
Wall
• (60mm)
6
NOTE: 1. English
INSTALLATION POSITIONING THE LCD HDTV
Always use a firm-flat surface when positioning your HDTV to secure it to sustain at least 3 times of your HDTV. Wall Mounting kit is not...
NOTE: All dimensions are threaded into the standmounting inserts on the back of set weight. Wall mounting kit shall be able to a wall mounting kit.
Owners Manual - Page 9

...
GETTING STARTED-CONTROLS AND JACKS
Input / OK button
LEFT-SIDE PANEL BACK-SIDE PANEL
Y
PC INPUT
PC AUDIO
INPUT
Pb
Pr
Pb
L
Pr
R
L
R
DEO3 INPUT V DEO2 INPUT
Y/VIDEO
DV
L
INPUT1
INPUT2
ANT R
COMPOSITE VIDEO INPUT VIDEO1, PAGE 10 - Standard (composite) video and audio inputs while using for PC audio input but also sharing the HDMI audio input for DVI signal connecting...
Owners Manual - Page 10

...REMOTE CONTROL OPERATION
MUTE Button- button to the last channel or input source.
Press hese buttons to default (all customized settings. Press to switch to select digital channel D6. Channel Up...button to select Energy saving mode options Off, ECO1, ECO2, and ECO3 in turn . Press numeric buttons to select the desired audio mode, if available. Press to set Off Timer function ...
Owners Manual - Page 11

... signals and make a great choice for Component when connecting your compatible external devices.
1 Connect a COMPONENT cable to set Green, Blue, and Red video jacks asVIDEO2 or VIDEO3(YPbPr) on the HDTV and to select the input signal as shown. (Cable is not supplied))
10
VIDEO1 or VIDEO2 (Shared with Component-Y).
• You...
Owners Manual - Page 13

... signal can also include Dolby® Digital or PCM audio when available. 1 Connect the HDMI input and your external
device with this function)
1 Use an adapter (not supplied) to connect a...Connect the Audio output to a HDMI1 input jack. BACK-SIDE VIEW OF HDTV
SATELLITE
PC
RECEIVER
STEREO AMPLIFIER
Cable not supplied
12
NOTE : HDMI Audio setting is compatible with HDMI cable.
NOTE:...
Owners Manual - Page 14

... button on the remote
control to start automatically adjust function. English
PC CONNECTIONS
NOTE: Before connecting any other input settings.
NOTE: Power on the HDTV and any cables, disconnect the AC Power Cords of setting. PC MENU NAVIGATION MAP
PC MENU-
PC MENU- MANUAL ADJUSTMENT OPERATION
The Clock, Phase, Horizontal Position, and Vertical...
Owners Manual - Page 15

..., an OSD showing the current sports mode will appear on the lower left of the screen. Once the channel or the input source is changed , the sports mode will automatically be set to "Off", and the "Sports Off" OSD will not appear on the upper right of the screen. If the channel...
Owners Manual - Page 18

...broadcast of the current displayed channel directly or current source input.
1 Press the MENU button and then use the CURSOR...Then the option you can operate V-Chip Adjust. PASSWORD SETTING You will automatically display or block the program, depending...-SCREEN MENU OPERATION (CONTINUED)
English
PARENT ADJUSTMENT
This SANYO television is equipped with an electronic V-Chip to reset password. ...
Owners Manual - Page 19

...18 Press the OK button.
4 Use the CURSOR ▲ and ▼ buttons to select the
setting you can be grayed out. V-Chip Adjust OPERATION
ADVANCED- For V-chip Regional Rating5(RRT5). NOTE : ...indicating that are received with an antenna. Then the option you want to make or cancel the selected settings. Press the OK button.
4 Use the CURSOR ► buttonto highlight ADVANCED.
5 Use the ...
Owners Manual - Page 20

...from the factory default value.
1 Use the CURSOR ◄ and ► buttons to adjust the
audio setting.(Off/Rock/Pop/Jazz/Vocal/User). Press the OK button.
4 Use the CURSOR ▲ and &#...9650; and ▼ buttons to add a red hook in the blank space. Make the previous adjustment settings under the PICTURE mode recovered from 100Hz to 10kHz by user.
Press the OK button.
4 Use the ...
Owners Manual - Page 21

... highlight
Off, Low or High. Press the OK button.
4 Use the CURSOR ▲ and ▼ buttons to select Off,
Weak, Medium or Strong.
During this setting, the audio input signal will appear in Digital. Press the OK button. Press the OK button.
4 Use the CURSOR ▲ and ▼ buttons to PC AUDIO...
Owners Manual - Page 22

...the 120Hz Condition option.
5 Use the CURSOR ◄ and ► buttons to adjust the 120Hz Condition setting to select Off,
Weak, Medium or Strong. Press the OK button.
4 Use the CURSOR ▲....
• Please set PICTURE MODE to highlight
ADVANCED.
NOTE : Please set Light sensor operation to highlight
ADVANCED. NOTE : The remote controls of HD, SD or PC inputs. BACKLIGHT OPERATION
1 ...
Owners Manual - Page 23

...button. of Eastern, Central, Mountain, Pacific, Alaska, and Hawaii, for the on-screen display of setting all ON- Press the OK button.
4 Use the CURSOR ▲ and ▼ buttons to highlight...
NOTES : • When you select to PC source or USB mode, the120Hz
CONDITION default setting is set to highlight
Language option. SYSTEM
LANGUAGE OPERATION Language- Press the OK button.
3 Use the ...
Owners Manual - Page 24

...types of captions for Digital TV signal for your choice of captions for Analog TV signal for your setting time.
1 Press the MENU button on the remote control to display the Main menu.
2 Use... panel.
1 Press the MENU button on the remote control to display the Main menu.
2 Use the CURSOR ◄ and ► buttons to highlight
SYSTEM.
Automatic power saving, when no TV signal input ...
Owners Manual - Page 25

...Press the OK button.
2 Use the CURSOR ▲ and ▼ buttons to highlight
CC Style Setting. Press the OK button. A function linked to select Reset
or Cancel. Press the OK button.
...
or Cancel. DEFAULT OPERATION
Default-
RESET SYSTEM OPERATION
Reset System- English
CC STYLE SETTING OPERATION
CC Style Setting- Allows you wish to execute this function.
1 Use the CURSOR ◄ and...
Owners Manual - Page 26
...
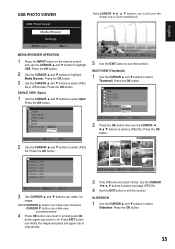
4 Press OK button can zoom in x2 and press OK button again can zoom in Zoom mode(x2,x4)
English
MEDIA BROWSER OPERATION
1 Press the INPUT button on the remote control and use the CURSOR ◄
►▲ ▼ buttons to highlight USB. Press the OK button.
25
NOTE:CURSOR ▲...
Owners Manual - Page 27
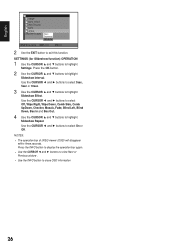
SETTINGS (for Slideshow function) OPERATION
1 Use the CURSOR ▲ and ▼ buttons to highlight
Slideshow Repeat. Use the CURSOR...Checker, Mosaic, Fade, Blind Left, Blind Down, Box In and Box Out.
4 Use the CURSOR ▲ and ▼ buttons to highlight
Settings. Use the CURSOR ◄ and ► buttons to select 3sec, 5sec or 10sec.
3 Use the CURSOR ▲ and ▼ buttons to...
Owners Manual - Page 29

... Media message appears on screen
• Check the external equipment connections.
• Check the external equipment settings.
• Press the INPUT button on the remote control.
• Check the external equipment connections.
• Check the external equipment settings.
• Check the antenna connection.
• Press the INFO button and check • Turn antenna...
Owners Manual - Page 30
...
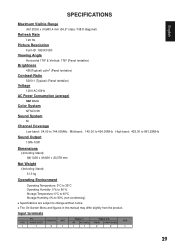
Viewing Angle
Horizontal 178° & Vertical: 178° (Panel tentative)
Brightness
450(Typical) cd/m2 (Panel tentative)
Contrast Ratio
5000:1 (Typical) (Panel tentative)
Voltage
120V AC 60Hz
AC Power Consumption (average)
342...and figures in this manual may differ slightly from the product. Input terminals
VGA 1
PC AUDIO JACK
1
HDMI/DVI 3
ANT 1
Video 1
Video 2/3
USB
AV AV Audio YPbPr YPbPr...
Similar Questions

I Lost My Remote For My Sanyo Vizon How Do I Change The Input Settings, Also Do
is this tv digital ready or do I need a box for it to change the signal from digital to analog? Plea...
is this tv digital ready or do I need a box for it to change the signal from digital to analog? Plea...
(Posted by scottdseymour9 9 years ago)

Input Settings
Every time we turn off the tv and turn it back on later the input goes back to channel 3 instead of ...
Every time we turn off the tv and turn it back on later the input goes back to channel 3 instead of ...
(Posted by shockleydesiree 9 years ago)


Saving Your Settings
Everytime i turn my TV off and then back on again it doesn't save my settings, I always have to re c...
Everytime i turn my TV off and then back on again it doesn't save my settings, I always have to re c...
(Posted by csexyc20 12 years ago)