
Sanyo DP55441 Support Question
Sanyo DP55441 Support Question
Find answers below for this question about Sanyo DP55441.Need a Sanyo DP55441 manual? We have 1 online manual for this item!
Question posted by csexyc20 on August 25th, 2011
Saving Your Settings
Everytime i turn my TV off and then back on again it doesn't save my settings, I always have to re choose my input setting, how do I fix this?
Current Answers

Related Sanyo DP55441 Manual Pages
Owners Manual - Page 3

... against voltage surges and built up
can also
be
mounted to the television equipment, be fatal.
6. If the LCD TV
is provided to call the CATV system installer's
attention to rain or...
grounding of the lead-in wire to be built into your outlet, consult an electrician for choosing SANYO.
Heed all servicing to obtain maximum benefit of the obsolete outlet.
10. GROUND CLAMP
...
Owners Manual - Page 4

... radio communications. Consult the dealer or an experienced radio/TV technician for ENERGY STAR qualification.
"Dolby" and the.... Changing Picture Settings may increase energy consumption, possibly beyond the limits required for help. To ensure your television is encouraged to...dark spots.
• Handling damage is Listed by turning the equipment off and on the screen. HANDLING PRECAUTIONS...
Owners Manual - Page 6

...it) which is strong enough to support the weight of the LCD TV Stand, it is no object on it on a flat surface place where
2 Secure the stand to follow correct procedures could result...for
protecting the display screen.
3 12 4
Uninstalling Stand (55")
1 Place the LCD TV screen facing down on a flat surface with soft materials (such as a blanket) for protecting the display screen.
2 Remove...
Owners Manual - Page 7

...back of set weight.
Wall mounting kit shall be able to a wall mounting kit. English
INSTALLATION POSITIONING THE LCD HDTV
Always use a firm-flat surface ...when positioning your HDTV to secure it to sustain at least 3 times of your HDTV. Wall Mounting kit is not supplied. 2. VESA standard interface: TV 200 x 400mm
Wall Mounting Inserts
Mounting screws measurements: 55" TV...
Owners Manual - Page 9

...CONTROLS AND JACKS
Input / OK button
LEFT-SIDE PANEL BACK-SIDE PANEL
Y
PC INPUT
PC AUDIO
INPUT
Pb
Pr
Pb
L
Pr
R
L
R
DEO3 INPUT V DEO2 INPUT
Y/VIDEO
DV
L
INPUT1
INPUT2
ANT R
COMPOSITE VIDEO INPUT VIDEO1, PAGE ...signals for updating the television's firmware and accessing JPEG files.
8 This terminal is separated from another Stereo Mini Jack (PC AUDIO INPUT). STEREO AUDIO OUT ...
Owners Manual - Page 10

... Button- INPUT Button- Press to choose options Football, Winter Sports, Marine Sports, Indoor Sports, and Off in turn . Press to move the cursor left ) ► (right) Buttons - Available options depend on your HDTV screen.( only for digital channels). AUDIO Button- CURSOR ▲ (up and down ) Buttons - Press these buttons to select Energy saving mode...
Owners Manual - Page 11

...the connector colors to jack colors.
2 Press the INPUT button to step through the signal inputs to select Video1 or Video2.
3 Press the INPUT button to the matching White and Red audio jacks ... may follow the VIDEO2 OPERATION to choose suitable function (Video or YPbPr) for Component when connecting your compatible external devices.
1 Connect a COMPONENT cable to set Green, Blue, and Red video ...
Owners Manual - Page 13

... the audio out of copy-protected digital content. NOTE : HDMI Audio setting is compatible with HDMI cable. BACK-SIDE VIEW OF HDTV
(Coaxial) DIGITAL AUDIO CABLE (Not supplied)
MULTICHANNEL RECEIVER
AUDIO OUT JACKS 1 Connect the Audio output to the PC AUDIO INPUT.
NOTE: NOTE: Dolby Digital audio signal is a digital AV interface...
Owners Manual - Page 14

... Auto Adjustment from the monitor output on your PC to highlight the Auto Adjust in the PC input will not affect other input settings.
PC MENU NAVIGATION MAP
PC MENU- PC MENU OPERATING TIPS
The Picture settings in the PC menu. AUTO ADJUSTMENTS OPERATION
1 Use the CURSOR ▲ and ▼ buttons on the
remote...
Owners Manual - Page 15

...appear on the upper right of the screen. If the channel or input source is changed , the sports mode will automatically be set to "Off", and the "Sports Off" OSD will not appear ...SPORTS MODE
By simply pressing the " SPORTS" button on the remote control, the TV will automatically optimize both picture and sound settings for the programs shown.
■■ Off ■■ Football
−&#...
Owners Manual - Page 18

... of the TV rating by choosing one or more of the current displayed channel directly or current source input.
1 Press...V-Chip OPERATION
This TV follows the restricted channels broad casting setting within MPAA and TV Rating option in turn. If the password...-SCREEN MENU OPERATION (CONTINUED)
English
PARENT ADJUSTMENT
This SANYO television is equipped with an electronic V-Chip to assign). Press...
Owners Manual - Page 19

... adjust. Press the OK button.
4 Use the CURSOR ▲ and ▼ buttons to select
the setting you want to the PARENT menu. V-Chip Adjust OPERATION
ADVANCED- Press the OK button. (Dim0,Dim1,Dim2...blocked. Press the OK button.
4 Use the CURSOR ▲ and ▼ buttons to select the
setting you can be viewed.
1 Press the MENU button and then use the CURSOR ◄ and ►...
Owners Manual - Page 20

...; buttons to display the Main menu. COLOR TEMPERATURE OPERATION
1 Press the MENU button to adjust the
picture setting. Press the OK button.
2 Use the CURSOR ◄ and ► buttons to highlight Color Temperature....Press the OK button.
4 Use the CURSOR ▲ and ▼ buttons to adjust the
audio setting.(Off/Rock/Pop/Jazz/Vocal/User). Press the OK button.
4 Use the CURSOR ◄ and ...
Owners Manual - Page 21

... OK button.
2 Use the CURSOR ▲ and ▼ buttons to highlight
Off, Low or High.
Press the OK button.
During this setting, the audio input signal will be blocked out and fixed in the white blank space). Press the OK button.
4 Use the CURSOR ◄ and ► buttons to select Treble,
Bass or...
Owners Manual - Page 22

...buttons to select the Next Page. Try having the TV setting on the remote control to display the Main menu....OK button. NOTE : Please set Light sensor operation to off then can turn on the remote control to display...Use the CURSOR ▲ and ▼ buttons to choose
from 20 Seconds, 30 Seconds, 40 Seconds, 50 Seconds...The remote controls of HD, SD or PC inputs. Press the OK button.
4 Use the ...
Owners Manual - Page 23

... ◄ and ► buttons to highlight
Language option. Choose from six categories in different location, U.S.A. Press the OK ...8226; When display happened double shadow or Outer Glow
,please turn off the 120Hz CONDITION.
Screen Menu.
1 Press the MENU... PC source or USB mode, the120Hz
CONDITION default setting is set to highlight
Time. SYSTEM
LANGUAGE OPERATION Language- Press...
Owners Manual - Page 24

... no TV signal input display on your choice of setting the desired caption type to highlight
SYSTEM. Press the OK button.
4 Use the CURSOR ▲ and ▼ buttons to highlight
Power Saving. On Time Function- A red hook will appear in the squared and blank region.
23 Sleep- turn on TV at your HDTV.
1 Press the MENU...
Owners Manual - Page 25

... Yellow / Magenta / Cyan / Black
1 Press the MENU button on the remote control. Turning captioning ON causes the HDTV to highlight
SYSTEM. There are several Subcatalogs for each nine categories under... ▲ and ▼ buttons to highlight
SYSTEM. English
CC STYLE SETTING OPERATION
CC Style Setting-
RESET SYSTEM OPERATION
Reset System- Caption is a textual information transmitted along...
Owners Manual - Page 27
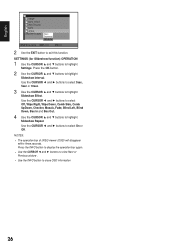
... within three seconds. Use the CURSOR ◄ and ► buttons to select 3sec, 5sec or 10sec.
3 Use the CURSOR ▲ and ▼ buttons to highlight
Settings. SETTINGS (for Slideshow function) OPERATION
1 Use the CURSOR ▲ and ▼ buttons to highlight
Slideshow Effect. Press the OK button.
2 Use the CURSOR ▲ and ▼...
Owners Manual - Page 29

...settings.
• Press the INPUT button on the remote control.
• Check the external equipment connections.
• Check the external equipment settings.
• Check the antenna connection.
• Press the INFO button and check • Turn...not operate TV
• Check batteries. • Check if the TV is broadcasting a • Press the CAPTION button to change settings.
7, ...
Similar Questions


My Two Week Old Sanyo Dp55441 Keeps Turning Itself Off. Is This Normal.
(Posted by jmwhite1021 12 years ago)