Ryobi RTS21 Support Question
Ryobi RTS21 Support Question
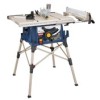
Find answers below for this question about Ryobi RTS21.Need a Ryobi RTS21 manual? We have 12 online manuals for this item!
Question posted by info10977 on February 23rd, 2017
Can't Raise/lower Blade
Hello. There are 2 screws that go through a plate involved in raising and lowering the blade. One is connected to the crank/handle used to raise the blade. It goes through the block which rides in a channel on one of the connected plates.The other seems to go through the plate and maybe supports the weight?? Anyway, my guess is that the nut on the supporting screw (it is threaded below the plate) must have come off which then caused the lock washer on the crank screw to come off (since it then supported all the force of raising and lowering) so the blade can't be moved. I tried putting a lock washer on the "supporting" screw but the lack washer on the crank screw keeps popping off and I doubt I will be able to get one to stay on since the groove it sits in is very shallow. The saw works fine except for this and I hate to trash it. The newer saws have a slightly different design and I was wondering if I can order the new parts and use them to fix the saw. Comments/suggestions??
Current Answers
Related Ryobi RTS21 Manual Pages
English Manual - Page 3

... (SPLITTER) IN PLACE and in working order.
KEEP BLADES CLEAN, SHARP, and with approved ground connection that may affect its intended function. When not in damp or wet locations or expose to operate tool.
DON'T OVERREACH. The use power tools in use of the tool, a guard or other part that it was not designed for...
English Manual - Page 11

...workpiece and is raised and lowered with the locking handle. A metal piece of the blade guard assembly, ...slightly thinner than the speed of the rip fence for rip cuts. BEVEL SCALE -
Grooves run along the top and sides of this handwheel to -read scale provides precise measurements for use this tool...
English Manual - Page 17

... over
the hex nut. To tighten the blade: Using the smaller blade wrench, place the flat open end
on the flats on the arbor shaft. Insert the closed end of the larger blade wrench over the
hex nut.
Raise the saw blade and remove the throat plate. Make sure the bevel locking lever is...
English Manual - Page 18
... with the saw table and is completely closed.
Position the end plug (LF) over the screw hole.
Insert a screw into the bottom slot of the spreader: Unplug the saw.
Raise the saw blade by turning the height/bevel adjusting handwheel counterclockwise.
Lift the anti-kickback pawls and place a framing...
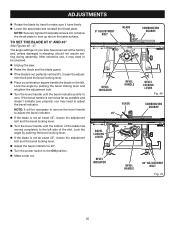
English Manual - Page 23

... angle of the blade are below the top surface.
Push the bevel locking lever to the left for elevation mode.
Raise the blade by loosening the screw and setting it ...
TO CHANGE BLADE DEPTH
See Figure 21.
Retighten the screw.
If the bevel indicator is at 90°, adjust the indicator by turning the height/bevel adjusting handwheel counterclockwise or lower it .
to...
English Manual - Page 34

... not start any adjustment, make sure the tool is to check your setups carefully with a framing square and make practice cuts in contact with the accessory. Make sure the blade nut is securely pushed to the side of the saw blade, raise the blade guard, and remove the throat plate.
Make sure the bevel locking...
English Manual - Page 35
... allow the throat plate to the ON position.
Make a test cut.
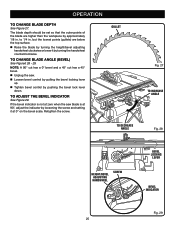
0° ADJUSTMENT BOLT
BLADE
BEVEL INDICATOR
BEVEL handle
BLADE 45°
BEVEL LOCKING
LEVER
BEVEL INDICATOR
BEVEL HANDLE
COMBINATION SQUARE
BEVEL LOCKING
LEVER Fig. 46
COMBINATION SQUARE
45° ADJUSTMENT BOLT Fig. 47
35 After extensive use, it turns freely. Lower the saw have...
User Manual - Page 3

... CUTTING AREA. Cluttered areas and benches invite accidents. Make sure your hand and frees both hands to remove cut material when blade is recommended for which it was designed. USE RIGHT TOOL. The smaller the gauge number, the heavier the cord. DRESS PROPERLY. They can get caught and draw you into...
User Manual - Page 10

... raised and lowered with the locking handle. Bevel angles are attempting. This handwheel also makes the adjustment for a miter cut . MITER GAUGE - The miter gauge rides in the grooves on the front of the tool gives the operator additional support when cutting long workpieces.
SCALE -
This saw table. WARNING:
Do not use of the blade guard assembly...
User Manual - Page 16

... "down" position for all nonthrough cutting: Remove the throat plate.
Raise the saw blade by turning the height/bevel adjusting handwheel clockwise.
Unlock the release... plate.
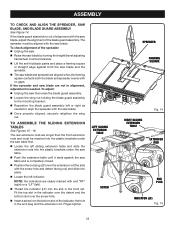
ASSEMBLY
TO REMOVE/REPLACE THE THROAT PLATE
See Figure 10.
Lower the blade by turning the height/bevel adjusting handwheel counterclockwise.
To remove the throat plate,...
User Manual - Page 17

... the blade: Using the blade wrench, place the flat open end of a blade wrench on the flats on the arbor shaft. Insert the closed end of the blade wrench over the blade nut. Do not overtighten. Reinstall the throat plate. Check all clearances for through cuts. Unplug the saw. Raise the saw blade...
User Manual - Page 18

...
Fig. 15
SCREWS
VERTICAL ADJUSTMENT
HORIZONTAL ADJUSTMENT Fig. 16 NOTE: Blade alignment can be in place by turning the height/bevel adjusting handwheel clockwise.
Remove the anti-kickback pawls and blade guard assembly. Check the blade guard assembly for squareness and continue to unlock.
With the front of the blade guard raised, lower the back...
User Manual - Page 25
... so that the outer points of the blade are below the top surface. Raise the blade by turning the height/bevel adjusting
handwheel clockwise or lower it by loosening the screw and setting it at 90°, adjust the indicator by turning the handwheel counterclockwise. TO CHANGE BLADE ANGLE (BEVEL)
See Figured 28 - 29. TO...
User Manual - Page 35

... tool is unplugged from the power supply and the switch is locked. Raise the saw blade to be within the limits stamped on the riving knife.
Unplug the saw. Remove the blade guard and anti-kickback pawls. Lower the saw blade and reinstall the throat plate. To install a standard blade: Place the new blade...
User Manual - Page 36

...The adjustment screws must be checked.
Unplug the saw.
Raise the blade.
Remove the blade guard ...screw. After extensive use, they may need to 45°.
Make a test cut. Check again for squareness and continue to an authorized service center.
0° ADJUSTMENT SCREW
BLADE
COMBINATION SQUARE
HANDLE
BEVEL
INDICATOR
BEVEL LOCKING
LEVER
Fig. 50
BLADE...
User Manual - Page 38

... recommended can result in the Assembly section. Clamp screw is out of this tool are dirty or sticky.
Replace the wood. The use any attachments or accessories not recommended by the manufacturer of adjustment. Blade is heeling. Replace blade.
Clean and wax rails.
Blade is damaged. Check saw blade" in serious personal injury.
Work surface is misaligned...
User Manual 5 - Page 3
... the operator's manual for an extension cord 25 feet or less in length. Keep cord away from blades. Cluttered areas and benches invite accidents. DO NOT leave tools or pieces of parts, mounting and any tool.
USE RECOMMENDED ACCESSORIES. It will cause a drop in line voltage resulting in loss of personal injury.
...
User Manual 5 - Page 11

...the locking handle. Before use this product, familiarize yourself with the height/bevel adjusting handwheel. carbide blade. The blade is secured ...rides in which helps keep the removable blade guard down over the saw blade teeth and becomes a riving knife. SCALE - This saw has an easy access power switch located below the saw blade for rip cuts. The easy-to lower and raise the blade...
User Manual 5 - Page 19
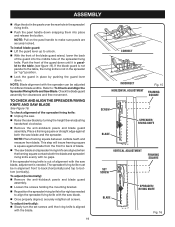
... HORIZONTAL ADJUSTMENT
Fig. 15
FRAMING SQUARE
SCREW BLADE
SPREADER/ RIVING KNIFE
VERTICAL ADJUSTMENT
FRAMING SQUARE
SET SCREW
BLADE
SPREADER/ RIVING KNIFE
Fig. 16 To check alignment of alignment with no gaps. If the spreader/riving knife is parallel to unlock.
With the front of the blade guard raised, lower the back of the guard into place...
User Manual 5 - Page 26

... the wheel counterclockwise increases the angle of the blade are below the top surface. Raise the blade by turning the height/bevel adjusting
handwheel clockwise or lower it by pushing the wheel in toward the
saw blade is at 90°, adjust the indicator by loosening the screw and setting it clockwise decreases the angle...
Similar Questions

Ryobi Lower Blade Clamp
Where can I buy a ryobi sc164 scroll saw lower blade clamp?
Where can I buy a ryobi sc164 scroll saw lower blade clamp?
(Posted by abirdboy 7 years ago)

Vibration In My Table Saw
I tried a 8in dia dado stack of 1/4 in, the saw vibrated so bad the blades retracted down in the saw...
I tried a 8in dia dado stack of 1/4 in, the saw vibrated so bad the blades retracted down in the saw...
(Posted by Lbtrail 8 years ago)

Lower Blade Guard
My lower blade guard is stuck, any ideas on getting it loose?
My lower blade guard is stuck, any ideas on getting it loose?
(Posted by kendallbailey969 9 years ago)

Lower Blade Guard Ts1342l Miter Saw
How do I replace the spring on my TS1342L 10" lower blade guard?
How do I replace the spring on my TS1342L 10" lower blade guard?
(Posted by MRELVIS 12 years ago)