Get support for Ricoh Pro 907EX

Ricoh Pro 907EX Support Question

Ricoh Pro 907EX Support Question

Find answers below for this question about Ricoh Pro 907EX.
Need a Ricoh Pro 907EX manual? We have 3 online manuals for this item!
Question posted by nadavk on December 16th, 2014

How Do You Set The Fusing Unit Correctly?

How do you set the fusing unit correctly? It's really urgent. Thanks, Nadav

Current Answers

Answer #1: Posted by TommyKervz on December 17th, 2014 3:21 AM
This answer was accepted by the poster of the original question.
TommyKervz

Member since:
January 10th, 2013

Points: 17,776,813
1,090
points
The fusing unit may not be installed correctly. Turn the printer off and re-install the fusing unit.

If the message is still displayed after re-installation, contact your sales or service representative.

See Replacing Maintenance Kit B for fusing unit installation


Hope that is helpful.
Kervz at www.satechhelp.co.za

Related Ricoh Pro 907EX Manual Pages

Quick Start Guide - Page 4

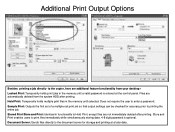
Sample Print: Outputs the first set of a multiple-set print job so that output settings can be checked for storage and printing at the control panel. Document Server: Sends files directly to the document server for accuracy prior to enter a ...
Quick Start Guide - Page 5

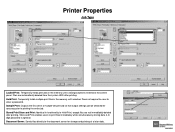
... at a later date. Store and Print enables users to enter a password. Sample Print: Outputs the first set of a multiple-set print job so that output settings can be checked for storage and printing at the control panel. Printer Properties Job Type Locked Print: Temporarily holds print jobs in the memory until selected. Stored Print...
Quick Start Guide - Page 9

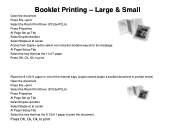
... document Press File >print Select the Ricoh Print Driver (PCL5e/PCL6) Press Properties At Page Set up Tab Select Duplex>booklet Select Staple>2 at center Across from Duplex option select non reduction... the document Press File >print Select the Ricoh Print Driver (PCL5e/PCL6) Press Properties At Page Set up Tab Select Duplex>booklet Select Staple>2 at center At Paper Setup Tab Select the tray that ...
Quick Start Guide - Page 11

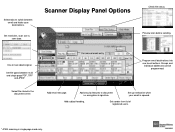
..., TIFF and JPEG* Select file stored in single page mode only. encryption & signature. Set sender from list of registered users. * JPEG scanning in the document server. Preview scan ... addresses can be programmed. Scanner Display Panel Options Check file status. Set resolution, scan size & scan type. Set up notification when your email is opened. Add subject heading. Select ...
Quick Start Guide - Page 16

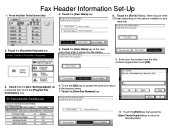
... numeric keypad then touch [OK] 3. Touch the [OK] key to accept the name and return to Standby Mode Check that the [Gen. Settings/Adjust] tab is selected then touch the [Program Fax Information] key 6. Touch the [Own Name] key 8. Touch the [Facsimile Features] key...Exit] key then press the [User Tools/Counter] key to return to the previous menu 7. Fax Header Information Set-Up 1.
Quick Start Guide - Page 19

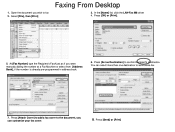
At [Fax Number] type the Recipient's Fax# just as Destination] to confirm Recipient's destination. Press [Set as if you wish to send same fax. 7. You can customize your fax cover. 8. Open the document you were manually dialing the number at a Fax ...
Troubleshooting Guide - Page 12

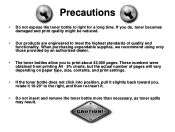
... might be reduced. • Our products are engineered to meet the highest standards of pages will vary depending on paper type, size, contents, and print settings. • If the toner bottle does not click into position, pull it . • Do not insert and remove the toner bottle more than necessary, as...
Troubleshooting Guide - Page 18

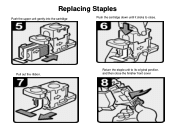
Replacing Staples (You may need to pull out the internal finisher tray to access the stapler) Open the finisher door Pull out the Staple Unit (Gently pull out the stapler cartridge) Holding both sides of the cartridge, pull up the upper unit (sides with arrows) and remove the empty case Push the new refill into the cartridge until it clicks.
Troubleshooting Guide - Page 19

Return the staple unit to close the finisher front cover Pull out the ribbon. Replacing Staples Push the upper unit gently into the cartridge Push the cartridge down until it clicks to its original position, and then close .
Troubleshooting Guide - Page 21

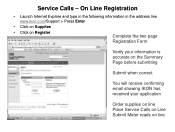
... on Supplies • Click on Register Complete the two page Registration Form Verify your information is accurate on the Summary Page before submitting Submit when correct You will receive confirming email showing IKON has received your application Order supplies on line Place Service Calls on Line Submit Meter reads on line...
Quick Start Guide - Page 2

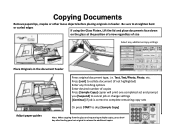
... Select any finishing options Enter desired number of copies Press [Sample Copy] copier will print one completed set and prompt you [Suspend] to cancel job or change settings [Continue] if job is correct to complete remaining copy sets Or press START to skip [Sample Copy] Adjust paper guides Note: When copying from the glass...
Quick Start Guide - Page 3

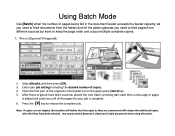
... been scanned, placed the next batch, pressing start each time a new page or pages is added and continue until all the pages for your job settings including the desired number of pages being fed in the feeder (or on the glass) press (Start) key 5. Enter your job is complete. 6. You cannot...
Quick Start Guide - Page 4

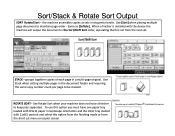
...you must have a finisher to keep jobs separated . To use this option from the finishing mode or from the next set from the short cut menu on copier screen. Use Rotate Sort when your machine does not have one paper tray loaded ... & Rotate Sort Output SORT Rotate/Sort - STACK - the machine assembles copies as [Collate]. Use Stack when setting multiple pages in a multi-page original.
Quick Start Guide - Page 8

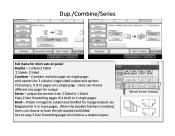
... - Dup./Combine/Series Full menu for short cuts on a single page. output documents from 2 Sided to have the job stapled and folded. Book - Default Screen Settings
Quick Start Guide - Page 10

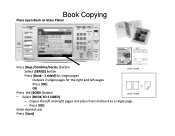
Press [OK] Enter desired sets Press [Start] Book Copying Place open Book on Glass Platen Press [Dup./Combine/Series ]button Select [SERIES] button Book 1-Sided Press [Book - 1 sided] for single ...
Quick Start Guide - Page 18

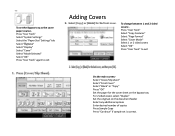
... Bypass tray as the cover paper source:Press "User Tools" Select "System Settings" Select the "Paper Size" Settings" tab Select "Bypass" Select "Display" Select "Cover" Select "Mode Selected" ... Cover" Select "Blank" or "Copy" Press "OK" Set the paper for the cover sheet on the bypass tray For 2 sided covers select "Duplex" Set the originals on the document feeder Select any additional options Enter...
Quick Start Guide - Page 19

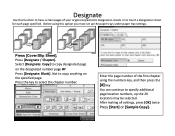
...: Copy] to insert a designation sheet for each page specified. After making all settings, press [OK] twice. Press [Start] or [Sample Copy]. Enter the page...can continue to specify additional page location numbers, up the paper trays under paper tray settings. Designate Use this option you must set up the 20 locations may be selected. Press [Designate / Chapter]. Press the key ...
Quick Start Guide - Page 20

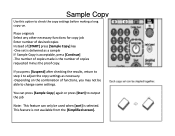
... job Note: This feature can press [Sample Copy] again or press [Start] to change some settings. requested minus the proof copy. Place originals Select any other necessary functions for copy job Enter number...be used when [sort] is selected. Sample Copy Use this option to check the copy settings before making a long copy run. This feature is delivered as necessary. -Depending on the combination of ...
Quick Start Guide - Page 31

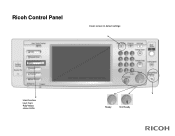
Ricoh Control Panel Clears screen to default settings Hard function keys have Red/Yellow status LEDs 8.5" Full Color W-VGA Screen Ready Not Ready
Quick Start Guide - Page 37

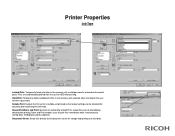
... automatically deleted from the system HDD after printing. Sample Print: Outputs the first set of a multiple-set print job so that output settings can be checked for storage and printing at the control panel. Document Server: Sends.... Does not require the user to printing the entire job. Printer Properties Job Type Locked Print: Temporarily holds print jobs in the memory until selected.

Similar Questions

Ricoh Pro907ex Fusing Unit
How do I set fusing unit correctly? Where is Fusing unit located?
(Posted by kuhla 8 years ago)
How To Get Individual Copy Counts For Ricoh Pro 907ex
Can I have a step by step instruction on how I can get an individual copy count for all users? Each ...
(Posted by lpeluso76442 9 years ago)
My Ricoh Pro 907ex Copier Displays That Replacement Required, Replacefusing Unit
my ricoh pro 907ex copier displays that replacement required, replace fusing unit. how can i reset i...
(Posted by azizsaidmparuka 9 years ago)
Ricoh Printers Pro 8110s Manual
How to print from a USB flash drive?
(Posted by markgilmore301 9 years ago)
Ask a New Question
Use the box below to post a new question about this Ricoh product .
Points & Prizes
  • You can earn points for nearly everything you do on HelpOwl.com
  • You can trade in those points for gift cards at leading retailers such as Amazon.com and Walmart
  • It's that simple!
See How it Works
Create a Free Account

Ricoh Manuals

Find free Ricoh Pro 907EX manuals and user guides available at ManualOwl.com. Try out our unique manual viewer allowing you to interact with manuals from directly within your browser!

Ricoh Reviews

View thousands of Ricoh user reviews and customer ratings available at ReviewOwl.com.

Contact Information

Complete Ricoh customer service contact information including steps to reach representatives, hours of operation, customer support links and more from ContactHelp.com.

Scoreboard Ratings

See detailed Ricoh customer service rankings, employee comments and much more from our sister site.