Ricoh Aficio MP C5000 Support Question
Ricoh Aficio MP C5000 Support Question
Find answers below for this question about Ricoh Aficio MP C5000.Need a Ricoh Aficio MP C5000 manual? We have 3 online manuals for this item!
Question posted by dtyler on November 12th, 2012
Need 'sender's' Option Highlited After Entering Email Address In Scanner.
When selecting an email addr to scan in MP5000, it can not scan because I can not select "sender's" button. It is not one of the options highlited.
Requests for more information
Request from dtyler on November 14th, 2012 6:09 AM
freginold - So, I need to set up email addresses for everyone in our office as a "sender" AND then again as a "recipient"? Thank you for all your help!
freginold - So, I need to set up email addresses for everyone in our office as a "sender" AND then again as a "recipient"? Thank you for all your help!
Request from dtyler on November 14th, 2012 9:39 AM
freginold - When I scanned document to (recipient) co-worker's email address I've set up in Scanner, and selected my email set up in Scanner as Sender & hit the "#" indicating finished scanning, I get an error msg: Transmission has Failed. To check the Current Status Press Scanned File Status". Where I used to work, I'd scan doc to MY email (setup in Scanner), & it would scan to my PC without any problem. Have any idea what I could be doing wrong now. THANK YOU!!!!!
freginold - When I scanned document to (recipient) co-worker's email address I've set up in Scanner, and selected my email set up in Scanner as Sender & hit the "#" indicating finished scanning, I get an error msg: Transmission has Failed. To check the Current Status Press Scanned File Status". Where I used to work, I'd scan doc to MY email (setup in Scanner), & it would scan to my PC without any problem. Have any idea what I could be doing wrong now. THANK YOU!!!!!
Current Answers
Answer #1: Posted by freginold on November 13th, 2012 9:21 AM
freginold

Member since:
December 20th, 2011 Points: 23,253,885

Member since:
December 20th, 2011 Points: 23,253,885
Hi, in order for the Sender option to be highlighted, you need to set at least one email address as a sender. You can do this through the address book (User Tools/Counter > System Settings > Address Book Management). Select the user you want to use as a sender, then go to the Protection tab and select Sender.
You can select as many different users to be senders as you want. Each user that you select as a sender will show up on the sender screen when you press the Sender button when scanning.
You can select as many different users to be senders as you want. Each user that you select as a sender will show up on the sender screen when you press the Sender button when scanning.
Related Ricoh Aficio MP C5000 Manual Pages
Quick Start Guide - Page 3
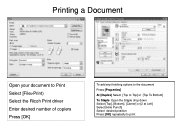
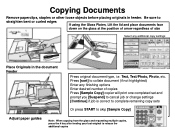
... document to Print Select [File>Print) Select the Ricoh Print driver Enter desired number of copiers Press [OK]
To add any finishing options to the document
Press [Properties]
At [Duplex] Select [Top to Top] or [Top To Bottom]
To Staple: Open the Staple drop down Select [Top], [Bottom], [Center] or [2 at Left] Select [Hole Punch] Select desired position...
Quick Start Guide - Page 4
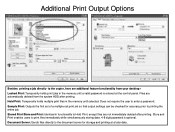
...digit password is entered at a later date. Store and Print enables users to enter a password. Hold Print: Temporarily holds multiple print files in the memory until a valid password is optional. Sample Print:...Print/Store and Print: Identical in the memory until selected. Additional Print Output Options
Besides printing a job directly to the copier, here are additional feature functionality from...
Quick Start Guide - Page 5
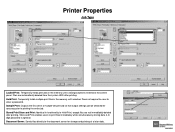
...optional. Hold Print: Temporarily holds multiple print files in functionality to Hold Print, except files are automatically deleted from the system HDD after printing. Printer Properties
Job Type
Locked Print: Temporarily holds print jobs in the memory until selected. Store and Print enables users to the document server for accuracy prior to enter... is entered at a later date.
Quick Start Guide - Page 11
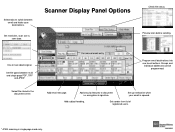
... & signature. Add subject heading.
Select tabs to document i.e. Set resolution, scan size & scan type.
Set file types between email and folder scan destinations.
For manual email entry
Program email destinations into one touch buttons. Set sender from list of registered users.
* JPEG scanning in the document server. Scanner Display Panel Options
Check file status. Preview...
Quick Start Guide - Page 12

Place Originals in Feeder or on your operating system and device.) At copier Screen Press [Scanner]
2. Select [E-mail] or [Folder] Tab 3. Select destination [email address or folder location
4. Press [Start]
(Note: Screenshots are provided for reference purposes only. Your display may vary depending on Glass 5. Basic Scanning
1.
Quick Start Guide - Page 16
...] key
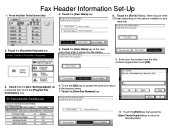
5. Touch the [Own Name] key at the next menu then enter a name from the blue numeric keypad then touch [OK]
3. Settings/Adjust] tab is selected then touch the [Program Fax Information] key
6. Touch the [Own Fax ...key ( there may be other G3 keys depending on the options installed on your fax number from the display keypad
9. Fax Header Information Set-Up
1. Check that the ...
Quick Start Guide - Page 18

... and copier
Will scan and send both sides. Confirmations can send single document to one or more users simultaneously. Select Stored Fax Destination(s) or enter a New Destination using the Numeric Key Pad on Right Side of Installing the LAN fax driver for errors only or off. When Networked, users have the option of Copier...
Troubleshooting Guide - Page 21
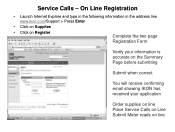
... Internet Explore and type in the following information in the address line www.ikon.com/Support > Press Enter
• Click on Supplies
• Click on Register
...Complete the two page
Registration Form
Verify your information is accurate on the Summary Page before submitting
Submit when correct
You will receive confirming email...
User Guide - Page 3
Black & White Display
Batch & Mixed Originals. Frequently used reduce/enlarge ratios.
Extended feature options including;
These can be added to suit users
needs. Sort, Stack, Staple and punch. margins, stamps, page numbering, covers & slip sheets.
Short cut keys. Finishing options. Simplified Display
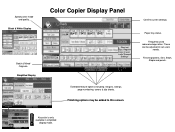
Color Copier Display Panel
Confirm current settings.
Register keys in...
User Guide - Page 4
...
Note: When copying from the glass and requesting multiple copies, press the # key after feeding your last original to collate document (if not highlighted) Enter any finishing options Enter desired number of size
Select any additional copy settings
Place Originals in feeder. Text, Text/Photo, Photo, etc. Press [sort] to release the additional copies
User Guide - Page 9
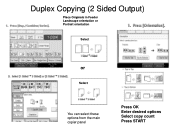
Duplex Copying (2 Sided Output)
Place Originals in Feeder Landscape orientation or Portrait orientation
Select
or
Select
You can select these options from the main copier panel
Press OK Enter desired options Select copy count Press START
User Guide - Page 10
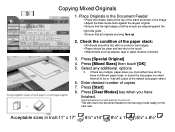
... [OK] 5. Enter desired number of the...8½" Press [Start] 8. This will output al the default auto paper select.
6.
If there are lying face up.
2. Selecting Duplexing must all to be clean and feel dry to normal copy mode ready ...Modes] key when you have all the sizes in different paper trays, or select the size paper you must be output on the same size. Copying Mixed ...
User Guide - Page 15
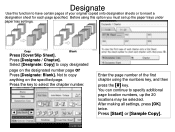
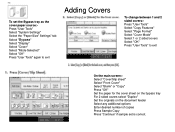
...option you must set up the 20 locations may be selected. After making all settings, press [OK] twice. Copy
Blank
Press [Cover/Slip Sheet]. Select [Designate: Copy] to insert a designation sheet for each page specified. You can continue to specify additional page location numbers, up the paper trays under paper tray settings.
Enter... [Designate: Blank]. Not to select the chapter number.
User Guide - Page 24
...
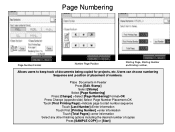
Number Page Position
Starting Page, Starting Number and Ending number,
Allows users to start number sequence
Touch [Last Number]>Enter information Touch First [Printing Number] >enter information
Touch [Total Pages] >enter information Select any other finishing options including the desired number of copies
Press [SAMPLE COPY] or [Start] Users can choose numbering Sequence and position...
User Guide - Page 29
... "User Tools" to exit
On the main screen:Select "Cover/Slip sheet" Select "Front Cover" Select "Blank" or "Copy" Press "OK" Set the paper for the cover sheet on the bypass tray For 2 sided covers select "Duplex" Set the originals on the document feeder Select any additional options Enter desired number of copies Press Sample Copy Press...
User Guide - Page 31

Magazine 2 - Select [Centering] 8. Enter desired number of sets
11. Sided for 4 page originals
9. Select [Dup./Combine/Series]
3. Select [OK]
Use [*Booklet] mode for Simplex originals or
12
2
5. Press [Start]
Optional
Press [Sample Copy] to preview job before running multiple sets
3 4
Use [*Magazine] Mode for Duplexed originals
5. Select [Magazine] *
4. 1 - Booklets...
User Guide - Page 32
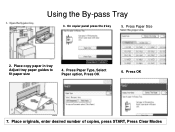
Press Paper Type, Select Paper option, Press OK
6. Place originals, enter desired number of copies, press START, Press Clear Modes Press OK
7. Place copy paper in tray Adjust tray paper guides to fit paper size
4. On copier panel press the # key
5. Press Paper Size
2. Using the By-pass Tray
3.
User Guide - Page 35

Using INTERUPT Option
Use the INTERUPT function when you want to interrupt a long copy job, to make urgently needed copies.
User Guide - Page 52
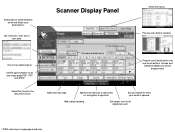
... touch buttons. Add email message.
Select tabs to document i.e.
Add security features to switch between multi and single page PDF, TIFF
and JPEG*
Select file stored in single page mode only. encryption & signature. Set up notification when your email is opened. Groups and
individual addresses can be programmed.
Set sender from list of registered users.
* JPEG scanning in...
User Guide - Page 60
...: If the Aficio MP 6001/MP 7001/MP 8001/MP 9001 Series is available with the Printer/Scanner Unit Type 9001 and standard with the SP versions of manually • re-entering address book entries is...Printer/Scanner Unit Type 9001 must be performed. • ■ Fax Forwarding via the • Wireless LAN option, faxing from the desktop can program the Aficio MP 6001/MP 7001/MP 8001/MP 9001...


