Ricoh Aficio MP C2051 Support Question
Ricoh Aficio MP C2051 Support Question
Find answers below for this question about Ricoh Aficio MP C2051.Need a Ricoh Aficio MP C2051 manual? We have 1 online manual for this item!
Question posted by holdgabrig on July 23rd, 2014
My Ricoh Aficio Mp C2051 Will Not Print A Test Page After I Down Load Drivers
The person who posted this question about this Ricoh product did not include a detailed explanation. Please use the "Request More Information" button to the right if more details would help you to answer this question.
Current Answers
Answer #1: Posted by freginold on July 31st, 2014 12:08 PM
freginold

Member since:
December 20th, 2011 Points: 23,253,895

Member since:
December 20th, 2011 Points: 23,253,895
Hi, the most likely cause is that the print driver does not have the right IP address. Check the IP address of the C2051 (you can check by printing a config page) and verify that it matches up with the IP address shown under the Ports tab of the print driver properties. If it's not the same, change the IP address in the print driver to match the printer's IP address, and once you've applied the change, you should be able to print your test page.
Related Ricoh Aficio MP C2051 Manual Pages
Quick Reference Guide - Page 1
RICOH COPIERS
PRINT ƒ COPY ƒ SCAN TO E-MAIL
Quick Reference Guide
Basic Printing & Scanning Functions
Quick Reference Guide - Page 2
RICOH
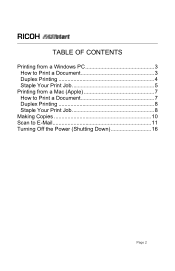
TABLE OF CONTENTS
Printing from a Windows PC 3 How to Print a Document 3 Duplex Printing 4 Staple Your Print Job 5
Printing from a Mac (Apple 7 How to Print a Document 7 Duplex Printing 8 Staple Your Print Job 8
Making Copies 10 Scan to E-Mail 11 Turning Off the Power (Shutting Down 16
Page 2
Quick Reference Guide - Page 3
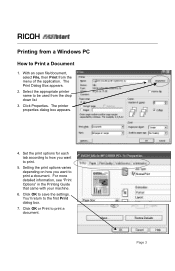
... to save the settings. For more detailed information, see "Print Options" in the Printing Guide that came with your machine.
6. Page 3 Set the print options for each tab according to how you want to print.
5.
Click OK to the first Print dialog box.
7. Click Properties. RICOH
Printing from a Windows PC
How to print a document. The Print Dialog Box appears.
2.
Quick Reference Guide - Page 4
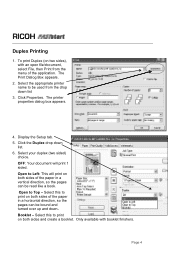
... to be used from the menu of the application. Open to print on two sides), with booklet finishers. The Print Dialog Box appears.
2. Open to print on both sides and create a booklet. Select this to Left: This will print 1 sided. Select this to Top - Page 4 RICOH
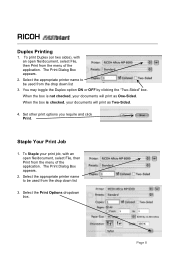
Duplex Printing
1. Display the Setup tab. 5. OFF: Your document will...
Quick Reference Guide - Page 5
... used from the menu of paper in the specified direction. The Print Dialog Box appears.
2.
RICOH
7.
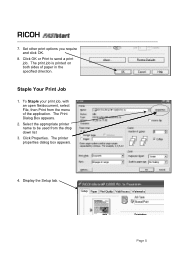
Staple Your Print Job
1. Click Properties. The printer properties dialog box appears.
4. Select the appropriate printer name to send a print job. Display the Setup tab. The print job is printed on both sides of the application. Page 5 To Staple your...
Quick Reference Guide - Page 6
RICOH
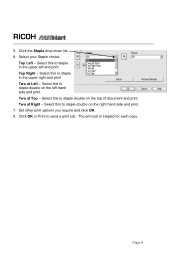
5.
Select this to staple double on the left and print. Select this to send a print job. The print job is stapled for each copy. Click the Staple drop down list. 6. Two at Left - Select this to staple in the upper right and print Two at Top -
Set other print options you require and click OK. 8. Top...
Quick Reference Guide - Page 7
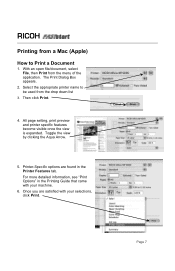
... the appropriate printer name to be used from a Mac (Apple)
How to Print a Document
1. The Print Dialog Box appears.
2. Page 7 RICOH
Printing from the drop down list
3. Printer-Specific options are satisfied with your selections, click Print. For more detailed information, see "Print Options" in the Printer Features tab. With an open file/document, select File...
Quick Reference Guide - Page 8
... 8 When the box is not checked, your documents will print as One-Sided. Staple Your Print Job
1. The Print Dialog Box appears.
2.
Select the Print Options dropdown box. RICOH
Duplex Printing
1. Select the appropriate printer name to be used from the menu of the application. To print Duplex (on two sides), with an open file/document, select...
Quick Reference Guide - Page 9
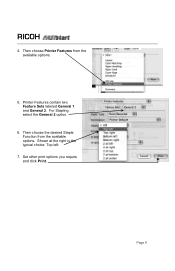
Then choose Printer Features from the available options. Shown at the right is the typical choice: Top left.
7. Printer Features contain two Feature Sets labeled General 1 and General 2. Set other print options you require and click Print.
Then choose the desired Staple Function from the available options.
5. Page 9 RICOH
4. For Stapling, select the General 2 option.
6.
Quick Reference Guide - Page 10
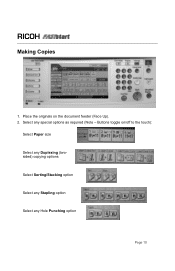
Place the originals on /off to the touch):
Select Paper size Select any Duplexing (twosided) copying options Select Sorting/Stacking option Select any Stapling option Select any special options as required (Note - Buttons toggle on the document feeder (Face Up). 2. RICOH
Making Copies
1. Select any Hole Punching option
Page 10
Quick Reference Guide - Page 11
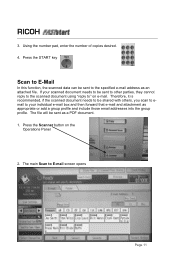
... individual e-mail box and then forward that e-mail and attachment as appropriate or add a group profile and include those email addresses into the group profile. RICOH
3. Using the number pad, enter the number of copies desired. 4. Press the START key
Scan to E-Mail
In this function, the scanned data can be...
Quick Reference Guide - Page 12
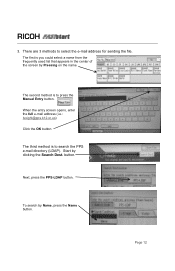
... search the PPS e-mail directory (LDAP). Next, press the PPS-LDAP button. The third method is to select the e-mail address for sending the file. RICOH
3. button.
Quick Reference Guide - Page 13
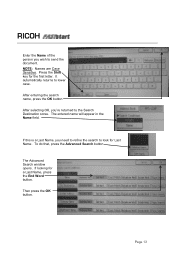
... will appear in the Name field. To do that, press the Advanced Search button. NOTE: Names are Case Sensitive. If looking for the first letter. RICOH
Enter the Name of the person you wish to look for Last Name.
Quick Reference Guide - Page 14
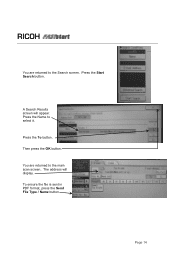
Press the Start Search button.
Press the To button.
The address will appear. RICOH
You are returned to the main scan screen.
Then press the OK button.
You are returned to select it. To ensure the file is sent in PDF format, press the Send File Type / Name button. Press the Name to the Search screen. A Search Results screen will display. Page 14
Quick Reference Guide - Page 15
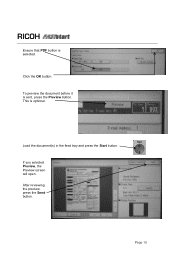
Click the OK button.
RICOH
Ensure that PDF button is optional.
Page 15
If you selected Preview, the Preview screen will open. This is selected. After reviewing the preview, press the Send button. To preview the document before it is sent, press the Preview button. Load the document(s) in the feed tray and press the Start button.
Quick Reference Guide - Page 16
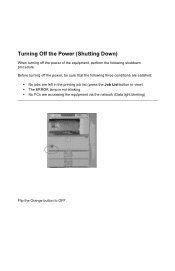
... following shutdown procedure. Before turning off the power of the equipment, perform the following three conditions are satisfied:
ƒ No jobs are left in the printing job list (press the Job List button to view) ƒ The ERROR lamp is not blinking ƒ No PCs are accessing the equipment via the...
Similar Questions


What Driver Should Be Used For Ricoh Aficio Mp C2051
(Posted by maegabil 9 years ago)


How to Cancel Sc899 Code On My Ricoh Aficio Mp C2051
Please help me to cancel the SC899 code for my ricoh aficio mp C2051
Please help me to cancel the SC899 code for my ricoh aficio mp C2051
(Posted by usertechnik 10 years ago)
How To Remove The Code Sc899 On My Ricoh Aficio Mp C2051
my ricoh aficio mp c2051 is showing the code C899 when i put it on please help me
my ricoh aficio mp c2051 is showing the code C899 when i put it on please help me
(Posted by usertechnik 10 years ago)