
ProForm 12.0tt Treadmill Support Question
ProForm 12.0tt Treadmill Support Question
Find answers below for this question about ProForm 12.0tt Treadmill.Need a ProForm 12.0tt Treadmill manual? We have 1 online manual for this item!
Question posted by sman63 on June 13th, 2018
How To Connect Proform 12.0 Tt To Wifi
I am having the hardest time trying to connect my treadmill to my wifi. I guess Im supposed to use some sort of screen cover to navigate it? I dont recall ever seeing that. How can I connect to wifi?
Current Answers
Answer #1: Posted by freginold on June 14th, 2018 5:37 PM
freginold

Member since:
December 20th, 2011 Points: 23,253,885

Member since:
December 20th, 2011 Points: 23,253,885
The screen cover is a card that will help you set up Wi-Fi using the treadmill's console. The Wi-Fi setup card should have come with your treadmill; don't worry if it didn't -- you can still connect to Wi-Fi using another device (tablet, smart phone, etc.) See page 30 for those instructions.
If you need a copy of the manual, you can download it here:
https://www.iconservice.com/CustomerService/manualsProductManuals.do?model=PFTL98015&modelName=PROFORM+12.0TT+TREADMILL&version=0&company=11&language=
If you need a copy of the manual, you can download it here:
https://www.iconservice.com/CustomerService/manualsProductManuals.do?model=PFTL98015&modelName=PROFORM+12.0TT+TREADMILL&version=0&company=11&language=
Related ProForm 12.0tt Treadmill Manual Pages
English Manual - Page 1

... your product and activate your warranty today, go to www.proformservice.com/ registration. CUSTOMER CARE
For service at any time, go to www.proformservice.com. Write the serial number in this manual before using this manual for reference. PFTL98015.0 Serial No.
MT Please do not contact the store. Save this equipment.
www...
English Manual - Page 2
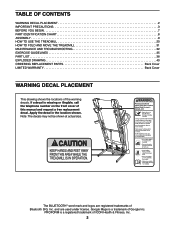
... 2 IMPORTANT PRECAUTIONS 3 BEFORE YOU BEGIN 7 PART IDENTIFICATION CHART 8 ASSEMBLY 9 HOW TO USE THE TREADMILL 20 HOW TO FOLD AND MOVE THE TREADMILL 31 MAINTENANCE AND TROUBLESHOOTING 32 EXERCISE GUIDELINES 35 PART LIST 38 EXPLODED DRAWING 40 ORDERING REPLACEMENT PARTS Back Cover LIMITED WARRANTY Back Cover
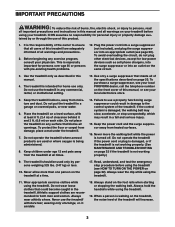
WARNING DECAL PLACEMENT
This drawing shows the locations of Google Inc.
English Manual - Page 3
... result in any commercial, rental, or institutional setting.
13. Wear appropriate exercise clothes while using the treadmill.
19. Always hold the handrails while using the treadmill. To purchase a surge suppressor, see your local PROFORM dealer, call the telephone number on page 22). Do not operate the treadmill if the power cord or plug is damaged, or if the...
English Manual - Page 4

...or connected to raise, lower, or move the treadmill until it is running. ing the treadmill, and before clean- Servicing
other antenna or transmitter. The heart rate monitor is used. ... parts each time the treadmill is intended only as an exercise aid in determining heart rate trends in general.
23. Never remove the
motor hood unless instructed to move the treadmill.
25.
...
English Manual - Page 7
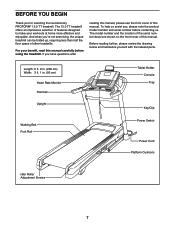
...revolutionary PROFORM® 12.0 TT treadmill. For your workouts at home more effective and enjoyable.
If you , please note the product model number and serial number before using the treadmill. The 12.0 TT treadmill ...this manual, please see the front cover of this manual carefully before contacting us. BEFORE YOU BEGIN
Thank you 're not exercising, the unique treadmill can be folded ...
English Manual - Page 8
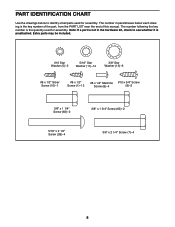
...number in the hardware kit, check to identify small parts used for assembly. Extra parts may be included.
#10 Star Washer (5)-2
5/16" Star Washer (11)-14
3/8" Star Washer (13)-6
#8 x 1/2" Silver Screw (10)-1
#8 x 1/2" Screw (1)-12
#8 x 1/2" Machine Screw (8)-4
#10 x 3/4" Screw...see whether it is preattached. PART IDENTIFICATION CHART
Use the drawings below each drawing is the quantity...
English Manual - Page 12
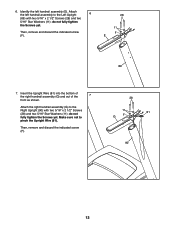
... Right Upright (90) with two 5/16" x 2 1/2" Screws (28) and two
5/16" Star Washers (11); Then, remove and discard the indicated screw (F).
28
11
81
G
F
90
12 Identify the left handrail assembly to pinch the Upright Wire (81).
English Manual - Page 14
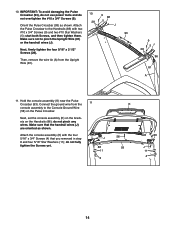
...remove the wire tie (A) from the console assembly to the Console Ground Wire (58) on the Handrails (86); Connect the ground wire from the Upright Wire (81).
9 5J
28 86
81
A
11. H old the console... the Pulse Crossbar (93). 10. IMPORTANT: To avoid damaging the Pulse Crossbar (93), do not use power tools and do not pinch any wires. Next, set the console assembly (K) on the brackets on...
English Manual - Page 15
...
11 4
31
4 11
90
89
15
Then, firmly tighten the four 5/16" x 3/4" Screws (4).
12 K
4
1
4 93
1
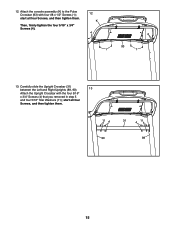
13. Carefully slide the Upright Crossbar (31) between the Left and Right ...Attach the Upright Crossbar with four #8 x 1/2" Screws (1); start all four
Screws, and then tighten them . 12. Attach the console assembly (K) to the Pulse Crossbar (93) with the four 5/16"
x 3/4" Screws (4)...
English Manual - Page 16
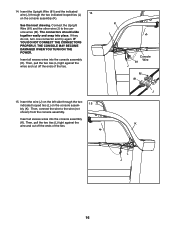
... Wire (81) and the other wire (J) to the wire (not
shown) from the console assembly. Then, connect the wire to the console wires (M). K L
Console 81 Wire J
M 81
J
K
L J
16
See the inset drawing. The connectors should slide together easily and snap into the console assembly (K).
Insert all excess wires into the console assembly...
English Manual - Page 18

...end of the Storage Latch (53) with the 5/16" x 1 3/4" Bolt (6) and the 5/16" Nut (12).
do not overtighten the Nut; Attach the lower end of the other end;
This will push a spacer (Q) out...53) to pivot.
Then, lower the Frame (56) (see HOW TO LOWER THE TREADMILL FOR USE on page 31).
19 56
12 Q 38
3
53
18 18. Remove the 5/16" Nut (12) and the 5/16" x 1 3/4" Bolt (6) from the bracket...
English Manual - Page 20
...on the surge suppressor to
connect the
surge suppres- The surge suppressor must be a monitoring light on a
A temporary adapter may
2
be used , see the front cover of the treadmill and serious injury to reduce ...). If it will not fit an outlet, have a UL suppressed voltage rating of 400 volts or less and a minimum surge dissipation of electric shock. The treadmill power cord has a plug...
English Manual - Page 27
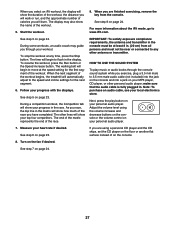
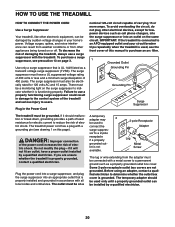
...See step 3 on your MP3 player, CD player, or other lines will burn. When the next segment of the workout begins, the treadmill...using the volume increase and decrease buttons on the console or the volume control on the fan if desired. The time will begin to any time.... If you are finished exercising, remove the key from all persons and must be near or connected to flash in . (...
English Manual - Page 28
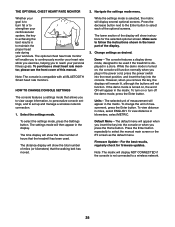
... settings, and to select each of the optional screens.
The lower section of miles (or kilometers) that the treadmill has been used if the treadmill is turned on or turn off the demo mode...CONNECTED if the console is not connected to be used .
The distance display will show the total number of the display will show the total number of hours that the walking belt has moved.
2. Navigate...
English Manual - Page 29
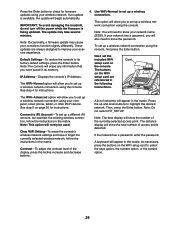
See step 4 for instructions.
4. Use WiFi-Normal to set up a wireless connection.
This option will allow you to set up a wireless network connection using the console.
Note: You will allow you have it forget the currently selected wireless network, follow the instructions in the matrix. Card
The WiFi-Advanced option will need to know your exercise experience.
Default ...
English Manual - Page 30
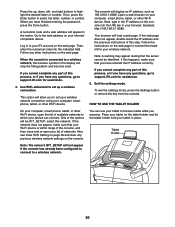
... Place your tablet on the web page to connect the treadmill to your wireless network.
Note: A warning... The network IFIT_SETUP will be identified. When you exercise. You can connect. Follow the instructions on the tablet holder and ...see Clear WiFi Setting on page 29 and clear any questions, go to support.iFit.com for assistance.
5. Use WiFi-Advanced to set up a wireless connection...
English Manual - Page 34
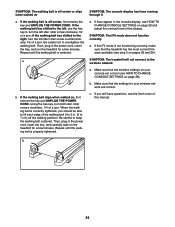
...see step 3 on pages 28 and 29). When the walking belt is centered. b
34 SYMPTOM: The iFit mode does not function correctly
a. If the iFit mode is properly tightened. SYMPTOM: The treadmill will not connect...treadmill for a few minutes. if the walking belt has shifted to turn the left idler roller screw counterclockwise 1/2 of a turn . Using... display, see the front cover of the...
English Manual - Page 38
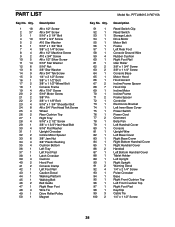
... Base Cover Right Base Cover Right Bottom Handrail Cover Right Handrail Cover Handrail Left Bottom Handrail Cover Tablet Holder Left Upright Right Upright Warning Decal 1/4" x 2 1/4" Screw Pulse Crossbar Base Right Front Cushion Top Left Front Cushion Top Right Foot Pad Key/Clip Cable Tie 1/4" x 1 1/2" Screw
38 Qty.
1
18
2
37
3
1
4
10
5
2
6
1
7
4
8
4
9
2
10
5
11 14
12
6
13...
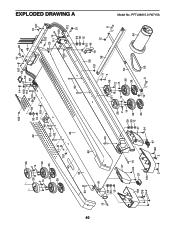
English Manual - Page 40
...14
39 35
11 101 4 43
44 23
60
61 15
59 30 12
57
103
108 2
24 15 37
104
102
42
30
59
12
101
46
19
101
92
45
23
26
2
59
14
30 12
39
47
35
24
14 100 21 112 23
107 51 50 52
49...
10
20
48
10 107
102 23
111 15
100
105 112
92
59 21
30
12
101
56
46
101
19
11
38
4
101
95...
English Manual - Page 44

Parts are warranted for a minimal trip charge. For in connection with the use or performance of the product;
ICON is not responsible or liable...specifically set forth herein. damages with an extended service plan, see the front cover of this warranty is in lieu of any implied warranties of merchantability or fitness for the lifetime of removal or installation; the customer may not...
Similar Questions

How Do I Find A High Performance Lubricant For The Pro-form 370e Crosswalk Walki
how do I find a high performance lubricant for the Pro-Form
how do I find a high performance lubricant for the Pro-Form
(Posted by Anonymous-138832 9 years ago)

I Get An Error On The Screen: E1 What Does It Mean?
(Posted by Ron818777 9 years ago)

Can You Post A Picture Of The Wifi Set Up Card
(Posted by egroeschel 10 years ago)

Where Can I Get The Wifi Set Up Card? I Can't Fine It In My Packet And Can't Se
(Posted by Idaschultze 10 years ago)