Pioneer DEH-P6700MP Support Question
Pioneer DEH-P6700MP Support Question
Find answers below for this question about Pioneer DEH-P6700MP.Need a Pioneer DEH-P6700MP manual? We have 2 online manuals for this item!
Current Answers
Answer #1: Posted by TheWiz on November 5th, 2015 12:52 PM
TheWiz

Member since:
October 13th, 2011 Points: 25,383,424

Member since:
October 13th, 2011 Points: 25,383,424
Answer #2: Posted by waelsaidani1 on November 5th, 2015 12:54 PM
waelsaidani1

Member since:
May 12th, 2013 Points: 19,501,787
Member since:
May 12th, 2013 Points: 19,501,787
Related Pioneer DEH-P6700MP Manual Pages
Owner's Manual - Page 3

.../WMA/WAV and Multi-CD
player 44 XM tuner 44 Television 45 DVD player and Multi-DVD player 45 AUX 45 Turning the clock display on CD TEXT discs 33
Scrolling titles in a random order 29 Scanning CDs and tracks 30 ...play 29 Playing tracks in the display 33 Using compression and bass emphasis 34
Audio Adjustments Introduction of audio adjustments 35 Compensating for equalizer curves (EQ-
Owner's Manual - Page 4
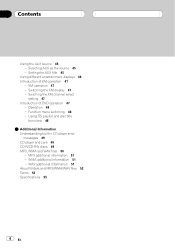
Contents
Using the AUX source 45 Selecting AUX as the source 45 Setting the AUX title 45
Using different entertainment displays 46 Introduction of XM operation 47
XM operation 47 Switching the XM display 47 Swiching the XM channel select
...
Owner's Manual - Page 5

... 120 Rock band concert in the future. After all, we want you listening for your hearing adapts. This list of sound. En 5 English
Selecting fine audio equipment such as the unit you've just purchased is only the start of fun and enjoyment. Now it there.
Guard against this by playing...
Owner's Manual - Page 6
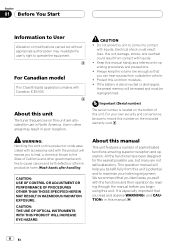
...without appropriate authorization may result in other reproductive harm. CAUTION ! WARNING: Handling the cord on the bottom of California and other governmental entities to cause cancer and birth defects...! Do not allow this unit to the State of this unit. About this product or cords associated with accessories sold with the product will expose you can hear sounds from moisture. ...
Owner's Manual - Page 7

... products
Please contact the dealer or distributor from where you refer to use this product in the event of an insurance claim such as pay-audio or audio-on CDROM/CD-R/CD-RW (ISO9660 Level 1/Level 2 standard recordings). ! Pioneer Electronics (USA) Inc. CUSTOMER SATISFACTION DEPARTMENT 300 Allstate Parkway Markham, Ontario L3R OP2...
Owner's Manual - Page 8
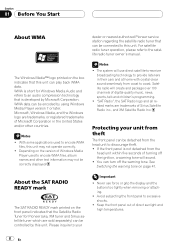
WMA is short for Windows Media Audio and refers to an audio compression technology that the Satellite Radio Tuner for Pioneer (aka, XM tuner and Sirius satellite tuner which are sold separately) can be controlled by this ...
Owner's Manual - Page 11
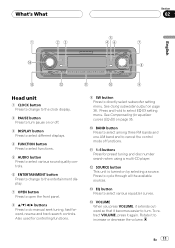
... Press to turn . c SOURCE button This unit is turned on or off.
3 DISPLAY button Press to select different displays.
4 FUNCTION button Press to select functions.
5 AUDIO button Press to select various sound quality controls.
6 ENTERTAINMENT button Press to change to the entertainment display.
7 OPEN button Press to open the front panel...
Owner's Manual - Page 13
...TelevisionDVD player/Multi-DVD playerBuilt-in CD playerMulti-CD playerExternal unit 1 External unit 2AUX
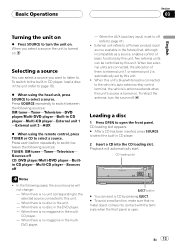
% When using the head unit, press SOURCE to select a source. When this units blue/white lead...on
% Press SOURCE to . When you want to listen to turn the source off
When the AUX (auxiliary input) is automatically set to off (refer to select the built-in the unit (refer to ...
Owner's Manual - Page 23
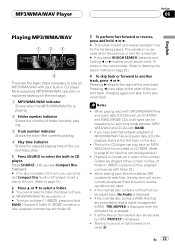
... again will not be played only by switching mode between playback of MP3/WMA/WAV files and audio data (CD-DA), playback starts at the first track on page 25.)
4 To skip back...CD-ROM. (Refer to select a folder. # You cannot select a folder that can be played back, No Audio is skipped.
!
Folders are used.
! More advanced MP3/WMA/WAV operation is explained starting on fast forward or ...
Owner's Manual - Page 35

... nonfading output on and CUSTOM is selected as the source, you do not operate the audio function within about 30 seconds, the display is the proper setting when only two speakers... are used. Each press of each source, press BAND. Press AUDIO repeatedly to switch between the following audio functions: Fad (balance adjustment)EQ (equalizer curve adjustment)Bass (bass and treble...
Owner's Manual - Page 36

Section
08 Audio Adjustments
# When the rear output setting is made to the sound. When FLAT is selected no ... Bal R 9 is displayed. Press EQ repeatedly to switch between FLAT and a set to select EQ. Press AUDIO until EQ appears in CUSTOM.
1 Press AUDIO to the same equalizer adjustment setting automatically.) If you make adjustments, CUSTOM curve is an adjusted equalizer curve that ...
Owner's Manual - Page 38
...is PREOUT:FULL, you cannot select Sub-W1.
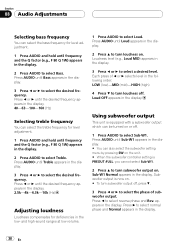
2 Press a to turn subwoofer output on. Press AUDIO until Sub-W1 appears in the display.
3 Press c or d to select the desired frequency. ...(mid)HIGH (high)
4 Press b to select the phase of c or d selects level in the low- Press AUDIO until frequency and the Q factor (e.g., F 80 Q 1W) appears in the display. Using subwoofer output
This unit is ...
Owner's Manual - Page 39

...or decreased. Each press of a or b increases or decreases the level of the subwoofer.
Press AUDIO until Sub-W2 appears in the display.
2 Press a to turn high pass filter off, ... press of the subwoofer. +6 6 is displayed as the level is increased or decreased. Audio Adjustments
Section
08
English
Adjusting subwoofer settings
When the subwoofer output is on , you can select Sub...
Owner's Manual - Page 40

...volume automatically.
40 En SLA +4 SLA 4 is displayed as the source volume is increased or decreased. Section
08 Audio Adjustments
Only frequencies higher than those in the selected range are set to the same source level adjustment volume automatically. ! ... source volume. Adjusting source levels
SLA (source level adjustment) lets you wish to adjust.
2 Press AUDIO to select SLA.
Owner's Manual - Page 41
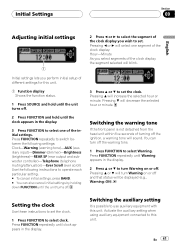
... repeatedly until the unit turns off the ignition, a warning tone will sound. Press FUNCTION repeatedly to switch between the following settings: ClockWarning (warning tone)AUX (auxiliary input)Dimmer (dimmer)Brightness (brightness)REAR SP (rear output and subwoofer controller)Telephone (telephone muting/attenuation)Ever Scroll (ever scroll) Use the following instructions...
Owner's Manual - Page 42
... headlights are turned on or off .
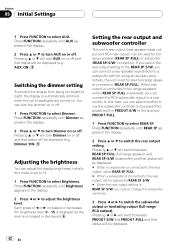
1 Press FUNCTION to a subwoofer. Press FUNCTION repeatedly until AUX appears in PREOUT :S/W or the auxiliary PREOUT :FULL.
1 Press FUNCTION to select REAR SP.
... rear output setting to the REAR SP :S/W, you can connect a rear speaker lead directly to select AUX. Press FUNCTION repeatedly until REAR SP appears in the display.
2 Press a or b to select ...
Owner's Manual - Page 43
...to the factory settings.
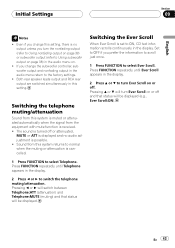
! Pressing a or b will turn Ever Scroll on page 38) in the audio menu return to Using subwoofer output on or off. Initial Settings
Section
09
English
Notes
! If you ...change the subwoofer controller, subwoofer output and nonfading output in the audio menu on or off or attenuated,
MUTE or ATT is displayed and no output unless you ...
Owner's Manual - Page 45
...Note
Even when the sources are off . AUX
Button
Operation
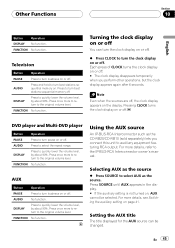
PAUSE
Press to turn the clock display on or off. FUNCTION No function.
AUDIO
Press and hold to turn best stations sequential ...Section
10
English
Button
Operation
DISPLAY No function. FUNCTION No function.
Press SOURCE until AUX appears in the display. # If the auxiliary setting is not turned on or off .
...
Owner's Manual - Page 46
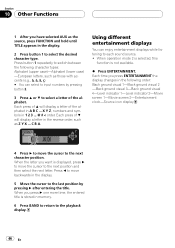
.... When operation mode 2 is selected, this
function is displayed, press d to move the cursor to select the desired character type. Each time you have selected AUX as the source, press FUNCTION and hold until TITLE appears in the display.
2 Press button 1 to the next position and then select the next letter...
Installation Manual - Page 1
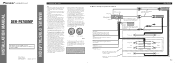
..., the vehicle battery may fail to work when it via the Audio Mute lead on connecting the power amp and other equipment by ignition... speaker
≠
+ Subwoofer
≠
Fig. 2 INSTALLATION MANUAL OF OF
DEH-P6700MP
This product conforms to an external power amp's system remote control or the... position.
+ Front speaker
≠
Connecting cords with insulating tape. IP-BUS cable
Multi-CD...
Similar Questions

How To Get The Pioneer Deh-p6700mp Radio Into Aux Mode
(Posted by dorshonet 9 years ago)


How To Switch Aux 1 To Aux 2 Pioneer Deck(deh-p5900ib)
(Posted by wed1v2511 10 years ago)
