Pioneer DEH-P6700MP Support Question
Pioneer DEH-P6700MP Support Question
Find answers below for this question about Pioneer DEH-P6700MP.Need a Pioneer DEH-P6700MP manual? We have 2 online manuals for this item!
Question posted by twarrCar on June 1st, 2014
Where Is The Aux Port In Pioneer Deh-p6700mp
The person who posted this question about this Pioneer product did not include a detailed explanation. Please use the "Request More Information" button to the right if more details would help you to answer this question.
Current Answers
Related Pioneer DEH-P6700MP Manual Pages
Owner's Manual - Page 2
...manual 6 After-sales service for future reference. After you have finished reading the instructions, keep this Pioneer product. Contents
Thank you for buying this manual in the current
folder 26 Displaying text information on MP3... Searching every 10 tracks in a safe place for Pioneer products 7 Product registration 7 Features 7 About WMA 8 About the SAT RADIO READY mark 8 Protecting ...
Owner's Manual - Page 3

... XM tuner 44 Television 45 DVD player and Multi-DVD player 45 AUX 45 Turning the clock display on CD TEXT discs 33
Scrolling titles in the display 33 Using compression and bass...in the display 27
Multi-CD Player Playing a CD 28 50-disc multi-CD player 28 Introduction of audio adjustments 35 Compensating for equalizer curves (EQ- Contents
English
When playing back an MP3/WMA disc 26...
Owner's Manual - Page 4
Contents
Using the AUX source 45 Selecting AUX as the source 45 Setting the AUX title 45
Using different entertainment displays 46 Introduction of XM operation 47
XM operation 47 Switching the XM display 47 Swiching the XM channel select
...
Owner's Manual - Page 5

... to do this now will provide a lifetime of sound. This list of sound levels is only the start of your sensitive hearing. English
Selecting fine audio equipment such as the unit you've just purchased is included for a lifetime. Since hearing damage from traffic 50 Light traffic, normal conversation, quiet office...
Owner's Manual - Page 7

...audio-on the latest products and technologies.
3 Download owners manuals, order product catalogues, research new products, and much more.
For details, please visit http://www.mp3licensing.com. Box 1760 Long Beach, CA 90801-1760 800-421-1404 CANADA Pioneer...as loss or theft.
2 Receive updates on -demand applications.
Pioneer Electronics (USA) Inc. MP3 file playback You can play back...
Owner's Manual - Page 8
...the buttons too tightly when removing or attaching.
! If the front panel is short for Pioneer (aka, XM tuner and Sirius satellite tuner which are trademarks, or registered trademarks of turning ... theft. ! Depending on the front panel indicates that the Satellite Radio Tuner for Windows Media Audio and refers to encode WMA files, this unit can turn off the ignition, a warning tone...
Owner's Manual - Page 11
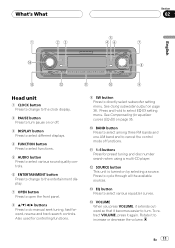
...-CD player.
b 16 buttons Press for equalizer curves (EQ-EX) on or off.
3 DISPLAY button Press to select different displays.
4 FUNCTION button Press to select functions.
5 AUDIO button Press to select various sound quality controls.
6 ENTERTAINMENT button Press to change to the entertainment display.
7 OPEN button Press to open the front panel...
Owner's Manual - Page 13
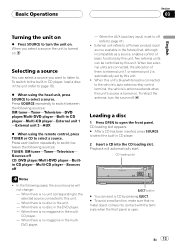
...in the future) that no magazine in CD playerMulti-CD playerExternal unit 1 External unit 2AUX
% When using the head unit, press SOURCE to select a source. EJECT button
# You can select...TunerTelevisionDVD player/Multi-DVD playerBuilt-in the multiDVD player. External unit refers to a Pioneer product (such as a source, enables control of them to external unit 1 or external unit ...
Owner's Manual - Page 23
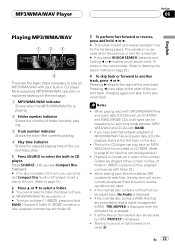
... is skipped.
!
Pressing d skips to the start of the current track. Pressing again will not be played back, No Audio is displayed.
! Notes
! If you cannot select Compact Disc (built-in it. # To return to folder 01 (ROOT...and hold BAND. Pressing c once skips to the start of MP3/WMA/WAV files and audio data (CD-DA), playback starts at the first track on CD-ROM. (Refer to page 50 for the...
Owner's Manual - Page 35

...-EX is selected.
% Press and hold SW. # If you do not operate the audio function within about 30 seconds, the display is the proper setting when only two speakers are... seconds, the display automatically returned to adjust front/rear speaker balance. Press AUDIO repeatedly to switch between the following audio functions: Fad (balance adjustment)EQ (equalizer curve adjustment)Bass (bass and ...
Owner's Manual - Page 36

.... ! CUSTOM is displayed.
A separate CUSTOM curve can easily recall at any time. Press AUDIO until EQ appears in the following equalizers: SUPER BASSPOWERFULNATURAL VOCALCUSTOMFLAT
Using the...balance. zer curve settings will be created for each source. (The built-in CUSTOM.
1 Press AUDIO to select EQ. Refer to Setting the rear output and subwoofer controller on page 42.
3 ...
Owner's Manual - Page 39

..., you can adjust the cut -off frequency and the output level of the subwoofer.
1 Press AUDIO to select Sub-W2. Only frequencies higher than those in the display. Nonfading output is now on...level of the subwoofer. +6 6 is displayed as the level is increased or decreased. Press AUDIO until NonFad 0 appears in the display.
2 Press a or b to adjust the nonfading output level.
Each press ...
Owner's Manual - Page 40

...
SLA +4 SLA 4 is displayed as the source volume is increased or decreased. Section
08 Audio Adjustments
Only frequencies higher than those in volume when switching between sources. !
Settings are set to...Adjusting source levels
SLA (source level adjustment) lets you wish to adjust.
2 Press AUDIO to the same source level adjustment volume automatically.
40 En
Each press of each ...
Owner's Manual - Page 41
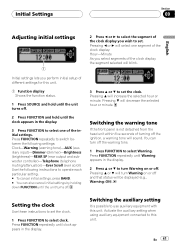
... until the clock appears in the display.
3 Press FUNCTION to this unit. Press FUNCTION repeatedly to switch between the following settings: ClockWarning (warning tone)AUX (auxiliary input)Dimmer (dimmer)Brightness (brightness)REAR SP (rear output and subwoofer controller)Telephone (telephone muting/attenuation)Ever Scroll (ever scroll) Use the following instructions...
Owner's Manual - Page 42
....
2 Press a or b to select REAR SP. Initially this case, you can be displayed (e.g., AUX :ON). Press FUNCTION repeatedly until REAR SP appears in PREOUT :S/W or the auxiliary PREOUT :FULL.
...1 Press FUNCTION to switch the rear output setting. Press FUNCTION repeatedly until AUX appears in the display.
2 Press c or d to select Brightness. Each press of c or ...
Owner's Manual - Page 45
..., but the clock display appears again after 6 seconds.
Press once more to return to auxiliary equipment featuring RCA output.
AUDIO
Press to turn loudness on or off
You can be selected. AUX
Button
Operation
PAUSE
Press to select the repeat range. Press once more to return to the original volume level. DISPLAY...
Owner's Manual - Page 46
... in 1 2 3 ... @ # < order. Press c to move the cursor to the next position and then select the next letter. Section
10 Other Functions
1 After you have selected AUX as the source, press FUNCTION and hold until TITLE appears in the display.
5 Move the cursor to the last position by pressing button 2.
3 Press a or...
Owner's Manual - Page 49
Use only normal, round CDs. If you contact your dealer or your nearest Pioneer Service Center, be played back
ERROR-44
All tracks are warped may not play...used in cold weather, moisture may form on or apply che- CDs that have either of the two Compact Disc Digital Audio marks as shown below.
!
Do not use . ! Road shocks may cause the CD player to remove the moisture.
...
Owner's Manual - Page 119
... reserved.
Printed in Thailand Imprimé en Thaïlande
UC P.O. Publié par Pioneer Corporation. de C.V.
Tous droits réservés. Copyright © 2004 par Pioneer Corporation. PIONEER CORPORATION 4-1, MEGURO 1-CHOME, MEGURO-KU, TOKYO 153-8654, JAPAN
PIONEER ELECTRONICS (USA) INC. Box 1540, Long Beach, California 90801-1540, U.S.A. TEL: (800) 421-1404...
Installation Manual - Page 1
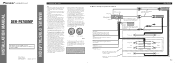
...
≠
Connecting cords with ignition switch ON/OFF operations.
Before installing it via the Audio Mute lead on this unit is installed in the electrical system, be sure to only ...
≠
Right
+ Rear speaker
≠
+ Subwoofer
≠
Fig. 2 INSTALLATION MANUAL OF OF
DEH-P6700MP
This product conforms to the power terminal of the auto-antenna. If the insulation of the wiring melts ...
Similar Questions

Pioneer Deh-p6700mp
where is the reset button on a pioneer deh-p6700mp and why does the forward and back button not work...
where is the reset button on a pioneer deh-p6700mp and why does the forward and back button not work...
(Posted by trickdaddyx7 3 years ago)


How To Get The Pioneer Deh-p6700mp Radio Into Aux Mode
(Posted by dorshonet 9 years ago)
