Oki C330dn Support Question
Oki C330dn Support Question
Find answers below for this question about Oki C330dn.Need a Oki C330dn manual? We have 7 online manuals for this item!
Question posted by renfroem13 on July 21st, 2014
980 Error Code How To Fix
Is there a way to rest this eoor code?
Current Answers
Answer #1: Posted by waelsaidani1 on July 22nd, 2014 5:21 AM
waelsaidani1

Member since:
May 12th, 2013 Points: 19,501,797

Member since:
May 12th, 2013 Points: 19,501,797
- Error 980 means that the error by media clinging to the fuser and the fuser is required to be replaced.
Solution 2:
- Take out the Fuser and lay the two blue levers flat and remove them.
- Remove the two silver screws and separate the casing.
- Remove the two black screws from the connector at the bottom of the fuser closest to the edge.
- Unravel and loosen the wires so you can pull that connector out a few inches so you can get a couple of wires in there.
- Insert a wire into each of the two holes on the back of that connector. 2 and 3 have wires going in, 4 and 5 dont which is the fuse. After you get the wires in the 2 holes, check for continuity from the end of the wires and the terminals if you can. Make sure the wires are long enough to hang out the case. Use the thinnest wires you can find.
- Run the wires out of the case and put the case back together and put the fuser in. Twist the two wires together and power up the machine. As soon as you here the first motor, which is about 5 seconds, pull the wires apart, you just reset the fuser back to 100% and cleared the "980" Fatal Error.
Answer #2: Posted by support38611 on July 23rd, 2014 4:14 AM
support38611

Member since:
March 23rd, 2012 Points: 203,070
Member since:
March 23rd, 2012 Points: 203,070
Hello. I am an Oki Data helpdesk technician from Oki Data America's.
Error 980 means "Error by media clinging to the fuser". I recommend you remove the fuser and check to make sure that there is no paper stuck / clinging to the fuser. Then reinstall the fuser and see if the error clears. Be careful the fuser gets hot. Power the printer off first, let it cool for 15 minutes. If you are still having an issue the fuser unit will need to be replaced.
If you need further assistance or have any questions, please contact our technical support number at 1-800-654-3282 available 24/7. You can also send email request's to our email support address at [email protected]
Related Oki C330dn Manual Pages
C330/C530 Software Setup Guide (English, Fran栩s, Espa?ol, Portugu鱩 - Page 3
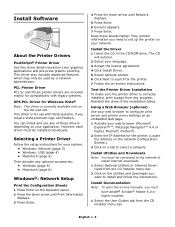
... Optional Utilities or Internet Downloads from any of these sheets handy: they contain information you require Vista premium logo certification. Install Software
About the Printer Drivers
PostScript® Printer Driver Use this driver ahigh-resolution color graphics applications and pre-press graphic proofing. You can install and use with legacy systems. XPS...
C330/C530 Software Setup Guide (English, Fran栩s, Espa?ol, Portugu鱩 - Page 4

... Driver Options Automatically If you have a TCP/IP enabled network, you can configure the options automatically using the Two-Way Communications feature. Click OK. Windows: USB Setup
Install the Driver 1 Turn the Printer OFF.
2 Insert the CD in Available Options. 5 Click OK to
complete the installation. 4 To view the manuals, click Start...
C330/C530 Software Setup Guide (English, Fran栩s, Espa?ol, Portugu鱩 - Page 5

...load: drag the .pdf file to the desktop To view: double-click it .
1 Turn the printer OFF. 2 Connect the USB cable to the USB port on
the computer, then to the USB port... the USB cable (if you are using USB, disregard the next step.
4 Enter the printer's IP address. 5 Select the printer model.
Install the Documentation
Note: Adobe® Acrobat® Reader 6.0 or higher is connected...
C330/C530 Software Setup Guide (English, Fran栩s, Espa?ol, Portugu鱩 - Page 6
... and Support
Available 24 hours a day, 7 days a week.
• Visit our website: www.okiprintingsolutions.com
• Call 1-800-654-3282. English • 6
button. 5 From the Printer Info window, select
"Installable Options" from the drop-down menu. 6 Click or drop-down the settings to enable the various options. 7 Click Apply Changes to...
C330/C530 Safety Warranty Regulatory Guide - Page 4

... card available as our representative will try to you via overnight carrier.
Overnight Exchange of the printer for the printhead (LED imaging array), which is used, the returned machine becomes the property of... THE OKI DATA PRODUCT IS NOT A "CONSUMER GOOD" (AS DEFINED IN THE UNIFORM COMMERCIAL CODE ADOPTED IN THE STATE OF PURCHASE OR IN OTHER APPLICABLE LAW), OKI DATA EXPRESSLY DISCLAIMS ALL ...
C330/C530 Safety Warranty Regulatory Guide - Page 5
... can easily create your own Personal Solutions Center providing up -to your machine so you can check your Personal Solutions Center for your machine • Error message interpretation/solutions • Parts and supplies identification • Consumer relations
Note: Customer Support Representatives are trained on all current OKI products. Spanish Only: call...
C330/C530/C610/C711 DIMM Install Sheet - Page 3
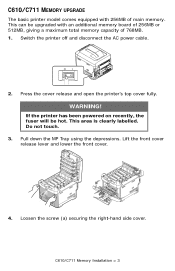
...cover release lever and lower the front cover.
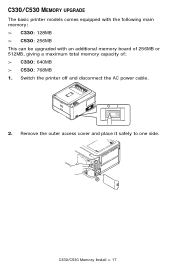
4. Switch the printer off and disconnect the AC power cable.
Press the cover release and open the printer's top cover fully. Loosen the screw (a) securing the right-...hand side cover.
C610/C711 MEMORY UPGRADE
The basic printer model comes equipped with an additional memory board of 256MB or 512MB, giving a...
C330/C530/C610/C711 DIMM Install Sheet - Page 4
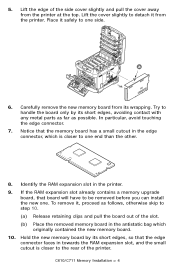
...closer to the rear of the side cover slightly and pull the cover away from the printer. Try to handle the board only by its short edges, so that the memory board ...Release retaining clips and pull the board out of the slot. (b) Place the removed memory board in the printer. 9.
In particular, avoid touching the edge connector.
7. 5. Carefully remove the new memory board from ...
C330/C530/C610/C711 DIMM Install Sheet - Page 5
... side cover up to execute the
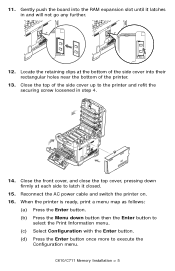
Configuration menu. Reconnect the AC power cable and switch the printer on. 16.
When the printer is ready, print a menu map as follows:
(a) Press the Enter button. (b) Press ...the Menu down firmly at the bottom of the printer.
13. C610/C711 Memory Installation > 5 Gently push the board into their rectangular holes near...
C330/C530/C610/C711 DIMM Install Sheet - Page 6
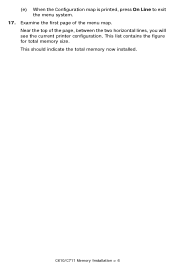
This list contains the figure for total memory size. Examine the first page of the page, between the two horizontal lines, you will see the current printer configuration. This should indicate the total memory now installed. (e) When the Configuration map is printed, press On Line to exit the menu system.
17.
C610/C711 Memory Installation > 6 Near the top of the menu map.
C330/C530/C610/C711 DIMM Install Sheet - Page 17
a b
C330/C530 Memory Install > 17
Remove the outer access cover and place it safely to one side. C330/C530 MEMORY UPGRADE
The basic printer models comes equipped with the following main memory: > C330: 128MB > C530: 256MB This can be upgraded with an additional memory board of 256MB or 512MB, ...
C330/C530/C610/C711 DIMM Install Sheet - Page 18
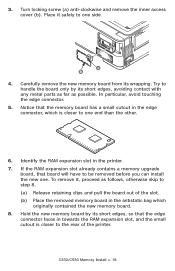
...it safely to step 8. (a) Release retaining clips and pull the board out of the printer. Hold the new memory board by its short edges, avoiding contact with any metal ...the antistatic bag which is closer to the rear of the slot. (b) Place the removed memory board in the printer. 7. 3. Notice that the memory board has a small cutout in the edge connector, which
originally contained the...
C330/C530/C610/C711 DIMM Install Sheet - Page 19
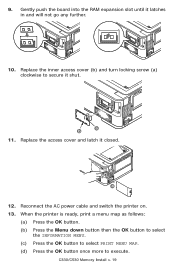
...C530 Memory Install > 19 Replace the inner access cover (b) and turn locking screw (a) clockwise to execute.
When the printer is ready, print a menu map as follows:
(a) Press the OK button. (b) Press the Menu down button then...secure it shut. Reconnect the AC power cable and switch the printer on. 13. Gently push the board into the RAM expansion slot until it closed.
b a
12. a b 11...
Safety Warranty Manual - Page 4

...service center. Overnight Exchange is limited to take advantage of purchase.
Overnight Exchange of the printer for authorized service locations or if you ship the Product, remove the image drums and toner... THE OKI DATA PRODUCT IS NOT A "CONSUMER GOOD" (AS DEFINED IN THE UNIFORM COMMERCIAL CODE ADOPTED IN THE STATE OF PURCHASE OR IN OTHER APPLICABLE LAW), OKI DATA EXPRESSLY DISCLAIMS ALL ...
Safety Warranty Manual - Page 5

...://MY.OKIDATA.com.
Mt. Please have a problem that you have the model number and serial number for warranty work.
Be sure that your machine • Error message interpretation/solutions • Parts and supplies identification • Consumer relations
Note: Customer Support Representatives are available 24 hours a day, 7 days a week. If you are...
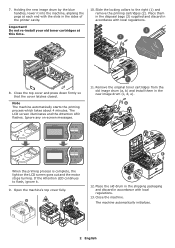
Image Drum Replacement Instructions (English, Fran栩s, Espa?ol, Poetugu鱩 - Page 1
... clearly labeled.
c
6. b
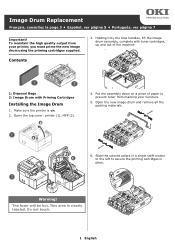
Warning! To maintain the high quality output from marking your printer, you must prime the new image drum using the priming cartridges supplied. Holding it by the blue handles, lift the ...Português, ver página 7
Important! Contents
3. Slide the colored collars in
a
place. The fuser will be hot.
Open the top cover: printer (1), MFP (2).
Image Drum Replacement Instructions (English, Fran栩s, Espa?ol, Poetugu鱩 - Page 2
.... Remove the original toner cartridges from the old image drum (a, b) and install them in the disposal bags (3) supplied and discard in the sides of the printer cavity. Holding the new image drum by the blue handles, lower it .
9. Important! Slide the locking collars to flash, ignore it into the machine, aligning...
Image Drum Replacement: Priming Cartridges Separate - Page 1
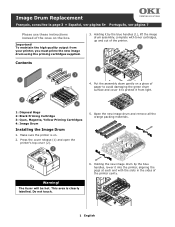
... Cartridge 3: Cyan, Magenta, Yellow Priming Cartridges 4: Image Drum
Installing the Image Drum
1.
Put the assembly down gently on . 2. Press the cover release (1) and open the
printer's top cover (2).
5. Holding the new image drum by the blue handles (1), lift the image drum assembly, complete with the slots in the sides of the...
Image Drum Replacement: Priming Cartridges Separate - Page 2
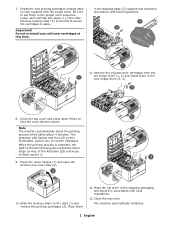
...) supplied with local regulations.
11. If the Attention LED continues to the right (1) and remove the priming cartridges (2). Press the cover release (1) and open the printer's top cover fully (2).
10. Slide the locking collars to flash, ignore it.
9. Close the top cover. Be sure to secure the cartridges in the new...
Similar Questions

Oki Model B431dn, Error Code 069
Hello.. my printer Oki model B431dn, error code 069. please help me. tq
Hello.. my printer Oki model B431dn, error code 069. please help me. tq
(Posted by mrkhairulkaizer 9 years ago)

Oki C530dn Error Codes 0093a934, 009381c4, And 0093bdec On/off Error. Solution?
The above error codes are displayed on my OKI C530dn printer. How do I resolve thes issues
The above error codes are displayed on my OKI C530dn printer. How do I resolve thes issues
(Posted by pchristian 9 years ago)


Service Call
Oki C330dn
Error Code 142
I keep getting an attention light On screen: Service call error 142 I turn the printer off and t...
I keep getting an attention light On screen: Service call error 142 I turn the printer off and t...
(Posted by MMMAAARRRYYY 11 years ago)