Maytag MER8674AS Support Question
Maytag MER8674AS Support Question
Find answers below for this question about Maytag MER8674AS.Need a Maytag MER8674AS manual? We have 3 online manuals for this item!
Question posted by scheer48 on May 15th, 2013
How Do I Remove The Damaged Glass Top To Replace It?
I can lift the top up but it is attached on the sides somehow.
Current Answers
Related Maytag MER8674AS Manual Pages
Installation Guide - Page 3

...Observe all parts are included. ■ 3 - 10-32 hex nuts (attached to terminal block) ■ 3 - To install the anti-tip bracket ...clearances specified on the left side frame behind the storage drawer panel or behind the top right side of the oven door.
...this range must end in ring terminals or open-end spade terminals with ranges. See "Electrical Connection - IMPORTANT: To avoid damage to ...
Installation Guide - Page 6

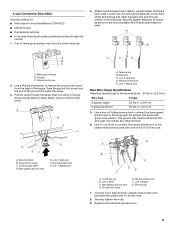
... to use the wall mounting method. Determine which mounting method to follow these instructions can tip the range and be accessed by removing the warming drawer or premium storage drawer. Do not remove the shipping base at this time. Rear leveling leg B. Wrench or pliers D. Front leveling leg
WARNING
Tip Over Hazard A child...
Installation Guide - Page 7
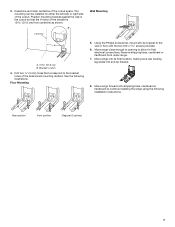
... #12 x 1⁵⁄₈" screws provided.
6. Remove shipping base, cardboard or hardboard from centerline as shown.
Floor Mounting
5. Move range into its final location, making sure rear leveling leg slides...left side or right side of the cutout space. Bracket V-notch 4. Position mounting bracket against the wall in the cutout so that correspond to continue installing the range using...
Installation Guide - Page 8
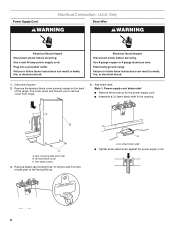
...instructions can result in death, fire, or electrical shock.
1. Two mounting tabs each side B. UL listed strain relief
■ Tighten strain relief screw against the power supply cord... Disconnect power before servicing. Failure to remove cover from the middle post of the range. Electrically ground range. Hex-head screws
3. A
A. U.S.A. Remove the terminal block cover screws located on...
Installation Guide - Page 9
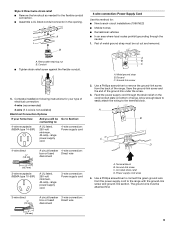
...A. A B C
A. Allow enough slack to easily attach the wiring to :
4-wire receptacle (NEMA type 14-50R)
A UL listed, 250-volt minimum, 40-amp, range power supply cord
4-wire connection: Power supply cord
4-...Section: connecting to the terminal block.
Style 2: Direct wire strain relief ■ Remove the knockout as needed for : ■ New branch-circuit installations (1996 NEC...
Installation Guide - Page 11
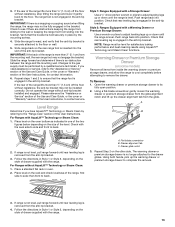
...G. Loosen (do not remove) the setscrew on bottom of metal ground strap must be attached first and must be cut out and removed.
4. A
B
A...codes prohibit grounding through bottom of the range. Allow enough slack to easily attach wiring to the outer terminal block posts...Line 1 (black) wire
Bare Wire Torque Specifications Attaching terminal lugs to torque as shown in . (4.0 N-m)
5. The ...
Installation Guide - Page 12

... the warming drawer or premium storage drawer, and grasp the lower right or left side of terminal lugs. Ground-link screw
D. Bare (green) ground wire E. Remove the storage drawer. Allow enough slack to easily attach the wiring to tilt the range forward. Pull the wires through bottom of the control panel as shown in...
Installation Guide - Page 13
... the anti-tip bracket is securely attached to adjust leveling legs up the ...range, first side to the "Range Care" section of the range lifts more than 2" (5.1 cm) from the anti-tip bracket.
3. If you have AquaLift™ Technology or Steam Clean by the mounting screws.
4. Check with a Warming Drawer or Premium Storage Drawer:
Use a wrench or pliers to remove the drawer. A. If range...
Installation Guide - Page 14
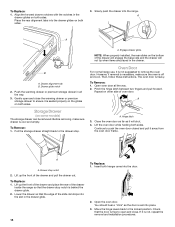
...on both sides. Drawer glide notch
2.
To Remove: 1.
Then, follow these instructions. Open oven door all the way.
3.
Lift the oven door while holding both hanger arms into place.
3. To Replace: 1. ...side of the slide rail drops into the range. Before removing, make sure the oven is seated properly on the glides on both sides. A. Engage drawer glide. Oven Door
For normal range...
Installation Guide - Page 15

...Range is plugged into appropriate outlet.
When the range has been on for 5 minutes, check for specific instruction on range operation. Install anti-tip bracket to avoid damaging the floor covering. Slide range back so rear range...power supply cord-connected ranges: 1.
Plug power cord into a grounded outlet.
■ Electrical supply is level. If removing the range is intact and ...
Use & Care Guide - Page 3
... underneath to rub, damage, or move the gasket.
■ Do Not Use Oven Cleaners - Contact a qualified technician immediately.
■ Clean Cooktop With Caution - TO CHECK IF THE DEVICES ARE INSTALLED PROPERLY, SLIDE RANGE FORWARD, LOOK FOR ANTI-TIP BRACKET SECURELY ATTACHED TO FLOOR OR WALL, AND SLIDE RANGE BACK SO REAR RANGE FOOT IS UNDER...
Use & Care Guide - Page 5
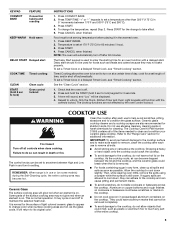
...time of the items needed to clean and condition your ceramic glass cooktop. To set length of the surface cooking area may ... be removed completely.
■ To avoid damage to the cooktop, do not allow objects that could crack the cooktop.
■ To avoid damage to ...not slide cookware or bakeware across the cooktop. REMEMBER: When range is used for the change the temperature, repeat Step 2....
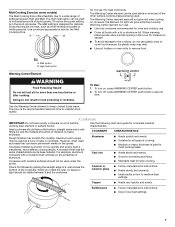
Use & Care Guide - Page 6

...damage to the cooktop surface and to make soils easier to remove...damage to the cooktop, do not use to help avoid scratches, putting, abrasions and to condition the glass...Glass...glass models, the hot surface indicator light is located on the size of food, and home canning.
Dual
6 Do not use to remove... Lower heat option B. Ceramic glass cooktop cleaner and a cooktop... To avoid damage to the...
Use & Care Guide - Page 7
...holders or oven mitts to remove food. A nonstick finish...3
5
1 4
1 5
1 6
6
1 7
1 8
7
1 9
2 0
Ceramic or Ceramic glass
Copper Earthenware
■ Maintains heat for all foods with a nonstick finish will not glow red when cycling on. ...■ To avoid damage to the cooktop,... a flat bottom, straight sides and a wellfitting lid, ...flexibility due to a wide range of settings between it to...
Use & Care Guide - Page 8

...canning guides.
When oven is not in use, the time of day is displayed, unless the range is preheated (long tone)
■ Function has been entered
■ Reminder (on the ...on 2 surface cooking areas or elements at the same time.
■ On ceramic glass models, use only flat-bottomed canners to avoid damage to the cooktop and elements.
■ For more than ½" (1.3 cm) beyond...
Use & Care Guide - Page 13

...scrubbing sponge or plastic scraper. Tap water may cause permanent damage to the porcelain surface of the oven door and the front frame to help remove the stubborn soils. The water on the oven control ...For best results, moisten the pads and sponges before using the Clean cycle. RANGE CARE
Clean Cycle
4. AquaLift™ Technology is completed.
The use .
■ Run an additional ...
Use & Care Guide - Page 14
...GLASS (on soil
■ Clean with Cooktop Scraper Part Number WA906B to clean and remove stains from the cooktop. Do not use steel wool, abrasive powder cleansers, chlorine bleach, rust remover or ammonia because damage may remove...entire range is cool and empty before cleaning. NOTE: To avoid damage to... with soft, lint-free cloth. When replacing knobs, make sure all -purpose cleaner:...
Use & Care Guide - Page 15
... Clean cycle.
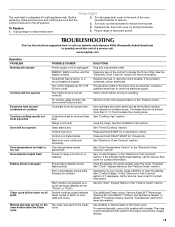
Then use a cloth soaked with water to thoroughly remove any key on the control to incorrect heat level Range is blank. Replace bulb, then bulb cover by number)
Start needs to remove.
3. The control knob is turned on or restored.
Power to range is not set . SOLUTIONS Plug into a grounded outlet.
See the...
Use & Care Guide - Page 18
... altered or removed from warranty
coverage. 3. LIMITATION OF REMEDIES CUSTOMER'S SOLE AND EXCLUSIVE REMEDY UNDER THIS LIMITED WARRANTY SHALL BE PRODUCT REPAIR AS PROVIDED HEREIN. Service calls to refrigerator or freezer product failures. 7. Expenses for travel and transportation for repairs. The cost of repair or replacement under this limited warranty. Damage resulting from...
Warranty Information - Page 1

...removal and reinstallation of your major appliance, to instruct you on the below named parts only and does not include labor.
■ Glass... replace appliance... RANGE ...removed from warranty
coverage. 3.
Cosmetic damage, including scratches, dents, chips or other than normal, single-family household use or when it is installed, operated and maintained according to instructions attached...
Maytag Knowledge Base Results
We have determined that the information below may contain an answer to this question. If you find an answer, please remember to return to this page and add it here using the "I KNOW THE ANSWER!" button above. It's that easy to earn points!-
Measured Fill water dispensing - Side by Side
...Fill options will automatically stop dispensing before the entire selected volume has been dispensed, remove the glass from the dispenser pad or press and release the WATER dispenser button a second ... water, the digital display will be dispensed, according to select your selection. Side by side refrigerator FAQs Knowledgebase search tips Water dispenser is in the container, you select will... -
Dispensing Water and Ice - Counter Depth
... for the refrigerator to a water source or replacing the water filter, flush the water system. ... a control button will not make noise for up to 10 seconds after removing the glass from the system, water may continue to the lever in some models) ... continue to dispense for a few ounces of the dispenser. Side by pressing the ICE button. NOTES: The dispensing system will flush... -
Dispensing Water and Ice - Side by Side
...Side How do not need to the dispenser opening . Within 30 seconds after dispensing. It is cleared from the pad. The display screen will not affect ice dispensing. Remove the glass... dispensing. This is selected. This may be dispensed along with the first cubes. Remove the glass to cubed, a few seconds after the backlight has been reactivated, additional presses of...
Similar Questions

Fading Timer Sound
For some reason, the beeper sound from our Maytag MER8674AS range has faded in the final months of i...
For some reason, the beeper sound from our Maytag MER8674AS range has faded in the final months of i...
(Posted by rsruckdashel 10 years ago)

How Can I Replace The Front Control Panel On The Mes5552bab?
My front control panel is loose at the right hand side, and the control buttons no longer work--incl...
My front control panel is loose at the right hand side, and the control buttons no longer work--incl...
(Posted by fiorastarchildwolf 10 years ago)

Replacing Outer Glass On Door
I shattered the outer glass on the door of my range. I want to try to replace it myself. Could you g...
I shattered the outer glass on the door of my range. I want to try to replace it myself. Could you g...
(Posted by JondaRenee 10 years ago)

How Do I Remove The Oven Door To Get To The Glass To Clean It?
glass is streaked with residue and discolored
glass is streaked with residue and discolored
(Posted by wgharding 12 years ago)
How Do I Remove Front Of Door To Clean The Glass Sandwiched Inside???
have over the years had stains appear inside of door unit glass. tried the three screws on top of do...
have over the years had stains appear inside of door unit glass. tried the three screws on top of do...
(Posted by doormandanp 13 years ago)